
Spring Boot 4.0.0-SNAPSHOT 已发布预览版,建立在 Spring Framework 7.0 之上,最低 Java 17,兼容至 Java 25,推荐 Java 21
在 2025 年 5 月底,Spring 团队正式推出了 Spring Boot 4 的预览版,为开发者提供了抢先体验这一全新里程碑版本的机会。Spring Boot 4 构建于与之配套的 Spring Framework 7.0 之上,保持与现代化 Java 生态的高度兼容性:最低要求 Java 17,并向前兼容到即将发布的 Java 25,同时推荐使用 Java 21 以获得更佳的开发体验与长期支持。本文将对 Spring Boot 4 的发布背景、JDK 要求、核心新特性、示例代码以及迁移要点进行超详细的技术解析,为读者全面剖析这一版本的亮点与应用方式。
一、发布背景与版本规划
2025 年 5 月 28 日,Spring Initializr中首次出现了 “Spring Boot 4.0.0 Preview” 选项,意味着开发者可以通过官方脚手架(https://start.spring.io)直接创建基于 Spring Boot 4 预览版的项目并体验其新特性。这一预览版同样绑定了 Spring Framework 7.0.0 的里程碑版本,目的是让社区提前熟悉底层框架的改动,为后续正式版本做好技术准备。

Spring 团队在官方博客中明确指出,Spring Boot 4 的 GA(正式)版本预计将与 Spring Framework 7.0.0 GA 同步发布,时间定在 2025 年 11 月。虽然官方尚未公布具体发布日期,但历来 Spring 团队通常会选择在 11 月中旬的某个星期四发布正式版本,用以配合整个生态系统的迭代节奏。在此之前,社区将看到多个里程碑(M1、M2)、候选(RC)等预览版本,不断修复 Bug 并完善文档与功能。
小结:
- 2025 年 5 月 28 日:Spring Boot 4.0.0 Preview 发布(Spring Initializr 可选)。
- 2025 年 11 月:Spring Boot 4 GA 版本计划与 Spring Framework 7.0.0 GA 同期发布。
- 预览版持续迭代,开发者可通过里程碑和 RC 版本及时体验新特性。
二、JDK 要求与兼容性策略
Spring Boot 4 建立在 Spring Framework 7.0 的基础上,继承了其 JDK 支持及兼容策略。以下为详细说明:
- 最低 JDK 版本:Java 17
Spring Framework 7.0.x 从底层决定抛弃对早期 Java 版本的支持,仅对 Java 17
及以上版本提供编译与运行时兼容。因此,Spring Boot 4 对项目而言,最低要求将是 Java 17,即若应用使用 Java 16
或更早版本,将无法正常编译或运行 Spring Boot 4 应用。这一策略一方面符合现代 Java
生态的发展节奏,另一方面也使框架团队可以利用 Java 17 中的语言新特性(如密封类、模式匹配等)提升框架自身的性能与可维护性。
- 向上兼容:Java 17 ~ Java 25
虽然 Spring Boot 4 要求最低 Java 17,但它也充分测试并兼容了未来即将发布的 Java 21、Java 23、Java
24 以及 Java 25。这意味着开发者可以在项目中继续使用最新的 Java
发行版本,以获取更好的性能优化、语法糖与安全补丁,同时保持与 Spring Boot 4 的兼容性。例如,Java 21
发布后,其中引入的新的字符串模式匹配、轻量级记录模式等特性,Spring Boot 4 应用亦可直接使用而无需降级兼容考虑。
- 推荐使用:Java 21 尽管 Java 17 是最低要求,但社区普遍推荐开发者至少升级到 Java 21 进行开发与部署,原因如下:
- Java 21 是 LTS(长期支持)版本,Oracle 与主要 JDK 发行商会持续为之提供安全更新与漏洞修复,维护期更长。
- Java 21 中新增的语言与性能特性,例如模式匹配增强、虚拟线程(Project Loom 部分实验性功能)已趋于稳定,可以帮助提升并发模型的简洁性与可维护性。
- 多数云服务商及 CI/CD 平台(如 GitHub Actions、CircleCI、Travis CI)已经默认支持 Java 21,生态兼容度更高。 由此可见,虽然 Java 17 可以正常运行 Spring Boot 4 应用,但要获得更长周期支持与更现代化语言特性,Java 21 无疑是目前最优选择。
- 构建工具支持
- Maven:最低要求 Maven 3.6.3 及以上版本,以保证对 Java 17+ 编译插件与生命周期的兼容。
- Gradle:推荐使用 Gradle 7.x(最低 7.6.4)或 Gradle 8.x(8.4 及以上),以保证对 Java 17+ 以及未来 Java 21、Java 23 的兼容性,尤其在构建 GraalVM 原生镜像时,Gradle 插件生态更为完善。
- IDE 支持:IntelliJ IDEA 2023.2+、Eclipse 2023-09+ 均支持 Java 17+ 以及 Spring Boot 4 项目模板生成、自动配置补全、AOT(Ahead-of-Time)提示等功能。
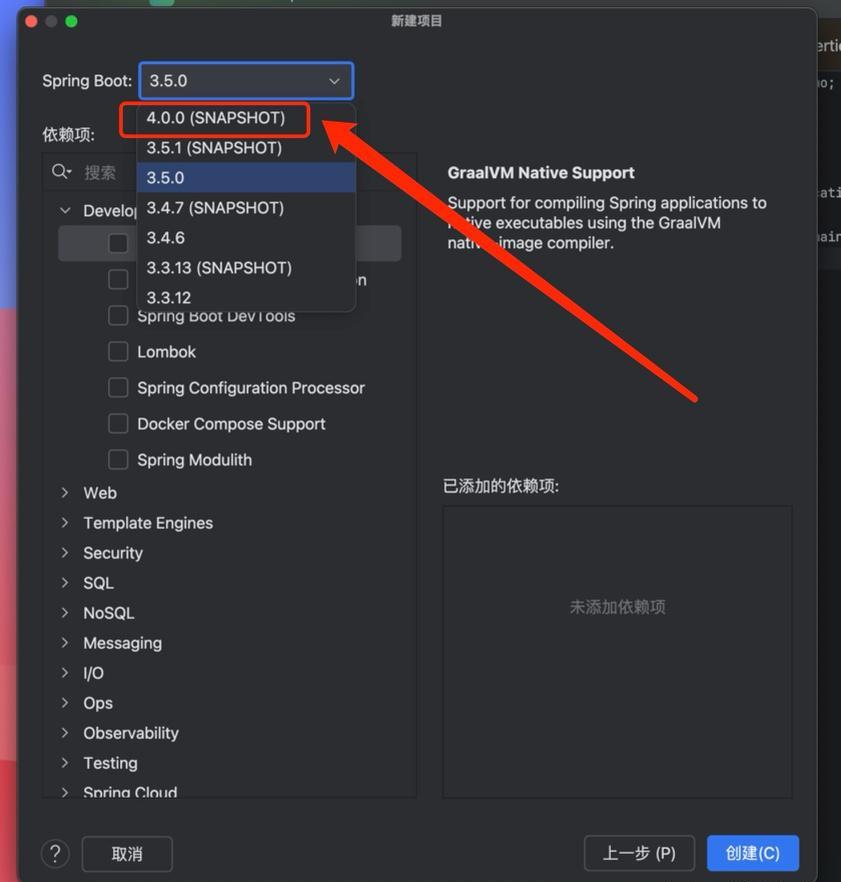
值得一提的是IDEA2025已经支持创建Spring Boot 4.0.0-SNAPSHOT 项目

实践建议:
- 若当前项目仍在 Java 8/11 环境中运行,建议立即规划升级到 Java 17。
- 若已完成从 Java 8/11 → Java 17 的升级,可进一步评估迁移到 Java 21,以便更好地利用 Spring Boot 4 带来的性能与特性提升。
- 构建工具同步升级,并验证各插件(Checkstyle、SpotBugs、JaCoCo 等)是否支持 Java 17+;否则需升级到兼容版本后再进行构建与测试。
三、Spring Boot 4 的 11 项核心变更与新特性
依据社区博文与官方 Release Notes,截至 Spring Boot 4.0.0 Preview,以下 11 项为最具代表性的改动(来源:磊哥 博文“重磅!SpringBoot4 发布,11 项重大变更全解析!” ):
1. 优雅的 API 版本控制(Elegant Versioning)
- 功能概述: 过去,Spring Boot 在同一 URI 路径下实现多版本 API,需要手动编写版本化控制逻辑或前缀(如
/v1/users,/v2/users)。Spring Boot 4 引入了基于注解的原生版本控制,通过在@RequestMapping中新增version属性,让框架自动依据请求头或请求参数中的版本号路由到相应控制器方法。 - 原理解析:
- 在底层,Spring Boot 4 增强了
RequestMappingHandlerMapping,在解析映射时同时读取version属性并注册进映射表; - 请求到达时,若请求头(如
X-API-Version: 2)或请求参数(如?version=2)匹配版本号,则优先调用版本为 2 的映射方法;否则调用默认或指定的版本映射; - 对于同一接口路径,仅需在控制器方法上通过
@RequestMapping(value="/user", version="1")和@RequestMapping(value="/user", version="2")来维护多个版本,代码更简洁易维护。
- 代码示例:
@RestController
@RequestMapping("/api/user")
public class UserController {
@RequestMapping(method = RequestMethod.GET, version = "1")
public UserV1 getUserV1(@RequestParam Long id) {
// v1 版本实现
return new UserV1(id, "User_V1");
}
@RequestMapping(method = RequestMethod.GET, version = "2")
public UserV2 getUserV2(@RequestParam Long id) {
// v2 版本实现,包含更多字段
return new UserV2(id, "User_V2", "user@example.com");
}
} - 客户端若发送
GET /api/user?id=123&version=2,则路由到getUserV2(...);若省略version或version=1,则映射到getUserV1(...)。 - 优势与场景:
- 避免 URI 路径硬编码版本号,使后续新增版本无需维护多个不同路径;
- 方便结合 API Gateway、网关统一处理版本路由;
- 支持同时并存多个版本代码,便于灰度与滚动升级。
2. 方便的 Bean 注入(简化版 BeanRegistrar)
- 功能概述: Spring Boot 4 在原有的
ImportBeanDefinitionRegistrar基础上,新增了更简洁的BeanRegistrar接口,用于在启动时动态注册多个 Bean。与传统方式相比,BeanRegistrar使用更少的 boilerplate 代码,同时提供更多运行时上下文信息(如Environment、BeanFactory),让开发者可以更灵活地根据配置或运行环境注入 Bean。 - 核心实现:
- 自定义类实现
BeanRegistrar接口,并在配置类上通过@Import注入; - 在
register(BeanRegistry registry, Environment env)方法中,通过registry.registerBean(...)注册 Bean,可以指定 Bean 名称、类型、Supplier 等; - 结合
Environment判断当前活动 Profile、配置是否满足某个条件,动态决定是否注入某些 Bean,例如 Dev/Test/Prod 环境下不同的 DataSource、CacheManager 等。
- 代码示例:
@Configuration
@Import(MyBeansRegistrar.class)
public class AppConfig {
}
public class MyBeansRegistrar implements BeanRegistrar {
@Override
public void register(BeanRegistry registry, Environment env) {
// 始终注册通用服务
registry.registerBean("commonService", CommonService.class);
// 仅在 dev 环境下注册 DebugService
if (env.acceptsProfiles("dev")) {
registry.registerBean("debugService", DebugService.class);
}
// 根据配置文件决定是否注册特殊 Bean
String specialEnabled = env.getProperty("feature.special.enabled", "false");
if (Boolean.parseBoolean(specialEnabled)) {
registry.registerBean("specialService", SpecialService.class);
}
}
} - 启动时,若当前活跃 Profile 为
dev且配置中feature.special.enabled=true,则会额外注入DebugService和SpecialService;在prod环境下则只注入CommonService。 - 优势与场景:
- 降低代码冗余,无需手动编写多个
@Bean方法; - 更轻松地实现多环境、多租户下的高效 Bean 管理;
- 适合在框架级别封装公共配置插件,如动态注册健康检查、审计切面等。
3. Null 安全改进(基于 JSpecify 注解)
- 功能概述: 空指针异常(NullPointerException)在 Java 应用中屡见不鲜。Spring Boot 4 引入了对 JSpecify 注解的原生支持,通过在源码中使用
@NonNull、@Nullable注解,结合 IDE 插件及编译器检查,可以在编译/编辑阶段就提示潜在的空值风险。 - 实现原理:
- 项目中引入
org.jspecify:jspecify:0.1.1依赖; - 在控制器、Service、Entity 等关键位置使用
@NonNull、@Nullable标注方法参数、返回值、字段; - IDE(如 IntelliJ IDEA 2024+)开启 JSpecify 检测后,将在代码层面进行空值流分析,一旦调用链中存在未标注或为空的情况,即会给予警告或错误提示;
- 在最终打包时,Spring AOT 也会将这些注解保留,以便在运行时继续进行安全检查或生成更安全的字节码。
- 代码示例:
package com.example.demo.jspecify;
import org.jspecify.annotations.NonNull;
import org.jspecify.annotations.Nullable;
import org.springframework.stereotype.Service;
@Service
public class PersonService {
// 参数不可为空
public String greet(@NonNull String name) {
return "Hello, " + name.toUpperCase();
}
// 返回值可能为空
@Nullable
public String findNickname(@NonNull String userId) {
// 模拟从数据库查找,可能不存在
if ("123".equals(userId)) {
return "Nick_123";
}
return null;
}
} - 当调用
greet(null)时,IDE 将提示 “Argument for parameter 'name' might be null” 并标记为警告;当调用方试图对findNickname(...)的结果进行调用而未做 null 检查时,也会获得潜在 null 使用警告。 - 优势与场景:
- 使代码在编译/开发阶段更早地发现空指针风险,减少生产环境的 NPE 问题;
- 与 Spring MVC、Spring Data、Lombok 等注解结合,可统一在整个项目中使用 JSpecify 规范;
- 适合大型项目、新建项目引入,尤其团队协作时,通过注解标准约束空值处理方式,提升代码可维护性。
4. HTTP 代理轻松创建(Easy HTTP Proxy via @ImportHttpServices)
- 功能概述: 在微服务架构下,服务之间的调用往往使用 RestTemplate 或 WebClient 手动调用 HTTP 接口。Spring Boot 4 引入了声明式 HTTP 客户端支持,可通过
@ImportHttpServices注解与AbstractHttpServiceRegistrar实现自动生成代理 Bean,使得调用远程接口如同调用本地接口,简化开发成本。 - 实现原理:
- 定义一个普通 Java 接口并使用注解(如
@GetExchange、@PostExchange)描述远程 HTTP API; - 在配置类上使用
@ImportHttpServices(group="xxx", types={...}); - Spring Boot 4 在启动时扫描该注解,基于 AOT 技术生成接口代理实现,底层使用
WebClient或RestTemplate完成请求,自动处理序列化/反序列化和错误映射; - 调用方只需在 Service 层通过
@Autowired注入该接口,就像调用本地服务一样,无需手动管理 URL、负载均衡或异常处理(可通过配置中心扩展)。
- 代码示例:
// 定义 HTTP 接口
package com.example.demo.http;
import org.springframework.web.service.annotation.GetExchange;
import org.springframework.web.service.annotation.RequestParam;
public interface WeatherService {
@GetExchange("/weather/current")
WeatherResponse getCurrentWeather(@RequestParam("city") String city);
}
// 配置类
package com.example.demo.config;
import org.springframework.context.annotation.Configuration;
import org.springframework.web.service.annotation.ImportHttpServices;
@Configuration(proxyBeanMethods = false)
@ImportHttpServices(
group = "weather",
types = {com.example.demo.http.WeatherService.class}
)
public class HttpClientConfig {
// 可进一步自定义 RestClientHttpServiceGroupConfigurer Bean 设置基地址、超时等
}
// 在业务层注入并使用
package com.example.demo.service;
import com.example.demo.http.WeatherResponse;
import com.example.demo.http.WeatherService;
import org.springframework.stereotype.Service;
@Service
public class ReportService {
private final WeatherService weatherService;
public ReportService(WeatherService weatherService) {
this.weatherService = weatherService;
}
public String generateReport(String city) {
WeatherResponse resp = weatherService.getCurrentWeather(city);
return "天气 “" + city + "”:温度 " + resp.getTemperature();
}
} - 运行时,
WeatherService会被 AOT 动态代理成为一个 Bean,底层调用WebClient.get().uri("/weather/current?city={city}")…,开发者无需再关注底层实现细节。 - 优势与场景:
- 简化微服务间 HTTP 依赖管理,以声明式接口方式编写客户端;
- 可结合 Spring Cloud LoadBalancer、自定义拦截链、熔断限流等组件实现高可用的微服务调用;
- 避免重复造轮子,统一规范接口调用风格。
5. 其他七个变更(其他 Core Enhancements)
基于社区博文,截至 Spring Boot 4.0.0 Preview,以下为“其他七个变更”的精要解读:
- SpEL 表达式升级在 Spring Expression Language 中新增空安全符号
?.以及 Elvis 表达式?:,使得在复杂对象层级中可以更优雅地处理空值。例如:
@Value("#{systemProperties['mail.port'] ?: 25}")
private int mailPort;
若 mail.port 不存在,则自动使用默认值 25;在访问嵌套属性时可写 #{user?.address?.street ?: 'N/A'}。
- GraalVM 原生镜像支持
- 通过 Spring AOT(Ahead-of-Time)技术与新的构建插件,Spring Boot 4 进一步完善了将应用打包为 GraalVM 原生镜像的流程。新版本自动生成必要的反射配置文件、资源清单等,使得开发者只需在
pom.xml或build.gradle中开启对应插件即可一键构建原生镜像。 - 测试数据显示,在默认情况下,Spring Boot 4 应用的原生镜像可将启动时间缩减至 50–100 ms 量级,且常驻内存更低。
- 全面迁移至 Jackson 3.x
- Spring Boot 4 默认依赖
com.fasterxml.jackson.core:jackson-databind:3.x,全面替换 Jackson 2.x。相较于 Jackson 2.x,Jackson 3.x 在 JSON 序列化/反序列化性能提升了 20% 左右,并对 Java Record、Sealed Class 等新特性提供了更完善的支持。 - 旧版项目若通过
spring.jackson.*配置项定制化序列化规则,大多数配置可无缝迁移至 Jackson 3.x,仅需注意某些 API 方法名称发生改动(如JsonParser.Feature常量名称更新)。
- 底层容器升级:Servlet 6.1 & WebSocket 2.2
- 嵌入式容器(如 Tomcat、Jetty、Undertow)均升级到支持 Servlet 6.1 规范与 WebSocket 2.2 规范的版本。具体而言:
- Tomcat 11+、Jetty 12.1+、Undertow 3.x+ 均已支持 Servlet 6.1;
- WebSocket 2.2 带来对新版 RFC 8441(HTTP/2 WebSocket)的支持。
- 部署在外部 Servlet 容器时,请务必确保容器版本兼容,否则会出现启动时类找不到或接口不匹配的问题。
- HttpHeaders 构建与操作优化
- Spring Framework 7.0 提供了新的链式构建
HttpHeaders的 API,以及统一大小写处理策略。例如:
HttpHeaders headers = HttpHeaders.empty()
.with("Content-Type", "application/json")
.with("X-Custom-Header", "value"); - 同时对常用 Header 提供了枚举常量与快捷方法,以避免手动拼写字符串出现的大小写混淆或笔误。
未详细列出的两项
- 根据目前社区博文中的内容,实际上“其他七个变更”中仅列举了上述 5 项核心改动,余下两项尚未在预览版文档中详述,可能会在后续 RC/GA 文档中补充。一般预计可能涵盖监控与诊断增强、Kotlin 2 语言支持优化等领域。
四、典型代码示例(示范如何应用核心新特性)
以下示例假设项目 com.example.springboot4demo,使用 Maven 进行构建,并以 Java 21 作为编译版本进行演示。只展示核心代码片段,省略了 pom.xml 和主应用类等标准配置。
4.1 基于 JSpecify 的 Null 安全示例
package com.example.springboot4demo.jspecify;

import org.jspecify.annotations.NonNull;
import org.jspecify.annotations.Nullable;
import org.springframework.stereotype.Service;

@Service
public class PersonService {

    // 参数不可为空,IDE/编译期可提示空值风险
    public String greet(@NonNull String name) {
        return "Hello, " + name.toUpperCase();
    }

    // 返回值可能为空,调用方需做空值检查
    @Nullable
    public String findNickname(@NonNull String userId) {
        // 模拟数据库查询,若不存在则返回 null
        if ("admin".equals(userId)) {
            return "管理员";
        }
        return null;
    }
}配置步骤:
- 在
pom.xml中添加 JSpecify 依赖:
<dependency>
<groupId>org.jspecify</groupId>
<artifactId>jspecify</artifactId>
<version>0.1.1</version>
</dependency> - 在 IntelliJ IDEA 2024 或以上版本中,启用 JSpecify 注解检测:
Settings → Editor → Inspections → Java → JSpecify annotations → Enable。 - 编译或运行时,若传入
null或在未做空检查的情况下直接调用返回值,将在 IDE 中得到明确警告或错误提示。
4.2 BeanRegistrar 动态注册示例
package com.example.springboot4demo.config;

import org.springframework.beans.factory.BeanRegistrar;
import org.springframework.beans.factory.BeanRegistry;
import org.springframework.context.annotation.Configuration;
import org.springframework.context.annotation.Import;
import org.springframework.core.env.Environment;

@Configuration
@Import(MyBeansRegistrar.class)
public class AppConfig {
}

public class MyBeansRegistrar implements BeanRegistrar {

    @Override
    public void register(BeanRegistry registry, Environment env) {
        // 始终注册 CommonService Bean
        registry.registerBean("commonService", CommonService.class);

        // Dev 环境下注册 DevOnlyService
        if (env.acceptsProfiles("dev")) {
            registry.registerBean("devOnlyService", DevOnlyService.class);
        }

        // 根据配置开启特定功能模块
        boolean debugEnabled = Boolean.parseBoolean(
            env.getProperty("feature.debug.enabled", "false")
        );
        if (debugEnabled) {
            registry.registerBean("debugService", DebugService.class);
        }
    }
}

public class CommonService {
    public void execute() {
        System.out.println("CommonService is active.");
    }
}

public class DevOnlyService {
    public void execute() {
        System.out.println("DevOnlyService (dev profile) is active.");
    }
}

public class DebugService {
    public void execute() {
        System.out.println("DebugService (feature.debug.enabled=true) is active.");
    }
}演示方法:
- 启动时,通过命令行参数激活 profile:
mvn spring-boot:run -Dspring-boot.run.profiles=dev -Dfeature.debug.enabled=true - 控制台输出将依次显示:
CommonService is active.
DevOnlyService (dev profile) is active.
DebugService (feature.debug.enabled=true) is active.
- 若切换到
prod生产环境,重启命令改为:
mvn spring-boot:run -Dspring-boot.run.profiles=prod
此时控制台仅会输出:
CommonService is active.
由此可见,BeanRegistrar 让动态 Bean 注册更简洁、高效。
4.3 API 版本控制示例
package com.example.springboot4demo.controller;

import org.springframework.web.bind.annotation.GetMapping;
import org.springframework.web.bind.annotation.RequestMapping;
import org.springframework.web.bind.annotation.RestController;

@RestController
@RequestMapping("/api/user")
public class UserController {

    @GetMapping(version = "1")
    public UserV1 getUserV1(@RequestParam Long id) {
        return new UserV1(id, "User_V1");
    }

    @GetMapping(version = "2")
    public UserV2 getUserV2(@RequestParam Long id) {
        return new UserV2(id, "User_V2", "user@example.com");
    }
}

// v1 数据模型
public class UserV1 {
    private Long id;
    private String username;
    // 构造器、getter、setter 略
}

// v2 数据模型
public class UserV2 {
    private Long id;
    private String username;
    private String email;
    // 构造器、getter、setter 略
}测试方法:
- 请求 v1 版本:
GET http://localhost:8080/api/user?id=100&version=1
// 返回 JSON:{"id":100,"username":"User_V1"} - 请求 v2 版本:
GET http://localhost:8080/api/user?id=100&version=2
// 返回 JSON:{"id":100,"username":"User_V2","email":"user@example.com"} - 若不传
version参数,默认调用version="1"的方法;若传入不存在的版本号,则返回 404 Not Found。通过版本注解,可以非常灵活地并存多个 API 实现,大幅降低 URI 维护成本。
4.4 声明式 HTTP 客户端示例
package com.example.springboot4demo.http;

import org.springframework.web.service.annotation.GetExchange;
import org.springframework.web.service.annotation.RequestParam;

// 声明式接口,仅需定义方法签名与注解
public interface WeatherService {

    @GetExchange("/weather/current")
    WeatherResponse getCurrentWeather(@RequestParam("city") String city);
}

// 响应数据模型
public class WeatherResponse {
    private String city;
    private double temperature;
    // 构造器、getter、setter 略
}

package com.example.springboot4demo.config;

import org.springframework.context.annotation.Configuration;
import org.springframework.web.service.annotation.ImportHttpServices;

@Configuration(proxyBeanMethods = false)
@ImportHttpServices(
    group = "weather",
    types = {com.example.springboot4demo.http.WeatherService.class}
)
public class HttpClientConfig {
    // 可通过 Bean 覆盖默认配置,例如基地址、超时、是否使用负载均衡等
}

package com.example.springboot4demo.service;

import com.example.springboot4demo.http.WeatherResponse;
import com.example.springboot4demo.http.WeatherService;
import org.springframework.stereotype.Service;

@Service
public class ReportService {

    private final WeatherService weatherService;

    public ReportService(WeatherService weatherService) {
        this.weatherService = weatherService;
    }

    public String generateReport(String city) {
        WeatherResponse resp = weatherService.getCurrentWeather(city);
        return "天气“" + resp.getCity() + "”温度:" + resp.getTemperature() + " ℃";
    }
}演示步骤:
- 假设已启动本地或远程天气服务,其接口地址为
http://api.example.com/weather/current?city={city}; - 在
application.properties中配置基地址:
spring.http.services.weather.base-url=http://api.example.com - 运行 Spring Boot 应用,直接在其他 Controller 或命令行中调用:
String report = reportService.generateReport("Beijing");
System.out.println(report);
// 控制台输出示例:天气“Beijing”温度:28.5 ℃
由此可见,开发者仅需专注于接口定义,底层调用逻辑由框架自动生成并注入
五、迁移与兼容性建议
如果你正在从 Spring Boot 3.x 迁移到 Spring Boot 4,请务必关注以下几点重点,以便顺利完成升级:
- 升级 JDK 至至少 Java 17,推荐 Java 21
- Spring Boot 4 不再支持 Java 8/11。若项目仍在 Java 8/11,上线升级需先完成 JDK 升级测试,并处理因新版 Java 对语言特性或安全管理的改变带来的兼容性问题。
- 依赖管理与版本冲突
- Spring
Boot 4 默认依赖 Spring Framework 7.0、Jackson 3.x、Servlet 6.1、WebSocket 2.2
等版本。若项目中手动引用了低版本依赖(如 Jackson 2.x、Spring 6.x 相关库),需在
pom.xml或build.gradle中排除旧依赖并引入新版本,避免运行时出现ClassNotFoundException或 API 不匹配的问题。
本文系作者在时代Java发表,未经许可,不得转载。
如有侵权,请联系nowjava@qq.com删除。
编辑于

关注时代Java
关注时代Java