
Spring @Async 异步注解的使用及原理。
@Async的基本使用
这个注解的作用在于可以让被标注的方法异步执行,但是有两个前提条件
- 配置类上添加
@EnableAsync注解 - 需要异步执行的方法的所在类由Spring管理
- 需要异步执行的方法上添加了
@Async注解
我们通过一个Demo体会下这个注解的作用吧
第一步,配置类上开启异步:
@EnableAsync
@Configuration
@ComponentScan("com.dmz.spring.async")
public class Config {

}
第二步,
@Component  // 这个类本身要被Spring管理
public class DmzAsyncService {

	@Async  // 添加注解表示这个方法要异步执行
	public void testAsync(){
		try {
			TimeUnit.SECONDS.sleep(1);
		} catch (InterruptedException e) {
			e.printStackTrace();
		}
		System.out.println("testAsync invoked");
	}
}
第三步,测试异步执行
public class Main {
	public static void main(String[] args) {
		AnnotationConfigApplicationContext ac = new AnnotationConfigApplicationContext(Config.class);
		DmzAsyncService bean = ac.getBean(DmzAsyncService.class);
		bean.testAsync();
		System.out.println("main函数执行完成");
	}
}
// 程序执行结果如下:
// main函数执行完成
// testAsync invoked通过上面的例子我们可以发现,DmzAsyncService中的testAsync方法是异步执行的,那么这背后的原理是什么呢?我们接着分析
原理分析
我们在分析某一个技术的时候,最重要的事情是,一定一定要找到代码的入口,像Spring这种都很明显,入口必定是在@EnableAsync这个注解上面,我们来看看这个注解干了啥事(本文基于5.2.x版本)
@Target(ElementType.TYPE)
@Retention(RetentionPolicy.RUNTIME)
@Documented
// 这里是重点,导入了一个ImportSelector
@Import(AsyncConfigurationSelector.class)
public @interface EnableAsync {

    // 这个配置可以让程序员配置需要被检查的注解,默认情况下检查的就是@Async注解
	Class<? extends Annotation> annotation() default Annotation.class;

    // 默认使用jdk代理
	boolean proxyTargetClass() default false;

    // 默认使用Spring AOP
	AdviceMode mode() default AdviceMode.PROXY;

    // 在后续分析我们会发现,这个注解实际往容器中添加了一个
    // AsyncAnnotationBeanPostProcessor,这个后置处理器实现了Ordered接口
    // 这个配置主要代表了AsyncAnnotationBeanPostProcessor执行的顺序
	int order() default Ordered.LOWEST_PRECEDENCE;
}上面这个注解做的最重要的事情就是导入了一个AsyncConfigurationSelector,这个类的源码如下:
public class AsyncConfigurationSelector extends AdviceModeImportSelector<EnableAsync> {

	private static final String ASYNC_EXECUTION_ASPECT_CONFIGURATION_CLASS_NAME =
			"org.springframework.scheduling.aspectj.AspectJAsyncConfiguration";

	@Override
	@Nullable
	public String[] selectImports(AdviceMode adviceMode) {
		switch (adviceMode) {
                // 默认会使用SpringAOP进行代理
			case PROXY:
				return new String[] {ProxyAsyncConfiguration.class.getName()};
			case ASPECTJ:
				return new String[] {ASYNC_EXECUTION_ASPECT_CONFIGURATION_CLASS_NAME};
			default:
				return null;
		}
	}

}这个类的作用是像容器中注册了一个ProxyAsyncConfiguration,这个类的继承关系如下:
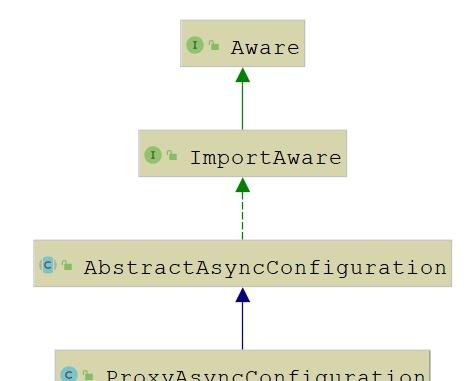
我们先看下它的父类AbstractAsyncConfiguration,其源码如下:
@Configuration
public abstract class AbstractAsyncConfiguration implements ImportAware {

	@Nullable
	protected AnnotationAttributes enableAsync;

	@Nullable
	protected Supplier<Executor> executor;

	@Nullable
	protected Supplier<AsyncUncaughtExceptionHandler> exceptionHandler;

    // 这里主要就是检查将其导入的类上是否有EnableAsync注解
    // 如果没有的话就报错
	@Override
	public void setImportMetadata(AnnotationMetadata importMetadata) {
		this.enableAsync = AnnotationAttributes.fromMap(
				importMetadata.getAnnotationAttributes(EnableAsync.class.getName(), false));
		if (this.enableAsync == null) {
			throw new IllegalArgumentException(
					"@EnableAsync is not present on importing class " + importMetadata.getClassName());
		}
	}

    // 将容器中配置的AsyncConfigurer注入
    // 异步执行嘛,所以我们可以配置使用的线程池
    // 另外也可以配置异常处理器
	@Autowired(required = false)
	void setConfigurers(Collection<AsyncConfigurer> configurers) {
		if (CollectionUtils.isEmpty(configurers)) {
			return;
		}
		if (configurers.size() > 1) {
			throw new IllegalStateException("Only one AsyncConfigurer may exist");
		}
		AsyncConfigurer configurer = configurers.iterator().next();
		this.executor = configurer::getAsyncExecutor;
		this.exceptionHandler = configurer::getAsyncUncaughtExceptionHandler;
	}

}再来看看ProxyAsyncConfiguration这个类的源码
@Configuration
@Role(BeanDefinition.ROLE_INFRASTRUCTURE)
public class ProxyAsyncConfiguration extends AbstractAsyncConfiguration {

	@Bean(name = TaskManagementConfigUtils.ASYNC_ANNOTATION_PROCESSOR_BEAN_NAME)
	@Role(BeanDefinition.ROLE_INFRASTRUCTURE)
	public AsyncAnnotationBeanPostProcessor asyncAdvisor() {
		AsyncAnnotationBeanPostProcessor bpp = new AsyncAnnotationBeanPostProcessor();
        // 将通过AsyncConfigurer配置好的线程池跟异常处理器设置到这个后置处理器中
        bpp.configure(this.executor, this.exceptionHandler);
		Class<? extends Annotation> customAsyncAnnotation = this.enableAsync.getClass("annotation");
		if (customAsyncAnnotation != AnnotationUtils.getDefaultValue(EnableAsync.class, "annotation")) {
			bpp.setAsyncAnnotationType(customAsyncAnnotation);
		}
		bpp.setProxyTargetClass(this.enableAsync.getBoolean("proxyTargetClass"));
		bpp.setOrder(this.enableAsync.<Integer>getNumber("order"));
		return bpp;
	}

}这个类本身是一个配置类,它的作用是向容器中添加一个AsyncAnnotationBeanPostProcessor。到这一步我们基本上就可以明白了,@Async注解的就是通过AsyncAnnotationBeanPostProcessor这个后置处理器生成一个代理对象来实现异步的,接下来我们就具体看看AsyncAnnotationBeanPostProcessor是如何生成代理对象的,我们主要关注一下几点即可:
- 是在生命周期的哪一步完成的代理?
- 切点的逻辑是怎么样的?它会对什么样的类进行拦截?
- 通知的逻辑是怎么样的?是如何实现异步的?
基于上面几个问题,我们进行逐一分析
是在生命周期的哪一步完成的代理?
我们抓住重点,AsyncAnnotationBeanPostProcessor是一个后置处理器器,按照我们对Spring的了解,大概率是在这个后置处理器的postProcessAfterInitialization方法中完成了代理,直接定位到这个方法,这个方法位于父类AbstractAdvisingBeanPostProcessor中,具体代码如下:
public Object postProcessAfterInitialization(Object bean, String beanName) {
    // 没有通知,或者是AOP的基础设施类,那么不进行代理
    if (this.advisor == null || bean instanceof AopInfrastructureBean) {
        return bean;
    }

    // 对已经被代理的类,不再生成代理,只是将通知添加到代理类的逻辑中
    // 这里通过beforeExistingAdvisors决定是将通知添加到所有通知之前还是添加到所有通知之后
    // 在使用@Async注解的时候,beforeExistingAdvisors被设置成了true
    // 意味着整个方法及其拦截逻辑都会异步执行
    if (bean instanceof Advised) {
        Advised advised = (Advised) bean;
        if (!advised.isFrozen() && isEligible(AopUtils.getTargetClass(bean))) {
            if (this.beforeExistingAdvisors) {
                advised.addAdvisor(0, this.advisor);
            }
            else {
                advised.addAdvisor(this.advisor);
            }
            return bean;
        }
    }

    // 判断需要对哪些Bean进行来代理
    if (isEligible(bean, beanName)) {
        ProxyFactory proxyFactory = prepareProxyFactory(bean, beanName);
        if (!proxyFactory.isProxyTargetClass()) {
            evaluateProxyInterfaces(bean.getClass(), proxyFactory);
        }
        proxyFactory.addAdvisor(this.advisor);
        customizeProxyFactory(proxyFactory);
        return proxyFactory.getProxy(getProxyClassLoader());
    }
    return bean;
}
果不其然,确实是在这个方法中完成的代理。接着我们就要思考,切点的过滤规则是什么呢?
切点的逻辑是怎么样的?
其实也不难猜到肯定就是类上添加了@Async注解或者类中含有被@Async注解修饰的方法。基于此,我们看看这个isEligible这个方法的实现逻辑,这个方位位于AbstractBeanFactoryAwareAdvisingPostProcessor中,也是AsyncAnnotationBeanPostProcessor的父类,对应代码如下:
// AbstractBeanFactoryAwareAdvisingPostProcessor的isEligible方法
// 调用了父类
protected boolean isEligible(Object bean, String beanName) {
    return (!AutoProxyUtils.isOriginalInstance(beanName, bean.getClass()) &&
            super.isEligible(bean, beanName));
}

protected boolean isEligible(Object bean, String beanName) {
    return isEligible(bean.getClass());
}

protected boolean isEligible(Class<?> targetClass) {
    Boolean eligible = this.eligibleBeans.get(targetClass);
    if (eligible != null) {
        return eligible;
    }
    if (this.advisor == null) {
        return false;
    }
    // 这里完成的判断
    eligible = AopUtils.canApply(this.advisor, targetClass);
    this.eligibleBeans.put(targetClass, eligible);
    return eligible;
}实际上最后就是根据advisor来确定是否要进行代理,advisor实际就是一个绑定了切点的通知,那么AsyncAnnotationBeanPostProcessor这个advisor是什么时候被初始化的呢?我们直接定位到AsyncAnnotationBeanPostProcessor的setBeanFactory方法,其源码如下:
public void setBeanFactory(BeanFactory beanFactory) {
    super.setBeanFactory(beanFactory);

    // 在这里new了一个AsyncAnnotationAdvisor
    AsyncAnnotationAdvisor advisor = new AsyncAnnotationAdvisor(this.executor, this.exceptionHandler);
    if (this.asyncAnnotationType != null) {
        advisor.setAsyncAnnotationType(this.asyncAnnotationType);
    }
    advisor.setBeanFactory(beanFactory);
    // 完成了初始化
    this.advisor = advisor;
}我们来看看AsyncAnnotationAdvisor中的切点匹配规程是怎么样的,直接定位到这个类的buildPointcut方法中,其源码如下:
protected Pointcut buildPointcut(Set<Class<? extends Annotation>> asyncAnnotationTypes) {
    ComposablePointcut result = null;
    for (Class<? extends Annotation> asyncAnnotationType : asyncAnnotationTypes) {
        // 就是根据这两个匹配器进行匹配的
        Pointcut cpc = new AnnotationMatchingPointcut(asyncAnnotationType, true);
        Pointcut mpc = new AnnotationMatchingPointcut(null, asyncAnnotationType, true);
        if (result == null) {
            result = new ComposablePointcut(cpc);
        }
        else {
            result.union(cpc);
        }
        result = result.union(mpc);
    }
    return (result != null ? result : Pointcut.TRUE);
}
代码很简单,就是根据cpc跟mpc两个匹配器来进行匹配的,第一个是检查类上是否有@Async注解,第二个是检查方法是是否有@Async注解。
那么,到现在为止,我们已经知道了它在何时创建代理,会为什么对象创建代理,最后我们还需要解决一个问题,代理的逻辑是怎么样的,异步到底是如何实现的?
通知的逻辑是怎么样的?是如何实现异步的?
前面也提到了advisor是一个绑定了切点的通知,前面分析了它的切点,那么现在我们就来看看它的通知逻辑,直接定位到AsyncAnnotationAdvisor中的buildAdvice方法,源码如下:
protected Advice buildAdvice(
    @Nullable Supplier<Executor> executor, @Nullable Supplier<AsyncUncaughtExceptionHandler> exceptionHandler) {

    AnnotationAsyncExecutionInterceptor interceptor = new AnnotationAsyncExecutionInterceptor(null);
    interceptor.configure(executor, exceptionHandler);
    return interceptor;
}简单吧,加了一个拦截器而已,对于interceptor类型的对象,我们关注它的核心方法invoke就行了,代码如下:
public Object invoke(final MethodInvocation invocation) throws Throwable {
    Class<?> targetClass = (invocation.getThis() != null ? AopUtils.getTargetClass(invocation.getThis()) : null);
    Method specificMethod = ClassUtils.getMostSpecificMethod(invocation.getMethod(), targetClass);
    final Method userDeclaredMethod = BridgeMethodResolver.findBridgedMethod(specificMethod);

    // 异步执行嘛,先获取到一个线程池
    AsyncTaskExecutor executor = determineAsyncExecutor(userDeclaredMethod);
    if (executor == null) {
        throw new IllegalStateException(
            "No executor specified and no default executor set on AsyncExecutionInterceptor either");
    }

    // 然后将这个方法封装成一个 Callable对象传入到线程池中执行
    Callable<Object> task = () -> {
        try {
            Object result = invocation.proceed();
            if (result instanceof Future) {
                return ((Future<?>) result).get();
            }
        }
        catch (ExecutionException ex) {
            handleError(ex.getCause(), userDeclaredMethod, invocation.getArguments());
        }
        catch (Throwable ex) {
            handleError(ex, userDeclaredMethod, invocation.getArguments());
        }
        return null;
    };
	// 将任务提交到线程池
    return doSubmit(task, executor, invocation.getMethod().getReturnType());
}
导致的问题及解决方案
问题1:循环依赖报错
就像在这张图里这个读者问的问题,

分为两点回答:
第一:循环依赖为什么不能被解决?
这个问题其实很简单,我之前从两个方面分析了循环依赖的处理流程
- 简单对象间的循环依赖处理
- AOP对象间的循环依赖处理
按照这种思路,@Async注解导致的循环依赖应该属于AOP对象间的循环依赖,也应该能被处理。但是,重点来了,解决AOP对象间循环依赖的核心方法是三级缓存,如下:
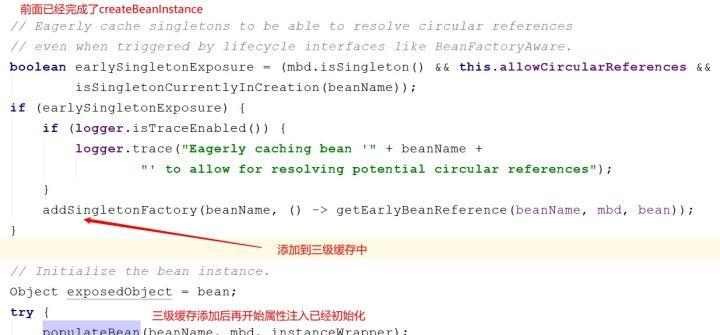
在三级缓存缓存了一个工厂对象,这个工厂对象会调用getEarlyBeanReference方法来获取一个早期的代理对象的引用,其源码如下:
protected Object getEarlyBeanReference(String beanName, RootBeanDefinition mbd, Object bean) {
   Object exposedObject = bean;
   if (!mbd.isSynthetic() && hasInstantiationAwareBeanPostProcessors()) {
      for (BeanPostProcessor bp : getBeanPostProcessors()) {
          // 看到这个判断了吗,通过@EnableAsync导入的后置处理器
          // AsyncAnnotationBeanPostProcessor根本就不是一个SmartInstantiationAwareBeanPostProcessor
          // 这就意味着即使我们通过AsyncAnnotationBeanPostProcessor创建了一个代理对象
          // 但是早期暴露出去的用于给别的Bean进行注入的那个对象还是原始对象
         if (bp instanceof SmartInstantiationAwareBeanPostProcessor) {
            SmartInstantiationAwareBeanPostProcessor ibp = (SmartInstantiationAwareBeanPostProcessor) bp;
            exposedObject = ibp.getEarlyBeanReference(exposedObject, beanName);
         }
      }
   }
   return exposedObject;
看完上面的代码循环依赖的问题就很明显了,因为早期暴露的对象跟最终放入容器中的对象不是同一个,所以报错了。

解决方案
就以上面读者给出的Demo为例,只需要在为B注入A时添加一个@Lazy注解即可
@Component
public class B implements BService {

    @Autowired
	@Lazy
	private A a;

	public void doSomething() {
	}
}这个注解的作用在于,当为B注入A时,会为A生成一个代理对象注入到B中,当真正调用代理对象的方法时,底层会调用getBean(a)去创建A对象,然后调用方法,这个注解的处理时机是在org.springframework.beans.factory.support.DefaultListableBeanFactory#resolveDependency方法中,处理这个注解的代码位于org.springframework.context.annotation.ContextAnnotationAutowireCandidateResolver#buildLazyResolutionProxy
问题2:默认线程池不会复用线程
我觉得这是这个注解最坑的地方,没有之一!我们来看看它默认使用的线程池是哪个,在前文的源码分析中,我们可以看到决定要使用线程池的方法是org.springframework.aop.interceptor.AsyncExecutionAspectSupport#determineAsyncExecutor。其源码如下:
本文系作者在时代Java发表,未经许可,不得转载。
如有侵权,请联系nowjava@qq.com删除。
编辑于

关注时代Java
关注时代Java