Table of Contents
This chapter covers MySQL InnoDB cluster, which combines MySQL technologies to enable you to create highly available clusters of MySQL server instances.
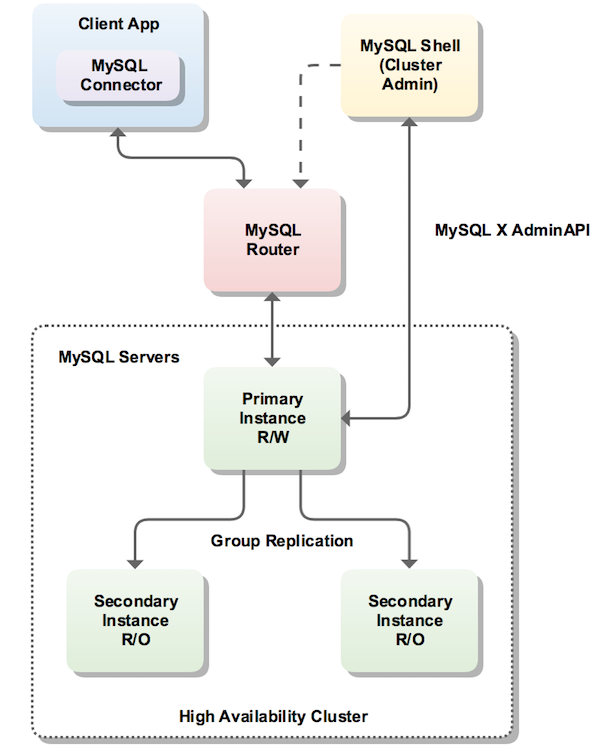
MySQL InnoDB cluster provides a complete high availability solution for MySQL. MySQL Shell includes AdminAPI which enables you to easily configure and administer a group of at least three MySQL server instances to function as an InnoDB cluster. Each MySQL server instance runs MySQL Group Replication, which provides the mechanism to replicate data within InnoDB clusters, with built-in failover. AdminAPI removes the need to work directly with Group Replication in InnoDB clusters, but for more information see Chapter 17, Group Replication which explains the details. MySQL Router can automatically configure itself based on the cluster you deploy, connecting client applications transparently to the server instances. In the event of an unexpected failure of a server instance the cluster reconfigures automatically. In the default single-primary mode, an InnoDB cluster has a single read-write server instance - the primary. Multiple secondary server instances are replicas of the primary. If the primary fails, a secondary is automatically promoted to the role of primary. MySQL Router detects this and forwards client applications to the new primary. Advanced users can also configure a cluster to have multiple-primaries.
InnoDB cluster does not provide support for MySQL NDB Cluster.
NDB Cluster depends on the NDB storage
engine as well as a number of programs specific to NDB Cluster which
are not furnished with MySQL Server 5.7;
NDB is available only as part of the MySQL
NDB Cluster distribution. In addition, the MySQL server binary
(mysqld) that is supplied with MySQL Server
5.7 cannot be used with NDB Cluster. For more
information about MySQL NDB Cluster, see
Chapter 21, MySQL NDB Cluster 7.5 and NDB Cluster 7.6.
Section 21.1.6, “MySQL Server Using InnoDB Compared with NDB Cluster”, provides information
about the differences between the InnoDB and
NDB storage engines.
The following diagram shows an overview of how these technologies work together:
MySQL Shell includes the AdminAPI, which is accessed
through the dba global variable and its
associated methods. The dba variable's
methods enable you to deploy, configure, and administer InnoDB
clusters. For example, use the
dba.createCluster() method to create an
InnoDB cluster.
MySQL Shell enables you to connect to servers over a socket connection, but AdminAPI requires TCP connections to a server instance. Do not use socket based connections with AdminAPI.
MySQL Shell provides online help for the AdminAPI. To
list all available dba commands, use the
dba.help() method. For online help on a
specific method, use the general format
object.help('methodname'). For example:
mysql-js> dba.help('getCluster')

Retrieves a cluster from the Metadata Store.

SYNTAX
  <Dba>.getCluster([name])

WHERE
  name: Parameter to specify the name of the cluster to be returned.

DESCRIPTION

If name is not specified, the default cluster will be returned.

If name is specified, and no cluster with the indicated name is found, an error
will be raised.
This section explains the different ways you can create an InnoDB cluster, the requirements for server instances and the software you need to install to deploy a cluster.
InnoDB cluster supports the following deployment scenarios:
Sandbox deployment: if you want to test out InnoDB cluster before committing to a full production deployment, the provided sandbox feature enables you to quickly set up a cluster on your local machine. Sandbox server instances are created with the required configuration and you can experiment with InnoDB cluster to become familiar with the technologies employed. See Section 20.2.4, “Sandbox Deployment of InnoDB Cluster” for instructions.
Production deployment: if you want to use InnoDB cluster in a full production environment you need to configure the required number of machines and then deploy your server instances to the machines. A production deployment enables you to exploit the high availability features of InnoDB cluster to their full potential. See Section 20.2.5, “Production Deployment of InnoDB Cluster” for instructions.
A sandbox deployment is not suitable for use in a full production environment.
Before installing a production deployment of InnoDB cluster, ensure that the server instances you intend to use meet the following requirements.
InnoDB cluster uses Group Replication and therefore your server instances must meet the same requirements. See Section 17.7.1, “Group Replication Requirements”. AdminAPI provides the
dba.checkInstanceConfiguration()method to verify that an instance meets the Group Replication requirements, and thedba.configureLocalInstance()method to configure an instance to meet the requirements.NoteWhen using a sandbox deployment the instances are configured to meet these requirements automatically.
Group Replication members can contain tables using a storage engine other than
InnoDB, for exampleMyISAM. Such tables cannot be written to by Group Replication, and therefore when using InnoDB cluster. To be able to write to such tables with InnoDB cluster, convert all such tables toInnoDBbefore using the instance in a InnoDB cluster.The Performance Schema must be enabled on any instance which you want to use with InnoDB cluster.
The provisioning scripts that MySQL Shell uses to configure servers for use in InnoDB cluster require access to Python version 2.7. For a sandbox deployment Python is required on the single machine used for the deployment, production deployments require Python on each server instance.
On Windows MySQL Shell includes Python and no user configuration is required. On Unix Python must be found as part of the shell environment. To check that your system has Python configured correctly issue:
$
/usr/bin/env pythonIf a Python interpreter starts, no further action is required. If the previous command fails, create a soft link between
/usr/bin/pythonand your chosen Python binary.
The method you use to install InnoDB cluster depends on the type of deployment you intend to use. For a sandbox deployment install the components of InnoDB cluster to a single machine. A sandbox deployment is local to a single machine, therefore the install needs to only be done once on the local machine. Similarly there is no need to connect to the instances individually for configuration, the sandbox instances are local. For a production deployment install the components to each machine that you intend to add to your cluster. A production deployment uses multiple remote host machines running MySQL server instances, so you need to connect to each machine using a tool such as SSH or Windows remote desktop to carry out tasks such as installing components and configuring the server instance. The following methods of installing InnoDB cluster are available:
Downloading and installing the components using the following documentation:
MySQL Server - see Chapter 2, Installing and Upgrading MySQL.
MySQL Shell - see Section 19.3.1, “Installing MySQL Shell”.
MySQL Router - see Installing MySQL Router.
On Windows you can use the MySQL Installer for Windows for a sandbox deployment. For details, see Section 2.3.3.3.1.1, “High Availability”.
Once you have installed the software required by InnoDB cluster choose to follow either Section 20.2.4, “Sandbox Deployment of InnoDB Cluster” or Section 20.2.5, “Production Deployment of InnoDB Cluster”.
This section explains how to set up a sandbox InnoDB cluster deployment. You create and administer your InnoDB clusters using MySQL Shell with the included AdminAPI. This section assumes familiarity with MySQL Shell, see MySQL Shell 8.0 (part of MySQL 8.0) for further information.
Initially deploying and using local sandbox instances of MySQL is a good way to start your exploration of InnoDB cluster. You can fully test out InnoDB cluster locally, prior to deployment on your production servers. MySQL Shell has built-in functionality for creating sandbox instances that are correctly configured to work with Group Replication in a locally deployed scenario.
Sandbox instances are only suitable for deploying and running on your local machine for testing purposes. In a production environment the MySQL Server instances are deployed to various host machines on the network. See Section 20.2.5, “Production Deployment of InnoDB Cluster” for more information.
This tutorial shows how to use MySQL Shell to create an InnoDB cluster consisting of three MySQL server instances.
MySQL Shell includes the AdminAPI that adds the
dba global variable, which provides
functions for administration of sandbox instances. In this
example setup, you create three sandbox instances using
dba.deploySandboxInstance().
Start MySQL Shell from a command prompt by issuing the command:
shell> mysqlsh
MySQL Shell provides two scripting language modes,
JavaScript and Python, in addition to a native SQL mode.
Throughout this guide MySQL Shell is used primarily in
JavaScript mode
. When MySQL Shell starts it is in JavaScript mode by
default. Switch modes by issuing \js for
JavaScript mode, \py for Python mode, and
\sql for SQL mode. Ensure you are in
JavaScript mode by issuing the \js command,
then execute:
mysql-js> dba.deploySandboxInstance(3310)
Terminating commands with a semi-colon is not required in JavaScript and Python modes.
The argument passed to
deploySandboxInstance() is the TCP port
number where the MySQL Server instance listens for
connections. By default the sandbox is created in a directory
named
$HOME/mysql-sandboxes/
on Unix systems. For Microsoft Windows systems the directory
is
port%userprofile%\MySQL\mysql-sandboxes\.
port
The root password for the instance is prompted for.
Each instance has its own password. Defining the same password for all sandboxes in this tutorial makes it easier, but remember to use different passwords for each instance in production deployments.
To deploy further sandbox server instances, repeat the steps followed for the sandbox instance at port 3310, choosing different port numbers. For each additional sandbox instance issue:
mysql-js> dba.deploySandboxInstance(port_number)
To follow this tutorial, use port numbers 3310, 3320 and 3330 for the three sandbox server instances. Issue:
mysql-js>dba.deploySandboxInstance(mysql-js>3320)dba.deploySandboxInstance(3330)
The next step is to create the InnoDB cluster while connected to the seed MySQL Server instance. The seed instance contains the data that you want to replicate to the other instances. In this example the sandbox instances are blank, therefore we can choose any instance.
Connect MySQL Shell to the seed instance, in this case the one at port 3310:
mysql-js> \connect root@localhost:3310
The \connect MySQL Shell command is a
shortcut for the shell.connect() method:
mysql-js> shell.connect('root@localhost:3310')
Once you have connected, AdminAPI can write to the local instance's option file. This is different to working with a production deployment, where you would need to connect to the remote instance and run the MySQL Shell application locally on the instance before AdminAPI can write to the instance's option file.
Use the dba.createCluster() method to
create the InnoDB cluster with the currently connected
instance as the seed:
mysql-js> var cluster = dba.createCluster('testCluster')
The createCluster() method deploys the
InnoDB cluster metadata to the selected instance, and adds
the instance you are currently connected to as the seed
instance. The createCluster() method
returns the created cluster, in the example above this is
assigned to the cluster variable. The
parameter passed to the createCluster()
method is a symbolic name given to this InnoDB cluster, in
this case testCluster.
If the instance has
super_read_only=ON then you
might need to confirm that AdminAPI can set
super_read_only=OFF. See
Super Read-only and Instances for more
information.
The next step is to add more instances to the InnoDB cluster. Any transactions that were executed by the seed instance are re-executed by each secondary instance as it is added. This tutorial uses the sandbox instances that were created earlier at ports 3320 and 3330.
The seed instance in this example was recently created, so it is nearly empty. Therefore, there is little data that needs to be replicated from the seed instance to the secondary instances. In a production environment, where you have an existing database on the seed instance, you could use a tool such as MySQL Enterprise Backup to ensure that the secondaries have matching data before replication starts. This avoids the possibility of lengthy delays while data replicates from the primary to the secondaries. See Section 17.4.4, “Using MySQL Enterprise Backup with Group Replication”.
Add the second instance to the InnoDB cluster:
mysql-js> cluster.addInstance('root@localhost:3320')
The root user's password is prompted for.
Add the third instance:
mysql-js> cluster.addInstance('root@localhost:3330')
The root user's password is prompted for.
At this point you have created a cluster with three instances: a primary, and two secondaries.
You can only specify localhost in
addInstance() if the instance is a
sandbox instance. This also applies to the implicit
addInstance() after issuing
createCluster().
Once the sandbox instances have been added to the cluster, the configuration required for InnoDB cluster must be persisted to each of the instance's option files. Connect to each instance.
mysql-js> \connect instance
Issue
dba.configureLocalInstance(.
instance)
mysql-js> dba.configureLocalInstance('instance')
You are prompted for the instance's password. The configuration changes are persisted to the instance.
If dba.configureLocalInstance() is not
issued when connected to the instance, the configuration is
not persisted to the option file. This does not stop the
instance from initially joining a cluster, but it does mean
that the instance cannot rejoin the cluster automatically,
for example after being stopped.
Repeat the process of connecting to each sandbox instance you added to the cluster and persisting the configuration. For this example we added sandbox instances at ports 3310, 3320 and 3330. Therefore issue this for ports 3320 and 3330:
mysql-js>\connect root@localhost:mysql-js>port_numberdba.configureLocalInstance('root@localhost:port_number')
To check the cluster has been created, use the cluster
instance's status() function. See
Checking the InnoDB Cluster Status.
Once you have your cluster deployed you can configure MySQL Router to provide high availability, see Section 20.3, “Using MySQL Router with InnoDB Cluster”.
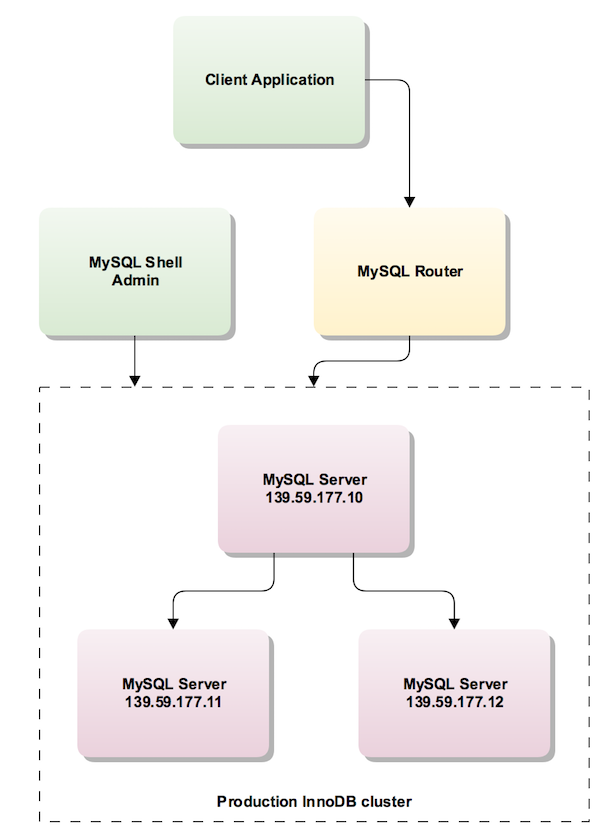
When working in a production environment, the MySQL server instances which make up an InnoDB cluster run on multiple host machines as part of a network rather than on single machine as described in Section 20.2.4, “Sandbox Deployment of InnoDB Cluster”. Before proceeding with these instructions you must install the required software to each machine that you intend to add as a server instance to your cluster, see Section 20.2.3, “Methods of Installing”.
The following diagram illustrates the scenario you work with in this section:
Unlike a sandbox deployment, where all instances are deployed
locally to one machine, for a production deployment you must
connect to each machine and run MySQL Shell locally before
issuing dba.configureLocalInstance() on the
instance. This ensures that any configuration changes are
persisted into the option file on the instance. This also
requires that you have access to the server and the required
permissions to execute MySQL Shell.
To pass a server's connection information to AdminAPI use URI type strings. See Connecting Using URI-Like Connection Strings for more information.
The user account used to administer an instance does not have
to be the root account, however the user needs to be assigned
full read and write privileges on the InnoDB cluster
metadata tables in addition to full MySQL administrator
privileges (SUPER, GRANT
OPTION, CREATE,
DROP and so on). The preferred method to
create users to administer the cluster is using the
clusterAdmin option with the
dba.configureInstance(), and
Cluster.addInstance() operations. In this
procedure the user ic is shown in examples.
If only read operations are needed (such as for monitoring
purposes), an account with more restricted privileges can be
used. To give the user your_user
the privileges needed to monitor InnoDB cluster issue:
GRANT SELECT ON mysql_innodb_cluster_metadata.* TOyour_user@'%'; GRANT SELECT ON performance_schema.global_status TOyour_user@'%'; GRANT SELECT ON performance_schema.replication_applier_configuration TOyour_user@'%'; GRANT SELECT ON performance_schema.replication_applier_status TOyour_user@'%'; GRANT SELECT ON performance_schema.replication_applier_status_by_coordinator TOyour_user@'%'; GRANT SELECT ON performance_schema.replication_applier_status_by_worker TOyour_user@'%'; GRANT SELECT ON performance_schema.replication_connection_configuration TOyour_user@'%'; GRANT SELECT ON performance_schema.replication_connection_status TOyour_user@'%'; GRANT SELECT ON performance_schema.replication_group_member_stats TOyour_user@'%'; GRANT SELECT ON performance_schema.replication_group_members TOyour_user@'%'; GRANT SELECT ON performance_schema.threads TOyour_user@'%'WITH GRANT OPTION;
In this procedure the user ic is used in
examples.
The production instances which make up a cluster run on separate machines, therefore each machine must have a unique host name and be able to resolve the host names of the other machines which run server instances in the cluster. If this is not the case, you can:
configure each machine to map the IP of each other machine to a hostname. See your operating system documentation for details. This is the recommended solution.
set up a DNS service
configure the
report_hostvariable in the MySQL configuration of each instance to a suitable externally reachable address
In this procedure the host name
ic- is
used in examples.
number
To verify whether the hostname of a MySQL server is correctly configured, execute the following query to see how the instance reports its own address to other servers and try to connect to that MySQL server from other hosts using the returned address:
SELECT coalesce(@@report_host, @@hostname);
When working with a production deployment it can be useful to
configure verbose logging for MySQL Shell, the information
in the log can help you to find and resolve any issues that
might occur when you are preparing server instances to work as
part of InnoDB cluster. To start MySQL Shell with a
verbose logging level use the
--log-level option:
shell> mysqlsh --log-level=DEBUG3
The DEBUG3 is recommended, see
--log-level for more
information. When DEBUG3 is set the
MySQL Shell log file contains lines such as Debug:
execute_sql( ... ) which contain the SQL queries
that are executed as part of each AdminAPI call. The log file
generated by MySQL Shell is located in
~/.mysqlsh/mysqlsh.log for Unix-based
systems; on Microsoft Windows systems it is located in
%APPDATA%\MySQL\mysqlsh\mysqlsh.log. See
MySQL Shell Logging and Debug for more
information.
In addition to enabling the MySQL Shell log level, you can configure the amount of output AdminAPI provides in MySQL Shell after each call to the API. To enable the amount of AdminAPI output, in MySQL Shell issue:
mysql-js> dba.verbose=2
This enables the maximum output from AdminAPI calls. The available levels of output are:
0 or OFF is the default. This provides minimal output and is the recommended level when not troubleshooting.
1 or ON adds verbose output from each call to the AdminAPI.
2 adds debug output to the verbose output providing full information about what each call to AdminAPI executes.
Before creating a production deployment from server instances
you need to check that MySQL on each instance is correctly
configured by using the
dba.checkInstanceConfiguration() function.
This ensures that the instance satisfies the
Section 20.2.2, “InnoDB Cluster Requirements”. This does
not check any data that is on the instance, see
Checking Instance State for more information.
The following demonstrates issuing this in a running
MySQL Shell:
mysql-js> dba.checkInstanceConfiguration('ic@ic-1:3306')

Please provide the password for 'ic@ic-1:3306':
Validating instance...

The instance 'ic-1:3306' is not valid for Cluster usage.

The following issues were encountered:

- Some configuration options need to be fixed.

+----------------------------------+---------------+----------------+--------------------------------------------------+
| Variable                         | Current Value | Required Value | Note                                             |
+----------------------------------+---------------+----------------+--------------------------------------------------+
| binlog_checksum                  | CRC32         | NONE           | Update the server variable or restart the server |
| enforce_gtid_consistency         | OFF           | ON             | Restart the server                               |
| gtid_mode                        | OFF           | ON             | Restart the server                               |
| log_bin                          | 0             | 1              | Restart the server                               |
| log_slave_updates                | 0             | ON             | Restart the server                               |
| master_info_repository           | FILE          | TABLE          | Restart the server                               |
| relay_log_info_repository        | FILE          | TABLE          | Restart the server                               |
| transaction_write_set_extraction | OFF           | XXHASH64       | Restart the server                               |
+----------------------------------+---------------+----------------+--------------------------------------------------+


Please fix these issues , restart the server and try again.

{
  "config_errors": [
    {
      "action": "server_update",
      "current": "CRC32",
      "option": "binlog_checksum",
      "required": "NONE"
    },
    {
      "action": "restart",
      "current": "OFF",
      "option": "enforce_gtid_consistency",
      "required": "ON"
    },
    {
      "action": "restart",
      "current": "OFF",
      "option": "gtid_mode",
      "required": "ON"
    },
    {
      "action": "restart",
      "current": "0",
      "option": "log_bin",
      "required": "1"
    },
    {
      "action": "restart",
      "current": "0",
      "option": "log_slave_updates",
      "required": "ON"
    },
    {
      "action": "restart",
      "current": "FILE",
      "option": "master_info_repository",
      "required": "TABLE"
    },
    {
      "action": "restart",
      "current": "FILE",
      "option": "relay_log_info_repository",
      "required": "TABLE"
    },
    {
      "action": "restart",
      "current": "OFF",
      "option": "transaction_write_set_extraction",
      "required": "XXHASH64"
    }
  ],
  "errors": [],
  "restart_required": true,
  "status": "error"
}
mysql-js>
Repeat this process for each server instance that you plan to
use as part of your cluster. The reports generated after
running dba.checkInstanceConfiguration()
provide information about any configuration changes required
before you can proceed. The
restart_required field in the final part of
the report tells you whether MySQL on the instance requires a
restart to detect any change made to the configuration file.
If configuration issues have been identified in the report
generated by running
dba.checkInstanceConfiguration() against
the instance, it does not satisfy the
Section 20.2.2, “InnoDB Cluster Requirements”. Therefore
you need to connect to the machine and reconfigure the server
instance. AdminAPI provides the
dba.configureLocalInstance() function that
finds the MySQL server's option file and modifies it to ensure
that the instance is correctly configured for
InnoDB cluster. Alternatively make the changes to the
instance's option file manually based on the information
in the report. See Section 4.2.2.2, “Using Option Files” for more
information. Regardless of the way you make the configuration
changes, you might have to restart MySQL to ensure the
configuration changes are detected.
The recommended method is to log in to the remote machine, run MySQL Shell as the root user and then connect to the local MySQL server:
shell> sudo -i mysqlsh --log-level=DEBUG3
The dba.configureLocalInstance() method
verifies that a suitable user is available for cluster usage,
which is used for connections between members of the cluster.
The root user cannot do remote logins by default, therefore
you have three options to continue with the configuration:
enable remote connections for the root user
, create a new user or neither of these two previous options.
The following example demonstrates the second option, creating
a new user for cluster usage.
The format of the user names accepted follows the standard
MySQL account name format, see
Section 6.2.4, “Specifying Account Names”.
mysql-js> dba.configureLocalInstance('root@localhost:3306')

Please provide the password for 'root@localhost:3306':

Please specify the path to the MySQL configuration file: /etc/mysql/mysql.conf.d/mysqld.cnf
Validating instance...

The configuration has been updated but it is required to restart the server.
{
  "config_errors": [
    {
      "action": "restart",
      "current": "OFF",
      "option": "enforce_gtid_consistency",
      "required": "ON"
    },
    {
      "action": "restart",
      "current": "OFF",
      "option": "gtid_mode",
      "required": "ON"
      },
    {
      "action": "restart",
      "current": "0",
      "option": "log_bin",
      "required": "1"
    },
    {
      "action": "restart",
      "current": "0",
      "option": "log_slave_updates",
      "required": "ON"
    },
    {
      "action": "restart",
      "current": "FILE",
      "option": "master_info_repository",
      "required": "TABLE"
    },
    {
      "action": "restart",
      "current": "FILE",
      "option": "relay_log_info_repository",
      "required": "TABLE"
    },
    {
      "action": "restart",
      "current": "OFF",
      "option": "transaction_write_set_extraction",
      "required": "XXHASH64"
    }
  ],
  "errors": [],
  "restart_required": true,
  "status": "error"
}
mysql-js>
If the instance has
super_read_only=ON then you
might need to confirm that AdminAPI can set
super_read_only=OFF. See
Super Read-only and Instances for more
information.
As with dba.checkInstanceConfiguration(),
the configuration requirements are identified, but this time
the chosen configuration file is modified. For the
configuration changes to take effect you might need to restart
the MySQL Server.
The dba.configureLocalInstance() function
also accepts the clusterAdmin and
clusterAdminPassword options, which enable
you to configure the cluster user and password when calling
the function. clusterAdmin supports
identifiers or strings for the user name and host name. By
default if unquoted it assumes input is a string. For example:
mysql-js> dba.configureLocalInstance('ic@ic-1:3306', \
	      {clusterAdmin: 'icadmin@ic-1%',clusterAdminPassword: 'password'});
This user is granted the privileges for an administrative user described at User Privileges.
Once you have prepared your instances, use the
dba.createCluster() function to create the
cluster. The machine which you are running MySQL Shell on is
used as the seed instance for the cluster. The seed instance
is replicated to the other instances which you add to the
cluster, making them replicas of the seed instance.
Log in to the instance and run MySQL Shell locally.
shell> mysqlsh --uri ic@ic-1:3306

Creating a Session to 'ic@ic-1:3306'
Enter password: *********
Classic Session successfully established. No default schema selected.
MySQL Shell must be connected to an instance before you can
create a cluster because when you issue
dba.createCluster(
MySQL Shell creates a MySQL protocol session to the server
instance connected to the MySQL Shell's current global
session. Use the
name)dba.createCluster(
function to create the cluster and assign the returned cluster
to a variable called name)cluster:
mysql-js> var cluster = dba.createCluster('prodCluster')

      A new InnoDB cluster will be created on instance 'ic@ic-1:3306'.

      Creating InnoDB cluster 'prodCluster' on 'ic@ic-1:3306'...
      Adding Seed Instance...

      Cluster successfully created. Use Cluster.addInstance() to add MySQL instances.
      At least 3 instances are needed for the cluster to be able to withstand up to
      one server failure.
If the instance has
super_read_only=ON then you
might need to confirm that AdminAPI can set
super_read_only=OFF. See
Super Read-only and Instances for more
information.
If you encounter an error related to metadata being inaccessible you might have the loopback network interface configured. For correct InnoDB cluster usage disable the loopback interface.
To check the cluster has been created, use the cluster
instance's status() function. See
Checking the InnoDB Cluster Status.
Once server instances belong to a cluster it is important to
only administer them using MySQL Shell and AdminAPI.
Attempting to manually change the configuration of Group
Replication on an instance once it has been added to a
cluster is not supported. Similarly, modifying server
variables critical to InnoDB cluster, such as
server_uuid after an
instance is configured using AdminAPI is not
supported.
Use the
cluster.addInstance(
function to add more instances to the cluster, where
instance)instance is a URI type string to
connect to the local instance. The instances must have been
configured for cluster usage. You need a minimum of three
instances in the cluster to make it tolerant to the failure of
one instance. Adding further instances increases the tolerance
to failure of an instance. To add an instance to the cluster
issue:
mysql-js> cluster.addInstance('ic@ic-2:3306');
To verify the instance has been added, use the cluster
instance's status() function.
At this stage, the server instances have been added to the
cluster but the changes to the InnoDB cluster metadata
have only been made on the instance which you are currently
connected to. To make the configuration changes persistent
for all instances in the cluster, you must connect to each
instance and issue
dba.configureLocalInstance() locally on
each instance you have added. This is essential to ensure
that instances rejoin the cluster in the event of leaving
the cluster.
To persist the InnoDB cluster metadata for all instances, log in to each instance that you added to the cluster and run MySQL Shell locally.
shell> mysqlsh
Use the \connect command to log in to MySQL
server. Execute the
dba.configureLocalInstance('
function, where instance')instance is a URI
type string to connect to the local instance. For example:
mysql-js> dba.configureLocalInstance('ic@ic-2:3306')
If the instance has
super_read_only=ON then you
might need to confirm that AdminAPI can set
super_read_only=OFF. See
Super Read-only and Instances for more
information.
Repeat this process for each server instance that you added to the cluster. Similarly if you modify the cluster structure, for example changing the number of instances, you need to repeat this process for each server instance to update the InnoDB cluster metadata accordingly for each instance in the cluster.
Once you have your cluster deployed you can configure MySQL Router to provide high availability, see Section 20.3, “Using MySQL Router with InnoDB Cluster”.
If you have an existing deployment of Group Replication and you
want to use it to create a cluster, pass the
adoptFromGR option to the
dba.createCluster() function. The created
InnoDB cluster matches whether the replication group is
running as single-primary or multi-primary.
Group Replication members might contain
MyISAM tables. Convert all such
tables to InnoDB before adopting
the group to an InnoDB cluster.
To adopt an existing Group Replication group, connect to a group
member using MySQL Shell. In the following example a
single-primary group is adopted. We connect to
gr-member-2, a secondary instance, while
gr-member-1 is functioning as the group's
primary. Create a cluster using
dba.createCluster(), passing in the
adoptFromGR option. For example:
mysql-js> var cluster = dba.createCluster('prodCluster', {adoptFromGR: true});

A new InnoDB cluster will be created on instance 'root@gr-member-2:3306'.

Creating InnoDB cluster 'prodCluster' on 'root@gr-member-2:3306'...
Adding Seed Instance...

Cluster successfully created. Use cluster.addInstance() to add MySQL instances.
At least 3 instances are needed for the cluster to be able to withstand up to
one server failure.
If the instance has
super_read_only=ON then you
might need to confirm that AdminAPI can set
super_read_only=OFF. See
Super Read-only and Instances for more
information.
The new cluster matches the mode of the group. If the adopted group was running in single-primary mode then a single-primary cluster is created. If the adopted group was running in multi-primary mode then a multi-primary cluster is created. For example:
mysql-js> cluster.status();

{
    "clusterName": "prodCluster",
    "defaultReplicaSet": {
        "name": "default",
        "primary": "gr-member-1:3306",
        "ssl": "REQUIRED",
        "status": "OK",
        "statusText": "Cluster is ONLINE and can tolerate up to ONE failure.",
        "topology": {
            "gr-member-2:3306": {
                "address": "gr-member-2:3306",
                "mode": "R/O",
                "readReplicas": {},
                "role": "HA",
                "status": "ONLINE"
            },
            "gr-member-1:3306": {
                "address": "gr-member-1:3306",
                "mode": "R/W",
                "readReplicas": {},
                "role": "HA",
                "status": "ONLINE"
            },
            "gr-member-3:3306": {
                "address": "gr-member-3:3306",
                "mode": "R/O",
                "readReplicas": {},
                "role": "HA",
                "status": "ONLINE"
            }
        }
    }
}
As seen above, the newly created cluster is single-primary and
uses gr-member-1 as the primary.
This section describes how to use MySQL Router with InnoDB cluster
to achieve high availability. Regardless of whether you have
deployed a sandbox or production cluster, MySQL Router can configure
itself based on the InnoDB cluster's metadata using the
--bootstrap option. This
configures MySQL Router automatically to route connections to the
cluster's server instances. Client applications connect to
the ports MySQL Router provides, without any need to be aware of the
InnoDB cluster topology. In the event of a unexpected failure,
the InnoDB cluster adjusts itself automatically and MySQL Router
detects the change. This removes the need for your client
application to handle failover. For more information, see
Routing for MySQL InnoDB cluster.
Do not attempt to configure MySQL Router manually to redirect to the
ports of an InnoDB cluster. Always use the
--bootstrap option as this
ensures that MySQL Router takes its configuration from the
InnoDB cluster's metadata. See
Cluster Metadata and State.
The recommended deployment of MySQL Router is on the same host as the application. When using a sandbox deployment, everything is running on a single host, therefore you deploy MySQL Router to the same host. When using a production deployment, we recommend deploying one MySQL Router instance to each machine used to host one of your client applications. It is also possible to deploy MySQL Router to a common machine through which your application instances connect. You need the MASTER key of the InnoDB cluster to auto-configure MySQL Router.
Assuming MySQL Router is already installed (see
Installing MySQL Router), use the
--bootstrap option to provide
the location of a server instance that belongs to the
InnoDB cluster. MySQL Router uses the included metadata cache
plugin to retrieve the InnoDB cluster's metadata,
consisting of a list of server instance addresses which make up
the InnoDB cluster and their role in the cluster. You pass the
URI type string of the server that MySQL Router should retrieve the
InnoDB cluster metadata from. For example:
shell> mysqlrouter --bootstrap ic@ic-1:3306 --user=mysqlrouter
You are prompted for the instance password and encryption key for
MySQL Router to use. This encryption key is used to encrypt the
instance password used by MySQL Router to connect to the cluster. The
ports you can use to connect to the InnoDB cluster are also
displayed. The MySQL Router bootstrap process creates a
mysqlrouter.conf file, with the settings
based on the cluster metadata retrieved from the address passed to
the --bootstrap option, in the
above example ic@ic-1:3306. Based on the
InnoDB cluster metadata retrieved, MySQL Router automatically
creates a configuration file, including a
metadata_cache section with
bootstrap_server_addresses
containing the addresses for all server instances in the cluster.
For example:
[metadata_cache:prodCluster]
router_id=1
bootstrap_server_addresses=mysql://ic@ic-1:3306,mysql://ic@ic-2:3306,mysql://ic@ic-3:3306
user=mysql_router1_jy95yozko3k2
metadata_cluster=prodCluster
ttl=300
When you change the topology of a cluster by adding another
server instance after you have bootstrapped MySQL Router, you need
to update
bootstrap_server_addresses
based on the updated metadata. Either restart MySQL Router using the
--bootstrap option, or
manually edit the
bootstrap_server_addresses
section of the mysqlrouter.conf file and
restart MySQL Router.
The generated MySQL Router configuration creates TCP ports which you use to connect to the cluster. Ports for communicating with the cluster using both Classic MySQL protocol and X Protocol are created. To use X Protocol the server instances must have X Plugin installed and configured. For a sandbox deployment, instances have X Plugin set up automatically. For a production deployment, if you want to use X Protocol you need to install and configure X Plugin on each instance, see Section 19.3, “Setting Up MySQL as a Document Store”. The default available TCP ports are:
6446- for Classic MySQL protocol read-write sessions, which MySQL Router redirects incoming connections to primary server instances.6447- for Classic MySQL protocol read-only sessions, which MySQL Router redirects incoming connections to one of the secondary server instances.64460- for X Protocol read-write sessions, which MySQL Router redirects incoming connections to primary server instances.64470- for X Protocol read-only sessions, which MySQL Router redirects incoming connections to one of the secondary server instances.
Depending on your MySQL Router configuration the port numbers might be
different to the above. For example if you use the
--conf-base-port option, or
the
group_replication_single_primary_mode
variable. The exact ports are listed when you start MySQL Router.
The way incoming connections are redirected depends on the type of cluster being used. When using a single-primary cluster, read-write sessions are redirected to the single primary, with a multi-primary cluster read-write sessions are redirected to one of the primary instances. For incoming read-only connections MySQL Router redirects connections to one of the secondary instances in a round-robin fashion.
Once bootstrapped and configured, start MySQL Router:
shell> mysqlrouter &
Alternatively set up a service to start MySQL Router automatically when the system boots, see Starting MySQL Router. You can now connect a MySQL client, such as MySQL Shell to one of the incoming MySQL Router ports as described above and see how the client gets transparently connected to one of the InnoDB cluster instances.
shell> mysqlsh --uri root@localhost:6442
To verify which instance you are actually connected to, simply
issue an SQL query against the
port status variable.
mysql-js>\sqlSwitching to SQL mode... Commands end with ; mysql-sql>select @@port;+--------+ | @@port | +--------+ | 3310 | +--------+
To test if high availability works, simulate an unexpected halt by killing an instance. The cluster detects the fact that the instance left the cluster and reconfigures itself. Exactly how the cluster reconfigures itself depends on whether you are using a single-primary or multi-primary cluster, and the role the instance serves within the cluster.
In single-primary mode:
If the current primary leaves the cluster, one of the secondary instances is elected as the new primary, with instances prioritized by the lowest
server_uuid. MySQL Router redirects read-write connections to the newly elected primary.If a current secondary leaves the cluster, MySQL Router stops redirecting read-only connections to the instance.
For more information see Section 17.4.1.1, “Single-Primary Mode”.
In multi-primary mode:
If a current "R/W" instance leaves the cluster, MySQL Router redirects read-write connections to other primaries.
If a current "R/O" instance leaves the cluster,
For more information see Section 17.4.1.2, “Multi-Primary Mode”.
There are various ways to simulate an instance leaving a
cluster, for example you can forcibly stop the MySQL server on
an instance, or use the AdminAPI
dba.killSandboxInstance() if testing a
sandbox deployment. In this example assume there is a
single-primary sandbox cluster deployment with three server
instances and the instance listening at port 3310 is the current
primary. Simulate the instance leaving the cluster unexpectedly:
mysql-js> dba.killSandboxInstance(3310)
Switch to SQL mode in MySQL Shell using the
\sql command and verify the
port variable to check which
instance you are connected to.
Notice that the first SELECT
statement fails as the connection to the original primary was
lost. This means the current session has been closed,
MySQL Shell automatically reconnects for you and when you
issue the command again the new port is confirmed.
mysql-js>\sqlSwitching to SQL mode... Commands end with ; mysql-sql>SELECT @@port;ERROR: 2013 (HY000): Lost connection to MySQL server during query The global session got disconnected. Attempting to reconnect to 'root@localhost:6446'... The global session was successfully reconnected. mysql-sql>SELECT @@port;+--------+ | @@port | +--------+ | 3330 | +--------+ 1 row in set (0.00 sec)
This shows that the InnoDB cluster provided us with automatic failover, that MySQL Router has automatically reconnected us to the new primary instance, and that we have high availability.
When MySQL Router is bootstrapped against a cluster, it records the server instance's addresses in its configuration file. If any additional instances are added to the cluster after bootstrapping the MySQL Router, they are not automatically detected and therefore are not used for connection routing.
To ensure that newly added instances are routed to correctly you
must bootstrap MySQL Router against the cluster to read the updated
metadata. This means that you must restart MySQL Router and include
the --bootstrap option.
This section explains how to work with InnoDB cluster, and how to handle common administration tasks.
When you create a cluster using
dba.createCluster(), the operation returns a
Cluster object which can be assigned to a variable. You use this
object to work with the cluster, for example to add instances or
check the cluster's status. If you want to retrieve a cluster
again at a later date, for example after restarting
MySQL Shell, use the
dba.getCluster( function. For
example:
name,
[options])
mysql-js> var cluster1 = dba.getCluster()
If you do not specify a cluster name
then the default cluster is returned. If there is more than one
cluster stored in the InnoDB cluster metadata of the server
instance which the MySQL Shell global session is currently
connected to, specify the name of the
cluster you want to retrieve.
Cluster objects provide the status() method
that enables you to check how a cluster is running. Before you
can check the status of the InnoDB cluster, you need to get a
reference to the InnoDB cluster object by connecting to any of
its instances. However, if you want to make changes to the
configuration of the cluster, you must connect to a "R/W"
instance. Issuing status() retrieves the
status of the cluster based on the view of the cluster which the
server instance you are connected to is aware of and outputs a
status report.
The instance's state in the cluster directly influences the
information provided in the status report. An instance which
has left the cluster provides a different view of the cluster
compared to a instance which belongs to the cluster. Therefore
ensure the instance you are connected to has a status of
ONLINE.
For information about how the InnoDB cluster is running, use
the cluster's status() method:
mysql-js>var cluster = dba.getCluster()mysql-js>cluster.status(){ "clusterName": "testCluster", "defaultReplicaSet": { "name": "default", "primary": "localhost:3320", "ssl": "REQUIRED", "status": "OK", "statusText": "Cluster is ONLINE and can tolerate up to ONE failure.", "topology": { "localhost:3310": { "address": "localhost:3310", "mode": "R/O", "readReplicas": {}, "role": "HA", "status": "ONLINE" }, "localhost:3320": { "address": "localhost:3320", "mode": "R/W", "readReplicas": {}, "role": "HA", "status": "ONLINE" }, "localhost:3330": { "address": "localhost:3330", "mode": "R/O", "readReplicas": {}, "role": "HA", "status": "ONLINE" } } } }
The information output by cluster.status()
provides the following information:
clusterName: name assigned to this cluster during
dba.createCluster().defaultReplicaSet: the server instances which belong to an InnoDB cluster and contain the data set.
primary: displayed when the cluster is operating in single-primary mode only. Shows the address of the current primary instance. If this field is not displayed, the cluster is operating in multi-primary mode.
ssl: whether secure connections are used by the cluster or not. Shows values of
REQUIREDorDISABLED, depending on how thememberSslModeoption was configured during eithercreateCluster()oraddInstance(). The value returned by this parameter corresponds to the value of thegroup_replication_ssl_modeserver variable on the instance. See Securing your Cluster.status: The status of this element of the cluster. For the overall cluster this describes the high availability provided by this cluster. The status is one of the following:
ONLINE: The instance is online and participating in the cluster.OFFLINE: The instance has lost connection to the other instances.RECOVERING: The instance is attempting to synchronize with the cluster by retrieving transactions it needs before it can become anONLINEmember.UNREACHABLE: The instance has lost communication with the cluster.ERROR: The instance has encountered an error during the recovery phase or while applying a transaction.ImportantOnce an instance enters
ERRORstate, thesuper_read_onlyoption is set toON. To leave theERRORstate you must manually configure the instance withsuper_read_only=OFF.(MISSING): The state of an instance which is part of the configured cluster, but is currently unavailable.NoteThe
MISSINGstate is specific to InnoDB cluster, it is not a state generated by Group Replication. MySQL Shell uses this state to indicate instances that are registered in the metadata, but cannot be found in the live cluster view.
topology: The instances which have been added to the cluster.
Host name of instance: The host name of an instance, for example localhost:3310.
role: what function this instance provides in the cluster. Currently only HA, for high availability.
mode: whether the server is read-write ("R/W") or read-only ("R/O"). The mode indicates either
R/W(read and writable) orR/O(read only). In single-primary mode, only the one instance marked "R/W" can execute transactions that update the database, so it is the primary. If that instance becomes unreachable for any reason (like an unexpected halt), one of the remaining "R/O" instances automatically takes over its place and becomes the new "R/W" primary. In multi-primary mode, all instances are marked as "R/W" and there is no single elected primary.
To get information about the structure of the InnoDB cluster
itself, use the cluster.describe() function:
mysql-js> cluster.describe();
{
    "clusterName": "test",
    "adminType": "local",
    "defaultReplicaSet": {
        "name": "default",
        "instances": [
            {
                "name": "localhost:3310",
                "host": "localhost:3310",
                "role": "HA"
            },
            {
                "name": "localhost:3320",
                "host": "localhost:3320",
                "role": "HA"
            },
            {
                "name": "localhost:3330",
                "host": "localhost:3330",
                "role": "HA"
            }
        ]
    }
}
The output from this function shows the structure of the InnoDB cluster including all of its configuration information, and so on.
Whenever Group Replication stops, the
super_read_only variable is set
to ON to ensure no writes are made to the
instance. When you try to use such an instance with the
following AdminAPI commands you are given the choice to set
super_read_only=OFF on the
instance:
dba.configureLocalInstance()dba.createCluster()dba.rebootClusterFromCompleteOutage()dba.dropMetadataSchema()
When AdminAPI encounters an instance which has
super_read_only=ON, in
interactive mode you are given the choice to set
super_read_only=OFF. For
example:
mysql-js> var myCluster = dba.createCluster('testCluster')
A new InnoDB cluster will be created on instance 'ic@ic-1:3306'.

The MySQL instance at 'ic@ic-1:3306' currently has the super_read_only
system variable set to protect it from inadvertent updates from applications.
You must first unset it to be able to perform any changes to this instance.
For more information see: https://dev.mysql.com/doc/refman/en/server-system-variables.html#sysvar_super_read_only.

Note: there are open sessions to 'ic@ic-1:3306'.
You may want to kill these sessions to prevent them from performing unexpected updates:

1 open session(s) of 'ic@ic-1:3306'.


Do you want to disable super_read_only and continue? [y|N]:
The number of current active sessions to the instance is shown.
You must ensure that no applications might write to the instance
inadvertently. By answering y you confirm
that AdminAPI can write to the instance. If there is more than
one open session to the instance listed, exercise caution before
permitting AdminAPI to set
super_read_only=OFF.
To force the function to set
super_read_only=OFF in a
script, pass the clearReadOnly option set to
true. For example
dba.configureInstance(
instance,
{clearReadOnly: true}).
Once a sandbox instance is running, it is possible to change its status at any time using the following:
To stop a sandbox instance use
dba.stopSandboxInstance(. This stops the instance gracefully, unlikeinstance)dba.killSandboxInstance(.instance)To start a sandbox instance use
dba.startSandboxInstance(.instance)To kill a sandbox instance use
dba.killSandboxInstance(. This stops the instance without gracefully stopping it and is useful in simulating unexpected halts.instance)To delete a sandbox instance use
dba.deleteSandboxInstance(. This completely removes the sandbox instance from your file system.instance)
You can remove an instance from a cluster at any time should you
wish to do so. This can be done with the
removeInstance() method, as in the following
example:
mysql-js> cluster.removeInstance('root@localhost:3310')
When you create a cluster and add instances to it, values such
as the group name, the local address, and the seed instances are
configured automatically by AdminAPI. These default
values are recommended for most deployments, but advanced users
can override these defaults by passing the following options to
the dba.createCluster() and
cluster.addInstance().
To customize the name of the replication group created by
InnoDB cluster, pass the groupName option
to the dba.createCluster() command. This sets
the
group_replication_group_name
system variable. The name must be a valid UUID.
To customize the address which an instance provides for
connections from other instances, pass the
localAddress option to the
dba.createCluster() and
cluster.addInstance() commands. Specify the
address in the format
host:portgroup_replication_local_address
system variable on the instance. The address must be accessible
to all instances in the cluster, and must be reserved for
internal cluster communication only. In other words do not use
this address for communication with the instance.
To customize the instances used as seeds when an instance joins
the cluster, pass the groupSeeds option to
the dba.createCluster() and
cluster.addInstance() commands. Seed
instances are contacted when a new instance joins a cluster and
used to provide data to the new instance. The addresses are
specified as a comma separated list such as
host1:port1,host2:port2.
This configures the
group_replication_group_seeds
system variable.
For more information see the documentation of the system variables configured by these AdminAPI options.
If an instance leaves the cluster, for example because it lost
connection and did not or could not automatically rejoin the
cluster, it might be necessary to rejoin it to the cluster at a
later stage. To rejoin an instance to a cluster issue
cluster.rejoinInstance().
In the case where an instance has not had it's
configuration persisted, for example when you have not issued
dba.configureLocalInstance()
locally on the instance but it has been
added to a cluster, upon restart the instance does not rejoin
the cluster automatically. The solution is to issue
cluster.rejoinInstance() so that the instance
is added to the cluster again. Then connect to the instance, run
MySQL Shell locally and issue
dba.configureLocalInstance(). This ensures
the InnoDB cluster configuration is persisted to the
instance's option file to enable it to rejoin the cluster
automatically.
If the instance has
super_read_only=ON then you
might need to confirm that AdminAPI can set
super_read_only=OFF. See
Super Read-only and Instances for more
information.
If a instance (or instances) fail, then a cluster can lose its
quorum, which is the ability to vote in a new primary. In this
case you can re-establish quorum using the method
cluster.forceQuorumUsingPartitionOf(), as
shown in the following MySQL Shell example:
// open session to a cluster mysql-js>cluster = dba.getCluster("prodCluster")// The cluster lost its quorum and its status shows // "status": "NO_QUORUM" mysql-js>cluster.forceQuorumUsingPartitionOf("localhost:3310")Restoring replicaset 'default' from loss of quorum, by using the partition composed of [localhost:3310] Please provide the password for 'root@localhost:3310': ****** Restoring the InnoDB cluster ... The InnoDB cluster was successfully restored using the partition from the instance 'root@localhost:3310'. WARNING: To avoid a split-brain scenario, ensure that all other members of the replicaset are removed or joined back to the group that was restored.
If your cluster suffers from a complete outage, you can ensure
it is reconfigured correctly using
dba.rebootClusterFromCompleteOutage(). In the
event that a cluster has completely stopped, the instances must
be started and only then can the cluster be started. For example
if the machine a sandbox cluster was running on has been
restarted, and the instances were at ports 3310, 3320 and 3330,
issue:
mysql-js> dba.startSandboxInstance(3310)
mysql-js> dba.startSandboxInstance(3320)
mysql-js> dba.startSandboxInstance(3330)
This ensures the sandbox instances are running. In the case of a production deployment you would have to start the instances outside of MySQL Shell. Once the instances have started, connect to an instance and run MySQL Shell. Then restart the cluster by issuing:
mysql-js> shell.connect('root@localhost:3310');
mysql-js> var cluster = dba.rebootClusterFromCompleteOutage();
If the instance has
super_read_only=ON then you
might need to confirm that AdminAPI can set
super_read_only=OFF. See
Super Read-only and Instances for more
information.
This ensures the cluster is correctly reconfigured after a complete outage. It uses the instance that MySQL Shell is connected to as the new seed instance and recovers the cluster based on the existing metadata of that instance.
If this process fails, and the cluster metadata has become badly
corrupted, you might need to drop the metadata and create the
cluster again from scratch. You can drop the cluster metadata
using dba.dropMetadataSchema().
The dba.dropMetadataSchema() method should
only be used as a last resort, when it is not possible to
restore the cluster. It cannot be undone.
If changes to an instance's configuration are made without
using AdminAPI, you need to rescan the cluster to update the
InnoDB cluster metadata. For example, if you manually add a
new instance to the Group Replication group, the
InnoDB cluster metadata is not modified based on this change
to the cluster because MySQL Shell was not used. In such a
scenario it is necessary to rescan the cluster with
cluster.rescan() to update the
InnoDB cluster metadata.
After the command cluster.rescan() has been
run, instances are identified that are newly discovered
instances. You are prompted to add each of these newly
discovered instances into your cluster as required, or you can
choose to ignore them.
Instances that no longer belong to the cluster or which are
unavailable are also reported. In this case you are prompted to
remove the instance, or you can later attempt to add it back
into the cluster using a command such as
cluster.rejoin('ic@ic-4:3306').
The cluster.checkInstanceState() function can
be used to verify the existing data on an instance does not
prevent it from joining a cluster. This process works by
validating the instance's global transaction identifier (GTID)
state compared to the GTIDs already processed by the cluster.
For more information on GTIDs see
Section 16.1.3.1, “GTID Format and Storage”. This check enables
you to determine if an instance which has processed transactions
can be added to the cluster.
The following demonstrates issuing this in a running MySQL Shell:
mysql-js> cluster.checkInstanceState('ic@ic-4:3306')
The output of this function can be one of the following:
OK new: the instance has not executed any GTID transactions, therefore it cannot conflict with the GTIDs executed by the cluster
OK recoverable: the instance has executed GTIDs which do not conflict with the executed GTIDs of the cluster seed instances
ERROR diverged: the instance has executed GTIDs which diverge with the executed GTIDs of the cluster seed instances
ERROR lost_transactions: the instance has more executed GTIDs than the executed GTIDs of the cluster seed instances
Instances with an OK status can be added to the cluster because any data on the instance is consistent with the cluster. In other words the instance being checked has not executed any transactions which conflict with the GTIDs executed by the cluster, and can be recovered to the same state as the rest of the cluster instances.
To dissolve an InnoDB cluster you connect to a read-write
instance, for example the primary in a single-primary cluster,
and use the Cluster.dissolve() command. This
removes all metadata and configuration associated with the
cluster, and disables Group Replication on the instances. Any
data that was replicated between the instances is not removed.
There is no way to undo the dissolving of a cluster, therefore
you must pass force: true to confirm you want
to dissolve the cluster. For example: to create it again use
dba.createCluster().
mysql-js>session<ClassicSession:root@localhost:3310> mysql-js>cluster.dissolve({force:true})The cluster was successfully dissolved. Replication was disabled but user data was left intact.
After issuing cluster.dissolve(), any
variable assigned to the Cluster object is
no longer valid.
Server instances can be configured to use secure connections. For general information on using SSL with MySQL see Section 6.3, “Using Encrypted Connections”. This section explains how to configure a cluster to use SSL. An additional security possibility is to configure which servers can access the cluster, see Creating a Whitelist of Servers.
Once you have configured a cluster to use SSL you must add the
servers to the ipWhitelist.
When using dba.createCluster() to set up a
cluster, if the server instance provides SSL encryption then it
is automatically enabled on the seed instance. Pass the
memberSslMode option to the
dba.createCluster() method to specify a
different SSL mode. The SSL mode of a cluster can only be set at
the time of creation. The memberSslMode
option is a string that configures the SSL mode to be used, it
defaults to AUTO. The permitted values are
DISABLED, REQUIRED, and
AUTO. These modes are defined as:
Setting
createCluster({memberSslMode:'DISABLED'})ensures SSL encryption is disabled for the seed instance in the cluster.Setting
createCluster({memberSslMode:'REQUIRED'})then SSL encryption is enabled for the seed instance in the cluster. If it cannot be enabled an error is raised.Setting
createCluster({memberSslMode:'AUTO'})(the default) then SSL encryption is automatically enabled if the server instance supports it, or disabled if the server does not support it.
When using the commercial version of MySQL, SSL is enabled by default and you might need to configure the whitelist for all instances. See Creating a Whitelist of Servers.
When you issue the cluster.addInstance() and
cluster.rejoinInstance() commands, SSL
encryption on the instance is enabled or disabled based on the
setting found for the seed instance. For more control, the
cluster.addInstance(), and
cluster.rejoinInstance() commands accept the
memberSslMode option. This can be used to
test the SSL settings of the cluster when instances join. The
behavior of the commands in this case is:
Setting
memberSslMode:'DISABLED'ensures SSL encryption is disabled for the instance in the cluster.Setting
memberSslMode:'REQUIRED'forces SSL encryption to be enabled for the instance in the cluster.Setting
memberSslMode:'AUTO'(the default) then SSL encryption is automatically enabled or disabled based on the setting used by the seed instance (other members of the cluster) and the available SSL support provided by the instance itself.
When using createCluster() with the
adoptFromGR option to adopt an existing Group
Replication group, no SSL settings are changed on the adopted
cluster:
memberSslModecannot be used withadoptFromGR.If the SSL settings of the adopted cluster are different from the ones supported by the MySQL Shell, in other words SSL for Group Replication recovery and Group Communication, both settings are not modified. This means you are not be able to add new instances to the cluster, unless you change the settings manually for the adopted cluster.
MySQL Shell always enables or disables SSL for the cluster for
both Group Replication recovery and Group Communication, see
Section 17.5.2, “Group Replication Secure Socket Layer (SSL) Support”.
A verification is performed and an error issued in case those
settings are different for the seed instance (for example as the
result of a dba.createCluster() using
adoptFromGR) when adding a new instance to
the cluster. SSL encryption must be enabled or disabled for all
instances in the cluster. Verifications are performed to ensure
that this invariant holds when adding a new instance to the
cluster.
The deploySandboxInstance() command attempts
to deploy sandbox instances with SSL encryption support by
default. If it is not possible, the server instance is deployed
without SSL support. Use the ignoreSslError
option set to false to ensure that sandbox instances are
deployed with SSL support, issuing an error if SSL support
cannot be provided. When ignoreSslError is
true, which is the default, no error is issued during the
operation if the SSL support cannot be provided and the server
instance is deployed without SSL support.
When using a cluster's createCluster(),
addInstance(), and
rejoinInstance() methods you can optionally
specify a list of approved servers that belong to the cluster,
referred to as a whitelist. By specifying the whitelist
explicitly in this way you can increase the security of your
cluster because only servers in the whitelist can connect to the
cluster.
By default, if not specified explicitly, the whitelist is
automatically set to the private network addresses that the
server has network interfaces on. To configure the whitelist,
specify the servers to add with the
ipWhitelist option when using the method.
Pass the servers as a comma separated list, surrounded by
quotes. Using the ipWhitelist option
configures the
group_replication_ip_whitelist
system variable on the instance. For example:
mysql-js> cluster.addInstance("ic@ic-3:3306", {ipWhitelist: "203.0.113.0/24, 198.51.100.110"})
This configures the instance to only accept connections from
servers at addresses 203.0.113.0/24 and
198.51.100.110. From MySQL 5.7.21, the
whitelist can also include host names, which are resolved only
when a connection request is made by another server.
Host names are inherently less secure than IP addresses in a whitelist. MySQL carries out FCrDNS verification, which provides a good level of protection, but can be compromised by certain types of attack. Specify host names in your whitelist only when strictly necessary, and ensure that all components used for name resolution, such as DNS servers, are maintained under your control. You can also implement name resolution locally using the hosts file, to avoid the use of external components.
You can automate cluster configuration with scripts. For example:
shell> mysqlsh -f setup-innodb-cluster.js
Any command line options specified after the script file name
are passed to the script and not to
MySQL Shell. You can access those options using the
os.argv array in JavaScript, or the
sys.argv array in Python. In both cases,
the first option picked up in the array is the script name.
The contents of an example script file is shown here:
  print('MySQL InnoDB cluster sandbox set up\n');
  print('==================================\n');
  print('Setting up a MySQL InnoDB cluster with 3 MySQL Server sandbox instances.\n');
  print('The instances will be installed in ~/mysql-sandboxes.\n');
  print('They will run on ports 3310, 3320 and 3330.\n\n');

  var dbPass = shell.prompt('Please enter a password for the MySQL root account: ', {type:"password"});

  try {
     print('\nDeploying the sandbox instances.');
     dba.deploySandboxInstance(3310, {password: dbPass});
     print('.');
     dba.deploySandboxInstance(3320, {password: dbPass});
     print('.');
     dba.deploySandboxInstance(3330, {password: dbPass});
     print('.\nSandbox instances deployed successfully.\n\n');

     print('Setting up InnoDB cluster...\n');
     shell.connect('root@localhost:3310', dbPass);

     var cluster = dba.createCluster("prodCluster");

     print('Adding instances to the cluster.');
     cluster.addInstance({user: "root", host: "localhost", port: 3320, password: dbPass});
     print('.');
     cluster.addInstance({user: "root", host: "localhost", port: 3330, password: dbPass});
     print('.\nInstances successfully added to the cluster.');

     print('\nInnoDB cluster deployed successfully.\n');
  } catch(e) {
     print('\nThe InnoDB cluster could not be created.\n\nError: ' +
     + e.message + '\n');
}
This section describes the known limitations of InnoDB cluster. As InnoDB cluster uses Group Replication, you should also be aware of its limitations, see Section 17.7.2, “Group Replication Limitations”.
The formatting of results which contain multi-byte characters sometimes do not have correctly aligned columns. Similarly, non-standard character sets are being corrupted in results.
AdminAPI does not support Unix socket connections. MySQL Shell currently does not prevent you from attempting to use socket connections to a cluster, and attempting to use a socket connection to a cluster can cause unexpected results.
The MySQL Shell help describes an invalid URI:
USER[:PASS]@::SOCKET[/DB].
This is invalid because the
@symbol can not be present if no user information is provided.If a session type is not specified when creating the global session, MySQL Shell provides automatic protocol detection which attempts to first create a NodeSession and if that fails it tries to create a ClassicSession. With an InnoDB cluster that consists of three server instances, where there is one read-write port and two read-only ports, this can cause MySQL Shell to only connect to one of the read-only instances. Therefore it is recommended to always specify the session type when creating the global session.
When adding non-sandbox server instances (instances which you have configured manually rather than using
dba.deploySandboxInstance()) to a cluster, MySQL Shell is not able to persist any configuration changes in the instance's configuration file. This leads to one or both of the following scenarios:The Group Replication configuration is not persisted in the instance's configuration file and upon restart the instance does not rejoin the cluster.
The instance is not valid for cluster usage. Although the instance can be verified with
dba.checkInstanceConfiguration(), and MySQL Shell makes the required configuration changes in order to make the instance ready for cluster usage, those changes are not persisted in the configuration file and so are lost once a restart happens.
If only
ahappens, the instance does not rejoin the cluster after a restart.If
balso happens, and you observe that the instance did not rejoin the cluster after a restart, you cannot use the recommendeddba.rebootClusterFromCompleteOutage()in this situation to get the cluster back online. This is because the instance loses any configuration changes made by MySQL Shell, and because they were not persisted, the instance reverts to the previous state before being configured for the cluster. This causes Group Replication to stop responding, and eventually the command times out.To avoid this problem it is strongly recommended to use
dba.configureLocalInstance()before adding instances to a cluster in order to persist the configuration changes.Using MySQL server instances configured with the validate_password plugin and password policy set to
STRONGcauses InnoDB clustercreateCluster()and MySQL Router bootstrap operations to fail. This is because the internal user required for access to the server instance can not be validated.The MySQL Router
--bootstrapcommand line option does not accept IPv6 addresses.The commercial version of MySQL Router does not have the correct setting for AppArmor. A work around is to edit the AppArmor profile configuration file
/etc/apparmor.d/usr.sbin.mysqlrouterand modify the line containing/usr/sbin/mysqldto use the path to MySQL Router, for example/usr/sbin/mysqlrouter.Using the
adoptFromGRoption with thedba.createCluster()function to create a cluster based on an existing deployment of Group Replication fails with an error that the instance is already part of a replication group. This happens in MySQL Shell's default wizard mode only. A workaround is to disable wizard mode by launching mysqlsh with the--no-wizardcommand option.The use of the
--defaults-extra-fileoption to specify an option file is not supported by InnoDB cluster server instances. InnoDB cluster only supports a single option file on instances and no extra option files are supported. Therefore for any operation working with the instance's option file the main one should be specified. If you want to use multiple option files you have to configure the files manually and make sure they are updated correctly considering the precedence rules of the use of multiple option files and ensuring that the desired settings are not incorrectly overwritten by options in an extra unrecognized option file.