Table of Contents
- 2.1 General Installation Guidance
- 2.2 Installing MySQL on Unix/Linux Using Generic Binaries
- 2.3 Installing MySQL on Microsoft Windows
- 2.3.1 MySQL Installation Layout on Microsoft Windows
- 2.3.2 Choosing an Installation Package
- 2.3.3 MySQL Installer for Windows
- 2.3.4 Installing MySQL on Microsoft Windows Using a
noinstallZIP Archive - 2.3.5 Troubleshooting a Microsoft Windows MySQL Server Installation
- 2.3.6 Windows Postinstallation Procedures
- 2.3.7 Windows Platform Restrictions
- 2.4 Installing MySQL on macOS
- 2.5 Installing MySQL on Linux
- 2.5.1 Installing MySQL on Linux Using the MySQL Yum Repository
- 2.5.2 Replacing a Third-Party Distribution of MySQL Using the MySQL Yum Repository
- 2.5.3 Installing MySQL on Linux Using the MySQL APT Repository
- 2.5.4 Installing MySQL on Linux Using the MySQL SLES Repository
- 2.5.5 Installing MySQL on Linux Using RPM Packages from Oracle
- 2.5.6 Installing MySQL on Linux Using Debian Packages from Oracle
- 2.5.7 Deploying MySQL on Linux with Docker
- 2.5.8 Installing MySQL on Linux from the Native Software Repositories
- 2.5.9 Installing MySQL on Linux with Juju
- 2.5.10 Managing MySQL Server with systemd
- 2.6 Installing MySQL Using Unbreakable Linux Network (ULN)
- 2.7 Installing MySQL on Solaris
- 2.8 Installing MySQL on FreeBSD
- 2.9 Installing MySQL from Source
- 2.9.1 Source Installation Methods
- 2.9.2 Source Installation Prerequisites
- 2.9.3 MySQL Layout for Source Installation
- 2.9.4 Installing MySQL Using a Standard Source Distribution
- 2.9.5 Installing MySQL Using a Development Source Tree
- 2.9.6 Configuring SSL Library Support
- 2.9.7 MySQL Source-Configuration Options
- 2.9.8 Dealing with Problems Compiling MySQL
- 2.9.9 MySQL Configuration and Third-Party Tools
- 2.10 Postinstallation Setup and Testing
- 2.11 Upgrading MySQL
- 2.11.1 Before You Begin
- 2.11.2 Upgrade Paths
- 2.11.3 Changes in MySQL 5.7
- 2.11.4 Upgrading MySQL Binary or Package-based Installations on Unix/Linux
- 2.11.5 Upgrading MySQL with the MySQL Yum Repository
- 2.11.6 Upgrading MySQL with the MySQL APT Repository
- 2.11.7 Upgrading MySQL with the MySQL SLES Repository
- 2.11.8 Upgrading MySQL on Windows
- 2.11.9 Upgrading a Docker Installation of MySQL
- 2.11.10 Upgrading MySQL with Directly-Downloaded RPM Packages
- 2.11.11 Upgrade Troubleshooting
- 2.11.12 Rebuilding or Repairing Tables or Indexes
- 2.11.13 Copying MySQL Databases to Another Machine
- 2.12 Downgrading MySQL
- 2.13 Perl Installation Notes
This chapter describes how to obtain and install MySQL. A summary of the procedure follows and later sections provide the details. If you plan to upgrade an existing version of MySQL to a newer version rather than install MySQL for the first time, see Section 2.11, “Upgrading MySQL”, for information about upgrade procedures and about issues that you should consider before upgrading.
If you are interested in migrating to MySQL from another database system, see Section A.8, “MySQL 5.7 FAQ: Migration”, which contains answers to some common questions concerning migration issues.
Installation of MySQL generally follows the steps outlined here:
Determine whether MySQL runs and is supported on your platform.
Please note that not all platforms are equally suitable for running MySQL, and that not all platforms on which MySQL is known to run are officially supported by Oracle Corporation. For information about those platforms that are officially supported, see https://www.mysql.com/support/supportedplatforms/database.html on the MySQL website.
Choose which distribution to install.
Several versions of MySQL are available, and most are available in several distribution formats. You can choose from pre-packaged distributions containing binary (precompiled) programs or source code. When in doubt, use a binary distribution. Oracle also provides access to the MySQL source code for those who want to see recent developments and test new code. To determine which version and type of distribution you should use, see Section 2.1.1, “Which MySQL Version and Distribution to Install”.
Download the distribution that you want to install.
For instructions, see Section 2.1.2, “How to Get MySQL”. To verify the integrity of the distribution, use the instructions in Section 2.1.3, “Verifying Package Integrity Using MD5 Checksums or GnuPG”.
Install the distribution.
To install MySQL from a binary distribution, use the instructions in Section 2.2, “Installing MySQL on Unix/Linux Using Generic Binaries”.
To install MySQL from a source distribution or from the current development source tree, use the instructions in Section 2.9, “Installing MySQL from Source”.
Perform any necessary postinstallation setup.
After installing MySQL, see Section 2.10, “Postinstallation Setup and Testing” for information about making sure the MySQL server is working properly. Also refer to the information provided in Section 2.10.4, “Securing the Initial MySQL Account”. This section describes how to secure the initial MySQL
rootuser account, which has no password until you assign one. The section applies whether you install MySQL using a binary or source distribution.If you want to run the MySQL benchmark scripts, Perl support for MySQL must be available. See Section 2.13, “Perl Installation Notes”.
Instructions for installing MySQL on different platforms and environments is available on a platform by platform basis:
Unix, Linux, FreeBSD
For instructions on installing MySQL on most Linux and Unix platforms using a generic binary (for example, a
.tar.gzpackage), see Section 2.2, “Installing MySQL on Unix/Linux Using Generic Binaries”.For information on building MySQL entirely from the source code distributions or the source code repositories, see Section 2.9, “Installing MySQL from Source”
For specific platform help on installation, configuration, and building from source see the corresponding platform section:
Linux, including notes on distribution specific methods, see Section 2.5, “Installing MySQL on Linux”.
Solaris, including PKG and IPS formats, see Section 2.7, “Installing MySQL on Solaris”.
IBM AIX, see Section 2.7, “Installing MySQL on Solaris”.
FreeBSD, see Section 2.8, “Installing MySQL on FreeBSD”.
Microsoft Windows
For instructions on installing MySQL on Microsoft Windows, using either the MySQL Installer or Zipped binary, see Section 2.3, “Installing MySQL on Microsoft Windows”.
For information about managing MySQL instances, see MySQL Notifier Overview.
For details and instructions on building MySQL from source code using Microsoft Visual Studio, see Section 2.9, “Installing MySQL from Source”.
OS X
For installation on OS X, including using both the binary package and native PKG formats, see Section 2.4, “Installing MySQL on macOS”.
For information on making use of an OS X Launch Daemon to automatically start and stop MySQL, see Section 2.4.3, “Installing a MySQL Launch Daemon”.
For information on the MySQL Preference Pane, see Section 2.4.4, “Installing and Using the MySQL Preference Pane”.
The immediately following sections contain the information necessary to choose, download, and verify your distribution. The instructions in later sections of the chapter describe how to install the distribution that you choose. For binary distributions, see the instructions at Section 2.2, “Installing MySQL on Unix/Linux Using Generic Binaries” or the corresponding section for your platform if available. To build MySQL from source, use the instructions in Section 2.9, “Installing MySQL from Source”.
MySQL is available on a number of operating systems and platforms. For information about those platforms that are officially supported, see https://www.mysql.com/support/supportedplatforms/database.html on the MySQL website.
MySQL is available on many operating systems and platforms. For information about platforms supported by GA releases of MySQL, see https://www.mysql.com/support/supportedplatforms/database.html. For development versions of MySQL, builds are available for a number of platforms at http://dev.mysql.com/downloads/mysql/5.7.html. To learn more about MySQL Support, see https://www.mysql.com/support/.
When preparing to install MySQL, decide which version and distribution format (binary or source) to use.
First, decide whether to install a development release or a General Availability (GA) release. Development releases have the newest features, but are not recommended for production use. GA releases, also called production or stable releases, are meant for production use. We recommend using the most recent GA release.
The naming scheme in MySQL 5.7 uses release names that consist of three numbers and an optional suffix; for example, mysql-5.7.1-m1. The numbers within the release name are interpreted as follows:
The first number (5) is the major version number.
The second number (7) is the minor version number. Taken together, the major and minor numbers constitute the release series number. The series number describes the stable feature set.
The third number (1) is the version number within the release series. This is incremented for each new bugfix release. In most cases, the most recent version within a series is the best choice.
Release names can also include a suffix to indicate the stability level of the release. Releases within a series progress through a set of suffixes to indicate how the stability level improves. The possible suffixes are:
mN (for example, m1, m2, m3, ...) indicates a milestone number. MySQL development uses a milestone model, in which each milestone introduces a small subset of thoroughly tested features. From one milestone to the next, feature interfaces may change or features may even be removed, based on feedback provided by community members who try these earily releases. Features within milestone releases may be considered to be of pre-production quality.
rc indicates a Release Candidate (RC). Release candidates are believed to be stable, having passed all of MySQL's internal testing. New features may still be introduced in RC releases, but the focus shifts to fixing bugs to stabilize features introduced earlier within the series.
Absence of a suffix indicates a General Availability (GA) or Production release. GA releases are stable, having successfully passed through the earlier release stages, and are believed to be reliable, free of serious bugs, and suitable for use in production systems.
Development within a series begins with milestone releases, followed by RC releases, and finally reaches GA status releases.
After choosing which MySQL version to install, decide which distribution format to install for your operating system. For most use cases, a binary distribution is the right choice. Binary distributions are available in native format for many platforms, such as RPM packages for Linux or DMG packages for OS X. Distributions are also available in more generic formats such as Zip archives or compressed tar files. On Windows, you can use the MySQL Installer to install a binary distribution.
Under some circumstances, it may be preferable to install MySQL from a source distribution:
You want to install MySQL at some explicit location. The standard binary distributions are ready to run at any installation location, but you might require even more flexibility to place MySQL components where you want.
You want to configure mysqld with features that might not be included in the standard binary distributions. Here is a list of the most common extra options used to ensure feature availability:
-DWITH_LIBWRAP=1for TCP wrappers support.-DWITH_ZLIB={system|bundled}for features that depend on compression-DWITH_DEBUG=1for debugging support
For additional information, see Section 2.9.7, “MySQL Source-Configuration Options”.
You want to configure mysqld without some features that are included in the standard binary distributions. For example, distributions normally are compiled with support for all character sets. If you want a smaller MySQL server, you can recompile it with support for only the character sets you need.
You want to read or modify the C and C++ code that makes up MySQL. For this purpose, obtain a source distribution.
Source distributions contain more tests and examples than binary distributions.
Check our downloads page at https://dev.mysql.com/downloads/ for information about the current version of MySQL and for downloading instructions. For a complete up-to-date list of MySQL download mirror sites, see https://dev.mysql.com/downloads/mirrors.html. You can also find information there about becoming a MySQL mirror site and how to report a bad or out-of-date mirror.
For RPM-based Linux platforms that use Yum as their package management system, MySQL can be installed using the MySQL Yum Repository. See Section 2.5.1, “Installing MySQL on Linux Using the MySQL Yum Repository” for details.
For Debian-based Linux platforms, MySQL can be installed using the MySQL APT Repository. See Section 2.5.3, “Installing MySQL on Linux Using the MySQL APT Repository” for details.
For SUSE Linux Enterprise Server (SLES) platforms, MySQL can be installed using the MySQL SLES Repository. See Section 2.5.4, “Installing MySQL on Linux Using the MySQL SLES Repository” for details.
To obtain the latest development source, see Section 2.9.5, “Installing MySQL Using a Development Source Tree”.
After downloading the MySQL package that suits your needs and before attempting to install it, make sure that it is intact and has not been tampered with. There are three means of integrity checking:
MD5 checksums
Cryptographic signatures using
GnuPG, the GNU Privacy GuardFor RPM packages, the built-in RPM integrity verification mechanism
The following sections describe how to use these methods.
If you notice that the MD5 checksum or GPG signatures do not match, first try to download the respective package one more time, perhaps from another mirror site.
After you have downloaded a MySQL package, you should make sure that its MD5 checksum matches the one provided on the MySQL download pages. Each package has an individual checksum that you can verify against the package that you downloaded. The correct MD5 checksum is listed on the downloads page for each MySQL product, and you will compare it against the MD5 checksum of the file (product) that you download.
Each operating system and setup offers its own version of tools
for checking the MD5 checksum. Typically the command is named
md5sum, or it may be named
md5, and some operating systems do not ship
it at all. On Linux, it is part of the GNU
Text Utilities package, which is available for a wide
range of platforms. You can also download the source code from
http://www.gnu.org/software/textutils/. If you
have OpenSSL installed, you can use the command openssl
md5 package_name instead. A
Windows implementation of the md5 command
line utility is available from
http://www.fourmilab.ch/md5/.
winMd5Sum is a graphical MD5 checking tool
that can be obtained from
http://www.nullriver.com/index/products/winmd5sum.
Our Microsoft Windows examples will assume the name
md5.exe.
Linux and Microsoft Windows examples:
shell> md5sum mysql-standard-5.7.29-linux-i686.tar.gz
aaab65abbec64d5e907dcd41b8699945  mysql-standard-5.7.29-linux-i686.tar.gz
shell> md5.exe mysql-installer-community-5.7.29.msi
aaab65abbec64d5e907dcd41b8699945  mysql-installer-community-5.7.29.msi
You should verify that the resulting checksum (the string of hexadecimal digits) matches the one displayed on the download page immediately below the respective package.
Make sure to verify the checksum of the archive
file (for example, the .zip,
.tar.gz, or .msi
file) and not of the files that are contained inside of the
archive. In other words, verify the file before extracting its
contents.
Another method of verifying the integrity and authenticity of a package is to use cryptographic signatures. This is more reliable than using MD5 checksums, but requires more work.
We sign MySQL downloadable packages with GnuPG (GNU Privacy Guard). GnuPG is an Open Source alternative to the well-known Pretty Good Privacy (PGP) by Phil Zimmermann. Most Linux distributions ship with GnuPG installed by default. Otherwise, see http://www.gnupg.org/ for more information about GnuPG and how to obtain and install it.
To verify the signature for a specific package, you first need
to obtain a copy of our public GPG build key, which you can
download from http://pgp.mit.edu/. The key that
you want to obtain is named
mysql-build@oss.oracle.com. Alternatively,
you can copy and paste the key directly from the following text:
-----BEGIN PGP PUBLIC KEY BLOCK-----
Version: GnuPG v1

mQGiBD4+owwRBAC14GIfUfCyEDSIePvEW3SAFUdJBtoQHH/nJKZyQT7h9bPlUWC3
RODjQReyCITRrdwyrKUGku2FmeVGwn2u2WmDMNABLnpprWPkBdCk96+OmSLN9brZ
fw2vOUgCmYv2hW0hyDHuvYlQA/BThQoADgj8AW6/0Lo7V1W9/8VuHP0gQwCgvzV3
BqOxRznNCRCRxAuAuVztHRcEAJooQK1+iSiunZMYD1WufeXfshc57S/+yeJkegNW
hxwR9pRWVArNYJdDRT+rf2RUe3vpquKNQU/hnEIUHJRQqYHo8gTxvxXNQc7fJYLV
K2HtkrPbP72vwsEKMYhhr0eKCbtLGfls9krjJ6sBgACyP/Vb7hiPwxh6rDZ7ITnE
kYpXBACmWpP8NJTkamEnPCia2ZoOHODANwpUkP43I7jsDmgtobZX9qnrAXw+uNDI
QJEXM6FSbi0LLtZciNlYsafwAPEOMDKpMqAK6IyisNtPvaLd8lH0bPAnWqcyefep
rv0sxxqUEMcM3o7wwgfN83POkDasDbs3pjwPhxvhz6//62zQJ7Q2TXlTUUwgUmVs
ZWFzZSBFbmdpbmVlcmluZyA8bXlzcWwtYnVpbGRAb3NzLm9yYWNsZS5jb20+iGwE
ExECACwCGyMCHgECF4ACGQEGCwkIBwMCBhUKCQgCAwUWAgMBAAUCXEBY+wUJI87e
5AAKCRCMcY07UHLh9RZPAJ9uvm0zlzfCN+DHxHVaoFLFjdVYTQCfborsC9tmEZYa
whhogjeBkZkorbyIaQQTEQIAKQIbIwYLCQgHAwIEFQIIAwQWAgMBAh4BAheAAhkB
BQJTAdRmBQkaZsvLAAoJEIxxjTtQcuH1X4MAoKNLWAbCBUj96637kv6Xa/fJuX5m
AJwPtmgDfjUe2iuhXdTrFEPT19SB6ohmBBMRAgAmAhsjBgsJCAcDAgQVAggDBBYC
AwECHgECF4AFAk53PioFCRP7AhUACgkQjHGNO1By4fUmzACeJdfqgc9gWTUhgmcM
AOmG4RjwuxcAoKfM+U8yMOGELi+TRif7MtKEms6piGkEExECACkCGyMGCwkIBwMC
BBUCCAMEFgIDAQIeAQIXgAIZAQUCUZSROgUJFTchqgAKCRCMcY07UHLh9YtAAJ9X
rA/ymlmozPZn+A9ls8/uwMcTsQCfaQMNq1dNkhH2kyByc3Rx9/W2xfqJARwEEAEC
AAYFAlAS6+UACgkQ8aIC+GoXHivrWwf/dtLk/x+NC2VMDlg+vOeM0qgG1IlhXZfi
NsEisvvGaz4m8fSFRGe+1bvvfDoKRhxiGXU48RusjixzvBb6KTMuY6JpOVfz9Dj3
H9spYriHa+i6rYySXZIpOhfLiMnTy7NH2OvYCyNzSS/ciIUACIfH/2NH8zNT5CNF
1uPNRs7HsHzzz7pOlTjtTWiF4cq/Ij6Z6CNrmdj+SiMvjYN9u6sdEKGtoNtpycgD
5HGKR+I7Nd/7v56yhaUe4FpuvsNXig86K9tI6MUFS8CUyy7Hj3kVBZOUWVBM053k
nGdALSygQr50DA3jMGKVl4ZnHje2RVWRmFTr5YWoRTMxUSQPMLpBNIkBHAQQAQIA
BgUCU1B+vQAKCRAohbcD0zcc8dWwCACWXXWDXIcAWRUw+j3ph8dr9u3SItljn3wB
c7clpclKWPuLvTz7lGgzlVB0s8hH4xgkSA+zLzl6u56mpUzskFl7f1I3Ac9GGpM4
0M5vmmR9hwlD1HdZtGfbD+wkjlqgitNLoRcGdRf/+U7x09GhSS7Bf339sunIX6sM
gXSC4L32D3zDjF5icGdb0kj+3lCrRmp853dGyA3ff9yUiBkxcKNawpi7Vz3D2ddU
pOF3BP+8NKPg4P2+srKgkFbd4HidcISQCt3rY4vaTkEkLKg0nNA6U4r0YgOa7wIT
SsxFlntMMzaRg53QtK0+YkH0KuZR3GY8B7pi+tlgycyVR7mIFo7riQEcBBABCAAG
BQJWgVd0AAoJEEZu4b/gk4UKk9MH/Rnt7EccPjSJC5CrB2AU5LY2Dsr+PePI2ubP
WsEdG82qSjjGpbhIH8LSg/PzQoGHiFWMmmZWJktRT+dcgLbs3b2VwCNAwCE8jOHd
UkQhEowgomdNvHiBHKHjP4/lF68KOPiO/2mxYYkmpM7BWf3kB57DJ5CTi3/JLoN7
zF40qIs/p09ePvnwStpglbbtUn7XPO+1/Ee8VHzimABom52PkQIuxNiVUzLVn3bS
Wqrd5ecuqLk6yzjPXd2XhDHWC9Twpl68GePru6EzQtusi0m6S/sHgEXqh/IxrFZV
JlljF75JvosZq5zeulr0i6kOij+Y1p6MFffihITZ1gTmk+CLvK2JASIEEAECAAwF
Ak53QS4FAwASdQAACgkQlxC4m8pXrXwJ8Qf/be/UO9mqfoc2sMyhwMpN4/fdBWwf
LkA12FXQDOQMvwH9HsmEjnfUgYKXschZRi+DuHXe1P7l8G2aQLubhBsQf9ejKvRF
TzuWMQkdIq+6Koulxv6ofkCcv3d1xtO2W7nb5yxcpVBPrRfGFGebJvZa58DymCNg
yGtAU6AOz4veavNmI2+GIDQsY66+tYDvZ+CxwzdYu+HDV9HmrJfc6deM0mnBn7SR
jqzxJPgoTQhihTav6q/R5/2p5NvQ/H84OgS6GjosfGc2duUDzCP/kheMRKfzuyKC
OHQPtJuIj8++gfpHtEU7IDUX1So3c9n0PdpeBvclsDbpRnCNxQWU4mBot4kBIgQQ
AQIADAUCToi2GQUDABJ1AAAKCRCXELibyletfLZAB/9oRqx+NC98UQD/wlxCRytz
vi/MuPnbgQUPLHEap10tvEi33S/H/xDR/tcGofY4cjAvo5skZXXeWq93Av7PACUb
zkg0X0eSr2oL6wy66xfov72AwSuX+iUK68qtKaLqRLitM02y8aNRV/ggKvt7UMvG
mOvs5yLaYlobyvGaFC2ClfkNOt2MlVnQZCmnYBCwOktPGkExiu2yZMifcYGxQcpH
KVFG59KeF2cM2d4xYM8HJqkSGGW306LFVSyeRwG+wbttgLpD5bM/T2b3fF/J35ra
CSMLZearRTq8aygPl+XM7MM2eR946aw6jmOsgNBErbvvIdQj6LudAZj+8imcXV2K
iQEiBBABAgAMBQJOmdnRBQMAEnUAAAoJEJcQuJvKV618AvIIAIEF1ZJ+Ry7WOdKF
5oeQ/ynaYUigzN92fW/9zB8yuQlngkFJGidYMbci1tR1siziIVJFusR3ZonqAPGK
/SUta9Y6KWLhmc7c5UnEHklq/NfdMZ2WVSIykXlctqw0sbb+z1ecEd4G8u9j5ill
MO1B36rQayYAPoeXLX8dY4VyFLVGaQ00rWQBYFZrpw16ATWbWGJP332NSfCk4zZq
6kXEW07q0st3YBgAAGdNQyEeZCa4d4pBRSX6189Kjg6GDnIcaiOF6HO6PLr9fRlL
r5ObCgU+G9gEhfiVwDEV9E+7/Bq2pYZ9whhkBqWQzdpXTNTM24uaEhE01EPO5zeC
O214q6mJASIEEAECAAwFAk6rpgEFAwASdQAACgkQlxC4m8pXrXzAhwf/f9O99z16
3Y5FZVIxexyqXQ/Mct9uKHuXEVnRFYbA49dQLD4S73N+zN7gn9jFeQcBo4w8qVUV
94U/ta/VbLkdtNREyplPM4XY8YE5Wfd9bfyg3q1PbEiVjk995sBF+2+To99YYKst
gXPqjlH0jUfEyDmexOj+hsp8Rc63kvkIx36VBa4ONRYFefGAhKDMigL2YAhc1UkG
tkGTuLmlCGwIV6lviDZD3RJf5375VFnaHv7eXfwQxCwE+BxG3CURrjfxjaxMTmMP
yAG2rhDp5oTUEvqDYNbko5UxYOmrSjvF4FzXwqerElXJUkUzSh0pp7RxHB/1lCxD
s7D1F1hlgFQuNIkBIgQQAQIADAUCTrzZHAUDABJ1AAAKCRCXELibyletfMUpB/4s
07dREULIBnA1D6qr3fHsQJNZqbAuyDlvgGGLWzoyEDs+1JMFFlaa+EeLIo1386GU
2DammDC23p3IB79uQhJeD2Z1TcVg4cA64SfF/CHca5coeRSrdAiudzU/cgLGtXIP
/OaFamXgdMxAhloLFbSHPCZkyb00phVa8+xeIVDrK1HByZsNIXy/SSK8U26S2PVZ
2o14fWvKbJ1Aga8N6DuWY/D8P2mi3RAbiuZgfzkmKL5idH/wSKfnFKdTgJzssdCc
1jZEGVk5rFYcWOrJARHeP/tsnb/UxKBEsNtO7e3N2e/rLVnEykVIO066hz7xZK/V
NBSpx3k3qj4XPK41IHy2iQEiBBABAgAMBQJOzqO8BQMAEnUAAAoJEJcQuJvKV618
2twH/0IzjXLxN45nvIfEjC75a+i9ZSLlqR8lsHL4GpEScFKI0a0lT4IVAIY2RKG+
MAs2eHm0UfKuwGs5jluRZ9RqKrc61sY0XQV9/7znY9Db16ghX04JjknOKs/fPi87
rvKkB/QxJWS8qbb/erRmW+cPNjbRxTFPS5JIwFWHA16ieFEpvdAgKV6nfvJVTq1r
jPDcnIA9CJN2SmUFx9Qx3SRc6ITbam1hjFnY6sCh6AUhxLI2f1mq1xH9PqEy42Um
68prRqTyJ7Iox1g/UDDkeeUcAg7T1viTz7uXpS3Wrq4zzo4yOpaJfLDR3pI5g2Zk
SNGTMo6aySE4OABt8i1Pc1Pm6AmJASIEEAECAAwFAk7yPFYFAwASdQAACgkQlxC4
m8pXrXzXiAf9FrXe0lgcPM+tYOWMLhv5gXJi2VUBaLxpyRXm/kJcmxInKq1GCd3y
D4/FLHNu3ZcCz/uklPAbZXWI0O6ewq0LWsRtklmJjWiedH+hGyaTv95VklojRIBd
8nBaJ6M98rljMBHTFwWvjQFVf4FLRJQZqHlvjcCkq2Dd9BWJpGXvr/gpKkmMJYNK
/ftfZRcChb35NI19WRpOhj9u808OPcqKVvZBcPwFGV5cEBzmAC94J7JcD8+S8Ik8
iUJMQGGL3QcmZOBozovh86hj7KTSEBHlLXl832z89H1hLeuLbnXoGLv3zeUFSxkv
1h35LhZLqIMDQRXLuUzxGHMBpLhPyGWRJ4kBIgQQAQIADAUCTwQJFwUDABJ1AAAK
CRCXELibyletfABvB/9Cy69cjOqLGywITs3Cpg//40jmdhSAVxilJivP6J5bubFH
DJlVTx541Dv5h4hTG2BQuueQ4q1VCpSGW+rHcdhPyvmZGRz1rxdQQGh1Dv0Bod2c
3PJVSYPSrRSwCZJkJHOtVRBdjK4mkZb5aFTza+Tor9kxzj4FcXVd4KAS+hHQHYHc
Ar8tt2eOLzqdEFTULeGiSoNn+PVzvzdfhndphK+8F2jfQ2UKuc01O7k0Yn9xZVx0
OG6fE1gStzLv7C5amWLRd8+xh+MN0G8MgNglpBoExsEMMlPBYSUHa6lxpdMNMuib
rIyVncE9X8QOhImt8K0sNn/EdbuldJNGYbDLt7O4iQEiBBABAgAMBQJPFdTcBQMA
EnUAAAoJEJcQuJvKV6184owH+wZ/uLpezXnSxigeH1sig72QEXMrNd5DVHCJdig3
bo+K5YmmN710/m5z+63XKUEWpd6/knajObgckThzWftNeK1SSFQGPmoYZP9EZnSU
7L+/dSUpExbj842G5LYagrCyMGtlxRywWEmbi72TKS/JOK0jLiOdvVy+PHrZSu0D
TVQ7cJh1BmPsbz7zzxjmcI5l+7B7K7RHZHq45nDLoIabwDacj7BXvBK0Ajqz4QyJ
GQUjXC7q+88I+ptPvOXlE5nI/NbiCJOMI6d/bWN1KwYrC80fZuFaznfQFcPyUaDw
yRaun+K3kEji2wXecq+yMmLUEp01TKsUeOL50HD6hHH07W+JASIEEAECAAwFAk85
bQsFAwASdQAACgkQlxC4m8pXrXwKPQgAlkbUsTr7nkq+haOk0jKpaHWEbRMEGMrB
I3F7E+RDO6V/8y4Jtn04EYDc8GgZMBah+mOgeINq3y8jRMYV5jVtZXv2MWYFUcjM
kVBKeqhi/pGEjmUdmdt3DlPv3Z+fMTMRmAocI981iY/go8PVPg/+nrR6cFK2xxnO
R8TacikJBFeSfkkORg1tDzjjYv1B5ZIEkpplepl5ahJBBq7cpYhTdY6Yk0Sz0J8w
EdffLSaNxrRuWLrRhWzZU7p9bFzfb/7OHc21dJnB7wKv5VvtgE+jiQw9tOKaf5hc
SgRYuF6heu+B25gc5Uu88lo409mZ7oxQ6hDCn7JHvzh0rhmSN+Kid4kBIgQQAQIA
DAUCT0qQrQUDABJ1AAAKCRCXELibyletfC9UB/4o2ggJYM0CLxEpP0GU8UKOh3+/
zm1DN7Qe4kY2iCtF1plKHQaTgt5FlgRCFaiXcVv7WzGz/FnmxonR1leLl+kfRlwy
PPnoI/AWPCy/NO4Cl5KnjsSmsdDUpObwZ4KYsdilZR7ViJu2swdAIgnXBUwrlRJR
7CK4TAKrTeonRgVSrVx8Vt//8/cYj73CLq8oY/KK0iHiQrSwo44uyhdiFIAssjyX
n6/2E+w0zgvPexNSNNROHQ8pjbq+NTY6GwKIGsaej3UTRwQ7psvKXz8y7xdzmOAr
/khGvxB5gjkx02pimjeia8v66aH6rbnojJMAovNUS4EHdHnulv4rovC8Kf9iiQEi
BBABAgAMBQJPVdsaBQMAEnUAAAoJEJcQuJvKV618vVEIALFXPBzcAO1SnQarBLzy
YMVZZumPvSXKnUHAO+6kjApXPJ+qFRdUaSNshZxVKY9Zryblu4ol/fLUTt0CliSD
IxD6L4GXEm4VYYCl4lPO3bVsJnGITLFwQGHM27EmjVoTiD8Ch7kPq2EXr3dMRgzj
pdz+6aHGSUfOdLTPXufDvW83bEWGaRVuTJKw+wIrcuRqQ+ucWJgJGwcE4zeHjZad
Jx1XUm1X+BbI73uiQussyjhhQVVNU7QEdrjyuscaZ/H38wjUwNbylxDPB4I8quC1
knQ0wSHr7gKpM+E9nhiS14poRqU18u78/sJ2MUPXnQA6533IC238/LP8JgqB+BiQ
BTSJASIEEAECAAwFAk9ng3cFAwASdQAACgkQlxC4m8pXrXxQRAf/UZlkkpFJj1om
9hIRz7gS+l7YvTaKSzpo+TBcx3C7aqKJpir6TlMK9cb9HGTHo2Xp1N3FtQL72NvO
6CcJpBURbvSyb4i0hrm/YcbUC4Y3eajWhkRS3iVfGNFbc/rHthViz0r6Y5lhXX16
aVkDv5CIFWaF3BiUK0FnHrZiy4FPacUXCwEjv3uf8MpxV5oEmo8Vs1h4TL3obyUz
qrImFrEMYE/12lkE8iR5KWCaF8eFyl56HL3PPl90JMQBXzhwsFoWCPuwjfM5w6sW
Ll//zynwxtlJ9CRz9c2vK6aJ8DRu3OfBKN1iiEcNEynksDnNXErn5xXKz3p5pYdq
e9BLzUQCDYkBIgQQAQIADAUCT3inRgUDABJ1AAAKCRCXELibyletfGMKCADJ97qk
geBntQ+tZtKSFyXznAugYQmbzJld8U6eGSQnQkM40Vd62UZLdA8MjlWKS8y4A4L2
0cI14zs5tKG9Q72BxQOw5xkxlLASw1/8WeYEbw7ZA+sPG//q9v3kIkru3sv64mMA
enZtxsykexRGyCumxLjzlAcL1drWJGUYE2Kl6uzQS7jb+3PNBloQvz6nb3YRZ+Cg
Ly9D41SIK+fpnV8r4iqhu7r4LmAQ7Q1DF9aoGaYvn2+xLGyWHxJAUet4xkMNOLp6
k9RF1nbNe4I/sqeCB25CZhCTEvHdjSGTD2yJR5jfoWkwO9w8DZG1Q9WrWqki4hSB
l0cmcvO34pC1SJYziQEiBBABAgAMBQJPinQFBQMAEnUAAAoJEJcQuJvKV618CFEI
AJp5BbcV7+JBMRSvkoUcAWDoJSP2ug9zGw5FB8J90PDefKWCKs5Tjayf2TvM5ntq
5DE9SGaXbloIwa74FoZlgqlhMZ4AtY9Br+oyPJ5S844wpAmWMFc6NnEPFaHQkQ+b
dJYpRVNd9lzagJP261P3S+S9T2UeHVdOJBgWIq9Mbs4lnZzWsnZfQ4Lsz0aPqe48
tkU8hw+nflby994qIwNOlk/u+I/lJbNz5zDY91oscXTRl2jV1qBgKYwwCXxyB3j9
fyVpRl+7QnqbTWcCICVFL+uuYpP0HjdoKNqhzEguAUQQLOB9msPTXfa2hG+32ZYg
5pzI5V7GCHq0KO6u5Ctj3TGJASIEEAECAAwFAk+cQEEFAwASdQAACgkQlxC4m8pX
rXzi7AgAx8wJzNdD7UlgdKmrAK//YqH7arSssb33Xf45sVHDpUVA454DXeBrZpi+
zEuo03o5BhAuf38cwfbkV6jN1mC2N0FZfpy4v7RxHKLYr7tr6r+DRn1L1giX5ybx
CgY0fLAxkwscWUKGKABWxkz9b/beEXaO2rMt+7DBUdpAOP5FNRQ8WLRWBcMGQiaT
S4YcNDAiNkrSP8CMLQP+04hQjahxwCgBnksylciqz3Y5/MreybNnTOrdjVDsF0Oe
t0uLOiWXUZV1FfaGIdb/oBQLg+e1B74p5+q3aF8YI97qAZpPa1qiQzWIDX8LX9QX
EFyZ3mvqzGrxkFoocXleNPgWT8fRuokBIgQQAQIADAUCT64N/QUDABJ1AAAKCRCX
ELibyletfDOGCACKfcjQlSxrWlEUrYYZpoBP7DE+YdlIGumt5l6vBmxmt/5OEhqr
+dWwuoiyC5tm9CvJbuZup8anWfFzTTJmPRPsmE4z7Ek+3CNMVM2wIynsLOt1pRFK
4/5RNjRLbwI6EtoCQfpLcZJ//SB56sK4DoFKH28Ok4cplESPnoMqA3QafdSEA/FL
qvZV/iPgtTz7vjQkMgrXAIUM4fvKe3iXkAExGXtmgdXHVFoKmHrxJ2DTSvM7/19z
jGJeu2MhIKHyqEmCk6hLjxyCE5pAH59KlbAQOP1bS28xlRskBApm2wN+LOZWzC62
HhEReQ50inCGuuubK0PqUQnyYc+lUFxrFpcliQEiBBABAgAMBQJPv9lVBQMAEnUA
AAoJEJcQuJvKV618AzgH/iRFFCi4qjvoqji1fi7yNPZVOMMO2H13Ks+AfcjRtHuV
aa30u50ND7TH+XQe6yerTapLh3aAm/sNP99aTxIuwRSlyKEoDs93+XVSgRqPBgbF
/vxv0ykok3p6L9DxFO/w5cL8JrBhMZoJrEkIBFkwN8tWlcXPRFQvcdBYv3M3DTZU
qY+UHnOxHvSzsl+LJ0S9Xcd9C5bvYfabmYJvG5eRS3pj1L/y3a6yw6hvY+JtnQAk
t05TdeHMIgQH/zb8V9wxDzmE0un8LyoC2Jx5TpikQsJSejwK6b3coxVBlngku6+C
qDAimObZLw6H9xYYIK0FoJs7j5bQZEwUO7OLBgjcMOqJASIEEAECAAwFAk/Rpc8F
AwASdQAACgkQlxC4m8pXrXw49Qf/TdNbun2htQ+cRWarszOx8BLEiW/x6PVyUQpZ
nV/0qvhKzlJUjM9hQPcA0AsOjhqtCN6Cy8KXbK/TvPm9D/Nk6HWwD1PomzrJVFk2
ywGFIuTR+lluKSp7mzm5ym0wJs5cPq731Im31RUQU8ndjLrq9YOf5FVL8NqmcOAU
4E8d68BbmVCQC5MMr0901FKwKznShfpy7VYN25/BASj8dhnynBYQErqToOJB6Cnd
JhdTlbfR4SirqAYZZg3XeqGhByytEHE1x7FMWWFYhdNtsnAVhYBbWqAzBs8lF9Jd
Mhaf0VQU/4z10gVrRtXLR/ixrCi+P4cM/fOQkqd6pwqWkaXt6okBIgQQAQIADAUC
T+NxIAUDABJ1AAAKCRCXELibyletfFBBCAC6+0TUJDcNaqOxOG1KViY6KYg9NCL8
pwNK+RKNK/N1V+WGJQH7qDMwRoOn3yogrHax4xIeOWiILrvHK0O6drS1DjsymIhR
Sm2XbE/8pYmEbuJ9vHh3b/FTChmSAO7dDjSKdWD3dvaY8lSsuDDqPdTX8FzOfrXC
M22C/YPg7oUG2A5svE1b+yismP4KmVNWAepEuPZcnEMPFgop3haHg9X2+mj/btDB
Yr6p9kAgIY17nigtNTNjtI0dMLu43aIzedCYHqOlNHiB049jkJs54fMGBjF9qPtc
m0k44xyKd1/JXWMdNUmtwKsChAXJS3YOciMgIx6tqYUTndrP4I6q1rfriQEiBBAB
AgAMBQJP9T1VBQMAEnUAAAoJEJcQuJvKV618J9wIAI1lId9SMbEHF6PKXRe154lE
pap5imMU/lGTj+9ZcXmlf8o2PoMMmb3/E1k+EZUaeSBoOmjS8C2gwd5XFwRrlwAD
RlK/pG5XsL4h5wmN2fj1ororrJXvqH427PLRQK9yzdwG4+9HTBOxjoS8qZT9plyK
AJZzAydAMqyseRHgNo0vMwlgrs4ojo+GcFGQHrF3IaUjvVfUPOmIj7afopFdIZmI
GaSF0TXBzqcZ1chFv/eTBcIuIKRvlaDee5FgV7+nLH2nKOARCLvV/+8uDi2zbr83
Ip5x2tD3XuUZ0ZWxD0AQWcrLdmGb4lkxbGxvCtsaJHaLXWQ2m760RjIUcwVMEBKJ
ASIEEAECAAwFAlAGYWsFAwASdQAACgkQlxC4m8pXrXwyVAgAvuvEl6yuGkniWOlv
uHEusUv/+2GCBg6qV+IEpVtbTCCgiFjYR5GasSp1gpZ5r4BocOlbGdjdJGHTpyK8
xD1i+6qZWUYhNRg2POXUVzcNEl2hhouwPLOifcmTwAKU76TEv3L5STviL3hWgUR2
yEUZ3Ut0IGVV6uPER9jpR3qd6O3PeuFkwf+NaGTye4jioLAy3aYwtZCUXzvYmNLP
90K4y+5yauZteLmNeq26miKC/NQu4snNFClPbGRjHD1ex9KDiAMttOgN4WEq7srT
rYgtT531WY4deHpNgoPlHPuAfC0H+S6YWuMbgfcb6dV+Rrd8Ij6zM3B/PcjmsYUf
OPdPtIkBIgQQAQIADAUCUBgtfQUDABJ1AAAKCRCXELibyletfAm3CACQlw21Lfeg
d8RmIITsfnFG/sfM3MvZcjVfEAtsY3fTK9NiyU0B3yX0PU3ei37qEW+50BzqiStf
5VhNvLfbZR+yPou7o2MAP31mq3Uc6grpTV64BRIkCmRWg40WMjNI1hv7AN/0atgj
ATYQXgnEw7mfFb0XZtMTD6cmrz/A9nTPVgZDxzopOMgCCC1ZK4Vpq9FKdCYUaHpX
3sqnDf+gpVIHkTCMgWLYQOeX5Nl+fgnq6JppaQ3ySZRUDr+uFUs0uvDRvI/cn+ur
ri92wdDnczjFumKvz/cLJAg5TG2Jv1Jx3wecALsVqQ3gL7f7vr1OMaqhI5FEBqdN
29L9cZe/ZmkriQEiBBIBCgAMBQJVoNxyBYMHhh+AAAoJEEoz7NUmyPxLD1EH/2eh
7a4+8A1lPLy2L9xcNt2bifLfFP2pEjcG6ulBoMKpHvuTCgtX6ZPdHpM7uUOje/F1
CCN0IPB533U1NIoWIKndwNUJjughtoRM+caMUdYyc4kQm29Se6hMPDfyswXE5Bwe
PmoOm4xWPVOH/cVN04zyLuxdlQZNQF/nJg6PMsz4w5z+K6NGGm24NEPcc72iv+6R
Uc/ry/7v5cVu4hO5+r104mmNV5yLecQF13cHy2JlngIHXPSlxTZbeJX7qqxE7TQh
5nviSPgdk89oB5jFSx4g1efXiwtLlP7lbDlxHduomyQuH9yqmPZMbkJt9uZDc8Zz
MYsDDwlc7BIe5bGKfjqJAhwEEAECAAYFAlSanFIACgkQdzHqU52lcqLdvg//cAEP
qdN5VTKWEoDFjDS4I6t8+0KzdDWDacVFwKJ8RAo1M2SklDxnIvnzysZd2VHp5Pq7
i4LYCZo5lDkertQ6LwaQxc4X6myKY4LTA652ObFqsSfgh9kW+aJBBAyeahPQ8CDD
+Yl23+MY5wTsj4qt7KffNzy78vLbYnVnvRQ3/CboVix0SRzg0I3Oi7n3B0lihvXy
5goy9ikjzZevejMEfjfeRCgoryy9j5RvHH9PF3fJVtUtHCS4f+kxLmbQJ1XqNDVD
hlFzjz8oUzz/8YXy3im5MY7Zuq4P4wWiI7rkIFMjTYSpz/evxkVlkR74qOngT2pY
VHLyJkqwh56i0aXcjMZiuu2cymUt2LB9IsaMyWBNJjXr2doRGMAfjuR5ZaittmML
yZwix9mWVk7tkwlIxmT/IW6Np0qMhDZcWYqPRpf7+MqY3ZYMK4552b8aDMjhXrnO
OwLsz+UI4bZa1r9dguIWIt2C2b5C1RQ9AsQBPwg7h5P+HhRuFAuDKK+vgV8FRuzR
JeKkFqwB4y0Nv7BzKbFKmP+V+/krRv+/Dyz9Bz/jyAQgw02u1tPupH9BGhlRyluN
yCJFTSNj7G+OLU0/l4XNph5OOC7sy+AMZcsL/gsT/TXCizRcCuApNTPDaenACpbv
g8OoIzmNWhh4LXbAUHCKmY//hEw9PvTZA1xKHgyJAhwEEgECAAYFAlJYsKQACgkQ
oirk60MpxUV2XQ//b2/uvThkkbeOegusDC4AZfjnL/V3mgk4iYy4AC9hum0R9oNl
XDR51P1TEw9mC1btHj+7m7Iq1a5ke5wIC7ENZiilr0yPqeWgL5+LC98dz/L85hqA
wIoGeOfMhrlaVbAZEj4yQTAJDA35vZHVsQmp87il0m+fZX04OBLXBzw86EoAAZ7Q
EoH4qFcT9k1T363tvNnIm3mEvkQ5WjE1R9uchJa1g7hdlNQlVkjFmPZrJK9fl4z5
6Dto89Po4Sge48jDH0pias4HATYHsxW819nz5jZzGcxLnFRRR5iITVZi9qzsHP7N
bUh3qxuWCHS9xziXpOcSZY848xXw63Y5jDJfpzupzu/KHj6CzXYJUEEqp9MluoGb
/BCCEPzdZ0ovyxFutM/BRcc6DvE6sTDF/UES21ROqfuwtJ6qJYWX+lBIgyCJvj4o
RdbzxUleePuzqCzmwrIXtoOKW0Rlj4SCeF9yCwUMBTGW5/nCLmN4dwf1KW2RP2Eg
4ERbuUy7QnwRP5UCl+0ISZJyYUISfg8fmPIdQsetUK9Cj+Q5jpB2GXwELXWnIK6h
K/6jXp+EGEXSqdIE53vAFe7LwfHiP/D5M71D2h62sdIOmUm3lm7xMOnM5tKlBiV+
4jJSUmriCT62zo710+6iLGqmUUYlEll6Ppvo8yuanXkYRCFJpSSP7VP0bBqIZgQT
EQIAJgUCTnc9dgIbIwUJEPPzpwYLCQgHAwIEFQIIAwQWAgMBAh4BAheAAAoJEIxx
jTtQcuH1Ut4AoIKjhdf70899d+7JFq3LD7zeeyI0AJ9Z+YyE1HZSnzYi73brScil
bIV6sbQ7TXlTUUwgUGFja2FnZSBzaWduaW5nIGtleSAod3d3Lm15c3FsLmNvbSkg
PGJ1aWxkQG15c3FsLmNvbT6IbwQwEQIALwUCTnc9rSgdIGJ1aWxkQG15c3FsLmNv
bSB3aWxsIHN0b3Agd29ya2luZyBzb29uAAoJEIxxjTtQcuH1tT0An3EMrSjEkUv2
9OX05JkLiVfQr0DPAJwKtL1ycnLPv15pGMvSzav8JyWN3IhlBBMRAgAdBQJHrJS0
BQkNMFioBQsHCgMEAxUDAgMWAgECF4AAEgkQjHGNO1By4fUHZUdQRwABAa6SAJ9/
PgZQSPNeQ6LvVVzCALEBJOBt7QCffgs+vWP18JutdZc7XiawgAN9vmmITAQTEQIA
DAUCPj6j0QWDCWYAuwAKCRBJUOEqsnKR8iThAJ9ZsR4o37dNGyl77nEqP6RAlJqa
YgCeNTPTEVY+VXHR/yjfyo0bVurRxT2ITAQTEQIADAUCPkKCAwWDCWIiiQAKCRC2
9c1NxrokP5aRAKCIaaegaMyiPKenmmm8xeTJSR+fKQCgrv0TqHyvCRINmi6LPucx
GKwfy7KIRgQQEQIABgUCP6zjrwAKCRCvxSNIeIN0D/aWAKDbUiEgwwAFNh2n8gGJ
Sw/8lAuISgCdHMzLAS26NDP8T2iejsfUOR5sNriIRgQQEQIABgUCP7RDdwAKCRCF
lq+rMHNOZsbDAJ0WoPV+tWILtZG3wYqg5LuHM03faQCeKuVvCmdPtro06xDzeeTX
VrZ14+GIRgQQEQIABgUCQ1uz6gAKCRCL2C5vMLlLXH90AJ0QsqhdAqTAk3SBnO2w
zuSOwiDIUwCdFExsdDtXf1cL3Q4ilo+OTdrTW2CIRgQTEQIABgUCRPEzJgAKCRD2
ScT0YJNTDApxAKCJtqT9LCHFYfWKNGGBgKjka0zi9wCcCG3MvnvBzDUqDVebudUZ
61Sont+ITAQQEQIADAUCQYHLAQWDBiLZiwAKCRAYWdAfZ3uh7EKNAJwPywk0Nz+Z
Lybw4YNQ7H1UxZycaQCePVhY4P5CHGjeYj9SX2gQCE2SNx+ITAQQEQIADAUCQYHL
NAWDBiLZWAAKCRCBwvfr4hO2kiIjAJ0VU1VQHzF7yYVeg+bh31nng9OOkwCeJI8D
9mx8neg4wspqvgXRA8+t2saITAQQEQIADAUCQYHLYgWDBiLZKgAKCRBrcOzZXcP0
cwmqAJsFjOvkY9c5eA/zyMrOZ1uPB6pd4QCdGyzgbYb/eoPu6FMvVI9PVIeNZReI
TAQQEQIADAUCQdCTJAWDBdQRaAAKCRB9JcoKwSmnwmJVAKCG9a+Q+qjCzDzDtZKx
5NzDW1+W+QCeL68seX8OoiXLQuRlifmPMrV2m9+ITAQQEQIADAUCQitbugWDBXlI
0gAKCRDmG6SJFeu5q/MTAKCTMvlCQtLKlzD0sYdwVLHXJrRUvgCffmdeS6aDpwIn
U0/yvYjg1xlYiuqITAQSEQIADAUCQCpZOgWDB3pLUgAKCRA8oR80lPr4YSZcAJwP
4DncDk4YzvDvnRbXW6SriJn1yQCdEy+d0CqfdhM7HGUs+PZQ9mJKBKqITAQSEQIA
DAUCQD36ugWDB2ap0gAKCRDy11xj45xlnLLfAKC0NzCVqrbTDRw25cUss14RRoUV
PACeLpEc3zSahJUB0NNGTNlpwlTczlCITAQSEQIADAUCQQ4KhAWDBpaaCAAKCRA5
yiv0PWqKX/zdAJ4hNn3AijtcAyMLrLhlZQvib551mwCgw6FEhGLjZ+as0W681luc
wZ6PzW+ITAQSEQIADAUCQoClNAWDBSP/WAAKCRAEDcCFfIOfqOMkAJwPUDhS1eTz
gnXclDKgf353LbjvXgCeLCWyyj/2d0gIk6SqzaPl2UcWrqiITAQTEQIADAUCPk1N
hAWDCVdXCAAKCRAtu3a/rdTJMwUMAKCVPkbk1Up/kyPrlsVKU/Nv3bOTZACfW5za
HX38jDCuxsjIr/084n4kw/uITAQTEQIADAUCQdeAdgWDBc0kFgAKCRBm79vIzYL9
Pj+8AJ9d7rvGJIcHzTCSYVnaStv6jP+AEACeNHa5yltqieRBCCcLcacGqYK81omI
TAQTEQIADAUCQhiBDgWDBYwjfgAKCRB2wQMcojFuoaDuAJ9CLYdysef7IsW42UfW
hI6HjxkzSgCfeEpXS4hEmmGicdpRiJQ/W21aB0GIZQQTEQIAHQULBwoDBAMVAwID
FgIBAheABQJLcC/KBQkQ8/OnABIHZUdQRwABAQkQjHGNO1By4fWw2wCeJilgEarL
8eEyfDdYTyRdqE45HkoAnjFSZY8Zg/iXeErHI0r04BRukNVgiHsEMBECADsFAkJ3
NfU0HQBPb3BzLi4uIHNob3VsZCBoYXZlIGJlZW4gbG9jYWwhIEknbSAqc28qIHN0
dXBpZC4uLgAKCRA5yiv0PWqKX+9HAJ0WjTx/rqgouK4QCrOV/2IOU+jMQQCfYSC8
JgsIIeN8aiyuStTdYrk0VWCIjwQwEQIATwUCRW8Av0gdAFNob3VsZCBoYXZlIGJl
ZW4gYSBsb2NhbCBzaWduYXR1cmUsIG9yIHNvbWV0aGluZyAtIFdURiB3YXMgSSB0
aGlua2luZz8ACgkQOcor9D1qil+g+wCfcFWoo5qUl4XTE9K8tH3Q+xGWeYYAnjii
KxjtOXc0ls+BlqXxbfZ9uqBsiQIiBBABAgAMBQJBgcuFBYMGItkHAAoJEKrj5s5m
oURoqC8QAIISudocbJRhrTAROOPoMsReyp46Jdp3iL1oFDGcPfkZSBwWh8L+cJjh
dycIwwSeZ1D2h9S5Tc4EnoE0khsS6wBpuAuih5s//coRqIIiLKEdhTmNqulkCH5m
imCzc5zXWZDW0hpLr2InGsZMuh2QCwAkB4RTBM+r18cUXMLV4YHKyjIVaDhsiPP/
MKUj6rJNsUDmDq1GiJdOjySjtCFjYADlQYSD7zcd1vpqQLThnZBESvEoCqumEfOP
xemNU6xAB0CL+pUpB40pE6Un6Krr5h6yZxYZ/N5vzt0Y3B5UUMkgYDSpjbulNvaU
TFiOxEU3gJvXc1+h0BsxM7FwBZnuMA8LEA+UdQb76YcyuFBcROhmcEUTiducLu84
E2BZ2NSBdymRQKSinhvXsEWlH6Txm1gtJLynYsvPi4B4JxKbb+awnFPusL8W+gfz
jbygeKdyqzYgKj3M79R3geaY7Q75Kxl1UogiOKcbI5VZvg47OQCWeeERnejqEAdx
EQiwGA/ARhVOP/1l0LQA7jg2P1xTtrBqqC2ufDB+v+jhXaCXxstKSW1lTbv/b0d6
454UaOUV7RisN39pE2zFvJvY7bwfiwbUJVmYLm4rWJAEOJLIDtDRtt2h8JahDObm
3CWkpadjw57S5v1c/mn+xV9yTgVx5YUfC/788L1HNKXfeVDq8zbAiQIiBBMBAgAM
BQJCnwocBYMFBZpwAAoJENjCCglaJFfPIT4P/25zvPp8ixqV85igs3rRqMBtBsj+
5EoEW6DJnlGhoi26yf1nasC2frVasWG7i4JIm0U3WfLZERGDjR/nqlOCEqsP5gS3
43N7r4UpDkBsYh0WxH/ZtST5llFK3zd7XgtxvqKL98l/OSgijH2W2SJ9DGpjtO+T
iegq7igtJzw7Vax9z/LQH2xhRQKZR9yernwMSYaJ72i9SyWbK3k0+e95fGnlR5pF
zlGq320rYHgD7v9yoQ2t1klsAxK6e3b7Z+RiJG6cAU8o8F0kGxjWzF4v8D1op7S+
IoRdB0Bap01ko0KLyt3+g4/33/2UxsW50BtfqcvYNJvU4bZns1YSqAgDOOanBhg8
Ip5XPlDxH6J/3997n5JNj/nk5ojfd8nYfe/5TjflWNiput6tZ7frEki1wl6pTNbv
V9C1eLUJMSXfDZyHtUXmiP9DKNpsucCUeBKWRKLqnsHLkLYydsIeUJ8+ciKc+EWh
FxEY+Ml72cXAaz5BuW9L8KHNzZZfez/ZJabiARQpFfjOwAnmhzJ9r++TEKRLEr96
taUI9/8nVPvT6LnBpcM38Td6dJ639YvuH3ilAqmPPw50YvglIEe4BUYD5r52Seqc
8XQowouGOuBX4vs7zgWFuYA/s9ebfGaIw+uJd/56Xl9ll6q5CghqB/yt1EceFEnF
CAjQc2SeRo6qzx22iEYEEBECAAYFAkSAbycACgkQCywYeUxD5vWDcACfQsVk/XGi
ITFyFVQ3IR/3Wt7zqBMAoNhso/cX8VUfs2BzxPvvGS3y+5Q9iEYEEBECAAYFAkUw
ntcACgkQOI4l6LNBlYkyFgCbBcw5gIii0RTDJsdNiuJDcu/NPqEAniSq9iTaLjgF
HZbaizUU8arsVCB5iEYEEBECAAYFAkWho2sACgkQu9u2hBuwKr6bjwCfa7ZK6O+X
mT08Sysg4DEoZnK4L9UAoLWgHuYg35wbZYx+ZUTh98diGU/miF0EExECAB0FAj4+
owwFCQlmAYAFCwcKAwQDFQMCAxYCAQIXgAAKCRCMcY07UHLh9XGOAJ4pVME15/DG
rUDohtGv2z8a7yv4AgCeKIp0jWUWE525QocBWms7ezxd6syIXQQTEQIAHQUCR6yU
zwUJDTBYqAULBwoDBAMVAwIDFgIBAheAAAoJEIxxjTtQcuH1dCoAoLC6RtsD9K3N
7NOxcp3PYOzH2oqzAKCFHn0jSqxk7E8by3sh+Ay8yVv0BYhdBBMRAgAdBQsHCgME
AxUDAgMWAgECF4AFAkequSEFCQ0ufRUACgkQjHGNO1By4fUdtwCfRNcueXikBMy7
tE2BbfwEyTLBTFAAnifQGbkmcARVS7nqauGhe1ED/vdgiF0EExECAB0FCwcKAwQD
FQMCAxYCAQIXgAUCS3AuZQUJEPPyWQAKCRCMcY07UHLh9aA+AKCHDkOBKBrGb8tO
g9BIub3LFhMvHQCeIOOot1hHHUlsTIXAUrD8+ubIeZaJARwEEgECAAYFAkvCIgMA
CgkQ3PTrHsNvDi8eQgf/dSx0R9Klozz8iK79w00NOsdoJY0Na0NTFmTbqHg30XJo
G62cXYgc3+TJnd+pYhYi5gyBixF/L8k/kPVPzX9W0YfwChZDsfTw0iDVmGxOswiN
jzSo0lhWq86/nEL30Khl9AhCC1XFNRw8WZYq9Z1qUXHHJ2rDARaedvpKHOjzRY0N
dx6R2zNyHDx2mlfCQ9wDchWEuJdAv0uHrQ0HV9+xq7lW/Q3L/V5AuU0tiowyAbBL
PPYrB6x9vt2ZcXS7BOy8SfQ1i8W2QDQ/Toork4YwBiv6WCW/ociy7paAoPOWV/Nf
2S6hDispeecbk7wqpbUj5klDmwrlgB/jmoAXWEnbsYkBIgQQAQIADAUCSSpooAUD
ABJ1AAAKCRCXELibyletfFOMCACpP+OVZ7lH/cNY+373c4FnSI0/S5PXS0ABgdd4
BFWRFWKrWBeXBGc8sZfHOzVEwkzV96iyHbpddeAOAkEA4OVPW1MMFCmlHxi2s9/N
JrSrTPVfQOH5fR9hn7Hbpq/ETw0IoX1FKo7vndMnHZnFEnI+PDXLcdMYQgljYzhT
xER4vYY0UKu8ekSshUy4zOX7XSJxwqPUvps8qs/TvojIF+vDJvgFYHVkgvS+shp8
Oh/exg9vKETBlgU87Jgsqn/SN2LrR/Jhl0aLd0G0iQ+/wHmVYdQUMFaCZwk/BKNa
XPzmGZEUZ3RNbYa19Mo7hcE3js76nh5YMxFvxbTggVu4kdFkiQEiBBABAgAMBQJK
M06IBQMAEnUAAAoJEJcQuJvKV618F4gH/innejIHffGMk8jYix4ZZT7pW6ApyoI+
N9Iy85H4L+8rVQrtcTHyq0VkcN3wPSwtfZszUF/0qP6P8sLJNJ1BtrHxLORYjJPm
gveeyHPzA2oJl6imqWUTiW822fyjY/azwhvZFzxmvbFJ+r5N/Z57+Ia4t9LTSqTN
HzMUYaXKDaAqzZeK7P0E6XUaaeygbjWjBLQ1O0ezozAy+Kk/gXApmDCGFuHSFe7Z
mgtFcbXLM2XFQpMUooETD2R8MUsd+xnQsff/k6pQOLxi+jUEsWSr/iqmvlk6gZ4D
pemBjuhcXYlxJYjUaX9Zmn5s+ofF4GFxRqXoY7l9Z+tCM9AX37lm6S+JASIEEAEC
AAwFAkpEcgoFAwASdQAACgkQlxC4m8pXrXz2mgf/RQkpmMM+5r8znx2TpRAGHi5w
ktvdFxlvPaOBWE28NDwTrpcoMqo9kzAiuvEQjVNihbP21wR3kvnQ84rTAH0mlC2I
uyybggpqwzOUl+Wi0o+vk8ZA0A0dStWRN8uqneCsd1XnqDe1rvqC4/9yY223tLmA
kPvz54ka2vX9GdJ3kxMWewhrVQSLCktQpygU0dujGTDqJtnk0WcBhVF9T87lv3W2
eGdPielzHU5trXezmGFj21d56G5ZFK8co7RrTt4qdznt80glh1BTGmhLlzjMPLTe
dcMusm3D1QB9ITogcG94ghSf9tEKmmRJ6OnnWM5Kn9KcL63E5oj2/lY9H54wSYkB
IgQQAQIADAUCSlY+RwUDABJ1AAAKCRCXELibyletfOOQB/0dyJBiBjgf+8d3yNID
pDktLhZYw8crIjPBVdOgX12xaUYBTGcQITRVHSggzffDA5BQXeUuWhpL4QB0uz1c
EPPwSMiWiXlBtwF5q6RVf3PZGJ9fmFuTkPRO7SruZeVDo9WP8HjbQtOLukYf566e
grzAYR9p74UgWftpDtmrqrRTobiuvsFBxosbeRCvEQCrN0n+p5D9hCVB88tUPHnO
WA4mlduAFZDxQWTApKQ92frHiBqy+M1JFezz2OM3fYN+Dqo/Cb7ZwOAA/2dbwS7o
y4sXEHbfWonjskgPQwFYB23tsFUuM4uZwVEbJg+bveglDsDStbDlfgArXSL/0+ak
lFcHiQEiBBABAgAMBQJKaAqEBQMAEnUAAAoJEJcQuJvKV618rH0H/iCciD4U6YZN
JBj0GN7/Xt851t9FWocmcaC+qtuXnkFhplXkxZVOCU4VBMs4GBoqfIvagbBTyfV4
Di+W8Uxr+/1jiu3l/HvoFxwdwNkGG6zNBhWSjdwQpGwPvh5ryV1OfLX/mgQgdDmx
vqz5+kFDUj4m7uLaeuU2j1T0lR4zU0yAsbt7J3hwfqJCXHOc9bm5nvJwMrSm+sdC
TP5HjUlwHr9mTe8xuZvj6sO/w0P4AqIMxjC9W7pT9q0ofG2KSTwt7wFbh05sbG4U
QYOJe4+Soh3+KjAa1c0cvmIh4cKX9qfCWwhhdeNfh1A9VTHhnl5zTv/UjvnQtjhl
H/Fq1eBSKcSJASIEEAECAAwFAkp5LgoFAwASdQAACgkQlxC4m8pXrXwY6wgAg3f8
76L3qDZTYlFAWs3pXBl8GsUr1DEkTlEDZMZKDM3wPmhaWBR1hMA3y6p3aaCUyJIJ
BEneXzgyU9uqCxXpC78d5qc3xs/Jd/SswzNYuvuzLYOw5wN5L31SLmQTQ8KqE0uo
RynBmtDCQ4M2UKifSnv+0+3mPh85LVAS481GNpL+VVfCYtKesWNu40+98Yg6L9NG
WwRTfsQbcdokZo44Jz7Y7f81ObC4r/X1DgPj2+d4AU/plzDcdrbINOyprs+7340e
cnaGO4Lsgd19b1CvcgJgltRquu3kRvd+Ero2RYpDv6GVK8Ea0Lto4+b/Ae8cLXAh
QnaWQCEWmw+AU4Jbz4kBIgQQAQIADAUCSo5fvQUDABJ1AAAKCRCXELibyletfA08
B/9w8yJdc8K+k07U30wR/RUg3Yb2lBDygmy091mVsyB0RGixBDXEPOXBqGKAXiV1
QSMAXM2VKRsuKahY2HFkPbyhZtjbdTa7Pr/bSnPvRhAh9GNWvvRg2Kp3qXDdjv9x
ywEghKVxcEIVXtNRvpbqRoKmHzIExvUQck5DM1VwfREeYIoxgs4035WADhVMdngQ
S2Gt8P2WaU/p8EZhFGg6X8KtOlD68zGboaJe0hj2VDc+Jc+KdjRfE3fW5IToid/o
DkUaIW6tB3WkXb0g6D/2hrEJbX3headChHKSB8eQdOR9bcCJDhhU8csd501qmrhC
ctmvlpeWQZdIQdk6sABPWeeCiQEiBBABAgAMBQJKoBJHBQMAEnUAAAoJEJcQuJvK
V618Ml8H/1D88/g/p9fSVor4Wu5WlMbg8zEAik3BIxQruEFWda6nART6M9E7e+P1
++UHZsWYs6l9ROpWxRLG1Yy9jLec2Y3nUtb20m65p+IVeKR2a9PHW35WZDV9dOYP
GZabKkO1clLeWLVgp9LRjZ+AeRG+ljHqsULXro1dwewLTB/gg9I2vgNv6dKxyKak
nM/GrqZLATAq2KoaE/u/6lzRFZIzZnLtjZh8X7+nS+V8v9IiY4ntrpkrbvFk30U6
WJp79oBIWwnW/84RbxutRoEwSar/TLwVRkcZyRXeJTapbnLGnQ/lDO1o1d7+Vbjd
q/Sg/cKHHf7NthCwkQNsCnHL0f51gZCJASIEEAECAAwFAkqoEAAFAwASdQAACgkQ
lxC4m8pXrXwE/Af/XD4R/A5R6Ir/nCvKwCTKJmalajssuAcLEa2pMnFZYO/8rzLO
+Gp8p0qFH9C4LFwA0NvR5q6X/swuROf4zxljSvNcdlQVaAfJ2ZDEgJ5GXzsPplrv
SAI9jS3LL7fSWDZgKuUe0a4qx7A0NgyGMUYGhP+QlRFa8vWEBI9fANd/0mMqAeBV
qQyOH0X1FiW1Ca2Jn4NKfuMy9GEvRddVIbB1LvoNVtXPNzeeKMyNb9Jdx1MFWssy
COBP2DayJKTmjvqPEc/YOjOowoN5sJ/jn4mVSTvvlTooLiReSs6GSCAjMVxN7eYS
/Oyq6Iu1JDcJvmB8N2WixAZtAVgF8OA7CWXKVYkBIgQQAQIADAUCSrnHiQUDABJ1
AAAKCRCXELibyletfPChB/9uECti1dZeNuFsd0/RuGyRUVlrrhJE6WCcOrLO9par
rPbewbKBmjSzB0MygJXGvcC06mPNuquJ7/WpxKsFmfg4vJBPlADFKtgRUy9BLzjC
eotWchPHFBVW9ftPbaQViSUu7d89NLjDDM5xrh80puDIApxoQLDoIrh3T1kpZx56
jSWv0gelFUMbXAzmqkJSyL4Xdh1aqzgUbREd7Xf2ICzuh0sV6V7c/AwWtjWEGEsA
HZaiQDywZwbC18GwrMLiAzGWb/AScFDQRCZKJDjL+Ql8YT6z+ZMVr8gb7CIU5PKY
dhiIf2UVTQwLAoW7lNRCQQAqcGjK3IMIz7SO/yk4HmVUiQEiBBABAgAMBQJK3gjG
BQMAEnUAAAoJEJcQuJvKV618jkEH+wb0Zv9z7xQgpLMowVuBFQVu8/z7P5ASumyB
PUO3+0JVxSHBhlCKQK7n11m1fhuGt2fCxXhSU6LzXj36rsKRY53lGZ9QhvqFUtQH
3Xb2IQLIJC4UKjG2jSSCdcuA/x98bwp2v7O03rn7ndCS16CwXnRV3geQoNipRKMS
DajKPpZv1RiZm8pMKqEb8WSw352xWoOcxuffjlsOEwvJ85SEGCAZ9tmIlkZOc7Ai
QONDvii9b8AYhQ60RIQC0HP2ASSmK0V92VeFPxHmAygdDQgZNVtbVxgnnt7oTNEu
VRXNY+z4OfBArp7R+cTsvijDRZY4kML1n22hUybwoxUEvjqZV2+JASIEEAECAAwF
AkrvOlQFAwASdQAACgkQlxC4m8pXrXxrPAgArXiNgZirNuBhfNCXlkzkCHLx5wnV
e4SmTpbWzTwWw7+qk7d4l9hlWtdImISORINzo7f4ShSUzJX2GciNaXhaHRo7+y5O
Zbu82jQb09aQQj/nibKYuqxqUrobTEm+DuYz3JUQZm2PsPcHLS8mX9cxvrJUncPG
nXEV0DRaq71SGWDprtkvBbp6i38aY3sIhYgz8wM5m1szKDtjywmBYcFehIdozt9z
hm7wZshzRWQX1+Rf/pIsnk+OzBIa34crSemTnacbV/B7278z2XAyziPNFuqz0xu+
iltOmYmayfNWAmumuw9NcuwWMlth6Mc2HLrpo0ZBheJ6iuDMPsHnwqdB/4kBIgQQ
AQIADAUCSwBd2gUDABJ1AAAKCRCXELibyletfP6tB/4m1w0BtlkJgtS6E+B/ns14
z4A4PGors+n+MYm05qzvi+EnDF/sytCmVcKeimrtvDcfoDtKAFFvJjcYXfnJdGWm
Pu0SJMRL5KKCirAKwZmU/saxOgoB5QLNw+DHPteJ3w9GmWlGxIqG1r15WC5duzBC
y3FsnjJYG3jaLnHOO9yXXb5h0kUTORfUKdvAr1gxF2KoatZWqGoaPPnHoqb88rjt
zk8I7gDqoXnzh8wLxa0ZYvfTC/McxdWTrwXLft+krmMQ18iIZEne2hvVLNJVuluU
oiWLeHA8iNCQ4W4WTdLc1mCnCjGTMX/MN41uLH0C9Ka4R6wEaqj4lPDk1B/1TV+Q
iQEiBBABAgAMBQJLEYGrBQMAEnUAAAoJEJcQuJvKV618naIH/2t9aH5mBTKBN6fU
qhrf79vIsjtI/QNS5qisBISZMX3/1/0Gu6WnxkPSfdCUJMWCjMcnVj7KU2wxTHHG
VpAStd9r2afUNxRyqZwzwyytktuZok0XngAEDYDDBS3ssu2R4uWLCsC2ysXEqO/5
tI5YrTWJZrfeIphTaYP5hxrMujvqy3kEwKKbiMz91cDeiLS+YCBcalj5n/1dMYf7
8U8C6ieurxAg/L8h6x25VM4Ilx4MmG2T8QGtkkUXd+Fd/KYWmf0LE5LLPknf0Hhw
oVslPXeinp4FsHK/5wzviv4YZpzuTqs9NlKcMsa4IuuPOB0FDf0pn+OFQbEg9QwY
2gCozK+JASIEEAECAAwFAksjTdQFAwASdQAACgkQlxC4m8pXrXwlogf/XBGbXRVX
LMaRN4SczOjwT3/tUCriTkb3v+zKjRG90zFhYAccjn7w+7jKQicjq6quQG1EH2X4
/Su6ps1lDLqGHHhiJW3ZhxQScLZmhdAYsh2qG4GP/UW3QjXG7c61t+H3olvWg2cr
wqCxxFZAgkAAkr9xcHWFZJEQeXoob6cCZObaUnHSANdmC6s5lUxXYa2bmL7Q3UB4
4KCzDvAfbPZKJOw9k0qb3lc11zx+vGdyZFbm4R0+3LPp/vT0b3GlSbbF9lU1GOXh
VaphrgFFa76dmjfHCkPplXAkK1VSIU/aPGAefduTFMdlSZpdMtJ5AULjGcszBDlR
pLlPxvqVa0ZpgIkBIgQQAQIADAUCSycmkgUDABJ1AAAKCRCXELibyletfHlNCACp
1YespiHfQt2alcscE5zgfETEHHic8Ai6pNkU9HT4TeWcFHEDe5QqfYcpjLrQvBXS
kSvxEittbyRdv+e+j5Z+HyHjiG8nAQBL6qy9eHqQE4+d7gYs6DTk7sG9ZMYphREb
ltzD+F4hVCQdLT8LNr0eVFN7ehqECScDaCG8/Qyti+l/0M902/Yn+mz0ilOiUdWJ
9x6LPaIINtb1gsYDEylLjwGIZmI0r5Kh9wYoV4vnNezFbxO1uRiW0B7iaPjIEsbt
OOKp7wx2aX+DM3N9F3BtaIY8XnzcnomNm83SNsgmgrZljpQltUnNqIhNM8DupQ+I
WOV5gtl6pTC7CgeVTVyRiQEiBBABAgAMBQJLOGXuBQMAEnUAAAoJEJcQuJvKV618
ll4IAKJ9mm4jb0c8fe9+uDI8eCJRbzNbVXm8zWzpA8GUtQAakwxoKv332QP1Wa1P
odni/e3EMhsSREOZJJv79YqGxGRBTE9Kb/VjM34nas4XSnXKW28XWhKyIw+XwQAi
nY2swFHh+83Htr/mwTdJfS2aEYl2zboBvd/JZCdhOGU2GH737S/3uEczoKkfVQ/w
OTM8X1xWwlYWqx23k/DsGcuDs9lA2g7Mx7DSqBtVjaTkn9h0zATzXLDkmP4SAUVj
cZ83WDpFre5WnizZjdXlBMM5OCexp5WpmzyHLTnaBFK4jEmnsk5C2Rnoyp8Ivz6g
Ecg1tRbEXijRw++d2TFYlJwLKtiJASIEEAECAAwFAktKMicFAwASdQAACgkQlxC4
m8pXrXxqHQgAuYY5scKrh0m/GS9EYnyC9494lOlO6iytU0CpE6oBC31M3hfX/Dbj
UbcS5szZNU+2CPYo4ujQLZ7suN7+tTjG6pZFfMevajT9+jsL+NPMF8RLdLOVYmbl
TmSQGNO+XGEYaKYH5oZIeIW5AKCgi2ozkdFlBBLAx7Kqo/FyybhkURFEcvEyVmgf
3KLV7IIiX/fYLfoCMCJ/Lcm9/llSFB1n8Nvg66Xd533DKoHjueD3jyaNAVlo2mq/
sIAv++kntvOiB3GDK5pfwHZ78WWiCpsWZpE5gzAnzJ1Y0WEigRo0PVLu3cLO0jLG
23d+H/CbfZ8rkajHJeCDQF7YVmP0t0nYpYkBIgQQAQIADAUCS1v+ZgUDABJ1AAAK
CRCXELibyletfNS/CACqt2TkB86mjqM+cJ74+dWBvJ2aFuURuxzm95i9Q/W/hU08
2iMbC3+0k2oD8CrTOe61P+3oRyLjv/UEDUNzLncNe2YsA9JeV+4hvPwH5Vp3Om13
089fCKZUbqslXNKkHiWYU+zAaZJXEuGRmRz0HbQIeAMOWF4oa226uo1e4ws1Jhc+
F3E/ApCRyFBqBUdL05hapQLditYpsBjIdiBGpjzidMLE2wX2W4ZpAdN0U6BIyIqR
mTPjbSkvzS9kSWFmfhQgnBDKEYJpVZgE1sN52rYC1sDeGeiuKxlzjVov9MMhYMWa
Zo3R5o3F2iIM/BK6FbC252lf/Mhu3ICuXujNBZNYiQEiBBABAgAMBQJLbSH4BQMA
EnUAAAoJEJcQuJvKV618kd0IAJLLwDH6gvgAlBFklQJXqQxUdcSOOVMAWtlHgWOy
ozjgomZZBkRL8dtCDr9YBMcj5czcQ3qpmLJdppXhKB+kJV2iUXfDMSFXwJ4wLfIs
8FNnXw8H5U01oBkGH/Ku6ngL9Vwt+MjYHtCWkw9QueUKZnDudX9qIzLAIt+mwSTu
A6+fY4VWIg40AA0v3exaQM55YR/UhlKunpGG9o8Qkq77dMEbTMpOmBoLbOMRB3Dd
MAvVU6G2l6Pcb7KobVCuOBnb6batXARV/G8sw+nzfJ16fr/KobZT2A6m+Jrqk4dl
F14ljLbz16O5JGUPAryN2G2ddBdSAy7dtFSVhWWiWC9n88q5Ag0EPj6jHRAIAO/h
iX8WzHWOMLJT54x/axeDdqn1rBDf5cWmaCWHN2ujNNlgpx5emoU9v7QStsNUCOGB
bXkeO4Ar7YG+jtSR33zqNh3y5kQ0YkY3dQ0wh6nsl+wh4XIIY/3TUZVtmdJeUBRH
JlfVNFYad2hX1guFI37Ny1PoZAFsxO82g+XB/Se8r/+sbmVcONdcdIeFKrE3FjLt
IjNQcxC6l9Q2Oy8KDxG/zvUZG3+H5i3tdRMyGgmuD6gEV0GXOHYUopzLeit1+Aa0
bCk36Mwbu+BeOw/CJW3+b0mB27hOaf9aCA855IP6fJFvtxcblq8nHIqhU3Dc9tec
sl9/S1xZ5S8ylG/xeRsAAwUH/i8KqmvAhq0X7DgCcYputwh37cuZlHOa1Ep07JRm
BCDgkdQXkGrsj2Wzw7Aw/TGdWWkmn2pxb8BRui5cfcZFO7c6vryi6FpJuLucX975
+eVY50ndWkPXkJ1HF4i+HJwRqE2zliN/RHMs4LJcwXQvvjD43EE3AO6eiVFbD+qA
AdxUFoOeLblKNBHPG7DPG9xL+Ni5rkE+TXShxsB7F0z7ZdJJZOG0JODmox7IstQT
GoaU9u41oyZTIiXPiFidJoIZCh7fdurP8pn3X+R5HUNXMr7M+ba8lSNxce/F3kmH
0L7rsKqdh9d/aVxhJINJ+inVDnrXWVoXu9GBjT8Nco1iU9SIVAQYEQIADAUCTnc9
7QUJE/sBuAASB2VHUEcAAQEJEIxxjTtQcuH1FJsAmwWK9vmwRJ/y9gTnJ8PWf0BV
roUTAKClYAhZuX2nUNwH4vlEJQHDqYa5yQ==
=ghXk
-----END PGP PUBLIC KEY BLOCK-----
To import the build key into your personal public GPG keyring,
use gpg --import. For example, if you have
saved the key in a file named
mysql_pubkey.asc, the import command looks
like this:
shell> gpg --import mysql_pubkey.asc
gpg: key 5072E1F5: public key "MySQL Release Engineering
<mysql-build@oss.oracle.com>" imported
gpg: Total number processed: 1
gpg:               imported: 1
gpg: no ultimately trusted keys found
You can also download the key from the public keyserver using
the public key id, 5072E1F5:
shell> gpg --recv-keys 5072E1F5
gpg: requesting key 5072E1F5 from hkp server keys.gnupg.net
gpg: key 5072E1F5: "MySQL Release Engineering <mysql-build@oss.oracle.com>"
1 new user ID
gpg: key 5072E1F5: "MySQL Release Engineering <mysql-build@oss.oracle.com>"
53 new signatures
gpg: no ultimately trusted keys found
gpg: Total number processed: 1
gpg:           new user IDs: 1
gpg:         new signatures: 53
If you want to import the key into your RPM configuration to validate RPM install packages, you should be able to import the key directly:
shell> rpm --import mysql_pubkey.asc
If you experience problems or require RPM specific information, see Section 2.1.3.4, “Signature Checking Using RPM”.
After you have downloaded and imported the public build key,
download your desired MySQL package and the corresponding
signature, which also is available from the download page. The
signature file has the same name as the distribution file with
an .asc extension, as shown by the examples
in the following table.
Table 2.1 MySQL Package and Signature Files for Source files
| File Type | File Name |
|---|---|
| Distribution file | mysql-standard-5.7.29-linux-i686.tar.gz |
| Signature file | mysql-standard-5.7.29-linux-i686.tar.gz.asc |
Make sure that both files are stored in the same directory and then run the following command to verify the signature for the distribution file:
shell> gpg --verify package_name.asc
If the downloaded package is valid, you will see a "Good signature" similar to:
shell> gpg --verify mysql-standard-5.7.29-linux-i686.tar.gz.asc
gpg: Signature made Tue 01 Feb 2011 02:38:30 AM CST using DSA key ID 5072E1F5
gpg: Good signature from "MySQL Release Engineering <mysql-build@oss.oracle.com>"
The Good signature message indicates that the
file signature is valid, when compared to the signature listed
on our site. But you might also see warnings, like so:
shell> gpg --verify mysql-standard-5.7.29-linux-i686.tar.gz.asc
gpg: Signature made Wed 23 Jan 2013 02:25:45 AM PST using DSA key ID 5072E1F5
gpg: checking the trustdb
gpg: no ultimately trusted keys found
gpg: Good signature from "MySQL Release Engineering <mysql-build@oss.oracle.com>"
gpg: WARNING: This key is not certified with a trusted signature!
gpg:          There is no indication that the signature belongs to the owner.
Primary key fingerprint: A4A9 4068 76FC BD3C 4567  70C8 8C71 8D3B 5072 E1F5
That is normal, as they depend on your setup and configuration. Here are explanations for these warnings:
gpg: no ultimately trusted keys found: This means that the specific key is not "ultimately trusted" by you or your web of trust, which is okay for the purposes of verifying file signatures.
WARNING: This key is not certified with a trusted signature! There is no indication that the signature belongs to the owner.: This refers to your level of trust in your belief that you possess our real public key. This is a personal decision. Ideally, a MySQL developer would hand you the key in person, but more commonly, you downloaded it. Was the download tampered with? Probably not, but this decision is up to you. Setting up a web of trust is one method for trusting them.
See the GPG documentation for more information on how to work with public keys.
The Section 2.1.3.2, “Signature Checking Using GnuPG” section describes
how to verify MySQL downloads using GPG. That guide also applies
to Microsoft Windows, but another option is to use a GUI tool
like Gpg4win. You
may use a different tool but our examples are based on Gpg4win,
and utilize its bundled Kleopatra GUI.
Download and install Gpg4win, and then load Kleopatra. The dialog should look similar to:

Next, add the MySQL Release Engineering certificate. Do this by clicking , . Type "Mysql Release Engineering" into the search box and press .
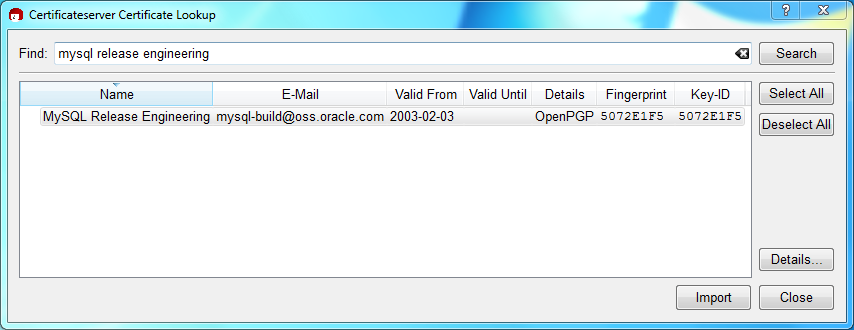
Select the "MySQL Release Engineering" certificate. The Fingerprint and Key-ID must be "5072E1F5", or choose to confirm the certificate is valid. Now, import it by clicking . An import dialog will be displayed, choose , and this certificate will now be listed under the Imported Certificates tab.
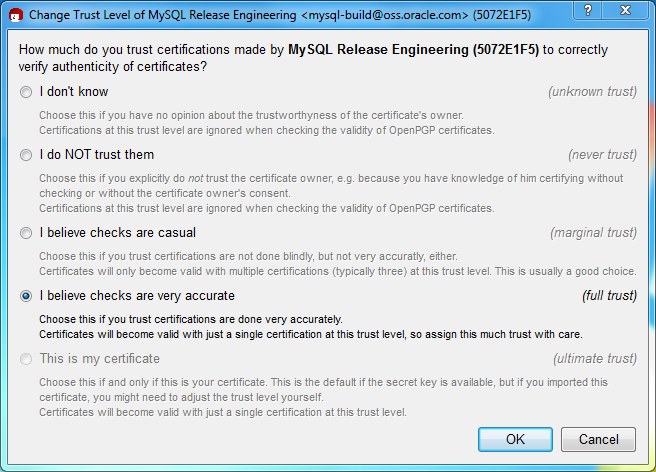
Next, configure the trust level for our certificate. Select our certificate, then from the main menu select , . We suggest choosing I believe checks are very accurate for our certificate, as otherwise you might not be able to verify our signature. Select I believe checks are very accurate to enable "full trust" and then press .
Next, verify the downloaded MySQL package file. This requires
files for both the packaged file, and the signature. The
signature file must have the same name as the packaged file but
with an appended .asc extension, as shown
by the example in the following table. The signature is linked
to on the downloads page for each MySQL product. You must create
the .asc file with this signature.
Table 2.2 MySQL Package and Signature Files for MySQL Installer for Microsoft Windows
| File Type | File Name |
|---|---|
| Distribution file | mysql-installer-community-5.7.29.msi |
| Signature file | mysql-installer-community-5.7.29.msi.asc |
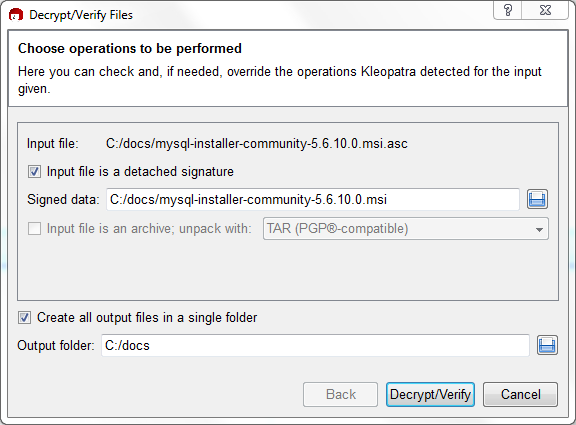
Make sure that both files are stored in the same directory and
then run the following command to verify the signature for the
distribution file. Either drag and drop the signature
(.asc) file into Kleopatra, or load the
dialog from , , and then choose either the
.msi or .asc file.
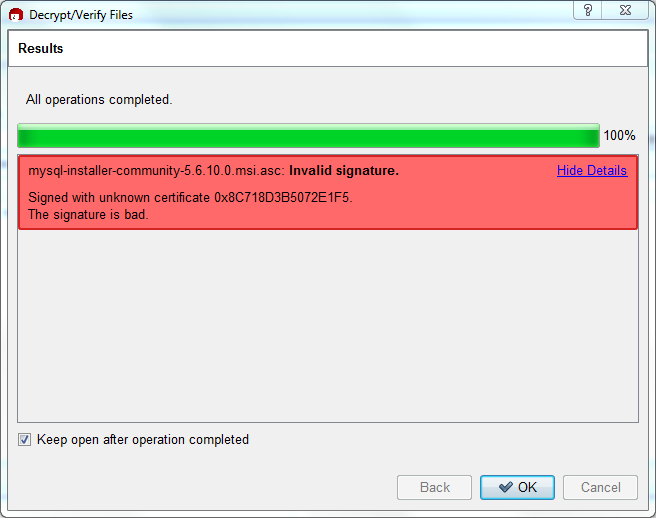
Click to check the file. The two most common results will look like the following, and although the yellow warning looks problematic, the following means that the file check passed with success. You may now run this installer.
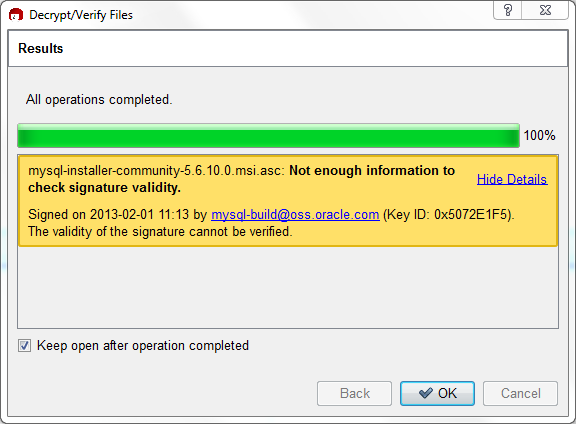
Seeing a red "The signature is bad" error means the file is invalid. Do not execute the MSI file if you see this error.
The Section 2.1.3.2, “Signature Checking Using GnuPG” section explains
why you probably don't see a green Good
signature result.
For RPM packages, there is no separate signature. RPM packages have a built-in GPG signature and MD5 checksum. You can verify a package by running the following command:
shell> rpm --checksig package_name.rpm
Example:
shell> rpm --checksig MySQL-server-5.7.29-0.linux_glibc2.5.i386.rpm
MySQL-server-5.7.29-0.linux_glibc2.5.i386.rpm: md5 gpg OK
If you are using RPM 4.1 and it complains about (GPG)
NOT OK (MISSING KEYS: GPG#5072e1f5), even though you
have imported the MySQL public build key into your own GPG
keyring, you need to import the key into the RPM keyring
first. RPM 4.1 no longer uses your personal GPG keyring (or
GPG itself). Rather, RPM maintains a separate keyring because
it is a system-wide application and a user's GPG public
keyring is a user-specific file. To import the MySQL public
key into the RPM keyring, first obtain the key, then use
rpm --import to import the key. For
example:
shell> gpg --export -a 5072e1f5 > 5072e1f5.asc
shell> rpm --import 5072e1f5.asc
Alternatively, rpm also supports loading the key directly from a URL, and you can use this manual page:
shell> rpm --import https://dev.mysql.com/doc/refman/5.7/en/checking-gpg-signature.html
If you need to obtain the MySQL public key, see Section 2.1.3.2, “Signature Checking Using GnuPG”.
The installation layout differs for different installation types (for example, native packages, binary tarballs, and source tarballs), which can lead to confusion when managing different systems or using different installation sources. The individual layouts are given in the corresponding installation type or platform chapter, as described following. Note that the layout of installations from vendors other than Oracle may differ from these layouts.
In some cases, the compiler used to build MySQL affects the features available for use. The notes in this section apply for binary distributions provided by Oracle Corporation or that you compile yourself from source.
icc (Intel C++ Compiler) Builds
A server built with icc has these characteristics:
SSL support is not included.
Oracle provides a set of binary distributions of MySQL. These
include generic binary distributions in the form of compressed
tar files (files with a
.tar.gz extension) for a number of platforms,
and binaries in platform-specific package formats for selected
platforms.
This section covers the installation of MySQL from a compressed tar file binary distribution on Unix/Linux platforms. For other platform-specific binary package formats, see the other platform-specific sections in this manual. For example, for Windows distributions, see Section 2.3, “Installing MySQL on Microsoft Windows”. See Section 2.1.2, “How to Get MySQL” on how to obtain MySQL in different distribution formats.
MySQL compressed tar file binary distributions
have names of the form
mysql-,
where VERSION-OS.tar.gzVERSION5.7.29), and
OS indicates the type of operating system
for which the distribution is intended (for example,
pc-linux-i686 or winx64).
If you have previously installed MySQL using your operating system native package management system, such as Yum or APT, you may experience problems installing using a native binary. Make sure your previous MySQL installation has been removed entirely (using your package management system), and that any additional files, such as old versions of your data files, have also been removed. You should also check for configuration files such as
/etc/my.cnfor the/etc/mysqldirectory and delete them.For information about replacing third-party packages with official MySQL packages, see the related APT guide or Yum guide.
MySQL has a dependency on the
libaiolibrary. Data directory initialization and subsequent server startup steps will fail if this library is not installed locally. If necessary, install it using the appropriate package manager. For example, on Yum-based systems:shell>
yum search libaio# search for info shell>yum install libaio# install libraryOr, on APT-based systems:
shell>
apt-cache search libaio# search for info shell>apt-get install libaio1# install libraryFor MySQL 5.7.19 and later: Support for Non-Uniform Memory Access (NUMA) has been added to the generic Linux build, which has a dependency now on the
libnumalibrary; if the library has not been installed on your system, use you system's package manager to search for and install it (see the preceding item for some sample commands).SLES 11: As of MySQL 5.7.19, the Linux Generic tarball package format is EL6 instead of EL5. As a side effect, the MySQL client bin/mysql needs
libtinfo.so.5.A workaround is to create a symlink, such as ln -s libncurses.so.5.6 /lib64/libtinfo.so.5 on 64-bit systems or ln -s libncurses.so.5.6 /lib/libtinfo.so.5 on 32-bit systems.
To install a compressed tar file binary
distribution, unpack it at the installation location you choose
(typically /usr/local/mysql). This creates the
directories shown in the following table.
Table 2.3 MySQL Installation Layout for Generic Unix/Linux Binary Package
| Directory | Contents of Directory |
|---|---|
bin |
mysqld server, client and utility programs |
docs |
MySQL manual in Info format |
man |
Unix manual pages |
include |
Include (header) files |
lib |
Libraries |
share |
Error messages, dictionary, and SQL for database installation |
support-files |
Miscellaneous support files |
Debug versions of the mysqld binary are available as mysqld-debug. To compile your own debug version of MySQL from a source distribution, use the appropriate configuration options to enable debugging support. See Section 2.9, “Installing MySQL from Source”.
To install and use a MySQL binary distribution, the command sequence looks like this:
shell>groupadd mysqlshell>useradd -r -g mysql -s /bin/false mysqlshell>cd /usr/localshell>tar zxvfshell>/path/to/mysql-VERSION-OS.tar.gzln -sshell>full-path-to-mysql-VERSION-OSmysqlcd mysqlshell>mkdir mysql-filesshell>chown mysql:mysql mysql-filesshell>chmod 750 mysql-filesshell>bin/mysqld --initialize --user=mysqlshell>bin/mysql_ssl_rsa_setupshell>bin/mysqld_safe --user=mysql &# Next command is optional shell>cp support-files/mysql.server /etc/init.d/mysql.server
This procedure assumes that you have root
(administrator) access to your system. Alternatively, you can
prefix each command using the sudo (Linux) or
pfexec (Solaris) command.
The mysql-files directory provides a convenient
location to use as the value for the
secure_file_priv system variable, which limits
import and export operations to a specific directory. See
Section 5.1.7, “Server System Variables”.
A more detailed version of the preceding description for installing a binary distribution follows.
Create a mysql User and Group
If your system does not already have a user and group to use for
running mysqld, you may need to create them. The
following commands add the mysql group and the
mysql user. You might want to call the user and
group something else instead of mysql. If so,
substitute the appropriate name in the following instructions. The
syntax for useradd and
groupadd may differ slightly on different
versions of Unix/Linux, or they may have different names such as
adduser and addgroup.
shell>groupadd mysqlshell>useradd -r -g mysql -s /bin/false mysql
Because the user is required only for ownership purposes, not
login purposes, the useradd command uses the
-r and -s /bin/false options to
create a user that does not have login permissions to your server
host. Omit these options if your useradd does
not support them.
Obtain and Unpack the Distribution
Pick the directory under which you want to unpack the distribution
and change location into it. The example here unpacks the
distribution under /usr/local. The
instructions, therefore, assume that you have permission to create
files and directories in /usr/local. If that
directory is protected, you must perform the installation as
root.
shell> cd /usr/local
Obtain a distribution file using the instructions in Section 2.1.2, “How to Get MySQL”. For a given release, binary distributions for all platforms are built from the same MySQL source distribution.
Unpack the distribution, which creates the installation directory.
tar can uncompress and unpack the distribution if
it has z option support:
shell> tar zxvf /path/to/mysql-VERSION-OS.tar.gz
The tar command creates a directory named
mysql-.
VERSION-OS
To install MySQL from a compressed tar file
binary distribution, your system must have GNU
gunzip to uncompress the distribution and a
reasonable tar to unpack it. If your
tar program supports the z
option, it can both uncompress and unpack the file.
GNU tar is known to work. The standard
tar provided with some operating systems is not
able to unpack the long file names in the MySQL distribution. You
should download and install GNU tar, or if
available, use a preinstalled version of GNU tar. Usually this is
available as gnutar, gtar, or
as tar within a GNU or Free Software directory,
such as /usr/sfw/bin or
/usr/local/bin. GNU tar is
available from http://www.gnu.org/software/tar/.
If your tar does not have z
option support, use gunzip to unpack the
distribution and tar to unpack it. Replace the
preceding tar command with the following
alternative command to uncompress and extract the distribution:
shell> gunzip < /path/to/mysql-VERSION-OS.tar.gz | tar xvf -
Next, create a symbolic link to the installation directory created by tar:
shell> ln -s full-path-to-mysql-VERSION-OS mysql
The ln command makes a symbolic link to the
installation directory. This enables you to refer more easily to it
as /usr/local/mysql. To avoid having to type
the path name of client programs always when you are working with
MySQL, you can add the /usr/local/mysql/bin
directory to your PATH variable:
shell> export PATH=$PATH:/usr/local/mysql/bin
Perform Postinstallation Setup
The remainder of the installation process involves setting distribution ownership and access permissions, initializing the data directory, starting the MySQL server, and setting up the configuration file. For instructions, see Section 2.10, “Postinstallation Setup and Testing”.
- 2.3.1 MySQL Installation Layout on Microsoft Windows
- 2.3.2 Choosing an Installation Package
- 2.3.3 MySQL Installer for Windows
- 2.3.4 Installing MySQL on Microsoft Windows Using a
noinstallZIP Archive - 2.3.5 Troubleshooting a Microsoft Windows MySQL Server Installation
- 2.3.6 Windows Postinstallation Procedures
- 2.3.7 Windows Platform Restrictions
MySQL Community 5.7 Server requires the Microsoft Visual C++ 2013 Redistributable Package to run on Windows platforms. Users should make sure the package has been installed on the system before installing the server. The package is available at the Microsoft Download Center.
MySQL is available for Microsoft Windows, for both 32-bit and 64-bit versions. For supported Windows platform information, see https://www.mysql.com/support/supportedplatforms/database.html.
If your operating system is Windows 2008 R2 or Windows 7 and you do not have Service Pack 1 (SP1) installed, MySQL 5.7 will regularly restart and in the MySQL server error log file you will see this message:
mysqld got exception 0xc000001d
This error message occurs because you are also using a CPU that does not support the VPSRLQ instruction and indicates that the CPU instruction that was attempted is not supported.
To fix this error, you must install SP1. This adds the required operating system support for the CPU capability detection and disables that support when the CPU does not have the required instructions.
Alternatively, install an older version of MySQL, such as 5.6.
There are different methods to install MySQL on Microsoft Windows.
MySQL Installer Method
The simplest and recommended method is to download MySQL Installer (for Windows) and let it install and configure all of the MySQL products on your system. Here is how:
Download MySQL Installer from https://dev.mysql.com/downloads/installer/ and execute it.
NoteUnlike the standard MySQL Installer, the smaller "web-community" version does not bundle any MySQL applications but it will download the MySQL products you choose to install.
Choose the appropriate Setup Type for your system. Typically you will choose Developer Default to install MySQL server and other MySQL tools related to MySQL development, helpful tools like MySQL Workbench. Or, choose the Custom setup type to manually select your desired MySQL products.
NoteMultiple versions of MySQL server can exist on a single system. You can choose one or multiple versions.
Complete the installation process by following the instructions. This will install several MySQL products and start the MySQL server.
MySQL is now installed. If you configured MySQL as a service, then Windows will automatically start MySQL server every time you restart your system.
You probably also installed other helpful MySQL products like MySQL Workbench and MySQL Notifier on your system. Consider loading Chapter 30, MySQL Workbench to check your new MySQL server connection, and MySQL Notifier Overview to view the connection's status. By default, these two programs automatically start after installing MySQL.
This process also installs the MySQL Installer application on your system, and later you can use MySQL Installer to upgrade or reconfigure your MySQL products.
Additional Installation Information
It is possible to run MySQL as a standard application or as a Windows service. By using a service, you can monitor and control the operation of the server through the standard Windows service management tools. For more information, see Section 2.3.4.8, “Starting MySQL as a Windows Service”.
Generally, you should install MySQL on Windows using an account that
has administrator rights. Otherwise, you may encounter problems with
certain operations such as editing the PATH
environment variable or accessing the Service Control
Manager. When installed, MySQL does not need to be
executed using a user with Administrator privileges.
For a list of limitations on the use of MySQL on the Windows platform, see Section 2.3.7, “Windows Platform Restrictions”.
In addition to the MySQL Server package, you may need or want additional components to use MySQL with your application or development environment. These include, but are not limited to:
To connect to the MySQL server using ODBC, you must have a Connector/ODBC driver. For more information, including installation and configuration instructions, see MySQL Connector/ODBC Developer Guide.
NoteMySQL Installer will install and configure Connector/ODBC for you.
To use MySQL server with .NET applications, you must have the Connector/NET driver. For more information, including installation and configuration instructions, see MySQL Connector/NET Developer Guide.
NoteMySQL Installer will install and configure MySQL Connector/NET for you.
MySQL distributions for Windows can be downloaded from https://dev.mysql.com/downloads/. See Section 2.1.2, “How to Get MySQL”.
MySQL for Windows is available in several distribution formats, detailed here. Generally speaking, you should use MySQL Installer. It contains more features and MySQL products than the older MSI, is simpler to use than the compressed file, and you need no additional tools to get MySQL up and running. MySQL Installer automatically installs MySQL Server and additional MySQL products, creates an options file, starts the server, and enables you to create default user accounts. For more information on choosing a package, see Section 2.3.2, “Choosing an Installation Package”.
A MySQL Installer distribution includes MySQL Server and additional MySQL products including MySQL Workbench, MySQL Notifier, and MySQL for Excel. MySQL Installer can also be used to upgrade these products in the future.
For instructions on installing MySQL using MySQL Installer, see Section 2.3.3, “MySQL Installer for Windows”.
The standard binary distribution (packaged as a compressed file) contains all of the necessary files that you unpack into your chosen location. This package contains all of the files in the full Windows MSI Installer package, but does not include an installation program.
For instructions on installing MySQL using the compressed file, see Section 2.3.4, “Installing MySQL on Microsoft Windows Using a
noinstallZIP Archive”.The source distribution format contains all the code and support files for building the executables using the Visual Studio compiler system.
For instructions on building MySQL from source on Windows, see Section 2.9, “Installing MySQL from Source”.
MySQL on Windows Considerations
Large Table Support
If you need tables with a size larger than 4 GB, install MySQL on an NTFS or newer file system. Do not forget to use
MAX_ROWSandAVG_ROW_LENGTHwhen you create tables. See Section 13.1.18, “CREATE TABLE Syntax”.NoteInnoDB tablespace files cannot exceed 4 GB on Windows 32-bit systems.
MySQL and Virus Checking Software
Virus-scanning software such as Norton/Symantec Anti-Virus on directories containing MySQL data and temporary tables can cause issues, both in terms of the performance of MySQL and the virus-scanning software misidentifying the contents of the files as containing spam. This is due to the fingerprinting mechanism used by the virus-scanning software, and the way in which MySQL rapidly updates different files, which may be identified as a potential security risk.
After installing MySQL Server, it is recommended that you disable virus scanning on the main directory (
datadir) used to store your MySQL table data. There is usually a system built into the virus-scanning software to enable specific directories to be ignored.In addition, by default, MySQL creates temporary files in the standard Windows temporary directory. To prevent the temporary files also being scanned, configure a separate temporary directory for MySQL temporary files and add this directory to the virus scanning exclusion list. To do this, add a configuration option for the
tmpdirparameter to yourmy.iniconfiguration file. For more information, see Section 2.3.4.2, “Creating an Option File”.Running MySQL on a 4K Sector Hard Drive
Running the MySQL server on a 4K sector hard drive on Windows is not supported with
innodb_flush_method=async_unbuffered, which is the default setting. The workaround is to useinnodb_flush_method=normal.
For MySQL 5.7 on Windows, the default installation
directory is C:\Program Files\MySQL\MySQL Server
5.7 for installations performed with MySQL Installer.
If you use the ZIP archive method to install MySQL, you may prefer
to install in C:\mysql. However, the layout
of the subdirectories remains the same.
All of the files are located within this parent directory, using the structure shown in the following table.
Table 2.4 Default MySQL Installation Layout for Microsoft Windows
| Directory | Contents of Directory | Notes |
|---|---|---|
bin |
mysqld server, client and utility programs | |
%PROGRAMDATA%\MySQL\MySQL Server 5.7\ |
Log files, databases | The Windows system variable %PROGRAMDATA% defaults to
C:\ProgramData. |
docs |
Release documentation | With MySQL Installer, use the Modify operation to select this
optional folder. |
include |
Include (header) files | |
lib |
Libraries | |
share |
Miscellaneous support files, including error messages, character set files, sample configuration files, SQL for database installation |
For MySQL 5.7, there are multiple installation package formats to choose from when installing MySQL on Windows. The package formats described in this section are:
Program Database (PDB) files (with file name extension
pdb) provide information for debugging your
MySQL installation in the event of a problem. These files are
included in ZIP Archive distributions (but not MSI distributions)
of MySQL.
This package has a file name similar to
mysql-installer-community-5.7.29.0.msi
or
mysql-installer-commercial-5.7.29.0.msi,
and utilizes MSIs to automatically install MySQL server and
other products. MySQL Installer will download and apply updates to itself,
and for each of the installed products. It also configures the
installed MySQL server (including a sandbox InnoDB cluster test
setup) and MySQL Router. MySQL Installer is recommended for most users.
MySQL Installer can install and manage (add, modify, upgrade, and remove) many other MySQL products, including:
Applications – MySQL Workbench, MySQL for Visual Studio, MySQL Notifier, MySQL for Excel, MySQL Utilities, MySQL Shell, MySQL Router
Connectors – MySQL Connector/C, MySQL Connector/C++, MySQL Connector/NET, Connector/ODBC, MySQL Connector/Python, MySQL Connector/J, MySQL Connector/Node.js
Documentation – MySQL Manual (PDF format), samples and examples
MySQL Installer operates on all MySQL supported versions of Windows (see https://www.mysql.com/support/supportedplatforms/database.html).
Because MySQL Installer is not a native component of Microsoft Windows and depends on .NET, it will not work on minimal installation options like the Server Core version of Windows Server.
For instructions on how to install MySQL using MySQL Installer, see Section 2.3.3, “MySQL Installer for Windows”.
These packages contain the files found in the complete MySQL Server installation package, with the exception of the GUI. This format does not include an automated installer, and must be manually installed and configured.
The noinstall ZIP archives are split into two
separate compressed files. The main package is named
mysql-
for 64-bit and
VERSION-winx64.zipmysql-
for 32-bit. This contains the components needed to use MySQL on
your system. The optional MySQL test suite, MySQL benchmark
suite, and debugging binaries/information components (including
PDB files) are in a separate compressed file named
VERSION-win32.zipmysql-
for 64-bit and
VERSION-winx64-debug-test.zipmysql-
for 32-bit.
VERSION-win32-debug-test.zip
If you choose to install a noinstall ZIP
archive, see Section 2.3.4, “Installing MySQL on Microsoft Windows Using a
noinstall ZIP Archive”.
For information on using the MySQL Docker images provided by Oracle on Windows platform, see Section 2.5.7.3, “Deploying MySQL on Windows and Other Non-Linux Platforms with Docker”.
The MySQL Docker images provided by Oracle are built specifically for Linux platforms. Other platforms are not supported, and users running the MySQL Docker images from Oracle on them are doing so at their own risk.
MySQL Installer is a standalone application designed to ease the complexity of installing and configuring MySQL products that run on Microsoft Windows. It supports the following MySQL products:
MySQL Servers
MySQL Installer can install and manage multiple, separate MySQL server instances on the same host at the same time. For example, MySQL Installer can install, configure, and upgrade a separate instance of MySQL 5.6, MySQL 5.7, and MySQL 8.0 on the same host. MySQL Installer does not permit server upgrades between major and minor version numbers, but does permit upgrades within a release series (such as 5.7.18 to 5.7.19).
NoteMySQL Installer cannot install both Community and Commercial (Standard Edition and Enterprise Edition) releases of MySQL server on the same host. If you require both releases on the same host, consider using the ZIP archive distribution to install one of the releases.
MySQL Applications
MySQL Workbench, MySQL Shell, MySQL Router, MySQL for Visual Studio, MySQL for Excel, MySQL Notifier, and MySQL Utilities.
MySQL Connectors
MySQL Connector/NET, MySQL Connector/Python, MySQL Connector/ODBC, MySQL Connector/J, MySQL Connector/C, and MySQL Connector/C++.
NoteTo install MySQL Connector/Node.js, see https://dev.mysql.com/downloads/connector/nodejs/. Connector/Node.js does not provide an
.msifile for use with MySQL Installer.Documentation and Samples
MySQL Reference Manuals (by version) in PDF format and MySQL database samples (by version).
Installation Requirements
MySQL Installer requires Microsoft .NET Framework 4.5.2 or later. If this version is not installed on the host computer, you can download it by visiting the Microsoft website.
MySQL Installer Community Release
Download software from https://dev.mysql.com/downloads/installer/ to install the Community release of all MySQL products for Windows. Select one of the following MySQL Installer package options:
Web: Contains MySQL Installer and configuration files only. The web package downloads only the MySQL products you select to install, but it requires an internet connection for each download. The size of this file is approximately 2 MB; the name of the file has the form
mysql-installer-community-whereweb-VERSION.N.msiVERSIONis the MySQL server version number such as 8.0 andNis the package number, which begins at 0.Full or Current Bundle: Bundles all of the MySQL products for Windows (including the MySQL server). The file size is over 300 MB, and the name has the form
mysql-installer-community-whereVERSION.N.msiVERSIONis the MySQL Server version number such as 8.0 andNis the package number, which begins at 0.
MySQL Installer Commercial Release
Download software from https://edelivery.oracle.com/ to install the Commercial (Standard Edition or Enterprise Edition) release of MySQL products for Windows. The Commercial release includes all of the current and previous GA versions in the Community release (excludes development-milestone versions) and also includes the following products:
Workbench SE/EE
MySQL Enterprise Backup
MySQL Enterprise Firewall
The Commercial release integrates with your My Oracle Support (MOS) account. For knowledge-base content and patches, see My Oracle Support.
When you download MySQL Installer for the first time, a setup wizard guides you through the initial installation of MySQL products. As the following figure shows, the initial setup is a one-time activity in the overall process. MySQL Installer detects existing MySQL products installed on the host during its initial setup and adds them to the list of products to be managed.
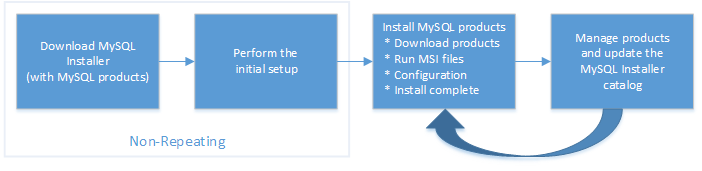
MySQL Installer extracts configuration files (described later) to the hard drive of the host during the initial setup. Although MySQL Installer is a 32-bit application, it can install both 32-bit and 64-bit binaries.
The initial setup adds a link to the Start menu under the group. Click , , , to open MySQL Installer.
During the initial setup, you are prompted to select the MySQL products to be installed on the host. One alternative is to use a predetermined setup type that matches your setup requirements. By default, both GA and pre-release products are included in the download and installation with the Developer Default, Client only, and Full setup types. Select the Only install GA products option to restrict the product set to include GA products only when using these setup types.
Choosing one of the following setup types determines the initial installation only and does not limit your ability to install or update MySQL products for Windows later:
Developer Default: Install the following products that compliment application development with MySQL:
MySQL Server (Installs the version that you selected when you downloaded MySQL Installer.)
MySQL Connectors (.NET / Python / ODBC / Java / C / C++)
MySQL Utilities
MySQL Documentation
MySQL Samples and Examples
Server only: Only install the MySQL server. This setup type installs the general availability (GA) or development release server that you selected when you downloaded MySQL Installer. It uses the default installation and data paths.
Client only: Only install the most recent MySQL applications and MySQL connectors. This setup type is similar to the
Developer Defaulttype, except that it does not include MySQL server or the client programs typically bundled with the server, such as mysql or mysqladmin.Full: Install all available MySQL products.
Custom The custom setup type enables you to filter and select individual MySQL products from the MySQL Installer catalog.
Use the
Customsetup type to install:A product or product version that is not available from the usual download locations. The catalog contains all product releases, including the other releases between pre-release (or development) and GA.
An instance of MySQL server using an alternative installation path, data path, or both. For instructions on how to adjust the paths, see Section 2.3.3.2, “Setting Alternative Server Paths with MySQL Installer”.
Two or more MySQL server versions on the same host at the same time (for example, 5.6, 5.7, and 8.0).
A specific combination of products and features not offered as a predetermine setup type. For example, you can install a single product, such as MySQL Workbench, instead of installing all client applications for Windows.
When the default installation or data folder (required by MySQL server) for a product to be installed already exists on the host, the wizard displays the Path Conflict step to identify each conflict and enable you to take action to avoid having files in the existing folder overwritten by the new installation. You see this step in the initial setup only when MySQL Installer detects a conflict.
To resolve the path conflict, do one of the following:
Select a product from the list to display the conflict options. A warning symbol indicates which path is in conflict. Use the browse button to choose a new path and then click .
Click to choose a different setup type or product version, if applicable. The
Customsetup type enables you to select individual product versions.Click to ignore the conflict and overwrite files in the existing folder.
Delete the existing product. Click to stop the initial setup and close MySQL Installer. Open MySQL Installer again from the Start menu and delete the installed product from the host using the Delete operation from the dashboard.
MySQL Installer uses entries in the package-rules.xml
file to determine whether the prerequisite software for each
product is installed on the host. When the requirements check
fails, MySQL Installer displays the Check Requirements
step to help you update the host. The following figure
identifies and describes the key areas of this step.
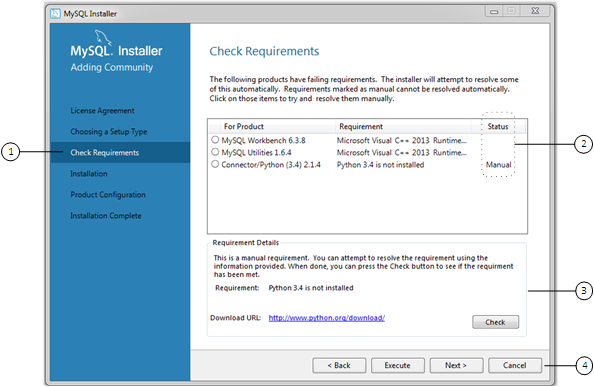
Description of Check Requirements Elements
Shows the current step in the initial setup. Steps in this list may change slightly depending on the products already installed on the host, the availability of prerequisite software, and the products to be installed on the host.
Lists all pending installation requirements by product and indicates the status as follows:
A blank space in the Status column means that MySQL Installer can attempt to download and install the required software for you.
The word Manual in the Status column means that you must satisfy the requirement manually. Select each product in the list to see its requirement details.
Describes the requirement in detail to assist you with each manual resolution. When possible, a download URL is provided. After you download and install the required software, click to verify that the requirement has been met.
Provides the following set operations to proceed:
– Return to the previous step. This action enables you to select a different the setup type.
– Have MySQL Installer attempt to download and install the required software for all items without a manual status. Manual requirements are resolved by you and verified by clicking .
– Do not execute the request to apply the requirements automatically and proceed to the installation without including the products that fail the check requirements step.
– Stop the installation of MySQL products. Because MySQL Installer is already installed, the initial setup begins again when you open MySQL Installer from the Start menu and click from the dashboard. For a description of the available management operations, see Product Catalog.
All MySQL Installer files are located within the C:\Program Files
(x86) and C:\ProgramData
folders. The following table describes the files and folders
that define MySQL Installer as a standalone application.
Installed MySQL products are neither altered nor removed when you update or uninstall MySQL Installer.
Table 2.5 MySQL Installer Configuration Files
| File or Folder | Description | Folder Hierarchy |
|---|---|---|
MySQL Installer for Windows |
This folder contains all of the files needed to run MySQL Installer and MySQLInstallerConsole.exe, a command-line program with similar functionality. | C:\Program Files (x86) |
Templates |
The Templates folder has one file for each version
of MySQL server. Template files contain keys and formulas
to calculate some values dynamically. |
C:\ProgramData\MySQL\MySQL Installer for
Windows\Manifest |
package-rules.xml |
This file contains the prerequisites for every product to be installed. |
C:\ProgramData\MySQL\MySQL Installer for
Windows\Manifest |
produts.xml |
The |
C:\ProgramData\MySQL\MySQL Installer for
Windows\Manifest |
Product Cache |
The |
C:\ProgramData\MySQL\MySQL Installer for Windows |
You can change the default installation path, the data path, or both when you install MySQL server. After you have installed the server, the paths cannot be altered without removing and reinstalling the server instance.
To change paths for MySQL server
Identify the MySQL server to change and display the Advanced Options link.
Navigate to the Select Products and Features step by doing one of the following:
If this is an initial setup of MySQL Installer, select the
Customsetup type and click .If MySQL Installer is installed already, launch it from the Start menu and then click from the dashboard.
Click to apply a filter on the product list shown in Available Products (see Locating Products to Install.
With the server instance selected, use the arrow to move the selected server to the Products/Features To Be Installed list.
Click the server to select it. When you select the server, the Advanced Options link appears. For details, see the figure that follows.
Click Advanced Options to open a dialog box where you can enter alternative path names. After the path names are validated, click to continue with the configuration steps.
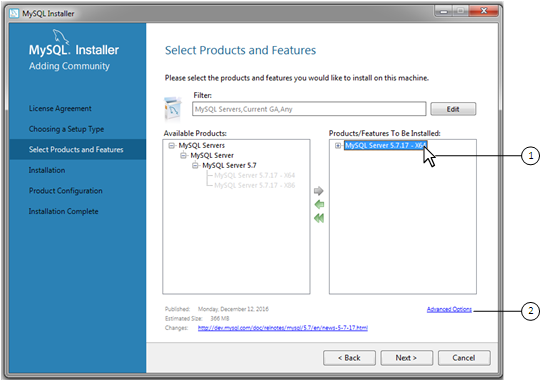
MySQL Installer provides a wizard-like tool to install and configure new MySQL products for Windows. Unlike the initial setup, which runs only once, MySQL Installer invokes the wizard each time you download or install a new product. For first-time installations, the steps of the initial setup proceed directly into the steps of the installation. For assistance with product selection, see Locating Products to Install.
Full permissions are granted to the user executing MySQL Installer to all
generated files, such as my.ini. This does
not apply to files and directories for specific products, such
as the MySQL server data directory in
%ProgramData% that is owned by
SYSTEM.
Products installed and configured on a host follow a general pattern that might require your input during the various steps. If you attempt to install a product that is incompatible with the existing MySQL server version (or a version selected for upgrade), you are alerted about the possible mismatch.
MySQL Installer loads all selected products together using the following workflow:
Product download. If you installed the full (not web) MySQL Installer package, all
.msifiles were loaded to theProduct Cachefolder during the initial setup and are not downloaded again. Otherwise, click to begin the download. The status of each product changes fromDownloadingtoDownloaded.Product installation. The status of each product in the list changes from
Ready to Install, toInstalling, and lastly toComplete. During the process, click Show Details to view the installation actions.If you cancel the installation at this point, the products are installed, but the server (if installed) is not yet configured. To restart the server configuration, open MySQL Installer from the Start menu and click the Reconfigure link next to the appropriate server in the dashboard.
Product configuration. This step applies to MySQL Server, MySQL Router, and samples only. The status for each item in the list should indicate
Ready to Configure.Click to start the configuration wizard for all items in the list. The configuration options presented during this step are specific to the version of database or router that you selected to install.
Click to begin applying the configuration options or click (repeatedly) to return to each configuration page. Click to open the MySQL Installer dashboard.
Installation complete. This step finalizes the installation for products that do not require configuration. It enables you to copy the log to a clipboard and to start certain applications, such as MySQL Workbench and MySQL Shell. Click to open the MySQL Installer dashboard.
MySQL Installer performs the initial configuration of the MySQL server. For example:
For the MySQL 8.0 release series, a server can be configured to run as a standalone database, as a sandbox InnoDB cluster on a single host, or to create a production InnoDB cluster inside a local network (see Section 2.3.3.3.1.1, “High Availability”).
It creates the configuration file (
my.ini) that is used to configure the MySQL server. The values written to this file are influenced by choices you make during the installation process. Some definitions are host dependent. For example, query_cache is enabled if the host has fewer than three cores.NoteQuery cache was deprecated in MySQL 5.7 and removed in MySQL 8.0 (and later).
By default, a Windows service for the MySQL server is added.
Provides default installation and data paths for MySQL server. For instructions on how to change the default paths, see Section 2.3.3.2, “Setting Alternative Server Paths with MySQL Installer”.
It can optionally create MySQL server user accounts with configurable permissions based on general roles, such as DB Administrator, DB Designer, and Backup Admin. It optionally creates a Windows user named
MysqlSyswith limited privileges, which would then run the MySQL Server.User accounts may also be added and configured in MySQL Workbench.
Checking Show Advanced Options enables additional Logging Options to be set. This includes defining custom file paths for the error log, general log, slow query log (including the configuration of seconds it requires to execute a query), and the binary log.
During the configuration process, click to proceed to the next step or to return to the previous step. Click at the final step to apply the server configuration.
The sections that follow describe the server configuration options that apply to MySQL server on Windows. The server version you installed will determine which steps and options you can configure. Configuring MySQL server may include some or all of the steps.
MySQL Installer enables you to install, configure, and deploy MySQL Server as a standalone instance or as a member of a highly available cluster using MySQL Group Replication. In either case, MySQL Installer restricts the installation and configuration of the server (or servers) to the local Windows host computer.
Standalone MySQL Server / Classic MySQL Replication (default)
Select this option to configure one MySQL instance to run as a standalone database server. This option is ideal if you intend to set up classic replication later and then to include this server in your custom solution. The remaining configuration steps are described in the sections that follow, starting with Type and Networking.
InnoDB cluster
Select this option to create or extend an InnoDB cluster solution that is based on MySQL Group Replication (see Section 20.1, “Introducing InnoDB Cluster”). You can configure (or reconfigure) a minimum of three server instances to perform a basic setup as a test-only sandbox cluster on a single computer or to create a production cluster inside a local network.
InnoDB Cluster Log Verbosity Level. This configuration step includes an adjustable log that captures information during the configuration of each server instance in the production or sandbox cluster. The values are:
MINIMAL,MEDIUM(default), andDEBUG. If the cluster configuration fails, use the Reconfigure action from the MySQL Installer dashboard to restart the configuration and then set the verbosity level toDEBUGto gather additional information during your next attempt.MySQL Installer provides the following configuration variations to deploy an InnoDB cluster:
Set Up a Local Server Cluster for Testing Only
Select Create a Sandbox InnoDB cluster for Testing to enable this option. When prompted, define the number of server sandbox instances in the cluster, set a password for the
rootuser, and adjust the InnoDB cluster log verbosity level as needed. For a more detailed description of the configuration, see Deploying a Sandbox InnoDB Cluster with MySQL Installer. This setup requires MySQL 5.7.17 or higher.Create or Join an InnoDB cluster
To set up a highly available InnoDB cluster using MySQL Installer, you must have a minimum of three computers on a local network. If you require a more advanced setup, use MySQL Shell to configure some or all of the server instances in the cluster. For details about how to perform a local-network cluster setup, see Setting up an InnoDB cluster with MySQL Installer. This setup requires MySQL 8.0.0 or higher.
InnoDB cluster was designed to operate with MySQL Shell, which enables you to perform advanced cluster administration, and MySQL Router to automate the connections made between client applications and server instances. Neither MySQL Shell nor MySQL Router are required to deploy a cluster on Windows using MySQL Installer.
A sandbox deployment includes multiple server sandbox instances that run together on the same computer. Because all server instances reside on the same computer, a sandbox cluster does not meet the requirements of a highly available solution. Instead, this deployment option simulates an environment from which you can explore the techniques associated with InnoDB cluster administration.
When you select Create a Sandbox InnoDB cluster
for Testing, a follow-on step prompts you to
select a cluster consisting of three, five, seven, or nine
MySQL server instances. Unlike the other server setups
provided by MySQL Installer, the sandbox deployment skips the usual
server configuration steps (except Authentication Method).
The resulting cluster, named
sandboxCluster, is available on selected
ports that are configured for you.
MySQL Installer deletes ports 3310 to 3390 during the configuration, if those ports were set for the sandbox InnoDB cluster manually using MySQL Shell.
Each sandbox instance is configured to run as a process (not a Windows service). You must start each instance in the sandbox cluster manually after restarting the computer.
After you create the test cluster, click the Summary tab to view the specific ports that apply to your cluster. To modify the number of server instances within the existing cluster or to adjust the logging level, use the Reconfigure quick action from the MySQL Installer dashboard.
MySQL Installer deletes all existing sandbox cluster data when the cluster is reconfigured or when the server instances within the sandbox cluster are upgraded.
MySQL Installer stores all sandbox InnoDB cluster configuration
entries in the installer_config.xml
file. By default, MySQL Installer creates the sandbox instances in
%userprofile%\MySQL\mysql-sandboxes on
the local host.
To create a single InnoDB cluster, select InnoDB Cluster as the High Availability option and then select Create a New InnoDB Cluster. Adjust the log verbosity level (as needed), and click to configure the first server instance. This setup process involves installing and running MySQL Installer on multiple computers.
Define the first server instance (or seed) by providing the following configuration information:
InnoDB Cluster Name:
The default cluster name is
myCluster. If you intend to configure multiple clusters, replace the default name with one that is meaningful within your solution. Alphanumeric characters, spaces, and underscore (_) characters are valid for this field. The limit is 40 characters.Cluster Admin User Name:
The default cluster administrator name is
ic. You can reuse the same MySQL administrative account across multiple clusters. You will be prompted for this account name (and password) later when you configure other server instances to join the cluster. The limit is 32 characters.Cluster Admin Password:
Enter a password for the cluster administrator account (minimum length is four characters). MySQL Installer will evaluate the strength of the MySQL password as you type. Use the Repeat Password field to confirm the password.
Host Address:
Select the host name or IP address of the local host from the list. When joining additional server instances to the cluster, you will be prompted to identify the seed instance by the host name or IP address.
Server ID:
The default value is
1. This identifier is required to record the events of a server instance in the binary log. The ID of each server instance within a cluster must be unique; however, you can reuse the same number in a different cluster. The server ID you specify in this field also appears later in Advanced Options step. If you change the value in Advanced Option, the number is changed for the InnoDB cluster Setup too.
Click and then complete the
remaining configuration steps, which are described in the
sections that follow, starting with
Type and
Networking. After the seed instance is added and the
cluster is created, it requires more instances for full
tolerance. At this point, the status is
OK_NO_TOLERANCE.
To add the second and third server instances to the cluster, you must use a separate computer inside the local network for each. Some of the configuration details of the seed instance are required to complete the join operation.
After you start MySQL Installer and install the server instance on the next computer, begin the configuration by selecting InnoDB Cluster as the High Availability option and then select Add Local MySQL Server Instance to an InnoDB Cluster. Adjust the InnoDB Cluster Log Verbosity Level (as needed) and then click Next.
Define the joining server instance by providing the following configuration information:
Seed Instance Address:
Enter the host name or IP address of the computer that hosts the seed instance.
Seed Instance Port:
The default value is
3306, which is the port for classic MySQL. Use the same TCP port that you configured for the seed instance.Cluster Admin User Name:
The default cluster administrator name is
ic. If you assigned a different name when you configured the seed instance, enter the alternative cluster administrator name.Cluster Admin Password:
Enter the password assigned to the cluster administrator account.
Host Address:
Select the host name or IP address of the local host from the list.
Server ID:
The default value is
1. This identifier is required to record the events of a server instance in the binary log. The ID of each server instance within a cluster must be unique; however, you can reuse the same number in a different cluster. The server ID you specify in this field also appears later in Advanced Options step. If you change the value in Advanced Option, the number is changed for the InnoDB cluster Setup too.Use this button to verify the connection between the local server instance and the seed instance defined for the cluster. A valid connection is required to proceed.
Click and then complete the remaining configuration steps, which are described in the sections that follow, starting with Type and Networking.
With one seed instance and a second server instance in the
cluster, the status is OK_NO_TOLERANCE.
After you add the third server instance, the status is
OK, which indicates that the cluster now
is tolerant to the failure of one instance.
Server Configuration Type
Choose the MySQL server configuration type that describes your setup. This setting defines the amount of system resources (memory) that will be assigned to your MySQL server instance.
Development: A machine that will host many other applications, and typically this is your personal workstation. This option configures MySQL to use the least amount of memory.
Server: Several other applications will be running on this machine, such as a web server. This option configures MySQL to use a medium amount of memory.
Dedicated: A machine that is dedicated to running the MySQL server. Because no other major applications will run on this server, such as a web server, this option configures MySQL to use the majority of available memory.
Connectivity
Connectivity options control how the connection to MySQL is made. Options include:
TCP/IP: You may enable TCP/IP Networking here as otherwise only local host connections are permitted. Also define the Port (for the classic MySQL protocol), X Protocol Port (for MySQL as a document store), and whether to open the firewall port for network access. If the port number is in use already, you will see the information icon (
 ) next to the default value and
is disabled until you
provide a new port number.
) next to the default value and
is disabled until you
provide a new port number.
Named Pipe: Enable and define the pipe name, similar to setting the
named_pipesystem variable. The default name isMySQL.Shared Memory: Enable and then define the memory name, similar to setting the
shared_memorysystem variable. The default name isMySQL.
Advanced Configuration
Check Show Advanced and Logging Options to set custom logging and advanced options in later steps. The Logging Options step enables you to define custom file paths for the error log, general log, slow query log (including the configuration of seconds it requires to execute a query), and the binary log. The Advanced Options step enables you to set the unique server ID required when binary logging is enabled in a replication topology.
MySQL Enterprise Firewall (Enterprise Edition only)
The Enable Enterprise Firewall check box is selected by default. For post-installation instructions, see Section 6.4.6, “MySQL Enterprise Firewall”.
The Authentication Method step is visible only during the installation or upgrade of MySQL 8.0.4 or higher. It introduces a choice between two server-side authentication options. The MySQL user accounts that you create in the next step will use the authentication method that you select in this step.
MySQL 8.0 connectors and community drivers that use
libmysqlclient 8.0 now support the
mysql_native_password default
authentication plugin. However, if you are unable to update
your clients and applications to support this new
authentication method, you can configure the MySQL server to
use mysql_native_password for legacy
authentication. For more information about the implications of
this change, see
caching_sha2_password as the Preferred Authentication Plugin.
If you are installing or upgrading to MySQL 8.0.4 or higher, select one of the following authentication methods:
Use Strong Password Encryption for Authentication (RECOMMENDED)
MySQL 8.0 supports a new authentication based on improved, stronger SHA256-based password methods. It is recommended that all new MySQL server installations use this method going forward.
ImportantThe
caching_sha2_passwordauthentication plugin on the server requires new versions of connectors and clients, which add support for the new MySQL 8.0 default authentication.Use Legacy Authentication Method (Retain MySQL 5.x Compatibility)
Using the old MySQL 5.x legacy authentication method should be considered only in the following cases:
Applications cannot be updated to use MySQL 8.0 connectors and drivers.
Recompilation of an existing application is not feasible.
An updated, language-specific connector or driver is not available yet.
Root Account Password
Assigning a root password is required and you will be asked for it when performing other MySQL Installer operations. Password strength is evaluated when you repeat the password in the box provided. For descriptive information regarding password requirements or status, move your mouse pointer over the information icon (
) when it appears.
MySQL User Accounts (Optional)
Click or to create or modify MySQL user accounts with predefined roles. Next, enter the required account credentials:
User Name: MySQL user names can be up to 32 characters long.
Host: Select
localhostfor local connections only or<All Hosts (%)>when remote connections to the server are required.Role: Each predefined role, such as
DB Admin, is configured with its own set of privileges. For example, theDB Adminrole has more privileges than theDB Designerrole. The Role drop-down list contains a description of each role.Password: Password strength assessment is performed while you type the password. Passwords must be confirmed. MySQL permits a blank or empty password (considered to be insecure).
MySQL Installer Commercial Release Only: MySQL Enterprise Edition for Windows, a commercial product, also supports an authentication method that performs external authentication on Windows. Accounts authenticated by the Windows operating system can access the MySQL server without providing an additional password.
To create a new MySQL account that uses Windows authentication, enter the user name and then select a value for Host and Role. Click Windows authentication to enable the
authentication_windowsplugin. In the Windows Security Tokens area, enter a token for each Windows user (or group) who can authenticate with the MySQL user name. MySQL accounts can include security tokens for both local Windows users and Windows users that belong to a domain. Multiple security tokens are separated by the semicolon character (;) and use the following format for local and domain accounts:Local account
Enter the simple Windows user name as the security token for each local user or group; for example,
finley;jeffrey;admin.Domain account
Use standard Windows syntax (
domain\domainuser) or MySQL syntax (domain\\domainuser) to enter Windows domain users and groups.For domain accounts, you may need to use the credentials of an administrator within the domain if the account running MySQL Installer lacks the permissions to query the Active Directory. If this is the case, select Validate Active Directory users with to activate the domain administrator credentials.
Windows authentication permits you to test all of the security tokens each time you add or modify a token. Click to validate (or revalidate) each token. Invalid tokens generate a descriptive error message along with a red
Xicon and red token text. When all tokens resolve as valid (green text without anXicon), you can click to save the changes.
On the Windows platform, MySQL server can run as a named service managed by the operating system and be configured to start up automatically when Windows starts. Alternatively, you can configure MySQL server to run as an executable program that requires manual configuration.
Configure MySQL server as a Windows service (Selected by default.)
When the default configuration option is selected, you can also select the following:
Start the MySQL Server at System Startup
When selected (default), the service startup type is set to Automatic; otherwise, the startup type is set to Manual.
Run Windows Service as
When Standard System Account is selected (default), the service logs on as Network Service.
The Custom User option must have privileges to log on to Microsoft Windows as a service. The button will be disabled until this user is configured with the required privileges.
A custom user account is configured in Windows by searching for "local security policy" in the Start menu. In the Local Security Policy window, select Local Policies, User Rights Assignment, and then Log On As A Service to open the property dialog. Click to add the custom user and then click in each dialog to save the changes.
Deselect the Windows Service option
This step is available if the Show Advanced Configuration check box was selected during the Type and Networking step. To enable this step now, click to return to the Type and Networking step and select the check box.
Advanced configuration options are related to the following MySQL log files:
The binary log is enabled by default for MySQL 5.7 and higher.
This step is available if the Show Advanced Configuration check box was selected during the Type and Networking step. To enable this step now, click to return to the Type and Networking step and select the check box.
The advanced-configuration options include:
Server ID
Set the unique identifier used in a replication topology. If binary logging is enabled, you must specify a server ID. The default ID value depends on the server version. For more information, see the description of the
--server-idoption.TipIf you specified an ID for a server instance of an InnoDB cluster, then MySQL Installer adjusts the ID (shown on this page) to match the previous identifier.
Table Names Case
You can set the following options during the initial and subsequent configuration the server. For the MySQL 8.0 release series, these options apply only to the initial configuration of the server.
Lower Case
Sets the
lower_case_table_namesoption value to 1 (default), in which table names are stored in lowercase on disk and comparisons are not case sensitive.Preserve Given Case
Sets the
lower_case_table_namesoption value to 2, in which table names are stored as given but compared in lowercase.
All configuration settings are applied to the MySQL server when you click . Use the Configuration Steps tab to follow the progress of each action; the icon for each toggles from white to green (with a check mark) on success. Otherwise, the process stops and displays an error message if an individual action times out. Click the Log tab to view the log.
When the installation completes successfully and you click
, MySQL Installer and the installed MySQL
products are added to the Microsoft Windows Start menu under
the MySQL group. Opening MySQL Installer loads the
dashboard
where installed MySQL products are listed and other MySQL Installer
operations are available.
MySQL Installer downloads and installs a suite of tools for developing and managing business-critical applications on Windows. The suite consist of applications, connectors, documentation, and samples.
During the initial
setup, choose any predetermined setup type, except
Server only, to install the latest GA version
of the tools. Use the Custom setup type to
install an individual tool or specific version. If MySQL Installer is
installed on the host already, use the Add
operation to select and install tools from the MySQL Installer dashboard.
MySQL Installer provides a configuration wizard that can bootstrap an installed instance of MySQL Router 8.0 or later to route traffic between MySQL applications and an InnoDB cluster. When configured, MySQL Router runs as a local Windows service. For detailed information about using MySQL Router with an InnoDB cluster, see Routing for MySQL InnoDB cluster.
You are prompted to configure MySQL Router after the initial installation and when you reconfigure an installed router explicitly. In contrast, the upgrade operation does not require or prompt you to configure the upgraded product.
To configure MySQL Router, do the following:
Set up InnoDB cluster. For instructions on how to configure a sandbox InnoDB cluster on the local host using MySQL Installer, see Section 2.3.3.3.1.1, “High Availability”.
For general InnoDB cluster information, see Chapter 20, InnoDB Cluster.
Using MySQL Installer, download and install the MySQL Router application. After the installation finishes, the configuration wizard prompts you for information. Select the Configure MySQL Router for InnoDB cluster check box to begin the configuration and provide the following configuration values:
Hostname: Host name of the primary (seed) server in the InnoDB cluster (
localhostby default).Port: The port number of the primary (seed) server in the InnoDB cluster (
3310by default).Management User: An administrative user with root-level privileges.
Password: The password for the management user.
Classic MySQL protocol connections to InnoDB cluster
Read/Write: Set the first base port number to one that is unused (between 80 and 65532) and the wizard will select the remaining ports for you.
The figure that follows shows an example of the MySQL Router configuration page, with the first base port number specified as 6446 and the remaining ports set by the wizard as 6447, 6448, and 6449.
Click and then to apply the configuration. Click to close MySQL Installer or return to the MySQL Installer dashboard.
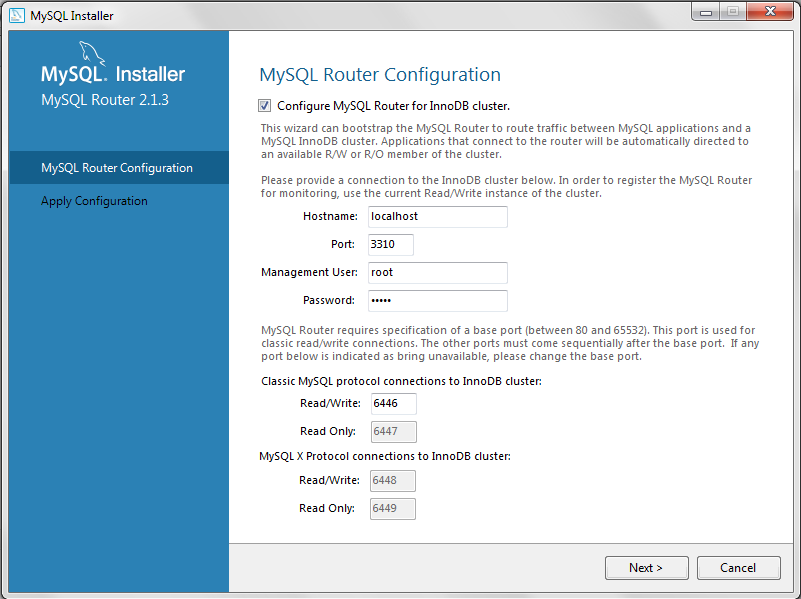
After installing a production cluster with MySQL Router, the root
account only exists in the user table as
root@localhost (local), instead of
root@% (remote). Regardless of where the
router or client are located, even if both are located on the
same host as the seed server, any connection that passes
through the router is viewed by server as being remote, not
local. As a result, a connection made to the server using the
local host (see the example that follows), does not
authenticate.
shell> \c root@localhost:6446
This section describes the MySQL Installer product catalog and the dashboard.
The product catalog stores the complete list of released MySQL products for Microsoft Windows that are available to download from MySQL Downloads. By default, and when an Internet connection is present, MySQL Installer updates the catalog daily. You can also update the catalog manually from the dashboard (described later).
An up-to-date catalog performs the following actions:
Populates the Available Products pane of the Select Products and Features step. This step appears when you select:
The
Customsetup type during the initial setup.The Add operation from the dashboard.
Identifies when product updates are available for the installed products listed in the dashboard.
The catalog includes all development releases (Pre-Release), general releases (Current GA), and minor releases (Other Releases). Products in the catalog will vary somewhat, depending on the MySQL Installer release that you download.
The MySQL Installer dashboard is the default view that you see when you start MySQL Installer after the initial setup finishes. If you closed MySQL Installer before the setup was finished, MySQL Installer resumes the initial setup before it displays the dashboard.
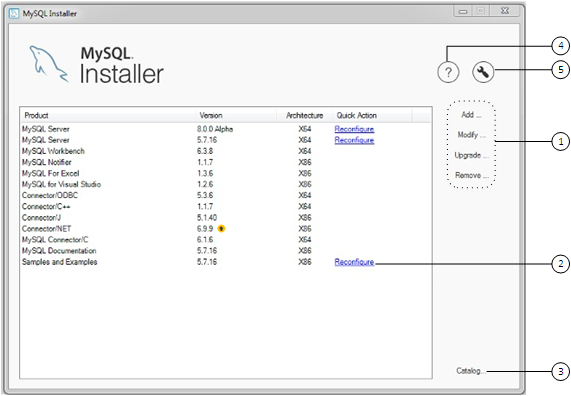
Description of MySQL Installer Dashboard Elements
MySQL Installer dashboard operations provide a variety of actions that apply to installed products or products listed in the catalog. To initiate the following operations, first click the operation link and then select the product or products to manage:
Add: This operation opens the Select Products and Features page. From there, you can filter the product in the product catalog, select one or more products to download (as needed), and begin the installation. For hints about using the filter, see Locating Products to Install.
Modify: Use this operation to add or remove the features associated with installed products. Features that you can modify vary in complexity by product. When the Program Shortcut check box is selected, the product appears in the Start menu under the
MySQLgroup.Upgrade: This operation loads the Select Products to Upgrade page and populates it with all the upgrade candidates. An installed product can have more than one upgrade version and requires a current product catalog.
Important server upgrade conditions:
MySQL Installer does not permit server upgrades between major release versions or minor release versions, but does permit upgrades within a release series, such as an upgrade from 5.7.18 to 5.7.19.
Upgrades between milestone releases (or from a milestone release to a GA release) are not supported. Significant development changes take place in milestone releases and you may encounter compatibility issues or problems starting the server.
For upgrades to MySQL 8.0.16 server and higher, a check box enables you to skip the upgrade check and process for system tables, while checking and processing data dictionary tables normally. MySQL Installer does not prompt you with the check box when the previous server upgrade was skipped or when the server was configured as a sandbox InnoDB cluster. This behavior represents a change in how MySQL Server performs an upgrade (see What the MySQL Upgrade Process Upgrades) and it alters the sequence of steps that MySQL Installer applies to the configuration process.
If you select Skip system tables upgrade check and process. (Not recommended), MySQL Installer starts the upgraded server with the
--upgrade=MINIMALserver option, which upgrades the data dictionary only. If you stop and then restart the server without the--upgrade=MINIMALoption, the server upgrades the system tables automatically, if needed.The following information appears in the Log tab and log file after the upgrade configuration (with system tables skipped) is complete:
WARNING: The system tables upgrade was skipped after upgrading MySQL Server. The server will be started now with the --upgrade=MINIMAL option, but then each time the server is started it will attempt to upgrade the system tables, unless you modify the Windows service (command line) to add --upgrade=MINIMAL to bypass the upgrade. FOR THE BEST RESULTS: Run mysqld.exe --upgrade=FORCE on the command line to upgrade the system tables manually.
To choose a new product version:
Click Upgrade. Confirm that the check box next to product name in the Upgradeable Products pane has a check mark. Deselect the products that you do not intend to upgrade at this time.
NoteFor server milestone releases in the same release series, MySQL Installer deselects the server upgrade and displays a warning to indicate that the upgrade is not supported, identifies the risks of continuing, and provides a summary of the steps to perform a logical upgrade manually. You can reselect server upgrade at your own risk. For instructions on how to perform a logical upgrade with a milestone release, see Logical Upgrade.
Click a product in the list to highlight it. This action populates the Upgradeable Versions pane with the details of each available version for the selected product: version number, published date, and a
Changeslink to open the release notes for that version.
MySQL Installer upgrades all of the selected products in one action. Click to view the actions performed by MySQL Installer.
Remove: This operation opens the Remove Products page and populates it with the MySQL products installed on the host. Select the MySQL products you want to remove (uninstall) and then click to begin the removal process. During the operation, an indicator shows the number of steps that are executed as a percentage of all steps.
To select products to remove, do one of the following:
Select the check box for one or more products.
Select the Product check box to select all products.
To remove a local MySQL server:
Determine whether the local data directory should be removed. If you retain the data directory, another server installation can reuse the data. This option is enabled by default (removes the data directory).
If the local server is a member of an InnoDB cluster, reconfigure the cluster as follows:
Type the administrator password for the cluster affected when the local server is removed and then click to verify the credentials. MySQL Installer can perform the following actions, depending on the configuration of the existing cluster:
If the local server is a seed instance and the number of instances in the cluster is one, dissolve the cluster when you remove the local server.
If the local server is a seed instance and the number of instances in the cluster is greater than one, remove the instance from the cluster or dissolve the cluster when you remove the local server.
If the local server is a slave instance within the cluster and the number of instances in the cluster is greater than two, remove the local instance from the cluster. (A single slave instance within a cluster reverts to a seed instance automatically.)
If the local server is configured as a sandbox InnoDB cluster, remove all instances created for the sandbox server installation.
When prompted, do one of the following:
Select an action to apply to the cluster and click .
Click without selecting an action. In most cases, MySQL Group Replication can manage the cluster when the local server becomes unavailable. A warning message reminds you that skipping the step may result in an inconsistent InnoDB cluster configuration.
Click to begin uninstalling the local server. Note that all products that you selected to remove are also uninstalled at this time.
(Optional) Click the Log tab to display the current actions performed by MySQL Installer.
The Reconfigure link in the Quick Action column next to each installed server loads the current configuration values for the server and then cycles through all configuration steps enabling you to change the options and values. You must provide credentials with root privileges to reconfigure these items. Click the Log tab to show the output of each configuration step performed by MySQL Installer.
On completion, MySQL Installer stops the server, applies the configuration changes, and restarts the server for you. For a description of each configuration option, see Section 2.3.3.3.1, “MySQL Server Configuration with MySQL Installer”. Installed
Samples and Examplesassociated with a specific MySQL server version can be also be reconfigured to apply new feature settings, if any.The Catalog link enables you to download the latest catalog of MySQL products manually and then to integrate those product changes with MySQL Installer. The catalog-download action does not perform an upgrade of the products already installed on the host. Instead, it returns to the dashboard and displays an arrow icon in the Version column for each installed product that has a newer version. Use the Upgrade operation to install the newer product version.
You can also use the Catalog link to display the current change history of each product without downloading the new catalog. Select the Do not update at this time check box to view the change history only.
The MySQL Installer About icon (
 ) shows the current version of MySQL Installer and
general information about MySQL. The version number is
located above the button.
Tip
) shows the current version of MySQL Installer and
general information about MySQL. The version number is
located above the button.
TipAlways include this version number when reporting a problem with MySQL Installer.
In addition to the About MySQL information (
 ), you can also select the following
icons from the side panel:
), you can also select the following
icons from the side panel:
License icon (
 ) for MySQL Installer.
This product may include third-party software, used under license. If you are using a Commercial release of MySQL Installer, the icon opens the MySQL Installer Commercial License Information User Manual for licensing information, including licensing information relating to third-party software that may be included in this Commercial release. If you are using a Community release of MySQL Installer, the icon opens the MySQL Installer Community License Information User Manual for licensing information, including licensing information relating to third-party software that may be included in this Community release.
Resource links icon (
 ) to the latest MySQL product
documentation, blogs, webinars, and more.
) to the latest MySQL product
documentation, blogs, webinars, and more.
The MySQL Installer Options icon (
 ) includes the following tabs:
Product Catalog: Manages the daily automatic catalog updates. By default, catalog updates are scheduled at a fixed hour. When new products or product versions are available, MySQL Installer adds them to the catalog and then displays an arrow icon (
 ) next to the version number of
installed products listed in the dashboard.
) next to the version number of
installed products listed in the dashboard.
Use this option to enable or disable automatic catalog updates and to reset the time of day when the MySQL Installer updates the catalog automatically. For specific settings, see the task named
ManifestUpdatein the Windows Task Scheduler.Connectivity Settings: Several operations performed by MySQL Installer require internet access. This option enables you to use a default value to validate the connection or to use a different URL, one selected from a list or added by you manually. With the Manual option selected, new URLs can be added and all URLs in the list can be moved or deleted. When the Automatic option is selected, MySQL Installer attempts to connect to each default URL in the list (in order) until a connection is made. If no connection can be made, it raises an error.
MySQL products in the catalog are listed by category: MySQL Servers, Applications, MySQL Connectors, and Documentation. Only the latest GA versions appear in the Available Products pane by default. If you are looking for a pre-release or older version of a product, it may not be visible in the default list.
To change the default product list, click Add on the dashboard to open the Select Products and Features page, and then click to open the filter dialog box (see the figure that follows). Modify the product values and then click .
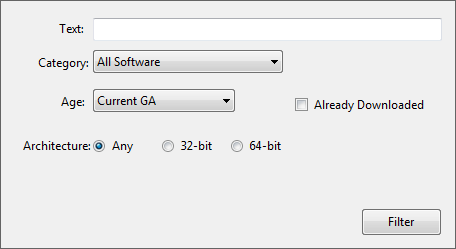
Reset one or more of the following values to filter the list of available products:
Text: Filter by text.
Category: All Software (default), MySQL Servers, Applications, MySQL Connectors, or Documentation (for samples and documentation).
Maturity: Current Bundle (appears initially with the full package only), Pre-Release, Current GA, or Other Releases.
NoteThe Commercial release of MySQL Installer does not display any MySQL products when you select the Pre-Release age filter. Products in development are available from the Community release of MySQL Installer only.
Already Downloaded (the check box is deselected by default).
Architecture: Any (default), 32-bit, or 64-bit.
MySQL Installer remains installed on your computer, and like other software, MySQL Installer can be upgraded from the previous version. In some cases, other MySQL software may require that you upgrade MySQL Installer for compatibility. This section describes how to identify the current version of MySQL Installer and how to upgrade MySQL Installer manually.
To locate the installed version of MySQL Installer:
Start MySQL Installer from the search menu. The MySQL Installer dashboard opens.
Click the MySQL Installer About icon (
). The version number is located above
the button.
To initiate an on-demand upgrade of MySQL Installer:
Connect the computer with MySQL Installer installed to the internet.
Start MySQL Installer from the search menu. The MySQL Installer dashboard opens.
Click Catalog on the bottom of the dashboard to open the Update Catalog window.
Click to begin the process. If the installed version of MySQL Installer can be upgraded, you will be prompted to start the upgrade.
Click to review all changes to the catalog and then click to return to the dashboard.
Verify the (new) installed version of MySQL Installer (see the previous procedure).
MySQLInstallerConsole.exe provides command-line
functionality that is similar to MySQL Installer. It is installed when MySQL Installer
is initially executed and then available within the
MySQL Installer directory. Typically, that is
in C:\Program Files (x86)\MySQL\MySQL
Installer\, and the console must be executed with
administrative privileges.
To use, invoke the command prompt with administrative privileges
by choosing ,
, then right-click on
and choose Run as
administrator. And from the command line, optionally
change the directory to where
MySQLInstallerConsole.exe is located:
C:\>cd Program Files (x86)\MySQL\MySQL Installer for WindowsC:\Program Files (x86)\MySQL\MySQL Installer for Windows>MySQLInstallerConsole.exe help=================== Start Initialization =================== MySQL Installer is running in Community mode Attempting to update manifest. Initializing product requirements Loading product catalog Checking for product catalog snippets Checking for product packages in the bundle Categorizing product catalog Finding all installed packages. Your product catalog was last updated at 11/1/2016 4:10:38 PM =================== End Initialization =================== The following commands are available: Configure - Configures one or more of your installed programs. Help - Provides list of available commands. Install - Install and configure one or more available MySQL programs. List - Provides an interactive way to list all products available. Modify - Modifies the features of installed products. Remove - Removes one or more products from your system. Status - Shows the status of all installed products. Update - Update the current product catalog. Upgrade - Upgrades one or more of your installed programs.
MySQLInstallerConsole.exe supports the following commands:
Configuration block values that contain a colon (":") must be wrapped in double quotes. For example, installdir="C:\MySQL\MySQL Server 8.0".
configure[product1]:[setting]=[value]; [product2]:[setting]=[value]; [...]Configure one or more MySQL products on your system. Multiple setting=value pairs can be configured for each product.
Switches include:
-showsettings: Displays the available options for the selected product, by passing in the product name after-showsettings.-silent: Disable confirmation prompts.
C:\>
MySQLInstallerConsole configure -showsettings serverC:\>MySQLInstallerConsole configure server:port=3307Displays a help message with usage examples, and then exits. Pass in an additional command to receive help specific to that command.
C:\>
MySQLInstallerConsole helpC:\>MySQLInstallerConsole help installinstall[product]:[features]:[config block]:[config block]:[config block]; [...]Install one or more MySQL products on your system. If pre-release products are available, both GA and pre-release products are installed when the value of the
-typeswitch isDeveloper,Client, orFull. Use the-only_ga_productsswitch to restrict the product set to GA products only when using these setup types.Switches and syntax options include:
-only_ga_products: Restricts the product set to include GA products only.-type=[SetupType]: Installs a predefined set of software. The "SetupType" can be one of the following:NoteNon-custom setup types can only be chosen if no other MySQL products are installed.
Developer: Installs a complete development environment.
Server: Installs a single MySQL server
Client: Installs client programs and libraries
Full: Installs everything
Custom: Installs user selected products. This is the default option.
-showsettings: Displays the available options for the selected product, by passing in the product name after-showsettings.-silent: Disable confirmation prompts.[config block]: One or more configuration blocks can be specified. Each configuration block is a semicolon separated list of key value pairs. A block can include either a "config" or "user" type key, where "config" is the default type if one is not defined.Configuration block values that contain a colon character (
:) must be wrapped in double quotes. For example,installdir="C:\MySQL\MySQL Server 8.0".Only one "config" type block can be defined per product. A "user" block should be defined for each user that should be created during the product's installation.
NoteAdding users is not supported when a product is being reconfigured.
[feature]: The feature block is a semicolon separated list of features, or an asterisk character (*) to select all features.
C:\>
MySQLInstallerConsole install server;5.6.25:*:port=3307;serverid=2:type=user;username=foo;password=bar;role=DBManagerC:\>MySQLInstallerConsole install server;5.6.25;x64 -silentAn example that passes in additional configuration blocks, separated by
^to fit:C:\>
MySQLInstallerConsole install server;5.6.25;x64:*:type=config;openfirewall=true; ^ generallog=true;binlog=true;serverid=3306;enable_tcpip=true;port=3306;rootpasswd=pass; ^ installdir="C:\MySQL\MySQL Server 5.6":type=user;datadir="C:\MySQL\data";username=foo;password=bar;role=DBManagerLists an interactive console where all of the available MySQL products can be searched. Execute
MySQLInstallerConsole listto launch the console, and enter in a substring to search.C:\>
MySQLInstallerConsole listmodify[product1:-removelist|+addlist] [product2:-removelist|+addlist] [...]Modifies or displays features of a previously installed MySQL product.
-silent: Disable confirmation prompts.
C:\>
MySQLInstallerConsole modify serverC:\>MySQLInstallerConsole modify server:+documentationC:\>MySQLInstallerConsole modify server:-debugremove[product1] [product2] [...]Removes one ore more products from your system.
*: Pass in*to remove all of the MySQL products.-continue: Continue the operation even if an error occurs.-silent: Disable confirmation prompts.
C:\>
MySQLInstallerConsole remove *C:\>MySQLInstallerConsole remove serverProvides a quick overview of the MySQL products that are installed on the system. Information includes product name and version, architecture, date installed, and install location.
C:\>
MySQLInstallerConsole statusDownloads the latest MySQL product catalog to your system. On success, the download catalog will be applied the next time either MySQLInstaller or MySQLInstallerConsole is executed.
C:\>
MySQLInstallerConsoleupdateNoteThe Automatic Catalog Update GUI option executes this command from the Windows Task Scheduler.
upgrade[product1:version] [product2:version] [...]Upgrades one or more products on your system. Syntax options include:
*: Pass in*to upgrade all products to the latest version, or pass in specific products.!: Pass in!as a version number to upgrade the MySQL product to its latest version.-silent: Disable confirmation prompts.
C:\>
MySQLInstallerConsole upgrade *C:\>MySQLInstallerConsole upgrade workbench:6.3.5C:\>MySQLInstallerConsole upgrade workbench:!C:\>MySQLInstallerConsole upgrade workbench:6.3.5 excel:1.3.2
- 2.3.4.1 Extracting the Install Archive
- 2.3.4.2 Creating an Option File
- 2.3.4.3 Selecting a MySQL Server Type
- 2.3.4.4 Initializing the Data Directory
- 2.3.4.5 Starting the Server for the First Time
- 2.3.4.6 Starting MySQL from the Windows Command Line
- 2.3.4.7 Customizing the PATH for MySQL Tools
- 2.3.4.8 Starting MySQL as a Windows Service
- 2.3.4.9 Testing The MySQL Installation
Users who are installing from the noinstall
package can use the instructions in this section to manually
install MySQL. The process for installing MySQL from a ZIP Archive
package is as follows:
Extract the main archive to the desired install directory
Optional: also extract the debug-test archive if you plan to execute the MySQL benchmark and test suite
Create an option file
Choose a MySQL server type
Initialize MySQL
Start the MySQL server
Secure the default user accounts
This process is described in the sections that follow.
To install MySQL manually, do the following:
If you are upgrading from a previous version please refer to Section 2.11.8, “Upgrading MySQL on Windows”, before beginning the upgrade process.
Make sure that you are logged in as a user with administrator privileges.
Choose an installation location. Traditionally, the MySQL server is installed in
C:\mysql. If you do not install MySQL atC:\mysql, you must specify the path to the install directory during startup or in an option file. See Section 2.3.4.2, “Creating an Option File”.NoteThe MySQL Installer installs MySQL under
C:\Program Files\MySQL.Extract the install archive to the chosen installation location using your preferred file-compression tool. Some tools may extract the archive to a folder within your chosen installation location. If this occurs, you can move the contents of the subfolder into the chosen installation location.
If you need to specify startup options when you run the server, you can indicate them on the command line or place them in an option file. For options that are used every time the server starts, you may find it most convenient to use an option file to specify your MySQL configuration. This is particularly true under the following circumstances:
The installation or data directory locations are different from the default locations (
C:\Program Files\MySQL\MySQL Server 5.7andC:\Program Files\MySQL\MySQL Server 5.7\data).You need to tune the server settings, such as memory, cache, or InnoDB configuration information.
When the MySQL server starts on Windows, it looks for option
files in several locations, such as the Windows directory,
C:\, and the MySQL installation directory
(for the full list of locations, see
Section 4.2.2.2, “Using Option Files”). The Windows directory typically
is named something like C:\WINDOWS. You can
determine its exact location from the value of the
WINDIR environment variable using the
following command:
C:\> echo %WINDIR%
MySQL looks for options in each location first in the
my.ini file, and then in the
my.cnf file. However, to avoid confusion,
it is best if you use only one file. If your PC uses a boot
loader where C: is not the boot drive, your
only option is to use the my.ini file.
Whichever option file you use, it must be a plain text file.
When using the MySQL Installer to install MySQL Server, it will create
the my.ini at the default location, and
the user executing MySQL Installer is granted full permissions to this
new my.ini file.
In other words, be sure that the MySQL Server user has
permission to read the my.ini file.
You can also make use of the example option files included with your MySQL distribution; see Section 5.1.2, “Server Configuration Defaults”.
An option file can be created and modified with any text editor,
such as Notepad. For example, if MySQL is installed in
E:\mysql and the data directory is in
E:\mydata\data, you can create an option
file containing a [mysqld] section to specify
values for the basedir and
datadir options:
[mysqld] # set basedir to your installation path basedir=E:/mysql # set datadir to the location of your data directory datadir=E:/mydata/data
Microsoft Windows path names are specified in option files using (forward) slashes rather than backslashes. If you do use backslashes, double them:
[mysqld] # set basedir to your installation path basedir=E:\\mysql # set datadir to the location of your data directory datadir=E:\\mydata\\data
The rules for use of backslash in option file values are given in Section 4.2.2.2, “Using Option Files”.
As of MySQL 5.7.6, the ZIP archive no longer includes a
data directory. To initialize a MySQL
installation by creating the data directory and populating the
tables in the mysql system database, initialize MySQL using
either --initialize or
--initialize-insecure. For
additional information, see
Section 2.10.1, “Initializing the Data Directory”.
If you would like to use a data directory in a different
location, you should copy the entire contents of the
data directory to the new location. For
example, if you want to use E:\mydata as
the data directory instead, you must do two things:
Move the entire
datadirectory and all of its contents from the default location (for exampleC:\Program Files\MySQL\MySQL Server 5.7\data) toE:\mydata.Use a
--datadiroption to specify the new data directory location each time you start the server.
The following table shows the available servers for Windows in MySQL 5.7.
| Binary | Description |
|---|---|
| mysqld | Optimized binary with named-pipe support |
| mysqld-debug | Like mysqld, but compiled with full debugging and automatic memory allocation checking |
All of the preceding binaries are optimized for modern Intel processors, but should work on any Intel i386-class or higher processor.
Each of the servers in a distribution support the same set of
storage engines. The SHOW ENGINES
statement displays which engines a given server supports.
All Windows MySQL 5.7 servers have support for symbolic linking of database directories.
MySQL supports TCP/IP on all Windows platforms. MySQL servers on
Windows also support named pipes, if you start the server with
the named_pipe system variable
enabled. It is necessary to enable this variable explicitly
because some users have experienced problems with shutting down
the MySQL server when named pipes were used. The default is to
use TCP/IP regardless of platform because named pipes are slower
than TCP/IP in many Windows configurations.
If you installed MySQL using the noinstall
package, you may need to initialize the data directory:
Windows distributions prior to MySQL 5.7.7 include a data directory with a set of preinitialized accounts in the
mysqldatabase.As of 5.7.7, Windows installation operations performed using the
noinstallpackage do not include a data directory. To initialize the data directory, use the instructions at Section 2.10.1, “Initializing the Data Directory”.
This section gives a general overview of starting the MySQL server. The following sections provide more specific information for starting the MySQL server from the command line or as a Windows service.
The information here applies primarily if you installed MySQL
using the noinstall version, or if you wish
to configure and test MySQL manually rather than with the GUI
tools.
The MySQL server will automatically start after using MySQL Installer, and MySQL Notifier can be used to start/stop/restart at any time.
The examples in these sections assume that MySQL is installed
under the default location of C:\Program
Files\MySQL\MySQL Server 5.7. Adjust the
path names shown in the examples if you have MySQL installed in
a different location.
Clients have two options. They can use TCP/IP, or they can use a named pipe if the server supports named-pipe connections.
MySQL for Windows also supports shared-memory connections if the
server is started with the
shared_memory system variable
enabled. Clients can connect through shared memory by using the
--protocol=MEMORY option.
For information about which server binary to run, see Section 2.3.4.3, “Selecting a MySQL Server Type”.
Testing is best done from a command prompt in a console window (or “DOS window”). In this way you can have the server display status messages in the window where they are easy to see. If something is wrong with your configuration, these messages make it easier for you to identify and fix any problems.
The database must be initialized before MySQL can be started. For additional information about the initialization process, see Section 2.10.1, “Initializing the Data Directory”.
To start the server, enter this command:
C:\> "C:\Program Files\MySQL\MySQL Server 5.7\bin\mysqld" --console
For a server that includes InnoDB support,
you should see the messages similar to those following as it
starts (the path names and sizes may differ):
InnoDB: The first specified datafile c:\ibdata\ibdata1 did not exist: InnoDB: a new database to be created! InnoDB: Setting file c:\ibdata\ibdata1 size to 209715200 InnoDB: Database physically writes the file full: wait... InnoDB: Log file c:\iblogs\ib_logfile0 did not exist: new to be created InnoDB: Setting log file c:\iblogs\ib_logfile0 size to 31457280 InnoDB: Log file c:\iblogs\ib_logfile1 did not exist: new to be created InnoDB: Setting log file c:\iblogs\ib_logfile1 size to 31457280 InnoDB: Log file c:\iblogs\ib_logfile2 did not exist: new to be created InnoDB: Setting log file c:\iblogs\ib_logfile2 size to 31457280 InnoDB: Doublewrite buffer not found: creating new InnoDB: Doublewrite buffer created InnoDB: creating foreign key constraint system tables InnoDB: foreign key constraint system tables created 011024 10:58:25 InnoDB: Started
When the server finishes its startup sequence, you should see something like this, which indicates that the server is ready to service client connections:
mysqld: ready for connections Version: '5.7.29' socket: '' port: 3306
The server continues to write to the console any further diagnostic output it produces. You can open a new console window in which to run client programs.
If you omit the --console option,
the server writes diagnostic output to the error log in the data
directory (C:\Program Files\MySQL\MySQL Server
5.7\data by default). The error log is
the file with the .err extension, and may
be set using the --log-error
option.
The initial root account in the MySQL grant
tables has no password. After starting the server, you should
set up a password for it using the instructions in
Section 2.10.4, “Securing the Initial MySQL Account”.
The MySQL server can be started manually from the command line. This can be done on any version of Windows.
MySQL Notifier can also be used to start/stop/restart the MySQL server.
To start the mysqld server from the command line, you should start a console window (or “DOS window”) and enter this command:
C:\> "C:\Program Files\MySQL\MySQL Server 5.7\bin\mysqld"
The path to mysqld may vary depending on the install location of MySQL on your system.
You can stop the MySQL server by executing this command:
C:\> "C:\Program Files\MySQL\MySQL Server 5.7\bin\mysqladmin" -u root shutdown
If the MySQL root user account has a
password, you need to invoke mysqladmin
with the -p option and supply the password
when prompted.
This command invokes the MySQL administrative utility
mysqladmin to connect to the server and tell
it to shut down. The command connects as the MySQL
root user, which is the default
administrative account in the MySQL grant system.
Users in the MySQL grant system are wholly independent from any operating system users under Microsoft Windows.
If mysqld doesn't start, check the error log
to see whether the server wrote any messages there to indicate
the cause of the problem. By default, the error log is located
in the C:\Program Files\MySQL\MySQL Server
5.7\data directory. It is the file with
a suffix of .err, or may be specified by
passing in the --log-error
option. Alternatively, you can try to start the server with the
--console option; in this case,
the server may display some useful information on the screen
that will help solve the problem.
The last option is to start mysqld with the
--standalone and
--debug options. In this case,
mysqld writes a log file
C:\mysqld.trace that should contain the
reason why mysqld doesn't start. See
Section 28.5.3, “The DBUG Package”.
Use mysqld --verbose --help to display all the options that mysqld supports.
You must exercise great care when editing your system
PATH by hand; accidental deletion or
modification of any portion of the existing
PATH value can leave you with a
malfunctioning or even unusable system.
To make it easier to invoke MySQL programs, you can add the path
name of the MySQL bin directory to your
Windows system PATH environment variable:
On the Windows desktop, right-click the My Computer icon, and select .
Next select the tab from the menu that appears, and click the button.
Under System Variables, select , and then click the button. The dialogue should appear.
Place your cursor at the end of the text appearing in the space marked Variable Value. (Use the End key to ensure that your cursor is positioned at the very end of the text in this space.) Then enter the complete path name of your MySQL
bindirectory (for example,C:\Program Files\MySQL\MySQL Server 5.7\bin)NoteThere must be a semicolon separating this path from any values present in this field.
Dismiss this dialogue, and each dialogue in turn, by clicking until all of the dialogues that were opened have been dismissed. The new
PATHvalue should now be available to any new command shell you open, allowing you to invoke any MySQL executable program by typing its name at the DOS prompt from any directory on the system, without having to supply the path. This includes the servers, the mysql client, and all MySQL command-line utilities such as mysqladmin and mysqldump.
You should not add the MySQL bin directory
to your Windows PATH if you are running
multiple MySQL servers on the same machine.
On Windows, the recommended way to run MySQL is to install it as a Windows service, so that MySQL starts and stops automatically when Windows starts and stops. A MySQL server installed as a service can also be controlled from the command line using NET commands, or with the graphical Services utility. Generally, to install MySQL as a Windows service you should be logged in using an account that has administrator rights.
MySQL Notifier can also be used to monitor the status of the MySQL service.
The Services utility (the Windows Service Control Manager) can be found in the Windows Control Panel. To avoid conflicts, it is advisable to close the Services utility while performing server installation or removal operations from the command line.
Installing the service
Before installing MySQL as a Windows service, you should first stop the current server if it is running by using the following command:
C:\>"C:\Program Files\MySQL\MySQL Server 5.7\bin\mysqladmin"-u root shutdown
If the MySQL root user account has a
password, you need to invoke mysqladmin
with the -p option and supply the password
when prompted.
This command invokes the MySQL administrative utility
mysqladmin to connect to the server and tell
it to shut down. The command connects as the MySQL
root user, which is the default
administrative account in the MySQL grant system.
Users in the MySQL grant system are wholly independent from any operating system users under Windows.
Install the server as a service using this command:
C:\> "C:\Program Files\MySQL\MySQL Server 5.7\bin\mysqld" --install
The service-installation command does not start the server. Instructions for that are given later in this section.
To make it easier to invoke MySQL programs, you can add the path
name of the MySQL bin directory to your
Windows system PATH environment variable:
On the Windows desktop, right-click the My Computer icon, and select .
Next select the tab from the menu that appears, and click the button.
Under System Variables, select , and then click the button. The dialogue should appear.
Place your cursor at the end of the text appearing in the space marked Variable Value. (Use the End key to ensure that your cursor is positioned at the very end of the text in this space.) Then enter the complete path name of your MySQL
bindirectory (for example,C:\Program Files\MySQL\MySQL Server 5.7\bin), and there should be a semicolon separating this path from any values present in this field. Dismiss this dialogue, and each dialogue in turn, by clicking until all of the dialogues that were opened have been dismissed. You should now be able to invoke any MySQL executable program by typing its name at the DOS prompt from any directory on the system, without having to supply the path. This includes the servers, the mysql client, and all MySQL command-line utilities such as mysqladmin and mysqldump.You should not add the MySQL
bindirectory to your WindowsPATHif you are running multiple MySQL servers on the same machine.
You must exercise great care when editing your system
PATH by hand; accidental deletion or
modification of any portion of the existing
PATH value can leave you with a
malfunctioning or even unusable system.
The following additional arguments can be used when installing the service:
You can specify a service name immediately following the
--installoption. The default service name isMySQL.If a service name is given, it can be followed by a single option. By convention, this should be
--defaults-file=to specify the name of an option file from which the server should read options when it starts.file_nameThe use of a single option other than
--defaults-fileis possible but discouraged.--defaults-fileis more flexible because it enables you to specify multiple startup options for the server by placing them in the named option file.You can also specify a
--local-serviceoption following the service name. This causes the server to run using theLocalServiceWindows account that has limited system privileges. If both--defaults-fileand--local-serviceare given following the service name, they can be in any order.
For a MySQL server that is installed as a Windows service, the following rules determine the service name and option files that the server uses:
If the service-installation command specifies no service name or the default service name (
MySQL) following the--installoption, the server uses the service name ofMySQLand reads options from the[mysqld]group in the standard option files.If the service-installation command specifies a service name other than
MySQLfollowing the--installoption, the server uses that service name. It reads options from the[mysqld]group and the group that has the same name as the service in the standard option files. This enables you to use the[mysqld]group for options that should be used by all MySQL services, and an option group with the service name for use by the server installed with that service name.If the service-installation command specifies a
--defaults-fileoption after the service name, the server reads options the same way as described in the previous item, except that it reads options only from the named file and ignores the standard option files.
As a more complex example, consider the following command:
C:\>"C:\Program Files\MySQL\MySQL Server 5.7\bin\mysqld"--install MySQL --defaults-file=C:\my-opts.cnf
Here, the default service name (MySQL) is
given after the --install option. If no
--defaults-file option had been
given, this command would have the effect of causing the server
to read the [mysqld] group from the standard
option files. However, because the
--defaults-file option is
present, the server reads options from the
[mysqld] option group, and only from the
named file.
On Windows, if the server is started with the
--defaults-file and
--install options,
--install must be first.
Otherwise, mysqld.exe will attempt to start
the MySQL server.
You can also specify options as Start parameters in the Windows Services utility before you start the MySQL service.
Finally, before trying to start the MySQL service, make sure the
user variables %TEMP% and
%TMP% (and also %TMPDIR%,
if it has ever been set) for the operating system user who is to
run the service are pointing to a folder to which the user has
write access. The default user for running the MySQL service is
LocalSystem, and the default value for its
%TEMP% and %TMP% is
C:\Windows\Temp, a directory
LocalSystem has write access to by default.
However, if there are any changes to that default setup (for
example, changes to the user who runs the service or to the
mentioned user variables, or the
--tmpdir option has been used to
put the temporary directory somewhere else), the MySQL service
might fail to run because write access to the temporary
directory has not been granted to the proper user.
Starting the service
After a MySQL server instance has been installed as a service,
Windows starts the service automatically whenever Windows
starts. The service also can be started immediately from the
Services utility, or by using an sc
start mysqld_service_name
or NET START
mysqld_service_name
command. SC and NET
commands are not case-sensitive.
When run as a service, mysqld has no access
to a console window, so no messages can be seen there. If
mysqld does not start, check the error log to
see whether the server wrote any messages there to indicate the
cause of the problem. The error log is located in the MySQL data
directory (for example, C:\Program Files\MySQL\MySQL
Server 5.7\data). It is the file with a
suffix of .err.
When a MySQL server has been installed as a service, and the
service is running, Windows stops the service automatically when
Windows shuts down. The server also can be stopped manually
using the Services utility, the sc
stop mysqld_service_name
command, the NET START
mysqld_service_name
command, or the mysqladmin shutdown command.
You also have the choice of installing the server as a manual
service if you do not wish for the service to be started
automatically during the boot process. To do this, use the
--install-manual option rather than the
--install option:
C:\> "C:\Program Files\MySQL\MySQL Server 5.7\bin\mysqld" --install-manual
Removing the service
To remove a server that is installed as a service, first stop it
if it is running by executing SC STOP
mysqld_service_name or
NET STOP
mysqld_service_name. Then
use SC DELETE
mysqld_service_name to
remove it:
C:\> SC DELETE mysql
Alternatively, use the mysqld
--remove option to remove the
service.
C:\> "C:\Program Files\MySQL\MySQL Server 5.7\bin\mysqld" --remove
If mysqld is not running as a service, you can start it from the command line. For instructions, see Section 2.3.4.6, “Starting MySQL from the Windows Command Line”.
If you encounter difficulties during installation, see Section 2.3.5, “Troubleshooting a Microsoft Windows MySQL Server Installation”.
For more information about stopping or removing a Windows service, see Section 5.7.2.2, “Starting Multiple MySQL Instances as Windows Services”.
You can test whether the MySQL server is working by executing any of the following commands:
C:\>"C:\Program Files\MySQL\MySQL Server 5.7\bin\mysqlshow"C:\>"C:\Program Files\MySQL\MySQL Server 5.7\bin\mysqlshow" -u root mysqlC:\>"C:\Program Files\MySQL\MySQL Server 5.7\bin\mysqladmin" version status procC:\>"C:\Program Files\MySQL\MySQL Server 5.7\bin\mysql" test
If mysqld is slow to respond to TCP/IP
connections from client programs, there is probably a problem
with your DNS. In this case, start mysqld
with the --skip-name-resolve
option and use only localhost and IP
addresses in the Host column of the MySQL
grant tables. (Be sure that an account exists that specifies an
IP address or you may not be able to connect.)
You can force a MySQL client to use a named-pipe connection
rather than TCP/IP by specifying the
--pipe or
--protocol=PIPE option, or by
specifying . (period) as the host name. Use
the --socket option to specify
the name of the pipe if you do not want to use the default pipe
name.
If you have set a password for the root
account, deleted the anonymous account, or created a new user
account, then to connect to the MySQL server you must use the
appropriate -u and -p options
with the commands shown previously. See
Section 4.2.4, “Connecting to the MySQL Server Using Command Options”.
For more information about mysqlshow, see Section 4.5.7, “mysqlshow — Display Database, Table, and Column Information”.
When installing and running MySQL for the first time, you may encounter certain errors that prevent the MySQL server from starting. This section helps you diagnose and correct some of these errors.
Your first resource when troubleshooting server issues is the
error log. The MySQL server
uses the error log to record information relevant to the error
that prevents the server from starting. The error log is located
in the data directory
specified in your my.ini file. The default
data directory location is C:\Program Files\MySQL\MySQL
Server 5.7\data, or
C:\ProgramData\Mysql on Windows 7 and Windows
Server 2008. The C:\ProgramData directory is
hidden by default. You need to change your folder options to see
the directory and contents. For more information on the error log
and understanding the content, see Section 5.4.2, “The Error Log”.
For information regarding possible errors, also consult the
console messages displayed when the MySQL service is starting. Use
the SC START
mysqld_service_name or
NET START
mysqld_service_name command
from the command line after installing mysqld
as a service to see any error messages regarding the starting of
the MySQL server as a service. See
Section 2.3.4.8, “Starting MySQL as a Windows Service”.
The following examples show other common error messages you might encounter when installing MySQL and starting the server for the first time:
If the MySQL server cannot find the
mysqlprivileges database or other critical files, it displays these messages:System error 1067 has occurred. Fatal error: Can't open and lock privilege tables: Table 'mysql.user' doesn't exist
These messages often occur when the MySQL base or data directories are installed in different locations than the default locations (
C:\Program Files\MySQL\MySQL Server 5.7andC:\Program Files\MySQL\MySQL Server 5.7\data, respectively).This situation can occur when MySQL is upgraded and installed to a new location, but the configuration file is not updated to reflect the new location. In addition, old and new configuration files might conflict. Be sure to delete or rename any old configuration files when upgrading MySQL.
If you have installed MySQL to a directory other than
C:\Program Files\MySQL\MySQL Server 5.7, ensure that the MySQL server is aware of this through the use of a configuration (my.ini) file. Put themy.inifile in your Windows directory, typicallyC:\WINDOWS. To determine its exact location from the value of theWINDIRenvironment variable, issue the following command from the command prompt:C:\>
echo %WINDIR%You can create or modify an option file with any text editor, such as Notepad. For example, if MySQL is installed in
E:\mysqland the data directory isD:\MySQLdata, you can create the option file and set up a[mysqld]section to specify values for thebasediranddatadiroptions:[mysqld] # set basedir to your installation path basedir=E:/mysql # set datadir to the location of your data directory datadir=D:/MySQLdata
Microsoft Windows path names are specified in option files using (forward) slashes rather than backslashes. If you do use backslashes, double them:
[mysqld] # set basedir to your installation path basedir=C:\\Program Files\\MySQL\\MySQL Server 5.7 # set datadir to the location of your data directory datadir=D:\\MySQLdata
The rules for use of backslash in option file values are given in Section 4.2.2.2, “Using Option Files”.
If you change the
datadirvalue in your MySQL configuration file, you must move the contents of the existing MySQL data directory before restarting the MySQL server.If you reinstall or upgrade MySQL without first stopping and removing the existing MySQL service and install MySQL using the MySQL Installer, you might see this error:
Error: Cannot create Windows service for MySql. Error: 0
This occurs when the Configuration Wizard tries to install the service and finds an existing service with the same name.
One solution to this problem is to choose a service name other than
mysqlwhen using the configuration wizard. This enables the new service to be installed correctly, but leaves the outdated service in place. Although this is harmless, it is best to remove old services that are no longer in use.To permanently remove the old
mysqlservice, execute the following command as a user with administrative privileges, on the command line:C:\>
SC DELETE mysql[SC] DeleteService SUCCESSIf the
SCutility is not available for your version of Windows, download thedelsrvutility from http://www.microsoft.com/windows2000/techinfo/reskit/tools/existing/delsrv-o.asp and use thedelsrv mysqlsyntax.
GUI tools exist that perform most of the tasks described in this section, including:
MySQL Installer: Used to install and upgrade MySQL products.
MySQL Workbench: Manages the MySQL server and edits SQL statements.
MySQL Notifier: Starts, stops, or restarts the MySQL server, and monitors its status.
MySQL for Excel: Edits MySQL data with Microsoft Excel.
If necessary, initialize the data directory and create the MySQL
grant tables. Windows distributions prior to MySQL 5.7.7 include a
data directory with a set of preinitialized accounts in the
mysql database. As of 5.7.7, Windows
installation operations performed by MySQL Installer initialize the data
directory automatically. For installation from a ZIP Archive
package, initialize the data directory as described at
Section 2.10.1, “Initializing the Data Directory”.
Regarding passwords, if you installed MySQL using the MySQL Installer, you
may have already assigned a password to the initial
root account. (See
Section 2.3.3, “MySQL Installer for Windows”.) Otherwise, use the
password-assignment procedure given in
Section 2.10.4, “Securing the Initial MySQL Account”.
Before assigning a password, you might want to try running some client programs to make sure that you can connect to the server and that it is operating properly. Make sure that the server is running (see Section 2.3.4.5, “Starting the Server for the First Time”). You can also set up a MySQL service that runs automatically when Windows starts (see Section 2.3.4.8, “Starting MySQL as a Windows Service”).
These instructions assume that your current location is the MySQL
installation directory and that it has a bin
subdirectory containing the MySQL programs used here. If that is
not true, adjust the command path names accordingly.
If you installed MySQL using MySQL Installer (see
Section 2.3.3, “MySQL Installer for Windows”), the default installation
directory is C:\Program Files\MySQL\MySQL Server
5.7:
C:\> cd "C:\Program Files\MySQL\MySQL Server 5.7"
A common installation location for installation from a ZIP archive
is C:\mysql:
C:\> cd C:\mysql
Alternatively, add the bin directory to your
PATH environment variable setting. That enables
your command interpreter to find MySQL programs properly, so that
you can run a program by typing only its name, not its path name.
See Section 2.3.4.7, “Customizing the PATH for MySQL Tools”.
With the server running, issue the following commands to verify that you can retrieve information from the server. The output should be similar to that shown here.
Use mysqlshow to see what databases exist:
C:\> bin\mysqlshow
+--------------------+
| Databases |
+--------------------+
| information_schema |
| mysql |
| performance_schema |
| sys |
+--------------------+
The list of installed databases may vary, but always includes at
least mysql and
information_schema. Before MySQL 5.7.7, a
test database may also be created
automatically.
The preceding command (and commands for other MySQL programs such
as mysql) may not work if the correct MySQL
account does not exist. For example, the program may fail with an
error, or you may not be able to view all databases. If you
install MySQL using MySQL Installer, the root user is
created automatically with the password you supplied. In this
case, you should use the -u root and
-p options. (You must use those options if you
have already secured the initial MySQL accounts.) With
-p, the client program prompts for the
root password. For example:
C:\>bin\mysqlshow -u root -pEnter password:(enter root password here)+--------------------+ | Databases | +--------------------+ | information_schema | | mysql | | performance_schema | | sys | +--------------------+
If you specify a database name, mysqlshow displays a list of the tables within the database:
C:\> bin\mysqlshow mysql
Database: mysql
+---------------------------+
| Tables |
+---------------------------+
| columns_priv |
| db |
| engine_cost |
| event |
| func |
| general_log |
| gtid_executed |
| help_category |
| help_keyword |
| help_relation |
| help_topic |
| innodb_index_stats |
| innodb_table_stats |
| ndb_binlog_index |
| plugin |
| proc |
| procs_priv |
| proxies_priv |
| server_cost |
| servers |
| slave_master_info |
| slave_relay_log_info |
| slave_worker_info |
| slow_log |
| tables_priv |
| time_zone |
| time_zone_leap_second |
| time_zone_name |
| time_zone_transition |
| time_zone_transition_type |
| user |
+---------------------------+
Use the mysql program to select information
from a table in the mysql database:
C:\> bin\mysql -e "SELECT User, Host, plugin FROM mysql.user" mysql
+------+-----------+-----------------------+
| User | Host | plugin |
+------+-----------+-----------------------+
| root | localhost | mysql_native_password |
+------+-----------+-----------------------+
For more information about mysql and mysqlshow, see Section 4.5.1, “mysql — The MySQL Command-Line Client”, and Section 4.5.7, “mysqlshow — Display Database, Table, and Column Information”.
The following restrictions apply to use of MySQL on the Windows platform:
Process memory
On Windows 32-bit platforms, it is not possible by default to use more than 2GB of RAM within a single process, including MySQL. This is because the physical address limit on Windows 32-bit is 4GB and the default setting within Windows is to split the virtual address space between kernel (2GB) and user/applications (2GB).
Some versions of Windows have a boot time setting to enable larger applications by reducing the kernel application. Alternatively, to use more than 2GB, use a 64-bit version of Windows.
File system aliases
When using
MyISAMtables, you cannot use aliases within Windows link to the data files on another volume and then link back to the main MySQLdatadirlocation.This facility is often used to move the data and index files to a RAID or other fast solution, while retaining the main
.frmfiles in the default data directory configured with thedatadiroption.Limited number of ports
Windows systems have about 4,000 ports available for client connections, and after a connection on a port closes, it takes two to four minutes before the port can be reused. In situations where clients connect to and disconnect from the server at a high rate, it is possible for all available ports to be used up before closed ports become available again. If this happens, the MySQL server appears to be unresponsive even though it is running. Ports may be used by other applications running on the machine as well, in which case the number of ports available to MySQL is lower.
For more information about this problem, see http://support.microsoft.com/default.aspx?scid=kb;en-us;196271.
DATA DIRECTORYandINDEX DIRECTORYThe
DATA DIRECTORYoption forCREATE TABLEis supported on Windows only forInnoDBtables, as described in Section 14.6.3.6, “Creating a Tablespace Outside of the Data Directory”. ForMyISAMand other storage engines, theDATA DIRECTORYandINDEX DIRECTORYoptions forCREATE TABLEare ignored on Windows and any other platforms with a nonfunctionalrealpath()call.You cannot drop a database that is in use by another session.
Case-insensitive names
File names are not case-sensitive on Windows, so MySQL database and table names are also not case-sensitive on Windows. The only restriction is that database and table names must be specified using the same case throughout a given statement. See Section 9.2.3, “Identifier Case Sensitivity”.
Directory and file names
On Windows, MySQL Server supports only directory and file names that are compatible with the current ANSI code pages. For example, the following Japanese directory name will not work in the Western locale (code page 1252):
datadir="C:/私たちのプロジェクトのデータ"
The same limitation applies to directory and file names referred to in SQL statements, such as the data file path name in
LOAD DATA.The
\path name separator characterPath name components in Windows are separated by the
\character, which is also the escape character in MySQL. If you are usingLOAD DATAorSELECT ... INTO OUTFILE, use Unix-style file names with/characters:mysql>
LOAD DATA INFILE 'C:/tmp/skr.txt' INTO TABLE skr;mysql>SELECT * INTO OUTFILE 'C:/tmp/skr.txt' FROM skr;Alternatively, you must double the
\character:mysql>
LOAD DATA INFILE 'C:\\tmp\\skr.txt' INTO TABLE skr;mysql>SELECT * INTO OUTFILE 'C:\\tmp\\skr.txt' FROM skr;Problems with pipes
Pipes do not work reliably from the Windows command-line prompt. If the pipe includes the character
^Z/CHAR(24), Windows thinks that it has encountered end-of-file and aborts the program.This is mainly a problem when you try to apply a binary log as follows:
C:\>
mysqlbinlogbinary_log_file| mysql --user=rootIf you have a problem applying the log and suspect that it is because of a
^Z/CHAR(24)character, you can use the following workaround:C:\>
mysqlbinlogC:\>binary_log_file--result-file=/tmp/bin.sqlmysql --user=root --execute "source /tmp/bin.sql"The latter command also can be used to reliably read any SQL file that may contain binary data.
For a list of macOS versions that the MySQL server supports, see https://www.mysql.com/support/supportedplatforms/database.html.
MySQL for macOS is available in a number of different forms:
Native Package Installer, which uses the native macOS installer (DMG) to walk you through the installation of MySQL. For more information, see Section 2.4.2, “Installing MySQL on macOS Using Native Packages”. You can use the package installer with macOS. The user you use to perform the installation must have administrator privileges.
Compressed TAR archive, which uses a file packaged using the Unix tar and gzip commands. To use this method, you will need to open a Terminal window. You do not need administrator privileges using this method, as you can install the MySQL server anywhere using this method. For more information on using this method, you can use the generic instructions for using a tarball, Section 2.2, “Installing MySQL on Unix/Linux Using Generic Binaries”.
In addition to the core installation, the Package Installer also includes Section 2.4.3, “Installing a MySQL Launch Daemon” and Section 2.4.4, “Installing and Using the MySQL Preference Pane”, both of which simplify the management of your installation.
For additional information on using MySQL on macOS, see Section 2.4.1, “General Notes on Installing MySQL on macOS”.
You should keep the following issues and notes in mind:
As of macOS 10.14 (Majave), the macOS MySQL 5.7 Installer application requires permission to control System Events so it can display a generated (temporary) MySQL root password. Choosing "Don't Allow" means this password won't be visible for use.
If previously disallowed, the fix is enabling System Events.app for Installer.app under the Security & Privacy | Automation | Privacy tab.
A launchd daemon is installed, and it includes MySQL configuration options. Consider editing it if needed, see the documentation below for additional information. Also, macOS 10.10 removed startup item support in favor of launchd daemons. The optional MySQL preference pane under macOS System Preferences uses the launchd daemon.
You may need (or want) to create a specific
mysqluser to own the MySQL directory and data. You can do this through the Directory Utility, and themysqluser should already exist. For use in single user mode, an entry for_mysql(note the underscore prefix) should already exist within the system/etc/passwdfile.Because the MySQL package installer installs the MySQL contents into a version and platform specific directory, you can use this to upgrade and migrate your database between versions. You will need to either copy the
datadirectory from the old version to the new version, or alternatively specify an alternativedatadirvalue to set location of the data directory. By default, the MySQL directories are installed under/usr/local/.You might want to add aliases to your shell's resource file to make it easier to access commonly used programs such as mysql and mysqladmin from the command line. The syntax for bash is:
alias mysql=/usr/local/mysql/bin/mysql alias mysqladmin=/usr/local/mysql/bin/mysqladmin
For tcsh, use:
alias mysql /usr/local/mysql/bin/mysql alias mysqladmin /usr/local/mysql/bin/mysqladmin
Even better, add
/usr/local/mysql/binto yourPATHenvironment variable. You can do this by modifying the appropriate startup file for your shell. For more information, see Section 4.2.1, “Invoking MySQL Programs”.After you have copied over the MySQL database files from the previous installation and have successfully started the new server, you should consider removing the old installation files to save disk space. Additionally, you should also remove older versions of the Package Receipt directories located in
/Library/Receipts/mysql-.VERSION.pkgPrior to OS X 10.7, MySQL server was bundled with OS X Server.
The package is located inside a disk image
(.dmg) file that you first need to mount by
double-clicking its icon in the Finder. It should then mount the
image and display its contents.
Before proceeding with the installation, be sure to stop all running MySQL server instances by using either the MySQL Manager Application (on macOS Server), the preference pane, or mysqladmin shutdown on the command line.
To install MySQL using the package installer:
Download the disk image (
.dmg) file (the community version is available here) that contains the MySQL package installer. Double-click the file to mount the disk image and see its contents.Double-click the MySQL installer package from the disk. It is named according to the version of MySQL you have downloaded. For example, for MySQL server 5.7.29 it might be named
mysql-5.7.29-osx-.10.13-x86_64.pkgThe initial wizard introduction screen references the MySQL server version to install. Click to begin the installation.
The MySQL community edition shows a copy of the relevant GNU General Public License. Click and then to continue.
From the Installation Type page you can either click to execute the installation wizard using all defaults, click to alter which components to install (MySQL server, Preference Pane, Launchd Support -- all enabled by default).
NoteAlthough the option is visible, the installation location cannot be changed.
Click to begin the installation process.
After a successful installation, the installer displays a window with your temporary root password. This cannot be recovered so you must save this password for the initial login to MySQL. For example:
NoteMySQL expires this temporary root password after the initial login and requires you to create a new password.
Summary is the final step and references a successful and complete MySQL Server installation. the wizard.
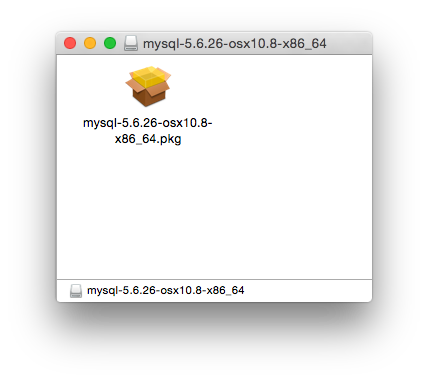
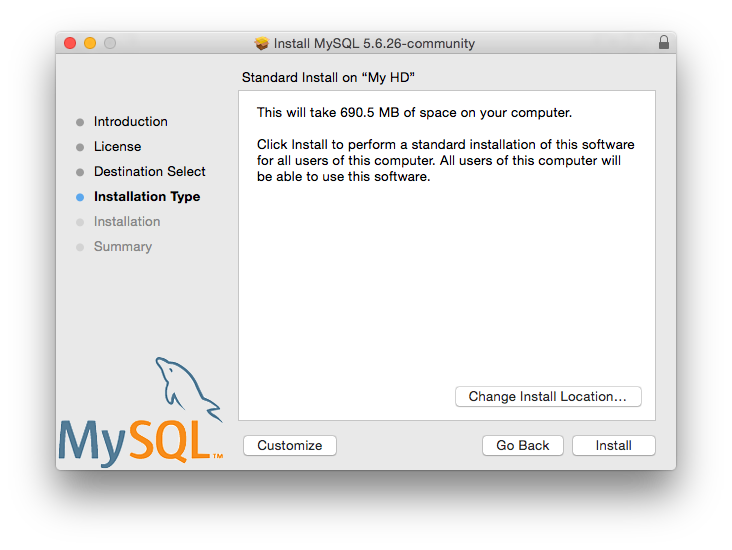
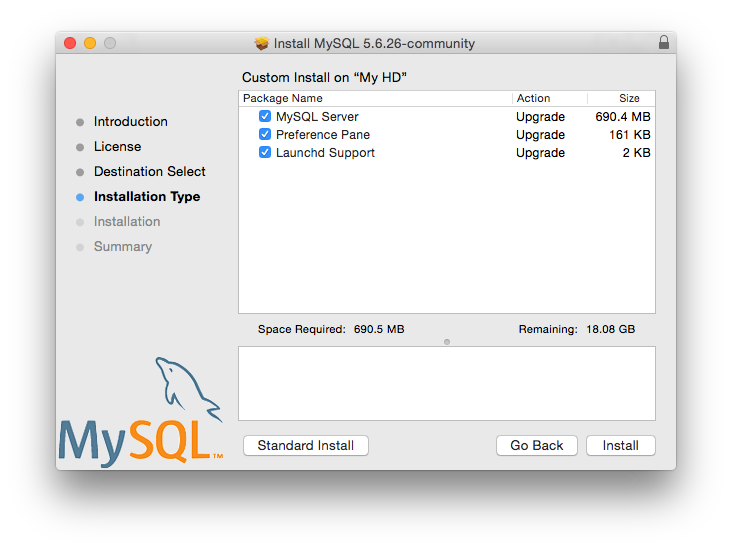
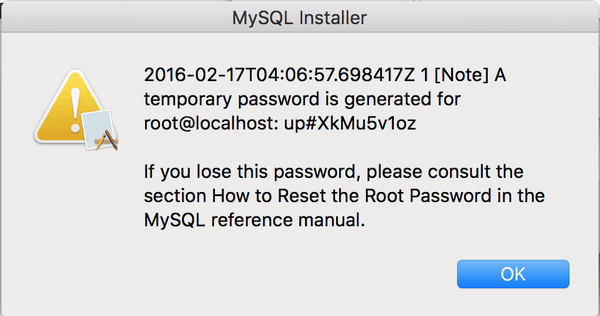
MySQL server is now installed, but it is not loaded (or started) by default. Use either launchctl from the command line, or start MySQL by clicking "Start" using the MySQL preference pane. For additional information, see Section 2.4.3, “Installing a MySQL Launch Daemon”, and Section 2.4.4, “Installing and Using the MySQL Preference Pane”. Use the MySQL Preference Pane or launchd to configure MySQL to automatically start at bootup.
When installing using the package installer, the files are
installed into a directory within /usr/local
matching the name of the installation version and platform. For
example, the installer file
mysql-5.7.29-
installs MySQL into
osx10.13-x86_64.dmg/usr/local/mysql-5.7.29-osx10.13-x86_64/
. The following table shows the layout of the
installation directory.
Table 2.6 MySQL Installation Layout on macOS
| Directory | Contents of Directory |
|---|---|
bin |
mysqld server, client and utility programs |
data |
Log files, databases |
docs |
Helper documents, like the Release Notes and build information |
include |
Include (header) files |
lib |
Libraries |
man |
Unix manual pages |
mysql-test |
MySQL test suite |
share |
Miscellaneous support files, including error messages, sample configuration files, SQL for database installation |
support-files |
Scripts and sample configuration files |
/tmp/mysql.sock |
Location of the MySQL Unix socket |
During the package installer process, a symbolic link from
/usr/local/mysql to the version/platform
specific directory created during installation will be created
automatically.
macOS uses launch daemons to automatically start, stop, and manage processes and applications such as MySQL.
By default, the installation package (DMG) on macOS installs a
launchd file named
/Library/LaunchDaemons/com.oracle.oss.mysql.mysqld.plist
that contains a plist definition similar to:
<?xml version="1.0" encoding="utf-8"?>
<!DOCTYPE plist PUBLIC "-//Apple Computer//DTD PLIST 1.0//EN" "http://www.apple.com/DTDs/PropertyList-1.0.dtd">
<plist version="1.0">
<dict>
<key>Label</key> <string>com.oracle.oss.mysql.mysqld</string>
<key>ProcessType</key> <string>Interactive</string>
<key>Disabled</key> <false/>
<key>RunAtLoad</key> <true/>
<key>KeepAlive</key> <true/>
<key>SessionCreate</key> <true/>
<key>LaunchOnlyOnce</key> <false/>
<key>UserName</key> <string>_mysql</string>
<key>GroupName</key> <string>_mysql</string>
<key>ExitTimeOut</key> <integer>600</integer>
<key>Program</key> <string>/usr/local/mysql/bin/mysqld</string>
<key>ProgramArguments</key>
<array>
<string>/usr/local/mysql/bin/mysqld</string>
<string>--user=_mysql</string>
<string>--basedir=/usr/local/mysql</string>
<string>--datadir=/usr/local/mysql/data</string>
<string>--plugin-dir=/usr/local/mysql/lib/plugin</string>
<string>--log-error=/usr/local/mysql/data/mysqld.local.err</string>
<string>--pid-file=/usr/local/mysql/data/mysqld.local.pid</string>
</array>
<key>WorkingDirectory</key> <string>/usr/local/mysql</string>
</dict>
</plist>
Some users report that adding a plist DOCTYPE declaration causes the launchd operation to fail, despite it passing the lint check. We suspect it's a copy-n-paste error. The md5 checksum of a file containing the above snippet is 24710a27dc7a28fb7ee6d825129cd3cf.
To enable the launchd service, you can either:
Click from the MySQL preference pane.
Or, manually load the launchd file.
shell> cd /Library/LaunchDaemons shell> sudo launchctl load -F com.oracle.oss.mysql.mysqld.plistTo configure MySQL to automatically start at bootup, you can:
shell> sudo launchctl load -w com.oracle.oss.mysql.mysqld.plist
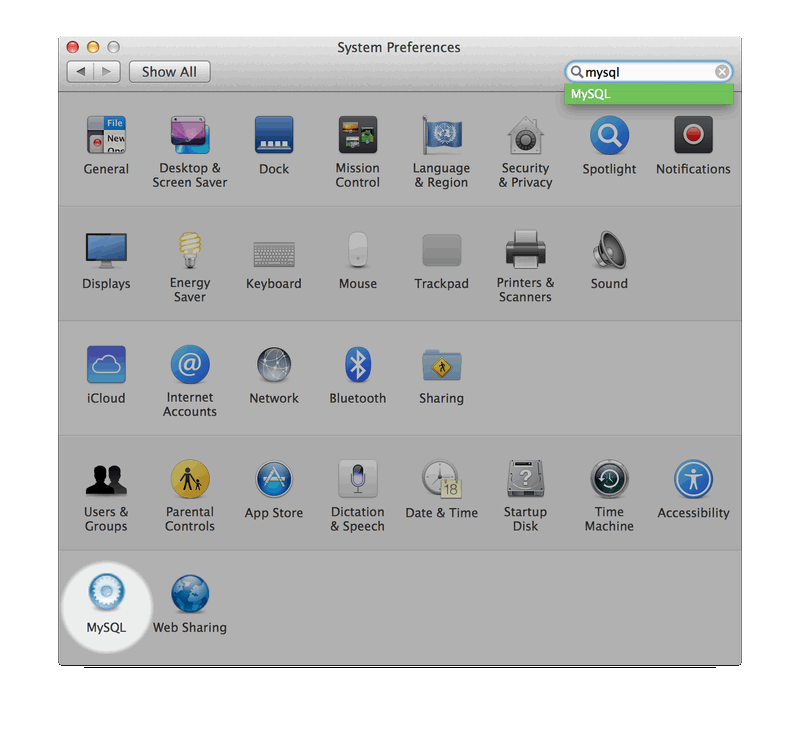

When upgrading MySQL server, the launchd installation process will remove the old startup items that were installed with MySQL server 5.7.7 and below.
Also, upgrading will replace your existing launchd file of the same name.
Additional launchd related information:
The plist entries override
my.cnfentries, because they are passed in as command line arguments. For additional information about passing in program options, see Section 4.2.2, “Specifying Program Options”.The ProgramArguments section defines the command line options that are passed into the program, which is the
mysqldbinary in this case.The default plist definition is written with less sophisticated use cases in mind. For more complicated setups, you may want to remove some of the arguments and instead rely on a MySQL configuration file, such as
my.cnf.If you edit the plist file, then uncheck the installer option when reinstalling or upgrading MySQL. Otherwise, your edited plist file will be overwritten, and all edits will be lost.
Because the default plist definition defines several
ProgramArguments, you might
remove most of these arguments and instead rely upon your
my.cnf MySQL configuration file to define
them. For example:
<?xml version="1.0" encoding="utf-8"?>
<!DOCTYPE plist PUBLIC "-//Apple Computer//DTD PLIST 1.0//EN" "http://www.apple.com/DTDs/PropertyList-1.0.dtd">
<plist version="1.0">
<dict>
<key>Label</key> <string>com.oracle.oss.mysql.mysqld</string>
<key>ProcessType</key> <string>Interactive</string>
<key>Disabled</key> <false/>
<key>RunAtLoad</key> <true/>
<key>KeepAlive</key> <true/>
<key>SessionCreate</key> <true/>
<key>LaunchOnlyOnce</key> <false/>
<key>UserName</key> <string>_mysql</string>
<key>GroupName</key> <string>_mysql</string>
<key>ExitTimeOut</key> <integer>600</integer>
<key>Program</key> <string>/usr/local/mysql/bin/mysqld</string>
<key>WorkingDirectory</key> <string>/usr/local/mysql</string>
<key>ProgramArguments</key>
<array>
<string>/usr/local/mysql/bin/mysqld</string>
<string>--user=_mysql</string>
</array>
</dict>
</plist>
In this case, the basedir,
datadir,
plugin_dir,
log_error, and
pid_file options were removed
from the plist definition, and then you you might define them in
my.cnf.
The MySQL Installation Package includes a MySQL preference pane that enables you to start, stop, and control automated startup during boot of your MySQL installation.
This preference pane is installed by default, and is listed under your system's System Preferences window.
To install the MySQL Preference Pane:
Download the disk image (
.dmg) file (the community version is available here) that contains the MySQL package installer. Double-click the file to mount the disk image and see its contents.Go through the process of installing the MySQL server, as described in the documentation at Section 2.4.2, “Installing MySQL on macOS Using Native Packages”.
Click at the Installation Type step. The "Preference Pane" option is listed there and enabled by default; make sure it is not deselected.
Complete the MySQL server installation process.
The MySQL preference pane only starts and stops MySQL installation installed from the MySQL package installation that have been installed in the default location.
Once the MySQL preference pane has been installed, you can control your MySQL server instance using the preference pane. To use the preference pane, open the System Preferences... from the Apple menu. Select the MySQL preference pane by clicking the MySQL icon within the preference panes list.
The MySQL Preference Pane shows the current status of the MySQL server, showing stopped (in red) if the server is not running and running (in green) if the server has already been started. The preference pane also shows the current setting for whether the MySQL server has been set to start automatically.
To start the MySQL server using the preference pane:
Click . You may be prompted for the username and password of a user with administrator privileges to start the MySQL server.
To stop the MySQL server using the preference pane:
Click . You may be prompted for the username and password of a user with administrator privileges to stop the MySQL server.
To automatically start the MySQL server when the system boots:
Check the check box next to Automatically Start MySQL Server on Startup.
To disable automatic MySQL server startup when the system boots:
Uncheck the check box next to Automatically Start MySQL Server on Startup.
You can close the System Preferences... window once you have completed your settings.
- 2.5.1 Installing MySQL on Linux Using the MySQL Yum Repository
- 2.5.2 Replacing a Third-Party Distribution of MySQL Using the MySQL Yum Repository
- 2.5.3 Installing MySQL on Linux Using the MySQL APT Repository
- 2.5.4 Installing MySQL on Linux Using the MySQL SLES Repository
- 2.5.5 Installing MySQL on Linux Using RPM Packages from Oracle
- 2.5.6 Installing MySQL on Linux Using Debian Packages from Oracle
- 2.5.7 Deploying MySQL on Linux with Docker
- 2.5.8 Installing MySQL on Linux from the Native Software Repositories
- 2.5.9 Installing MySQL on Linux with Juju
- 2.5.10 Managing MySQL Server with systemd
Linux supports a number of different solutions for installing MySQL. We recommend that you use one of the distributions from Oracle, for which several methods for installation are available:
Table 2.7 Linux Installation Methods and Information
| Type | Setup Method | Additional Information |
|---|---|---|
| Apt | Enable the MySQL Apt repository | Documentation |
| Yum | Enable the MySQL Yum repository | Documentation |
| Zypper | Enable the MySQL SLES repository | Documentation |
| RPM | Download a specific package | Documentation |
| DEB | Download a specific package | Documentation |
| Generic | Download a generic package | Documentation |
| Source | Compile from source | Documentation |
| Docker | Use Docker Hub for MySQL Community Edition; download Docker image for MySQL Enterprise Edition from My Oracle Support | Documentation |
| Oracle Unbreakable Linux Network | Use ULN channels | Documentation |
As an alternative, you can use the package manager on your system to automatically download and install MySQL with packages from the native software repositories of your Linux distribution. These native packages are often several versions behind the currently available release. You will also normally be unable to install development milestone releases (DMRs), as these are not usually made available in the native repositories. For more information on using the native package installers, see Section 2.5.8, “Installing MySQL on Linux from the Native Software Repositories”.
For many Linux installations, you will want to set up MySQL to be
started automatically when your machine starts. Many of the native
package installations perform this operation for you, but for
source, binary and RPM solutions you may need to set this up
separately. The required script, mysql.server,
can be found in the support-files directory
under the MySQL installation directory or in a MySQL source tree.
You can install it as /etc/init.d/mysql for
automatic MySQL startup and shutdown. See
Section 4.3.3, “mysql.server — MySQL Server Startup Script”.
The MySQL Yum repository for Oracle Linux, Red Hat Enterprise Linux, CentOS, and Fedora provides RPM packages for installing the MySQL server, client, MySQL Workbench, MySQL Utilities, MySQL Router, MySQL Shell, Connector/ODBC, Connector/Python and so on (not all packages are available for all the distributions; see Installing Additional MySQL Products and Components with Yum for details).
Before You Start
As a popular, open-source software, MySQL, in its original or re-packaged form, is widely installed on many systems from various sources, including different software download sites, software repositories, and so on. The following instructions assume that MySQL is not already installed on your system using a third-party-distributed RPM package; if that is not the case, follow the instructions given in Section 2.11.5, “Upgrading MySQL with the MySQL Yum Repository” or Section 2.5.2, “Replacing a Third-Party Distribution of MySQL Using the MySQL Yum Repository”.
Steps for a Fresh Installation of MySQL
Follow the steps below to install the latest GA version of MySQL with the MySQL Yum repository:
-
Adding the MySQL Yum Repository
First, add the MySQL Yum repository to your system's repository list. This is a one-time operation, which can be performed by installing an RPM provided by MySQL. Follow these steps:
Go to the Download MySQL Yum Repository page (https://dev.mysql.com/downloads/repo/yum/) in the MySQL Developer Zone.
Select and download the release package for your platform.
Install the downloaded release package with the following command, replacing
platform-and-version-specific-package-namewith the name of the downloaded RPM package:shell>
sudo yum localinstallplatform-and-version-specific-package-name.rpmFor an EL6-based system, the command is in the form of:
shell>
sudo yum localinstall mysql57-community-release-el6-{version-number}.noarch.rpmFor an EL7-based system:
shell>
sudo yum localinstall mysql57-community-release-el7-{version-number}.noarch.rpmFor Fedora 28:
shell>
sudo dnf install mysql57-community-release-fc28-{version-number}.noarch.rpmFor Fedora 29:
shell>
sudo dnf install mysql57-community-release-fc29-{version-number}.noarch.rpmThe installation command adds the MySQL Yum repository to your system's repository list and downloads the GnuPG key to check the integrity of the software packages. See Section 2.1.3.2, “Signature Checking Using GnuPG” for details on GnuPG key checking.
You can check that the MySQL Yum repository has been successfully added by the following command (for Fedora, replace yum in the command with dnf):
shell>
yum repolist enabled | grep "mysql.*-community.*"
NoteOnce the MySQL Yum repository is enabled on your system, any system-wide update by the yum update command (or dnf upgrade for Fedora) will upgrade MySQL packages on your system and also replace any native third-party packages, if Yum finds replacements for them in the MySQL Yum repository; see Section 2.11.5, “Upgrading MySQL with the MySQL Yum Repository” and, for a discussion on some possible effects of that on your system, see Upgrading the Shared Client Libraries.
-
Selecting a Release Series
When using the MySQL Yum repository, the latest GA series (currently MySQL 5.7) is selected for installation by default. If this is what you want, you can skip to the next step, Installing MySQL.
Within the MySQL Yum repository, different release series of the MySQL Community Server are hosted in different subrepositories. The subrepository for the latest GA series (currently MySQL 5.7) is enabled by default, and the subrepositories for all other series (for example, the MySQL 5.6 series) are disabled by default. Use this command to see all the subrepositories in the MySQL Yum repository, and see which of them are enabled or disabled (for Fedora, replace yum in the command with dnf):
shell>
yum repolist all | grep mysqlTo install the latest release from the latest GA series, no configuration is needed. To install the latest release from a specific series other than the latest GA series, disable the subrepository for the latest GA series and enable the subrepository for the specific series before running the installation command. If your platform supports yum-config-manager, you can do that by issuing these commands, which disable the subrepository for the 5.7 series and enable the one for the 5.6 series:
shell>
sudo yum-config-manager --disable mysql57-communityshell>sudo yum-config-manager --enable mysql56-communityFor Fedora platforms:
shell>
sudo dnf config-manager --disable mysql57-communityshell>sudo dnf config-manager --enable mysql56-communityBesides using yum-config-manager or the dnf config-manager command, you can also select a release series by editing manually the
/etc/yum.repos.d/mysql-community.repofile. This is a typical entry for a release series' subrepository in the file:[mysql57-community] name=MySQL 5.7 Community Server baseurl=http://repo.mysql.com/yum/mysql-5.7-community/el/6/$basearch/ enabled=1 gpgcheck=1 gpgkey=file:///etc/pki/rpm-gpg/RPM-GPG-KEY-mysql
Find the entry for the subrepository you want to configure, and edit the
enabledoption. Specifyenabled=0to disable a subrepository, orenabled=1to enable a subrepository. For example, to install MySQL 5.6, make sure you haveenabled=0for the above subrepository entry for MySQL 5.7, and haveenabled=1for the entry for the 5.6 series:# Enable to use MySQL 5.6 [mysql56-community] name=MySQL 5.6 Community Server baseurl=http://repo.mysql.com/yum/mysql-5.6-community/el/6/$basearch/ enabled=1 gpgcheck=1 gpgkey=file:///etc/pki/rpm-gpg/RPM-GPG-KEY-mysql
You should only enable subrepository for one release series at any time. When subrepositories for more than one release series are enabled, the latest series will be used by Yum.
Verify that the correct subrepositories have been enabled and disabled by running the following command and checking its output (for Fedora, replace yum in the command with dnf):
shell>
yum repolist enabled | grep mysql -
Installing MySQL
Install MySQL by the following command (for Fedora, replace yum in the command with dnf):
shell>
sudo yum install mysql-community-serverThis installs the package for MySQL server (
mysql-community-server) and also packages for the components required to run the server, including packages for the client (mysql-community-client), the common error messages and character sets for client and server (mysql-community-common), and the shared client libraries (mysql-community-libs). -
Starting the MySQL Server
Start the MySQL server with the following command:
shell>
sudo service mysqld startStarting mysqld:[ OK ]You can check the status of the MySQL server with the following command:
shell>
sudo service mysqld statusmysqld (pid 3066) is running.
At the initial start up of the server, the following happens, given that the data directory of the server is empty:
The server is initialized.
SSL certificate and key files are generated in the data directory.
validate_passwordis installed and enabled.A superuser account
'root'@'localhostis created. A password for the superuser is set and stored in the error log file. To reveal it, use the following command:shell>
sudo grep 'temporary password' /var/log/mysqld.logChange the root password as soon as possible by logging in with the generated, temporary password and set a custom password for the superuser account:
shell>
mysql -uroot -pmysql>
ALTER USER 'root'@'localhost' IDENTIFIED BY 'MyNewPass4!';Notevalidate_passwordis installed by default. The default password policy implemented byvalidate_passwordrequires that passwords contain at least one upper case letter, one lower case letter, one digit, and one special character, and that the total password length is at least 8 characters.
For more information on the postinstallation procedures, see Section 2.10, “Postinstallation Setup and Testing”.
Compatibility Information for EL7-based platforms: The following RPM packages from the native software repositories of the platforms are incompatible with the package from the MySQL Yum repository that installs the MySQL server. Once you have installed MySQL using the MySQL Yum repository, you will not be able to install these packages (and vice versa).
akonadi-mysql
Installing Additional MySQL Products and Components with Yum
You can use Yum to install and manage individual components of MySQL. Some of these components are hosted in sub-repositories of the MySQL Yum repository: for example, the MySQL Connectors are to be found in the MySQL Connectors Community sub-repository, and the MySQL Workbench in MySQL Tools Community. You can use the following command to list the packages for all the MySQL components available for your platform from the MySQL Yum repository (for Fedora, replace yum in the command with dnf):
shell> sudo yum --disablerepo=\* --enablerepo='mysql*-community*' list available
Install any packages of your choice with the following command,
replacing package-name with name of the
package (for Fedora, replace yum in the command
with dnf):
shell> sudo yum install package-name
For example, to install MySQL Workbench on Fedora:
shell> sudo dnf install mysql-workbench-community
To install the shared client libraries (for Fedora, replace yum in the command with dnf):
shell> sudo yum install mysql-community-libs
Updating MySQL with Yum
Besides installation, you can also perform updates for MySQL products and components using the MySQL Yum repository. See Section 2.11.5, “Upgrading MySQL with the MySQL Yum Repository” for details.
For supported Yum-based platforms (see Section 2.5.1, “Installing MySQL on Linux Using the MySQL Yum Repository”, for a list), you can replace a third-party distribution of MySQL with the latest GA release (from the MySQL 5.7 series currently) from the MySQL Yum repository. According to how your third-party distribution of MySQL was installed, there are different steps to follow:
Replacing a Native Third-Party Distribution of MySQL
If you have installed a third-party distribution of MySQL from a native software repository (that is, a software repository provided by your own Linux distribution), follow these steps:
-
Backing Up Your Database
To avoid loss of data, always back up your database before trying to replace your MySQL installation using the MySQL Yum repository. See Chapter 7, Backup and Recovery, on how to back up your database.
-
Adding the MySQL Yum Repository
Add the MySQL Yum repository to your system's repository list by following the instructions given in Adding the MySQL Yum Repository.
-
Replacing the Native Third-Party Distribution by a Yum Update or a DNF Upgrade
By design, the MySQL Yum repository will replace your native, third-party MySQL with the latest GA release (from the MySQL 5.7 series currently) from the MySQL Yum repository when you perform a yum update command (or dnf upgrade for Fedora) on the system, or a yum update mysql-server (or dnf upgrade mysql-server for Fedora).
After updating MySQL using the Yum repository, applications compiled with older versions of the shared client libraries should continue to work. However, if you want to recompile applications and dynamically link them with the updated libraries, see Upgrading the Shared Client Libraries, for some special considerations.
Replacing a Nonnative Third-Party Distribution of MySQL
If you have installed a third-party distribution of MySQL from a nonnative software repository (that is, a software repository not provided by your own Linux distribution), follow these steps:
-
Backing Up Your Database
To avoid loss of data, always back up your database before trying to replace your MySQL installation using the MySQL Yum repository. See Chapter 7, Backup and Recovery, on how to back up your database.
-
Stopping Yum from Receiving MySQL Packages from Third-Party, Nonnative Repositories
Before you can use the MySQL Yum repository for installing MySQL, you must stop your system from receiving MySQL packages from any third-party, nonnative Yum repositories.
For example, if you have installed MariaDB using their own software repository, get a list of the installed MariaDB packages using the following command (for Fedora, replace yum in the command with dnf):
shell>
yum list installed mariadb\*MariaDB-common.i686 10.0.4-1 @mariadb MariaDB-compat.i686 10.0.4-1 @mariadb MariaDB-server.i686 10.0.4-1 @mariadbFrom the command output, we can identify the installed packages (
MariaDB-common,MariaDB-compat, andMariaDB-server) and the source of them (a nonnative software repository namedmariadb).As another example, if you have installed Percona using their own software repository, get a list of the installed Percona packages using the following command (for Fedora, replace yum in the command with dnf):
shell>
yum list installed Percona\*Percona-Server-client-55.i686 5.5.39-rel36.0.el6 @percona-release-i386 Percona-Server-server-55.i686 5.5.39-rel36.0.el6 @percona-release-i386 Percona-Server-shared-55.i686 5.5.39-rel36.0.el6 @percona-release-i386 percona-release.noarch 0.1-3 @/percona-release-0.1-3.noarchFrom the command output, we can identify the installed packages (
Percona-Server-client,Percona-Server-server,Percona-Server-shared, andpercona-release.noarch) and the source of them (a nonnative software repository namedpercona-release).If you are not sure which third-party MySQL fork you have installed, this command should reveal it and list the RPM packages installed for it, as well as the third-party repository that supplies the packages (for Fedora, replace yum in the command with dnf):
shell>
yum --disablerepo=\* provides mysql\*The next step is to stop Yum from receiving packages from the nonnative repository. If the yum-config-manager utility is supported on your platform, you can, for example, use this command for stopping delivery from MariaDB (on Fedora, use the dnf config-manager command instead of yum-config-manager):
shell>
sudo yum-config-manager --disable mariadbUse this command for stopping delivery from Percona (on Fedora, use the dnf config-manager command instead of yum-config-manager):
shell>
sudo yum-config-manager --disable percona-releaseYou can perform the same task by removing the entry for the software repository existing in one of the repository files under the
/etc/yum.repos.d/directory. This is how the entry typically looks for MariaDB:[mariadb] name = MariaDB baseurl =
[base URL for repository]gpgkey =[URL for GPG key]gpgcheck =1The entry is usually found in the file
/etc/yum.repos.d/MariaDB.repofor MariaDB—delete the file, or remove entry from it (or from the file in which you find the entry).NoteThis step is not necessary for an installation that was configured with a Yum repository release package (like Percona) if you are going to remove the release package (
percona-release.noarchfor Percona), as shown in the uninstall command for Percona in Step 3 below. -
Uninstalling the Nonnative Third-Party MySQL Distribution of MySQL
The nonnative third-party MySQL distribution must first be uninstalled before you can use the MySQL Yum repository to install MySQL. For the MariaDB packages found in Step 2 above, uninstall them with the following command (for Fedora, replace yum in the command with dnf):
shell>
sudo yum remove MariaDB-common MariaDB-compat MariaDB-serverFor the Percona packages we found in Step 2 above (for Fedora, replace yum in the command with dnf):
shell>
sudo yum remove Percona-Server-client-55 Percona-Server-server-55 \ Percona-Server-shared-55.i686 percona-release -
Installing MySQL with the MySQL Yum Repository
Then, install MySQL with the MySQL Yum repository by following the instructions given in Section 2.5.1, “Installing MySQL on Linux Using the MySQL Yum Repository”: .
ImportantIf you have chosen to replace your third-party MySQL distribution with a newer version of MySQL from the MySQL Yum repository, remember to run mysql_upgrade after the server starts, to check and possibly resolve any incompatibilities between the old data and the upgraded software. mysql_upgrade also performs other functions; see Section 4.4.7, “mysql_upgrade — Check and Upgrade MySQL Tables” for details.
For EL7-based platforms: See Compatibility Information for EL7-based platforms.
The MySQL APT repository provides deb
packages for installing and managing the MySQL server, client, and
other components on Debian and Ubuntu platforms.
Instructions for using the MySQL APT Repository are available in A Quick Guide to Using the MySQL APT Repository.
The MySQL SLES repository provides RPM packages for installing and managing the MySQL server, client, and other components on SUSE Enterprise Linux Server.
Instructions for using the MySQL SLES repository are available in A Quick Guide to Using the MySQL SLES Repository.
The recommended way to install MySQL on RPM-based Linux distributions is by using the RPM packages provided by Oracle. There are two sources for obtaining them, for the Community Edition of MySQL:
From the MySQL software repositories:
The MySQL Yum repository (see Section 2.5.1, “Installing MySQL on Linux Using the MySQL Yum Repository” for details).
The MySQL SLES repository (see Section 2.5.4, “Installing MySQL on Linux Using the MySQL SLES Repository” for details).
From the Download MySQL Community Server page in the MySQL Developer Zone.
RPM distributions of MySQL are also provided by other vendors. Be aware that they may differ from those built by Oracle in features, capabilities, and conventions (including communication setup), and that the installation instructions in this manual do not necessarily apply to them. The vendor's instructions should be consulted instead.
If you have such a third-party distribution of MySQL running on your system and now want to migrate to Oracle's distribution using the RPM packages downloaded from the MySQL Developer Zone, see Compatibility with RPM Packages from Other Vendors below. The preferred method of migration, however, is to use the MySQL Yum repository or MySQL SLES repository.
RPM packages for MySQL are listed in the following tables:
Table 2.8 RPM Packages for MySQL Community Edition
| Package Name | Summary |
|---|---|
mysql-community-server |
Database server and related tools |
mysql-community-client |
MySQL client applications and tools |
mysql-community-common |
Common files for server and client libraries |
mysql-community-devel |
Development header files and libraries for MySQL database client applications |
mysql-community-libs |
Shared libraries for MySQL database client applications |
mysql-community-libs-compat |
Shared compatibility libraries for previous MySQL installations |
mysql-community-embedded |
MySQL embedded library |
mysql-community-embedded-devel |
Development header files and libraries for MySQL as an embeddable library |
mysql-community-test |
Test suite for the MySQL server |
Table 2.9 RPM Packages for the MySQL Enterprise Edition
| Package Name | Summary |
|---|---|
mysql-commercial-server |
Database server and related tools |
mysql-commercial-client |
MySQL client applications and tools |
mysql-commercial-common |
Common files for server and client libraries |
mysql-commercial-devel |
Development header files and libraries for MySQL database client applications |
mysql-commercial-libs |
Shared libraries for MySQL database client applications |
mysql-commercial-libs-compat |
Shared compatibility libraries for previous MySQL installations |
mysql-commercial-embedded |
MySQL embedded library |
mysql-commercial-embedded-devel |
Development header files and libraries for MySQL as an embeddable library |
mysql-commercial-test |
Test suite for the MySQL server |
The full names for the RPMs have the following syntax:
packagename-version-distribution-arch.rpm
The distribution and
arch values indicate the Linux
distribution and the processor type for which the package was
built. See the table below for lists of the distribution
identifiers:
Table 2.10 MySQL Linux RPM Package Distribution Identifiers
| distribution Value | Intended Use |
|---|---|
el6, el7 |
Red Hat Enterprise Linux/Oracle Linux/CentOS 6, or 7 |
fc28 and fc29 |
Fedora 28 and 29 |
sles12 |
SUSE Linux Enterprise Server 12 |
To see all files in an RPM package (for example,
mysql-community-server), use the following
command:
shell> rpm -qpl mysql-community-server-version-distribution-arch.rpm
The discussion in the rest of this section applies only to an installation process using the RPM packages directly downloaded from Oracle, instead of through a MySQL repository.
Dependency relationships exist among some of the packages. If you plan to install many of the packages, you may wish to download the RPM bundle tar file instead, which contains all the RPM packages listed above, so that you need not download them separately.
In most cases, you need to install the
mysql-community-server,
mysql-community-client,
mysql-community-libs,
mysql-community-common, and
mysql-community-libs-compat packages to get a
functional, standard MySQL installation. To perform such a
standard, basic installation, go to the folder that contains all
those packages (and, preferably, no other RPM packages with
similar names), and issue the following command for platforms
other than Red Hat Enterprise Linux/Oracle
Linux/CentOS:
shell> sudo yum install mysql-community-{server,client,common,libs}-*
Replace yum with zypper for SLES, and with dnf for Fedora.
For Red Hat Enterprise Linux/Oracle Linux/CentOS systems:
shell> sudo yum install mysql-community-{server,client,common,libs}-* mysql-5.*
While it is much preferable to use a high-level package management tool like yum to install the packages, users who prefer direct rpm commands can replace the yum install command with the rpm -Uvh command; however, using rpm -Uvh instead makes the installation process more prone to failure, due to potential dependency issues the installation process might run into.
To install only the client programs, you can skip
mysql-community-server in your list of packages
to install; issue the following command for platforms
other than Red Hat Enterprise Linux/Oracle
Linux/CentOS:
shell> sudo yum install mysql-community-{client,common,libs}-*
Replace yum with zypper for SLES, and with dnf for Fedora.
For Red Hat Enterprise Linux/Oracle Linux/CentOS systems:
shell> sudo yum install mysql-community-{client,common,libs}-* mysql-5.*
A standard installation of MySQL using the RPM packages result in files and resources created under the system directories, shown in the following table.
Table 2.11 MySQL Installation Layout for Linux RPM Packages from the MySQL Developer Zone
| Files or Resources | Location |
|---|---|
| Client programs and scripts | /usr/bin |
| mysqld server | /usr/sbin |
| Configuration file | /etc/my.cnf |
| Data directory | /var/lib/mysql |
| Error log file |
For RHEL, Oracle Linux, CentOS or Fedora platforms:
For SLES: |
Value of secure_file_priv |
/var/lib/mysql-files |
| System V init script |
For RHEL, Oracle Linux, CentOS or Fedora platforms:
For SLES: |
| Systemd service |
For RHEL, Oracle Linux, CentOS or Fedora platforms:
For SLES: |
| Pid file | /var/run/mysql/mysqld.pid |
| Socket | /var/lib/mysql/mysql.sock |
| Keyring directory | /var/lib/mysql-keyring |
| Unix manual pages | /usr/share/man |
| Include (header) files | /usr/include/mysql |
| Libraries | /usr/lib/mysql |
| Miscellaneous support files (for example, error messages, and character set files) | /usr/share/mysql |
The installation also creates a user named
mysql and a group named
mysql on the system.
Installation of previous versions of MySQL using older packages
might have created a configuration file named
/usr/my.cnf. It is highly recommended that
you examine the contents of the file and migrate the desired
settings inside to the file /etc/my.cnf
file, then remove /usr/my.cnf.
MySQL is not automatically started at the end of the installation process. For Red Hat Enterprise Linux, Oracle Linux, CentOS, and Fedora systems, use the following command to start MySQL:
shell> sudo service mysqld start
For SLES systems, the command is the same, but the service name is different:
shell> sudo service mysql start
If the operating system is systemd enabled, standard
service commands such as
stop, start,
status and restart should be
used to manage the MySQL server service. The
mysqld service is enabled by default, and it
starts at system reboot. Notice that certain things might work
differently on systemd platforms: for example, changing the
location of the data directory might cause issues. See
Section 2.5.10, “Managing MySQL Server with systemd” for additional information.
During an upgrade installation using RPM packages, if the MySQL server is running when the upgrade occurs then the MySQL server is stopped, the upgrade occurs, and the MySQL server is restarted. One exception: if the edition also changes during an upgrade (such as community to commercial, or vice-versa), then MySQL server is not restarted.
At the initial start up of the server, the following happens, given that the data directory of the server is empty:
The server is initialized.
An SSL certificate and key files are generated in the data directory.
validate_passwordis installed and enabled.A superuser account
'root'@'localhost'is created. A password for the superuser is set and stored in the error log file. To reveal it, use the following command for RHEL, Oracle Linux, CentOS, and Fedora systems:shell>
sudo grep 'temporary password' /var/log/mysqld.logUse the following command for SLES systems:
shell>
sudo grep 'temporary password' /var/log/mysql/mysqld.logThe next step is to log in with the generated, temporary password and set a custom password for the superuser account:
shell> mysql -uroot -p
mysql> ALTER USER 'root'@'localhost' IDENTIFIED BY 'MyNewPass4!';
validate_password
is installed by default. The default password policy implemented
by validate_password requires that passwords
contain at least one upper case letter, one lower case letter,
one digit, and one special character, and that the total
password length is at least 8 characters.
If something goes wrong during installation, you might find debug
information in the error log file
/var/log/mysqld.log.
For some Linux distributions, it might be necessary to increase the limit on number of file descriptors available to mysqld. See Section B.4.2.17, “File Not Found and Similar Errors”
Compatibility with RPM Packages from Other Vendors.
If you have installed packages for MySQL from your Linux
distribution's local software repository, it is much preferable
to install the new, directly-downloaded packages from Oracle
using the package management system of your platform
(yum, dnf, or
zypper), as described above. The command
replaces old packages with new ones to ensure compatibility of
old applications with the new installation; for example, the old
mysql-libs package is replaced with the
mysql-community-libs-compat package, which
provides a replacement-compatible client library for
applications that were using your older MySQL installation. If
there was an older version of
mysql-community-libs-compat on the system, it
also gets replaced.
If you have installed third-party packages for MySQL that are NOT from your Linux distribution's local software repository (for example, packages directly downloaded from a vendor other than Oracle), you should uninstall all those packages before installing the new, directly-downloaded packages from Oracle. This is because conflicts may arise between those vendor's RPM packages and Oracle's: for example, a vendor's convention about which files belong with the server and which belong with the client library may differ from that used for Oracle packages. Attempts to install an Oracle RPM may then result in messages saying that files in the RPM to be installed conflict with files from an installed package.
Installing Client Libraries from Multiple MySQL Versions.
It is possible to install multiple client library versions, such
as for the case that you want to maintain compatibility with
older applications linked against previous libraries. To install
an older client library, use the --oldpackage
option with rpm. For example, to install
mysql-community-libs-5.5 on an EL6 system
that has libmysqlclient.20 from MySQL 5.7,
use a command like this:
shell> rpm --oldpackage -ivh mysql-community-libs-5.5.50-2.el6.x86_64.rpm
Debug Package.
A special variant of MySQL Server compiled with the
debug package has been
included in the server RPM packages. It performs debugging and
memory allocation checks and produces a trace file when the
server is running. To use that debug version, start MySQL with
/usr/sbin/mysqld-debug, instead of starting
it as a service or with /usr/sbin/mysqld.
See Section 28.5.3, “The DBUG Package” for the debug options you can
use.
The default plugin directory for debug builds changed from
/usr/lib64/mysql/plugin to
/usr/lib64/mysql/plugin/debug in 5.7.21.
Previously, it was necessary to change
plugin_dir to
/usr/lib64/mysql/plugin/debug for debug
builds.
Rebuilding RPMs from source SRPMs. Source code SRPM packages for MySQL are available for download. They can be used as-is to rebuild the MySQL RPMs with the standard rpmbuild tool chain.
root passwords for pre-GA releases.
For MySQL 5.7.4 and 5.7.5, the initial random
root password is written to the
.mysql_secret file in the directory named
by the HOME environment variable. When trying
to access the file, bear in mind that depending on operating
system, using a command such as sudo may
cause the value of HOME to refer to the home
directory of the root system user
. .mysql_secret is created with mode 600 to
be accessible only to the system user for whom it is created.
Before MySQL 5.7.4, the accounts (including
root) created in the MySQL grant tables for
an RPM installation initially have no passwords; after starting
the server, you should assign passwords to them using the
instructions in Section 2.10, “Postinstallation Setup and Testing”."
Oracle provides Debian packages for installing MySQL on Debian or Debian-like Linux systems. The packages are available through two different channels:
The MySQL APT Repository. This is the preferred method for installing MySQL on Debian-like systems, as it provides a simple and convenient way to install and update MySQL products. For details, see Section 2.5.3, “Installing MySQL on Linux Using the MySQL APT Repository”.
The MySQL Developer Zone's Download Area. For details, see Section 2.1.2, “How to Get MySQL”. The following are some information on the Debian packages available there and the instructions for installing them:
Various Debian packages are provided in the MySQL Developer Zone for installing different components of MySQL on different Debian or Ubuntu platforms. The preferred method is to use the tarball bundle, which contains the packages needed for a basic setup of MySQL. The tarball bundles have names in the format of
mysql-server_.MVER-DVER_CPU.deb-bundle.tarMVERis the MySQL version andDVERis the Linux distribution version. TheCPUvalue indicates the processor type or family for which the package is built, as shown in the following table:Table 2.12 MySQL Debian and Ubuntu Installation Packages CPU Identifiers
CPUValueIntended Processor Type or Family i386Pentium processor or better, 32 bit amd6464-bit x86 processor After downloading the tarball, unpack it with the following command:
shell>
tar -xvf mysql-server_MVER-DVER_CPU.deb-bundle.tarYou may need to install the
libaiolibrary if it is not already present on your system:shell>
sudo apt-get install libaio1Preconfigure the MySQL server package with the following command:
shell>
sudo dpkg-preconfigure mysql-community-server_*.debYou will be asked to provide a password for the root user for your MySQL installation. You might also be asked other questions regarding the installation.
ImportantMake sure you remember the root password you set. Users who want to set a password later can leave the password field blank in the dialogue box and just press ; in that case, root access to the server is authenticated using the MySQL Socket Peer-Credential Authentication Plugin for connections using a Unix socket file. You can set the root password later using mysql_secure_installation.
For a basic installation of the MySQL server, install the database common files package, the client package, the client metapackage, the server package, and the server metapackage (in that order); you can do that with a single command:
shell>
sudo dpkg -i mysql-{common,community-client,client,community-server,server}_*.debIf you are being warned of unmet dependencies by dpkg, you can fix them using apt-get:
sudo apt-get -f installHere are where the files are installed on the system:
All configuration files (like
my.cnf) are under/etc/mysqlAll binaries, libraries, headers, etc., are under
/usr/binand/usr/sbinThe data directory is
/var/lib/mysql
Debian distributions of MySQL are also provided by other vendors. Be aware that they may differ from those built by Oracle in features, capabilities, and conventions (including communication setup), and that the instructions in this manual do not necessarily apply to installing them. The vendor's instructions should be consulted instead.
The Docker deployment framework supports easy installation and configuration of MySQL Server. This section explains how to use a MySQL Server Docker image.
You need to have Docker installed on your system before you can use a MySQL Server Docker image. See Install Docker for instructions.
You need to either run docker commands with
sudo, or create a docker
usergroup, and then add to it any users who want to run
docker commands. See details
here.
Because Docker containers are always run with root privileges,
you should understand the
Docker
daemon attack surface and properly mitigate the related
risks.
The instructions for using the MySQL Docker container are divided into two sections.
The MySQL Docker images maintained by the MySQL team are built specifically for Linux platforms. Other platforms are not supported, and users using these MySQL Docker images on them are doing so at their own risk. See the discussion here for some known limitations for running these containers on non-Linux operating systems.
Downloading a MySQL Server Docker Image
Downloading the server image in a separate step is not strictly necessary; however, performing this step before you create your Docker container ensures your local image is up to date. To download the MySQL Community Edition image, run this command:
docker pull mysql/mysql-server:tag
The tag is the label for the image
version you want to pull (for example, 5.5,
5.6, 5.7,
8.0, or latest). If
: is
omitted, the taglatest label is used, and the
image for the latest GA version of MySQL Community Server is
downloaded. Refer to the list of tags for available versions on
the
mysql/mysql-server
page in the Docker Hub.
You can list downloaded Docker images with this command:
shell> docker images
REPOSITORY TAG IMAGE ID CREATED SIZE
mysql/mysql-server latest 3157d7f55f8d 4 weeks ago 241MB
To download the MySQL Enterprise Edition image from the
My Oracle
Support website, sign in to your Oracle account,
download from the
tar.zip file for the Docker image
(mysql-commercial-),
unzip it to obtain the tarball inside
(version_linux_x86_64_docker_tar.zipmysql-enterprise-server-),
and then load the image by running this command:
version.tar
docker load -i mysql-enterprise-server-version.tarStarting a MySQL Server Instance
To start a new Docker container for a MySQL Server, use the following command:
docker run --name=container_name -d image_name:tag
The image name can be obtained using the docker
images command, as explained in
Downloading a MySQL Server Docker Image. The
--name option, for supplying a custom name for
your server container, is optional; if no container name is
supplied, a random one is generated.
For example, to start a new Docker container for the MySQL Community Server, use this command:
docker run --name=mysql1 -d mysql/mysql-server:5.7 To start a new Docker container for the MySQL Enterprise Server with a Docker image downloaded from My Oracle Support, use this command:
docker run --name=mysql1 -d mysql/enterprise-server:5.7 If the Docker image of the specified name and tag has not been downloaded by an earlier docker pull or docker run command, the image is now downloaded. Initialization for the container begins, and the container appears in the list of running containers when you run the docker ps command. For example:
shell> docker ps
CONTAINER ID IMAGE COMMAND CREATED STATUS PORTS NAMES
a24888f0d6f4 mysql/mysql-server "/entrypoint.sh my..." 14 seconds ago Up 13 seconds (health: starting) 3306/tcp, 33060/tcp mysql1
The container initialization might take some time. When the
server is ready for use, the STATUS of the
container in the output of the docker ps
command changes from (health: starting) to
(healthy).
The -d option used in the docker
run command above makes the container run in the
background. Use this command to monitor the output from the
container:
docker logs mysql1
Once initialization is finished, the command's output is going to contain the random password generated for the root user; check the password with, for example, this command:
shell> docker logs mysql1 2>&1 | grep GENERATED
GENERATED ROOT PASSWORD: Axegh3kAJyDLaRuBemecis&EShOs
Connecting to MySQL Server from within the Container
Once the server is ready, you can run the mysql client within the MySQL Server container you just started, and connect it to the MySQL Server. Use the docker exec -it command to start a mysql client inside the Docker container you have started, like the following:
docker exec -it mysql1 mysql -uroot -p
When asked, enter the generated root password (see the last step
in Starting a MySQL Server Instance above on how
to find the password). Because the
MYSQL_ONETIME_PASSWORD
option is true by default, after you have connected a
mysql client to the server, you must reset
the server root password by issuing this statement:
mysql> ALTER USER 'root'@'localhost' IDENTIFIED BY 'password';
Substitute password with the password
of your choice. Once the password is reset, the server is ready
for use.
Container Shell Access
To have shell access to your MySQL Server container, use the docker exec -it command to start a bash shell inside the container:
shell> docker exec -it mysql1 bash
bash-4.2#You can then run Linux commands inside the container. For example, to view contents in the server's data directory inside the container, use this command:
bash-4.2# ls /var/lib/mysql
auto.cnf ca.pem client-key.pem ib_logfile0 ibdata1 mysql mysql.sock.lock private_key.pem server-cert.pem sys
ca-key.pem client-cert.pem ib_buffer_pool ib_logfile1 ibtmp1 mysql.sock performance_schema public_key.pem server-key.pem
Stopping and Deleting a MySQL Container
To stop the MySQL Server container we have created, use this command:
docker stop mysql1docker stop sends a SIGTERM signal to the mysqld process, so that the server is shut down gracefully.
Also notice that when the main process of a container (mysqld in the case of a MySQL Server container) is stopped, the Docker container stops automatically.
To start the MySQL Server container again:
docker start mysql1To stop and start again the MySQL Server container with a single command:
docker restart mysql1To delete the MySQL container, stop it first, and then use the docker rm command:
docker stop mysql1docker rm mysql1
If you want the
Docker
volume for the server's data directory to be deleted at
the same time, add the -v option to the
docker rm command.
Upgrading a MySQL Server Container
Before performing any upgrade to MySQL, follow carefully the instructions in Section 2.11, “Upgrading MySQL”. Among other instructions discussed there, it is especially important to back up your database before the upgrade.
The instructions in this section require that the server's data and configuration have been persisted on the host. See Persisting Data and Configuration Changes for details.
Follow these steps to upgrade a Docker installation of MySQL 5.6 to 5.7:
Stop the MySQL 5.6 server (container name is
mysql56in this example):docker stop mysql56Download the MySQL 5.7 Server Docker image. See instructions in Downloading a MySQL Server Docker Image; make sure you use the right tag for MySQL 5.7.
Start a new MySQL 5.7 Docker container (named
mysql57in this example) with the old server data and configuration (with proper modifications if needed—see Section 2.11, “Upgrading MySQL”) that have been persisted on the host (by bind-mounting in this example). For the MySQL Community Server, run this command:docker run --name=mysql57 \ --mount type=bind,src=/path-on-host-machine/my.cnf,dst=/etc/my.cnf \ --mount type=bind,src=/path-on-host-machine/datadir,dst=/var/lib/mysql \ -d mysql/mysql-server:5.7If needed, adjust
mysql/mysql-serverto the correct repository name—for example, replace it withmysql/enterprise-serverfor MySQL Enterprise Edition images downloaded from My Oracle Support.Wait for the server to finish startup. You can check the status of the server using the docker ps command (see Starting a MySQL Server Instance for how to do that).
Run the mysql_upgrade utility in the MySQL 5.7 Server container:
docker exec -it mysql57 mysql_upgrade -uroot -pWhen prompted, enter the root password for your old MySQL 5.6 Server.
Finish the upgrade by restarting the MySQL 5.7 Server container:
docker restart mysql57
More Topics on Deploying MySQL Server with Docker
For more topics on deploying MySQL Server with Docker like server configuration, persisting data and configuration, server error log, and container environment variables, see Section 2.5.7.2, “More Topics on Deploying MySQL Server with Docker”.
Most of the sample commands below have
mysql/mysql-server as the Docker image
repository when that has to be specified (like with the
docker pull and docker
run commands); change that if your image is from
another repository—for example, replace it with
mysql/enterprise-server for MySQL Enterprise Edition images
downloaded from
My Oracle
Support.
The Optimized MySQL Installation for Docker
Docker images for MySQL are optimized for code size, which means they only include crucial components that are expected to be relevant for the majority of users who run MySQL instances in Docker containers. A MySQL Docker installation is different from a common, non-Docker installation in the following aspects:
Included binaries are limited to:
/usr/bin/my_print_defaults/usr/bin/mysql/usr/bin/mysql_config/usr/bin/mysql_install_db/usr/bin/mysql_tzinfo_to_sql/usr/bin/mysql_upgrade/usr/bin/mysqladmin/usr/bin/mysqlcheck/usr/bin/mysqldump/usr/bin/mysqlpump/usr/sbin/mysqld
All binaries are stripped; they contain no debug information.
Configuring the MySQL Server
When you start the MySQL Docker container, you can pass configuration options to the server through the docker run command. For example:
docker run --name mysql1 -d mysql/mysql-server:tag --character-set-server=utf8mb4 --collation-server=utf8mb4_col
The command starts your MySQL Server with
utf8mb4 as the default character set and
utf8mb4_col as the default collation for your
databases.
Another way to configure the MySQL Server is to prepare a configuration file and mount it at the location of the server configuration file inside the container. See Persisting Data and Configuration Changes for details.
Persisting Data and Configuration Changes
Docker containers are in principle ephemeral, and any data or
configuration are expected to be lost if the container is
deleted or corrupted (see discussions
here).
Docker
volumes, however, provides a mechanism to persist data
created inside a Docker container. At its initialization, the
MySQL Server container creates a Docker volume for the server
data directory. The JSON output for running the docker
inspect command on the container has a
Mount key, whose value provides information
on the data directory volume:
shell> docker inspect mysql1
...
"Mounts": [
{
"Type": "volume",
"Name": "4f2d463cfc4bdd4baebcb098c97d7da3337195ed2c6572bc0b89f7e845d27652",
"Source": "/var/lib/docker/volumes/4f2d463cfc4bdd4baebcb098c97d7da3337195ed2c6572bc0b89f7e845d27652/_data",
"Destination": "/var/lib/mysql",
"Driver": "local",
"Mode": "",
"RW": true,
"Propagation": ""
}
],
...
The output shows that the source folder
/var/lib/docker/volumes/4f2d463cfc4bdd4baebcb098c97d7da3337195ed2c6572bc0b89f7e845d27652/_data,
in which data is persisted on the host, has been mounted at
/var/lib/mysql, the server data directory
inside the container.
Another way to preserve data is to
bind-mount
a host directory using the --mount option when
creating the container. The same technique can be used to
persist the configuration of the server. The following command
creates a MySQL Server container and bind-mounts both the data
directory and the server configuration file:
docker run --name=mysql1 \
--mount type=bind,src=/path-on-host-machine/my.cnf,dst=/etc/my.cnf \
--mount type=bind,src=/path-on-host-machine/datadir,dst=/var/lib/mysql \
-d mysql/mysql-server:tag
The command mounts
path-on-host-machine/my.cnf/etc/my.cnfpath-on-host-machine/datadir/var/lib/mysql
The configuration file
path-on-host-machine/my.cnfmysql:[mysqld] user=mysql
You can also include other server configuration options in the file.
The data directory
path-on-host-machine/datadir
Running Additional Initialization Scripts
If there are any .sh or
.sql scripts you want to run on the
database immediately after it has been created, you can put them
into a host directory and then mount the directory at
/docker-entrypoint-initdb.d/ inside the
container. For example:
docker run --name=mysql1 \
--mount type=bind,src=/path-on-host-machine/scripts/,dst=/docker-entrypoint-initdb.d/ \
-d mysql/mysql-server:tagConnect to MySQL from an Application in Another Docker Container
By setting up a Docker network, you can allow multiple Docker containers to communicate with each other, so that a client application in another Docker container can access the MySQL Server in the server container. First, create a Docker network:
docker network create my-custom-net
Then, when you are creating and starting the server and the
client containers, use the --network option to
put them on network you created. For example:
docker run --name=mysql1 --network=my-custom-net -d mysql/mysql-serverdocker run --name=myapp1 --network=my-custom-net -d myapp
The myapp1 container can then connect to the
mysql1 container with the
mysql1 hostname and vice versa, as Docker
automatically sets up a DNS for the given container names. In
the following example, we run the
mysql client from inside
the myapp1 container to connect to host
mysql1 in its own container:
docker exec -it myapp1 mysql --host=mysql1 --user=myuser --passwordFor other networking techniques for containers, see the Docker container networking section in the Docker Documentation.
Server Error Log
When the MySQL Server is first started with your server container, a server error log is NOT generated if either of the following conditions is true:
A server configuration file from the host has been mounted, but the file does not contain the system variable
log_error(see Persisting Data and Configuration Changes on bind-mounting a server configuration file).A server configuration file from the host has not been mounted, but the Docker environment variable
MYSQL_LOG_CONSOLEistrue(the variable's default state for MySQL 5.7 server containers isfalse). The MySQL Server's error log is then redirected tostderr, so that the error log goes into the Docker container's log and is viewable using the docker logsmysqld-containercommand.
To make MySQL Server generate an error log when either of the
two conditions is true, use the
--log-error option to
configure the
server to generate the error log at a specific location
inside the container. To persist the error log, mount a host
file at the location of the error log inside the container as
explained in
Persisting Data and Configuration Changes. However,
you must make sure your MySQL Server inside its container has
write access to the mounted host file.
Docker Environment Variables
When you create a MySQL Server container, you can configure the
MySQL instance by using the --env option
(-e in short) and specifying one or more of the
following environment variables.
None of the variables below has any effect if the data directory you mount is not empty, as no server initialization is going to be attempted then (see Persisting Data and Configuration Changes for more details). Any pre-existing contents in the folder, including any old server settings, are not modified during the container startup.
The boolean variables including
MYSQL_RANDOM_ROOT_PASSWORD,MYSQL_ONETIME_PASSWORD,MYSQL_ALLOW_EMPTY_PASSWORD, andMYSQL_LOG_CONSOLEare made true by setting them with any strings of nonzero lengths. Therefore, setting them to, for example, “0”, “false”, or “no” does not make them false, but actually makes them true. This is a known issue of the MySQL Server containers.
MYSQL_RANDOM_ROOT_PASSWORD: When this variable is true (which is its default state, unlessMYSQL_ROOT_PASSWORDis set orMYSQL_ALLOW_EMPTY_PASSWORDis set to true), a random password for the server's root user is generated when the Docker container is started. The password is printed tostdoutof the container and can be found by looking at the container’s log (see Starting a MySQL Server Instance).MYSQL_ONETIME_PASSWORD: When the variable is true (which is its default state, unlessMYSQL_ROOT_PASSWORDis set orMYSQL_ALLOW_EMPTY_PASSWORDis set to true), the root user's password is set as expired and must be changed before MySQL can be used normally.MYSQL_DATABASE: This variable allows you to specify the name of a database to be created on image startup. If a user name and a password are supplied withMYSQL_USERandMYSQL_PASSWORD, the user is created and granted superuser access to this database (corresponding toGRANT ALL). The specified database is created by a CREATE DATABASE IF NOT EXIST statement, so that the variable has no effect if the database already exists.MYSQL_USER,MYSQL_PASSWORD: These variables are used in conjunction to create a user and set that user's password, and the user is granted superuser permissions for the database specified by theMYSQL_DATABASEvariable. BothMYSQL_USERandMYSQL_PASSWORDare required for a user to be created—if any of the two variables is not set, the other is ignored. If both variables are set butMYSQL_DATABASEis not, the user is created without any privileges.NoteThere is no need to use this mechanism to create the root superuser, which is created by default with the password set by either one of the mechanisms discussed in the descriptions for
MYSQL_ROOT_PASSWORDandMYSQL_RANDOM_ROOT_PASSWORD, unlessMYSQL_ALLOW_EMPTY_PASSWORDis true.MYSQL_ROOT_HOST: By default, MySQL creates the'root'@'localhost'account. This account can only be connected to from inside the container as described in Connecting to MySQL Server from within the Container. To allow root connections from other hosts, set this environment variable. For example, the value172.17.0.1, which is the default Docker gateway IP, allows connections from the host machine that runs the container. The option accepts only one entry, but wildcards are allowed (for example,MYSQL_ROOT_HOST=172.*.*.*orMYSQL_ROOT_HOST=%).MYSQL_LOG_CONSOLE: When the variable is true (the variable's default state for MySQL 5.7 server containers isfalse), the MySQL Server's error log is redirected tostderr, so that the error log goes into the Docker container's log and is viewable using the docker logsmysqld-containercommand.NoteThe variable has no effect if a server configuration file from the host has been mounted (see Persisting Data and Configuration Changes on bind-mounting a configuration file).
MYSQL_ROOT_PASSWORD: This variable specifies a password that is set for the MySQL root account.WarningSetting the MySQL root user password on the command line is insecure. As an alternative to specifying the password explicitly, you can set the variable with a container file path for a password file, and then mount a file from your host that contains the password at the container file path. This is still not very secure, as the location of the password file is still exposed. It is preferable to use the default settings of
MYSQL_RANDOM_ROOT_PASSWORDandMYSQL_ONETIME_PASSWORDboth being true.MYSQL_ALLOW_EMPTY_PASSWORD. Set it to true to allow the container to be started with a blank password for the root user.WarningSetting this variable to true is insecure, because it is going to leave your MySQL instance completely unprotected, allowing anyone to gain complete superuser access. It is preferable to use the default settings of
MYSQL_RANDOM_ROOT_PASSWORDandMYSQL_ONETIME_PASSWORDboth being true.
The MySQL Docker images provided by Oracle are built specifically for Linux platforms. Other platforms are not supported, and users running the MySQL Docker images from Oracle on them are doing so at their own risk. This section discusses some known issues for the images when used on non-Linux platforms.
Known Issues for using the MySQL Server Docker images from Oracle on Windows include:
If you are bind-mounting on the container's MySQL data directory (see Persisting Data and Configuration Changes for details), you have to set the location of the server socket file with the
--socketoption to somewhere outside of the MySQL data directory; otherwise, the server will fail to start. This is because the way Docker for Windows handles file mounting does not allow a host file from being bind-mounted on the socket file.
Many Linux distributions include a version of the MySQL server, client tools, and development components in their native software repositories and can be installed with the platforms' standard package management systems. This section provides basic instructions for installing MySQL using those package management systems.
Native packages are often several versions behind the currently available release. You will also normally be unable to install development milestone releases (DMRs), as these are not usually made available in the native repositories. Before proceeding, we recommend that you check out the other installation options described in Section 2.5, “Installing MySQL on Linux”.
Distribution specific instructions are shown below:
Red Hat Linux, Fedora, CentOS
NoteFor a number of Linux distributions, you can install MySQL using the MySQL Yum repository instead of the platform's native software repository. See Section 2.5.1, “Installing MySQL on Linux Using the MySQL Yum Repository” for details.
For Red Hat and similar distributions, the MySQL distribution is divided into a number of separate packages,
mysqlfor the client tools,mysql-serverfor the server and associated tools, andmysql-libsfor the libraries. The libraries are required if you want to provide connectivity from different languages and environments such as Perl, Python and others.To install, use the yum command to specify the packages that you want to install. For example:
root-shell> yum install mysql mysql-server mysql-libs mysql-server Loaded plugins: presto, refresh-packagekit Setting up Install Process Resolving Dependencies --> Running transaction check ---> Package mysql.x86_64 0:5.1.48-2.fc13 set to be updated ---> Package mysql-libs.x86_64 0:5.1.48-2.fc13 set to be updated ---> Package mysql-server.x86_64 0:5.1.48-2.fc13 set to be updated --> Processing Dependency: perl-DBD-MySQL for package: mysql-server-5.1.48-2.fc13.x86_64 --> Running transaction check ---> Package perl-DBD-MySQL.x86_64 0:4.017-1.fc13 set to be updated --> Finished Dependency Resolution Dependencies Resolved ================================================================================ Package Arch Version Repository Size ================================================================================ Installing: mysql x86_64 5.1.48-2.fc13 updates 889 k mysql-libs x86_64 5.1.48-2.fc13 updates 1.2 M mysql-server x86_64 5.1.48-2.fc13 updates 8.1 M Installing for dependencies: perl-DBD-MySQL x86_64 4.017-1.fc13 updates 136 k Transaction Summary ================================================================================ Install 4 Package(s) Upgrade 0 Package(s) Total download size: 10 M Installed size: 30 M Is this ok [y/N]: y Downloading Packages: Setting up and reading Presto delta metadata Processing delta metadata Package(s) data still to download: 10 M (1/4): mysql-5.1.48-2.fc13.x86_64.rpm | 889 kB 00:04 (2/4): mysql-libs-5.1.48-2.fc13.x86_64.rpm | 1.2 MB 00:06 (3/4): mysql-server-5.1.48-2.fc13.x86_64.rpm | 8.1 MB 00:40 (4/4): perl-DBD-MySQL-4.017-1.fc13.x86_64.rpm | 136 kB 00:00 -------------------------------------------------------------------------------- Total 201 kB/s | 10 MB 00:52 Running rpm_check_debug Running Transaction Test Transaction Test Succeeded Running Transaction Installing : mysql-libs-5.1.48-2.fc13.x86_64 1/4 Installing : mysql-5.1.48-2.fc13.x86_64 2/4 Installing : perl-DBD-MySQL-4.017-1.fc13.x86_64 3/4 Installing : mysql-server-5.1.48-2.fc13.x86_64 4/4 Installed: mysql.x86_64 0:5.1.48-2.fc13 mysql-libs.x86_64 0:5.1.48-2.fc13 mysql-server.x86_64 0:5.1.48-2.fc13 Dependency Installed: perl-DBD-MySQL.x86_64 0:4.017-1.fc13 Complete!
MySQL and the MySQL server should now be installed. A sample configuration file is installed into
/etc/my.cnf. An init script, to start and stop the server, will have been installed into/etc/init.d/mysqld. To start the MySQL server use service:root-shell> service mysqld start
To enable the server to be started and stopped automatically during boot, use chkconfig:
root-shell> chkconfig --levels 235 mysqld on
Which enables the MySQL server to be started (and stopped) automatically at the specified the run levels.
The database tables will have been automatically created for you, if they do not already exist. You should, however, run mysql_secure_installation to set the root passwords on your server.
Debian, Ubuntu, Kubuntu
NoteOn Debian, Ubuntu, and Kubuntu, MySQL can be installed using the MySQL APT Repository instead of the platform's native software repository. See Section 2.5.3, “Installing MySQL on Linux Using the MySQL APT Repository” for details.
On Debian and related distributions, there are two packages for MySQL in their software repositories,
mysql-clientandmysql-server, for the client and server components respectively. You should specify an explicit version, for examplemysql-client-5.1, to ensure that you install the version of MySQL that you want.To download and install, including any dependencies, use the apt-get command, specifying the packages that you want to install.
NoteBefore installing, make sure that you update your
apt-getindex files to ensure you are downloading the latest available version.A sample installation of the MySQL packages might look like this (some sections trimmed for clarity):
root-shell> apt-get install mysql-client-5.1 mysql-server-5.1 Reading package lists... Done Building dependency tree Reading state information... Done The following packages were automatically installed and are no longer required: linux-headers-2.6.28-11 linux-headers-2.6.28-11-generic Use 'apt-get autoremove' to remove them. The following extra packages will be installed: bsd-mailx libdbd-mysql-perl libdbi-perl libhtml-template-perl libmysqlclient15off libmysqlclient16 libnet-daemon-perl libplrpc-perl mailx mysql-common postfix Suggested packages: dbishell libipc-sharedcache-perl tinyca procmail postfix-mysql postfix-pgsql postfix-ldap postfix-pcre sasl2-bin resolvconf postfix-cdb The following NEW packages will be installed bsd-mailx libdbd-mysql-perl libdbi-perl libhtml-template-perl libmysqlclient15off libmysqlclient16 libnet-daemon-perl libplrpc-perl mailx mysql-client-5.1 mysql-common mysql-server-5.1 postfix 0 upgraded, 13 newly installed, 0 to remove and 182 not upgraded. Need to get 1907kB/25.3MB of archives. After this operation, 59.5MB of additional disk space will be used. Do you want to continue [Y/n]? Y Get: 1 http://gb.archive.ubuntu.com jaunty-updates/main mysql-common 5.1.30really5.0.75-0ubuntu10.5 [63.6kB] Get: 2 http://gb.archive.ubuntu.com jaunty-updates/main libmysqlclient15off 5.1.30really5.0.75-0ubuntu10.5 [1843kB] Fetched 1907kB in 9s (205kB/s) Preconfiguring packages ... Selecting previously deselected package mysql-common. (Reading database ... 121260 files and directories currently installed.) ... Processing 1 added doc-base file(s)... Registering documents with scrollkeeper... Setting up libnet-daemon-perl (0.43-1) ... Setting up libplrpc-perl (0.2020-1) ... Setting up libdbi-perl (1.607-1) ... Setting up libmysqlclient15off (5.1.30really5.0.75-0ubuntu10.5) ... Setting up libdbd-mysql-perl (4.008-1) ... Setting up libmysqlclient16 (5.1.31-1ubuntu2) ... Setting up mysql-client-5.1 (5.1.31-1ubuntu2) ... Setting up mysql-server-5.1 (5.1.31-1ubuntu2) ... * Stopping MySQL database server mysqld ...done. 2013-09-24T13:03:09.048353Z 0 [Note] InnoDB: 5.7.29 started; log sequence number 1566036 2013-09-24T13:03:10.057269Z 0 [Note] InnoDB: Starting shutdown... 2013-09-24T13:03:10.857032Z 0 [Note] InnoDB: Shutdown completed; log sequence number 1566036 * Starting MySQL database server mysqld ...done. * Checking for corrupt, not cleanly closed and upgrade needing tables. ... Processing triggers for libc6 ... ldconfig deferred processing now taking place
NoteThe apt-get command will install a number of packages, including the MySQL server, in order to provide the typical tools and application environment. This can mean that you install a large number of packages in addition to the main MySQL package.
During installation, the initial database will be created, and you will be prompted for the MySQL root password (and confirmation). A configuration file will have been created in
/etc/mysql/my.cnf. An init script will have been created in/etc/init.d/mysql.The server will already be started. You can manually start and stop the server using:
root-shell> service mysql [start|stop]
The service will automatically be added to the 2, 3 and 4 run levels, with stop scripts in the single, shutdown and restart levels.
The Juju deployment framework supports easy installation and configuration of MySQL servers. For instructions, see https://jujucharms.com/mysql/.
If you install MySQL using an RPM or Debian package on the following Linux platforms, server startup and shutdown is managed by systemd:
RPM package platforms:
Red Hat Enterprise Linux 7; Oracle Linux 7; CentOS 7
SUSE Linux Enterprise Server 12
Fedora 28 and 29
Debian package platforms:
Debian 8 or higher
Ubuntu 16 or higher
If you install MySQL from a generic binary distribution on a platform that uses systemd, you can manually configure systemd support for MySQL following the instructions provided in the post-installation setup section of the MySQL 5.7 Secure Deployment Guide.
If you install MySQL from a source distribution on a platform that
uses systemd, obtain systemd support for MySQL by configuring the
distribution using the
-DWITH_SYSTEMD=1
CMake option. See
Section 2.9.7, “MySQL Source-Configuration Options”.
The following discussion covers these topics:
On platforms for which systemd support for MySQL is installed, scripts such as mysqld_safe and the System V initialization script are unnecessary and are not installed. For example, mysqld_safe can handle server restarts, but systemd provides the same capability, and does so in a manner consistent with management of other services rather than by using an application-specific program.
Because systemd has the capability of managing multiple MySQL instances on platforms for which systemd support for MySQL is installed, mysqld_multi and mysqld_multi.server are unnecessary and are not installed.
systemd provides automatic MySQL server startup and shutdown. It also enables manual server management using the systemctl command. For example:
systemctl {start|stop|restart|status} mysqld
Alternatively, use the service command (with the arguments reversed), which is compatible with System V systems:
service mysqld {start|stop|restart|status}
For the systemctl or
service commands, if the MySQL service name
is not mysqld, use the appropriate name.
For example, use mysql rather than
mysqld on Debian-based and SLES systems.
Support for systemd includes these files:
mysqld.service(RPM platforms),mysql.service(Debian platforms): systemd service unit configuration file, with details about the MySQL service.mysqld@.service(RPM platforms),mysql@.service(Debian platforms): Likemysqld.serviceormysql.service, but used for managing multiple MySQL instances.mysqld.tmpfiles.d: File containing information to support thetmpfilesfeature. This file is installed under the namemysql.conf.mysqld_pre_systemd(RPM platforms),mysql-system-start(Debian platforms): Support script for the unit file. This script assists in creating the error log file only if the log location matches a pattern (/var/log/mysql*.logfor RPM platforms,/var/log/mysql/*.logfor Debian platforms). In other cases, the error log directory must be writable or the error log must be present and writable for the user running the mysqld process.
To add or change systemd options for MySQL, these methods are available:
Use a localized systemd configuration file.
Arrange for systemd to set environment variables for the MySQL server process.
Set the
MYSQLD_OPTSsystemd variable.
To use a localized systemd configuration file, create the
/etc/systemd/system/mysqld.service.d
directory if it does not exist. In that directory, create a file
that contains a [Service] section listing the
desired settings. For example:
[Service] LimitNOFILE=max_open_filesPIDFile=/path/to/pid/fileNice=nice_levelLimitCore=core_file_limitEnvironment="LD_PRELOAD=/path/to/malloc/library" Environment="TZ=time_zone_setting"
The discussion here uses override.conf as
the name of this file. Newer versions of systemd support the
following command, which opens an editor and permits you to edit
the file:
systemctl edit mysqld # RPM platforms systemctl edit mysql # Debian platforms
Whenever you create or change
override.conf, reload the systemd
configuration, then tell systemd to restart the MySQL service:
systemctl daemon-reload systemctl restart mysqld # RPM platforms systemctl restart mysql # Debian platforms
With systemd, the override.conf
configuration method must be used for certain parameters, rather
than settings in a [mysqld] or
[mysqld_safe] group in a MySQL option file:
For some parameters,
override.confmust be used because systemd itself must know their values and it cannot read MySQL option files to get them.Parameters that specify values otherwise settable only using options known to mysqld_safe must be specified using systemd because there is no corresponding mysqld parameter.
For additional information about using systemd rather than mysqld_safe, see Migrating from mysqld_safe to systemd.
You can set the following parameters in
override.conf:
To specify the process ID file:
As of MySQL 5.7.10: Use
override.confand change bothPIDFileandExecStartto name the PID file path name. Any setting of the process ID file in MySQL option files is ignored. To modifyExecStart, it must first be cleared. For example:[Service] PIDFile=/var/run/mysqld/mysqld-custom.pid ExecStart= ExecStart=/usr/sbin/mysqld --pid-file=/var/run/mysqld/mysqld-custom.pid $MYSQLD_OPTS
Before MySQL 5.7.10: Use
PIDFileinoverride.confrather than the--pid-fileoption for mysqld or mysqld_safe. systemd must know the PID file location so that it can restart or stop the server. If the PID file value is specified in a MySQL option file, the value must match thePIDFilevalue or MySQL startup may fail.
To set the number of file descriptors available to the MySQL server, use
LimitNOFILEinoverride.confrather than theopen_files_limitsystem variable for mysqld or--open-files-limitoption for mysqld_safe.To set the maximum core file size, use
LimitCoreinoverride.confrather than the--core-file-sizeoption for mysqld_safe.To set the scheduling priority for the MySQL server, use
Niceinoverride.confrather than the--niceoption for mysqld_safe.
Some MySQL parameters are configured using environment variables:
LD_PRELOAD: Set this variable if the MySQL server should use a specific memory-allocation library.TZ: Set this variable to specify the default time zone for the server.
There are multiple ways to specify environment variable values for use by the MySQL server process managed by systemd:
Use
Environmentlines in theoverride.conffile. For the syntax, see the example in the preceding discussion that describes how to use this file.Specify the values in the
/etc/sysconfig/mysqlfile (create the file if it does not exist). Assign values using the following syntax:LD_PRELOAD=
/path/to/malloc/libraryTZ=time_zone_settingAfter modifying
/etc/sysconfig/mysql, restart the server to make the changes effective:systemctl restart mysqld # RPM platforms systemctl restart mysql # Debian platforms
To specify options for mysqld without
modifying systemd configuration files directly, set or unset the
MYSQLD_OPTS systemd variable. For example:
systemctl set-environment MYSQLD_OPTS="--general_log=1" systemctl unset-environment MYSQLD_OPTS
MYSQLD_OPTS can also be set in the
/etc/sysconfig/mysql file.
After modifying the systemd environment, restart the server to make the changes effective:
systemctl restart mysqld # RPM platforms systemctl restart mysql # Debian platforms
For platforms that use systemd, the data directory is
initialized if empty at server startup. This might be a problem
if the data directory is a remote mount that has temporarily
disappeared: The mount point would appear to be an empty data
directory, which then would be initialized as a new data
directory. As of MySQL 5.7.20, to suppress this automatic
initialization behavior, specify the following line in the
/etc/sysconfig/mysql file (create the file
if it does not exist):
NO_INIT=true
This section describes how to configure systemd for multiple instances of MySQL.
Because systemd has the capability of managing multiple MySQL instances on platforms for which systemd support is installed, mysqld_multi and mysqld_multi.server are unnecessary and are not installed. This is true as of MySQL 5.7.13 for RPM platforms, 5.7.19 for Debian platforms.
To use multiple-instance capability, modify the
my.cnf option file to include configuration
of key options for each instance. These file locations are
typical:
/etc/my.cnfor/etc/mysql/my.cnf(RPM platforms)/etc/mysql/mysql.conf.d/mysqld.cnf(Debian platforms)
For example, to manage two instances named
replica01 and replica02,
add something like this to the option file:
RPM platforms:
[mysqld@replica01] datadir=/var/lib/mysql-replica01 socket=/var/lib/mysql-replica01/mysql.sock port=3307 log-error=/var/log/mysqld-replica01.log [mysqld@replica02] datadir=/var/lib/mysql-replica02 socket=/var/lib/mysql-replica02/mysql.sock port=3308 log-error=/var/log/mysqld-replica02.log
Debian platforms:
[mysqld@replica01] datadir=/var/lib/mysql-replica01 socket=/var/lib/mysql-replica01/mysql.sock port=3307 log-error=/var/log/mysql/replica01.log [mysqld@replica02] datadir=/var/lib/mysql-replica02 socket=/var/lib/mysql-replica02/mysql.sock port=3308 log-error=/var/log/mysql/replica02.log
The replica names shown here use @ as the
delimiter because that is the only delimiter supported by
systemd.
Instances then are managed by normal systemd commands, such as:
systemctl start mysqld@replica01 systemctl start mysqld@replica02
To enable instances to run at boot time, do this:
systemctl enable mysqld@replica01 systemctl enable mysqld@replica02
Use of wildcards is also supported. For example, this command displays the status of all replica instances:
systemctl status 'mysqld@replica*'
For management of multiple MySQL instances on the same machine, systemd automatically uses a different unit file:
mysqld@.servicerather thanmysqld.service(RPM platforms)mysql@.servicerather thanmysql.service(Debian platforms)
In the unit file, %I and
%i reference the parameter passed in after
the @ marker and are used to manage the
specific instance. For a command such as this:
systemctl start mysqld@replica01
systemd starts the server using a command such as this:
mysqld --defaults-group-suffix=@%I ...
The result is that the [server],
[mysqld], and
[mysqld@replica01] option groups are read and
used for that instance of the service.
On Debian platforms, AppArmor prevents the server from reading
or writing /var/lib/mysql-replica*, or
anything other than the default locations. To address this,
you must customize or disable the profile in
/etc/apparmor.d/usr.sbin.mysqld.
On Debian platforms, the packaging scripts for MySQL
uninstallation cannot currently handle
mysqld@ instances. Before removing or
upgrading the package, you must stop any extra instances
manually first.
Because mysqld_safe is not installed on
platforms that use systemd to manage MySQL, options previously
specified for that program (for example, in an
[mysqld_safe] option group) must be specified
another way:
Some mysqld_safe options are also understood by mysqld and can be moved from the
[mysqld_safe]option group to the[mysqld]group. This does not include--pid-file,--open-files-limit, or--nice. To specify those options, use theoverride.confsystemd file, described previously.For some mysqld_safe options, there are similar mysqld options. For example, the mysqld_safe option for enabling
sysloglogging is--syslog, which is deprecated. For mysqld, enable thelog_syslogsystem variable instead. For details, see Section 5.4.2, “The Error Log”.mysqld_safe options not understood by mysqld can be specified in
override.confor environment variables. For example, with mysqld_safe, if the server should use a specific memory allocation library, this is specified using the--malloc-liboption. For installations that manage the server with systemd, arrange to set theLD_PRELOADenvironment variable instead, as described previously.
Linux supports a number of different solutions for installing MySQL, covered in Section 2.5, “Installing MySQL on Linux”. One of the methods, covered in this section, is installing from Oracle's Unbreakable Linux Network (ULN). You can find information about Oracle Linux and ULN under http://linux.oracle.com/.
To use ULN, you need to obtain a ULN login and register the machine used for installation with ULN. This is described in detail in the ULN FAQ. The page also describes how to install and update packages. The MySQL packages are in the “MySQL for Oracle Linux 6” and “MySQL for Oracle Linux 7” channels for your system architecture on ULN.
At the time of this writing, ULN provides MySQL 5.7 for Oracle Linux 6 and Oracle Linux 7.
Once MySQL has been installed using ULN, you can find information on starting and stopping the server, and more, in this section, particularly under Section 2.5.5, “Installing MySQL on Linux Using RPM Packages from Oracle”.
If you're updating an existing MySQL installation to an installation using ULN, the recommended procedure is to export your data using mysqldump, remove the existing installation, install MySQL from ULN, and load the exported data into your freshly installed MySQL.
If the existing MySQL installation you're upgrading from is from a previous release series (prior to MySQL 5.7), make sure to read the section on upgrading MySQL, Section 2.11, “Upgrading MySQL”.
MySQL 5.7 supports Solaris 11 (Update 3 and later).
MySQL on Solaris is available in a number of different formats.
For information on installing using the native Solaris PKG format, see Section 2.7.1, “Installing MySQL on Solaris Using a Solaris PKG”.
To use a standard
tarbinary installation, use the notes provided in Section 2.2, “Installing MySQL on Unix/Linux Using Generic Binaries”. Check the notes and hints at the end of this section for Solaris specific notes that you may need before or after installation.
The installation packages have a dependency on the Oracle Developer Studio 12.5 Runtime Libraries, which must be installed before you run the MySQL installation package. See the download options for Oracle Developer Studio here. The installation package enables you to install the runtime libraries only instead of the full Oracle Developer Studio; see instructions in Installing Only the Runtime Libraries on Oracle Solaris 11.
To obtain a binary MySQL distribution for Solaris in tarball or PKG format, https://dev.mysql.com/downloads/mysql/5.7.html.
Additional notes to be aware of when installing and using MySQL on Solaris:
If you want to use MySQL with the
mysqluser and group, use the groupadd and useradd commands:groupadd mysql useradd -g mysql -s /bin/false mysql
If you install MySQL using a binary tarball distribution on Solaris, because the Solaris tar cannot handle long file names, use GNU tar (gtar) to unpack the distribution. If you do not have GNU tar on your system, install it with the following command:
pkg install archiver/gnu-tar
You should mount any file systems on which you intend to store
InnoDBfiles with theforcedirectiooption. (By default mounting is done without this option.) Failing to do so will cause a significant drop in performance when using theInnoDBstorage engine on this platform.If you would like MySQL to start automatically, you can copy
support-files/mysql.serverto/etc/init.dand create a symbolic link to it named/etc/rc3.d/S99mysql.server.If too many processes try to connect very rapidly to mysqld, you should see this error in the MySQL log:
Error in accept: Protocol error
You might try starting the server with the
--back_log=50option as a workaround for this.To configure the generation of core files on Solaris you should use the coreadm command. Because of the security implications of generating a core on a
setuid()application, by default, Solaris does not support core files onsetuid()programs. However, you can modify this behavior using coreadm. If you enablesetuid()core files for the current user, they will be generated using the mode 600 and owned by the superuser.
You can install MySQL on Solaris using a binary package of the native Solaris PKG format instead of the binary tarball distribution.
The installation package has a dependency on the Oracle Developer Studio 12.5 Runtime Libraries, which must be installed before you run the MySQL installation package. See the download options for Oracle Developer Studio here. The installation package enables you to install the runtime libraries only instead of the full Oracle Developer Studio; see instructions in Installing Only the Runtime Libraries on Oracle Solaris 11.
To use this package, download the corresponding
mysql-VERSION-solaris11-PLATFORM.pkg.gz file,
then uncompress it. For example:
shell> gunzip mysql-5.7.29-solaris11-x86_64.pkg.gz
To install a new package, use pkgadd and follow the onscreen prompts. You must have root privileges to perform this operation:
shell> pkgadd -d mysql-5.7.29-solaris11-x86_64.pkg
The following packages are available:
1 mysql MySQL Community Server (GPL)
(i86pc) 5.7.29
Select package(s) you wish to process (or 'all' to process
all packages). (default: all) [?,??,q]:
The PKG installer installs all of the files and tools needed, and then initializes your database if one does not exist. To complete the installation, you should set the root password for MySQL as provided in the instructions at the end of the installation. Alternatively, you can run the mysql_secure_installation script that comes with the installation.
By default, the PKG package installs MySQL under the root path
/opt/mysql. You can change only the
installation root path when using pkgadd, which
can be used to install MySQL in a different Solaris zone. If you
need to install in a specific directory, use a binary
tar file distribution.
The pkg installer copies a suitable startup
script for MySQL into /etc/init.d/mysql. To
enable MySQL to startup and shutdown automatically, you should
create a link between this file and the init script directories.
For example, to ensure safe startup and shutdown of MySQL you
could use the following commands to add the right links:
shell>ln /etc/init.d/mysql /etc/rc3.d/S91mysqlshell>ln /etc/init.d/mysql /etc/rc0.d/K02mysql
To remove MySQL, the installed package name is
mysql. You can use this in combination with the
pkgrm command to remove the installation.
To upgrade when using the Solaris package file format, you must remove the existing installation before installing the updated package. Removal of the package does not delete the existing database information, only the server, binaries and support files. The typical upgrade sequence is therefore:
shell>mysqladmin shutdownshell>pkgrm mysqlshell>pkgadd -d mysql-shell>5.7.29-solaris11-x86_64.pkgmysqld_safe &shell>mysql_upgrade
You should check the notes in Section 2.11, “Upgrading MySQL” before performing any upgrade.
This section provides information about installing MySQL on variants of FreeBSD Unix.
You can install MySQL on FreeBSD by using the binary distribution provided by Oracle. For more information, see Section 2.2, “Installing MySQL on Unix/Linux Using Generic Binaries”.
The easiest (and preferred) way to install MySQL is to use the
mysql-server and mysql-client
ports available at http://www.freebsd.org/. Using
these ports gives you the following benefits:
A working MySQL with all optimizations enabled that are known to work on your version of FreeBSD.
Automatic configuration and build.
Startup scripts installed in
/usr/local/etc/rc.d.The ability to use
pkg_info -Lto see which files are installed.The ability to use
pkg_deleteto remove MySQL if you no longer want it on your machine.
The MySQL build process requires GNU make (gmake) to work. If GNU make is not available, you must install it first before compiling MySQL.
To install using the ports system:
# cd /usr/ports/databases/mysql57-server # make ... # cd /usr/ports/databases/mysql57-client # make ...
The standard port installation places the server into
/usr/local/libexec/mysqld, with the startup
script for the MySQL server placed in
/usr/local/etc/rc.d/mysql-server.
Some additional notes on the BSD implementation:
To remove MySQL after installation using the ports system:
# cd /usr/ports/databases/mysql57-server # make deinstall ... # cd /usr/ports/databases/mysql57-client # make deinstall ...
If you get problems with the current date in MySQL, setting the
TZvariable should help. See Section 4.9, “MySQL Environment Variables”.
- 2.9.1 Source Installation Methods
- 2.9.2 Source Installation Prerequisites
- 2.9.3 MySQL Layout for Source Installation
- 2.9.4 Installing MySQL Using a Standard Source Distribution
- 2.9.5 Installing MySQL Using a Development Source Tree
- 2.9.6 Configuring SSL Library Support
- 2.9.7 MySQL Source-Configuration Options
- 2.9.8 Dealing with Problems Compiling MySQL
- 2.9.9 MySQL Configuration and Third-Party Tools
Building MySQL from the source code enables you to customize build parameters, compiler optimizations, and installation location. For a list of systems on which MySQL is known to run, see https://www.mysql.com/support/supportedplatforms/database.html.
Before you proceed with an installation from source, check whether Oracle produces a precompiled binary distribution for your platform and whether it works for you. We put a great deal of effort into ensuring that our binaries are built with the best possible options for optimal performance. Instructions for installing binary distributions are available in Section 2.2, “Installing MySQL on Unix/Linux Using Generic Binaries”.
Building MySQL with nonstandard options may lead to reduced functionality, performance, or security.
There are two methods for installing MySQL from source:
Use a standard MySQL source distribution. To obtain a standard distribution, see Section 2.1.2, “How to Get MySQL”. For instructions on building from a standard distribution, see Section 2.9.4, “Installing MySQL Using a Standard Source Distribution”.
Standard distributions are available as compressed tar files, Zip archives, or RPM packages. Distribution files have names of the form
mysql-,VERSION.tar.gzmysql-, orVERSION.zipmysql-, whereVERSION.rpmVERSIONis a number like5.7.29. File names for source distributions can be distinguished from those for precompiled binary distributions in that source distribution names are generic and include no platform name, whereas binary distribution names include a platform name indicating the type of system for which the distribution is intended (for example,pc-linux-i686orwinx64).Use a MySQL development tree. For information on building from one of the development trees, see Section 2.9.5, “Installing MySQL Using a Development Source Tree”.
Installation of MySQL from source requires several development tools. Some of these tools are needed no matter whether you use a standard source distribution or a development source tree. Other tool requirements depend on which installation method you use.
To install MySQL from source, the following system requirements must be satisfied, regardless of installation method:
CMake, which is used as the build framework on all platforms. CMake can be downloaded from http://www.cmake.org.
A good make program. Although some platforms come with their own make implementations, it is highly recommended that you use GNU make 3.75 or higher. It may already be available on your system as gmake. GNU make is available from http://www.gnu.org/software/make/.
A working ANSI C++ compiler. See the description of the
FORCE_UNSUPPORTED_COMPILER. option for some guidelines.An SSL library is required for support of encrypted connections, entropy for random number generation, and other encryption-related operations. To specify the library explicitly, use the
WITH_SSLoption when you invoke CMake. For additional information, see Section 2.9.6, “Configuring SSL Library Support”.The Boost C++ libraries are required to build MySQL (but not to use it). Boost 1.59.0 must be installed. To obtain Boost and its installation instructions, visit the official site. After Boost is installed, tell the build system where the Boost files are located by defining the
WITH_BOOSToption when you invoke CMake. For example:cmake . -DWITH_BOOST=/usr/local/boost_1_59_0
Adjust the path as necessary to match your installation.
The ncurses library.
Sufficient free memory. If you encounter problems such as “internal compiler error” when compiling large source files, it may be that you have too little memory. If compiling on a virtual machine, try increasing the memory allocation.
Perl is needed if you intend to run test scripts. Most Unix-like systems include Perl. On Windows, you can use a version such as ActiveState Perl.
To install MySQL from a standard source distribution, one of the following tools is required to unpack the distribution file:
For a
.tar.gzcompressed tar file: GNUgunzipto uncompress the distribution and a reasonable tar to unpack it. If your tar program supports thezoption, it can both uncompress and unpack the file.GNU tar is known to work. The standard tar provided with some operating systems is not able to unpack the long file names in the MySQL distribution. You should download and install GNU tar, or if available, use a preinstalled version of GNU tar. Usually this is available as gnutar, gtar, or as tar within a GNU or Free Software directory, such as
/usr/sfw/binor/usr/local/bin. GNU tar is available from http://www.gnu.org/software/tar/.For a
.zipZip archive: WinZip or another tool that can read.zipfiles.For an
.rpmRPM package: The rpmbuild program used to build the distribution unpacks it.
To install MySQL from a development source tree, the following additional tools are required:
The Git revision control system is required to obtain the development source code. The GitHub Help provides instructions for downloading and installing Git on different platforms. MySQL officially joined GitHub in September, 2014. For more information about MySQL's move to GitHub, refer to the announcement on the MySQL Release Engineering blog: MySQL on GitHub
bison 2.1 or higher, available from http://www.gnu.org/software/bison/. (Version 1 is no longer supported.) Use the latest version of bison where possible; if you experience problems, upgrade to a later version, rather than revert to an earlier one.
bison is available from http://www.gnu.org/software/bison/.
bisonfor Windows can be downloaded from http://gnuwin32.sourceforge.net/packages/bison.htm. Download the package labeled “Complete package, excluding sources”. On Windows, the default location for bison is theC:\Program Files\GnuWin32directory. Some utilities may fail to find bison because of the space in the directory name. Also, Visual Studio may simply hang if there are spaces in the path. You can resolve these problems by installing into a directory that does not contain a space (for exampleC:\GnuWin32).On Solaris Express, m4 must be installed in addition to bison. m4 is available from http://www.gnu.org/software/m4/.
If you have to install any programs, modify your
PATH environment variable to include any
directories in which the programs are located. See
Section 4.2.6, “Setting Environment Variables”.
If you run into problems and need to file a bug report, please use the instructions in Section 1.7, “How to Report Bugs or Problems”.
By default, when you install MySQL after compiling it from source,
the installation step installs files under
/usr/local/mysql. The component locations
under the installation directory are the same as for binary
distributions. See Table 2.3, “MySQL Installation Layout for Generic Unix/Linux Binary Package”,
and Section 2.3.1, “MySQL Installation Layout on Microsoft Windows”. To configure
installation locations different from the defaults, use the
options described at
Section 2.9.7, “MySQL Source-Configuration Options”.
To install MySQL from a standard source distribution:
Verify that your system satisfies the tool requirements listed at Section 2.9.2, “Source Installation Prerequisites”.
Obtain a distribution file using the instructions in Section 2.1.2, “How to Get MySQL”.
Configure, build, and install the distribution using the instructions in this section.
Perform postinstallation procedures using the instructions in Section 2.10, “Postinstallation Setup and Testing”.
MySQL uses CMake as the build framework on all platforms. The instructions given here should enable you to produce a working installation. For additional information on using CMake to build MySQL, see How to Build MySQL Server with CMake.
If you start from a source RPM, use the following command to make a binary RPM that you can install. If you do not have rpmbuild, use rpm instead.
shell> rpmbuild --rebuild --clean MySQL-VERSION.src.rpm
The result is one or more binary RPM packages that you install as indicated in Section 2.5.5, “Installing MySQL on Linux Using RPM Packages from Oracle”.
The sequence for installation from a compressed tar file or Zip archive source distribution is similar to the process for installing from a generic binary distribution (see Section 2.2, “Installing MySQL on Unix/Linux Using Generic Binaries”), except that it is used on all platforms and includes steps to configure and compile the distribution. For example, with a compressed tar file source distribution on Unix, the basic installation command sequence looks like this:
# Preconfiguration setup shell>groupadd mysqlshell>useradd -r -g mysql -s /bin/false mysql# Beginning of source-build specific instructions shell>tar zxvf mysql-shell>VERSION.tar.gzcd mysql-shell>VERSIONmkdir bldshell>cd bldshell>cmake ..shell>makeshell>make install# End of source-build specific instructions # Postinstallation setup shell>cd /usr/local/mysqlshell>mkdir mysql-filesshell>chown mysql:mysql mysql-filesshell>chmod 750 mysql-filesshell>bin/mysqld --initialize --user=mysqlshell>bin/mysql_ssl_rsa_setupshell>bin/mysqld_safe --user=mysql &# Next command is optional shell>cp support-files/mysql.server /etc/init.d/mysql.server
A more detailed version of the source-build specific instructions is shown following.
The procedure shown here does not set up any passwords for MySQL accounts. After following the procedure, proceed to Section 2.10, “Postinstallation Setup and Testing”, for postinstallation setup and testing.
On Unix, set up the mysql user and group that
will be used to run and execute the MySQL server and own the
database directory. For details, see
Create a mysql User and Group. Then
perform the following steps as the mysql
user, except as noted.
Pick the directory under which you want to unpack the distribution and change location into it.
Obtain a distribution file using the instructions in Section 2.1.2, “How to Get MySQL”.
Unpack the distribution into the current directory:
To unpack a compressed tar file, tar can uncompress and unpack the distribution if it has
zoption support:shell>
tar zxvf mysql-VERSION.tar.gzIf your tar does not have
zoption support, use gunzip to unpack the distribution and tar to unpack it:shell>
gunzip < mysql-VERSION.tar.gz | tar xvf -Alternatively, CMake can uncompress and unpack the distribution:
shell>
cmake -E tar zxvf mysql-VERSION.tar.gzTo unpack a Zip archive, use WinZip or another tool that can read
.zipfiles.
Unpacking the distribution file creates a directory named
mysql-.
VERSION
Change location into the top-level directory of the unpacked distribution:
shell> cd mysql-VERSION
Build outside of the source tree to keep the tree clean. If the
top-level source directory is named
mysql-src under your current working
directory, you can build in a directory named
bld at the same level. Create the directory
and go there:
shell>mkdir bldshell>cd bld
Configure the build directory. The minimum configuration command includes no options to override configuration defaults:
shell> cmake ../mysql-src
The build directory needs not be outside the source tree.
For example, you can build in a directory named
bld under the top-level source tree. To do
this, starting with mysql-src as your
current working directory, create the directory
bld and then go there:
shell>mkdir bldshell>cd bld
Configure the build directory. The minimum configuration command includes no options to override configuration defaults:
shell> cmake ..
If you have multiple source trees at the same level (for example, to build multiple versions of MySQL), the second strategy can be advantageous. The first strategy places all build directories at the same level, which requires that you choose a unique name for each. With the second strategy, you can use the same name for the build directory within each source tree. The following instructions assume this second strategy.
On Windows, specify the development environment. For example, the following commands configure MySQL for 32-bit or 64-bit builds, respectively:
shell>cmake .. -G "Visual Studio 12 2013"shell>cmake .. -G "Visual Studio 12 2013 Win64"
On macOS, to use the Xcode IDE:
shell> cmake .. -G Xcode
When you run cmake, you might want to add options to the command line. Here are some examples:
-DBUILD_CONFIG=mysql_release: Configure the source with the same build options used by Oracle to produce binary distributions for official MySQL releases.-DCMAKE_INSTALL_PREFIX=: Configure the distribution for installation under a particular location.dir_name-DCPACK_MONOLITHIC_INSTALL=1: Cause make package to generate a single installation file rather than multiple files.-DWITH_DEBUG=1: Build the distribution with debugging support.
For a more extensive list of options, see Section 2.9.7, “MySQL Source-Configuration Options”.
To list the configuration options, use one of the following commands:
shell>cmake .. -L# overview shell>cmake .. -LH# overview with help text shell>cmake .. -LAH# all params with help text shell>ccmake ..# interactive display
If CMake fails, you might need to reconfigure by running it again with different options. If you do reconfigure, take note of the following:
If CMake is run after it has previously been run, it may use information that was gathered during its previous invocation. This information is stored in
CMakeCache.txt. When CMake starts, it looks for that file and reads its contents if it exists, on the assumption that the information is still correct. That assumption is invalid when you reconfigure.Each time you run CMake, you must run make again to recompile. However, you may want to remove old object files from previous builds first because they were compiled using different configuration options.
To prevent old object files or configuration information from being used, run these commands in the build direcotry on Unix before re-running CMake:
shell>make cleanshell>rm CMakeCache.txt
Or, on Windows:
shell>devenv MySQL.sln /cleanshell>del CMakeCache.txt
Before asking on the
MySQL Community
Slack, check the files in the
CMakeFiles directory for useful information
about the failure. To file a bug report, please use the
instructions in Section 1.7, “How to Report Bugs or Problems”.
On Unix:
shell>makeshell>make VERBOSE=1
The second command sets VERBOSE to show the
commands for each compiled source.
Use gmake instead on systems where you are using GNU make and it has been installed as gmake.
On Windows:
shell> devenv MySQL.sln /build RelWithDebInfo
If you have gotten to the compilation stage, but the
distribution does not build, see
Section 2.9.8, “Dealing with Problems Compiling MySQL”, for help. If that does
not solve the problem, please enter it into our bugs database
using the instructions given in Section 1.7, “How to Report Bugs or Problems”.
If you have installed the latest versions of the required tools,
and they crash trying to process our configuration files, please
report that also. However, if you get a command not
found error or a similar problem for required tools,
do not report it. Instead, make sure that all the required tools
are installed and that your PATH variable is
set correctly so that your shell can find them.
On Unix:
shell> make install
This installs the files under the configured installation
directory (by default, /usr/local/mysql).
You might need to run the command as root.
To install in a specific directory, add a
DESTDIR parameter to the command line:
shell> make install DESTDIR="/opt/mysql"
Alternatively, generate installation package files that you can install where you like:
shell> make package
This operation produces one or more .tar.gz
files that can be installed like generic binary distribution
packages. See Section 2.2, “Installing MySQL on Unix/Linux Using Generic Binaries”. If you run
CMake with
-DCPACK_MONOLITHIC_INSTALL=1, the
operation produces a single file. Otherwise, it produces
multiple files.
On Windows, generate the data directory, then create a
.zip archive installation package:
shell>devenv MySQL.sln /build RelWithDebInfo /project initial_databaseshell>devenv MySQL.sln /build RelWithDebInfo /project package
You can install the resulting .zip archive
where you like. See Section 2.3.4, “Installing MySQL on Microsoft Windows Using a
noinstall ZIP Archive”.
The remainder of the installation process involves setting up the configuration file, creating the core databases, and starting the MySQL server. For instructions, see Section 2.10, “Postinstallation Setup and Testing”.
The accounts that are listed in the MySQL grant tables initially have no passwords. After starting the server, you should set up passwords for them using the instructions in Section 2.10, “Postinstallation Setup and Testing”.
This section describes how to install MySQL from the latest development source code, which is hosted on GitHub. To obtain the MySQL Server source code from this repository hosting service, you can set up a local MySQL Git repository.
On GitHub, MySQL Server and other MySQL projects are found on the MySQL page. The MySQL Server project is a single repository that contains branches for several MySQL series.
MySQL officially joined GitHub in September, 2014. For more information about MySQL's move to GitHub, refer to the announcement on the MySQL Release Engineering blog: MySQL on GitHub
To install MySQL from a development source tree, your system must satisfy the tool requirements listed at Section 2.9.2, “Source Installation Prerequisites”.
To set up a MySQL Git repository on your machine, use this procedure:
Clone the MySQL Git repository to your machine. The following command clones the MySQL Git repository to a directory named
mysql-server. The initial download will take some time to complete, depending on the speed of your connection.~$ git clone https://github.com/mysql/mysql-server.git Cloning into 'mysql-server'... remote: Counting objects: 1035465, done. remote: Total 1035465 (delta 0), reused 0 (delta 0) Receiving objects: 100% (1035465/1035465), 437.48 MiB | 5.10 MiB/s, done. Resolving deltas: 100% (855607/855607), done. Checking connectivity... done. Checking out files: 100% (21902/21902), done.
When the clone operation completes, the contents of your local MySQL Git repository appear similar to the following:
~$ cd mysql-server ~/mysql-server$ ls BUILD COPYING libmysqld regex unittest BUILD-CMAKE dbug libservices scripts VERSION client Docs man sql vio cmake extra mysql-test sql-common win CMakeLists.txt include mysys storage zlib cmd-line-utils INSTALL-SOURCE packaging strings config.h.cmake INSTALL-WIN-SOURCE plugin support-files configure.cmake libmysql README tests
Use the git branch -r command to view the remote tracking branches for the MySQL repository.
~/mysql-server$ git branch -r origin/5.5 origin/5.6 origin/5.7 origin/HEAD -> origin/5.7 origin/cluster-7.2 origin/cluster-7.3 origin/cluster-7.4
To view the branches that are checked out in your local repository, issue the git branch command. When you cloned the MySQL Git repository, the MySQL 5.7 branch was checked out automatically. The asterisk identifies the 5.7 branch as the active branch.
~/mysql-server$ git branch * 5.7
To check out a different MySQL branch, run the git checkout command, specifying the branch name. For example, to check out the MySQL 5.5 branch:
~/mysql-server$ git checkout 5.5 Branch 5.5 set up to track remote branch 5.5 from origin. Switched to a new branch '5.5'
Run
git branchto verify that the MySQL 5.5 branch is present. MySQL 5.5, which is the last branch you checked out, is marked by an asterisk indicating that it is the active branch.~/mysql-server$ git branch * 5.5 5.7
Use the git checkout command to switch between branches. For example:
~/mysql-server$ git checkout 5.7
To obtain changes made after your initial setup of the MySQL Git repository, switch to the branch you want to update and issue the
git pullcommand:~/mysql-server$ git checkout 5.7 ~/mysql-server$ git pull
To examine the commit history, use the
git logoption:~/mysql-server$ git log
You can also browse commit history and source code on the GitHub MySQL site.
If you see changes or code that you have a question about, ask on the MySQL Community Slack. For information about contributing a patch, see Contributing to MySQL Server.
After you have cloned the MySQL Git repository and have checked out the branch you want to build, you can build MySQL Server from the source code. Instructions are provided in Section 2.9.4, “Installing MySQL Using a Standard Source Distribution”, except that you skip the part about obtaining and unpacking the distribution.
Be careful about installing a build from a distribution source tree on a production machine. The installation command may overwrite your live release installation. If you already have MySQL installed and do not want to overwrite it, run CMake with values for the
CMAKE_INSTALL_PREFIX,MYSQL_TCP_PORT, andMYSQL_UNIX_ADDRoptions different from those used by your production server. For additional information about preventing multiple servers from interfering with each other, see Section 5.7, “Running Multiple MySQL Instances on One Machine”.Play hard with your new installation. For example, try to make new features crash. Start by running make test. See Section 28.1.2, “The MySQL Test Suite”.
An SSL library is required for support of encrypted connections, entropy for random number generation, and other encryption-related operations. Your system must support either OpenSSL or yaSSL:
MySQL Enterprise Edition binary distributions are compiled using OpenSSL. It is not possible to use yaSSL with MySQL Enterprise Edition.
MySQL Community Edition binary distributions are compiled using yaSSL.
MySQL Community Edition source distributions can be compiled using either OpenSSL or yaSSL.
It is possible to compile MySQL using yaSSL as an alternative to OpenSSL only prior to MySQL 5.7.28. As of MySQL 5.7.28, support for yaSSL is removed and all MySQL builds use OpenSSL.
If you compile MySQL from a source distribution, CMake configures the distribution to use the installed OpenSSL library by default.
To compile using OpenSSL, use this procedure:
Ensure that OpenSSL 1.0.1 or higher is installed on your system. If the installed OpenSSL version is lower than 1.0.1, CMake produces an error at MySQL configuration time. If it is necessary to obtain OpenSSL, visit http://www.openssl.org.
The
WITH_SSLCMake option determines which SSL library to use for compiling MySQL (see Section 2.9.7, “MySQL Source-Configuration Options”). The default is-DWITH_SSL=system, which uses OpenSSL. To make this explicit, specify that option on the CMake command line. For example:cmake . -DWITH_SSL=system
That command configures the distribution to use the installed OpenSSL library. Alternatively, to explicitly specify the path name to the OpenSSL installation, use the following syntax. This can be useful if you have multiple versions of OpenSSL installed, to prevent CMake from choosing the wrong one:
cmake . -DWITH_SSL=
path_nameCompile and install the distribution.
To check whether a mysqld server supports
encrypted connections, examine the value of the
have_ssl system variable:
mysql> SHOW VARIABLES LIKE 'have_ssl';
+---------------+-------+
| Variable_name | Value |
+---------------+-------+
| have_ssl | YES |
+---------------+-------+
If the value is YES, the server supports
encrypted connections. If the value is
DISABLED, the server is capable of supporting
encrypted connections but was not started with the appropriate
--ssl- options to
enable encrypted connections to be used; see
Section 6.3.1, “Configuring MySQL to Use Encrypted Connections”.
xxx
To determine whether a server was compiled using OpenSSL or yaSSL, check the existence of any of the system or status variables that are present only for OpenSSL. See Section 6.3.4, “SSL Library-Dependent Capabilities”
The CMake program provides a great deal of control over how you configure a MySQL source distribution. Typically, you do this using options on the CMake command line. For information about options supported by CMake, run either of these commands in the top-level source directory:
cmake . -LH ccmake .
You can also affect CMake using certain environment variables. See Section 4.9, “MySQL Environment Variables”.
For boolean options, the value may be specified as 1 or
ON to enable the option, or as 0 or
OFF to disable the option.
Many options configure compile-time defaults that can be
overridden at server startup. For example, the
CMAKE_INSTALL_PREFIX,
MYSQL_TCP_PORT, and
MYSQL_UNIX_ADDR options that
configure the default installation base directory location, TCP/IP
port number, and Unix socket file can be changed at server startup
with the --basedir,
--port, and
--socket options for
mysqld. Where applicable, configuration option
descriptions indicate the corresponding mysqld
startup option.
The following sections provide more information about CMake options.
The following table shows the available CMake
options. In the Default column,
PREFIX stands for the value of the
CMAKE_INSTALL_PREFIX option, which
specifies the installation base directory. This value is used as
the parent location for several of the installation
subdirectories.
Table 2.13 MySQL Source-Configuration Option Reference (CMake)
| Formats | Description | Default | Introduced | Removed |
|---|---|---|---|---|
BUILD_CONFIG |
Use same build options as official releases | |||
CMAKE_BUILD_TYPE |
Type of build to produce | RelWithDebInfo |
||
CMAKE_CXX_FLAGS |
Flags for C++ Compiler | |||
CMAKE_C_FLAGS |
Flags for C Compiler | |||
CMAKE_INSTALL_PREFIX |
Installation base directory | /usr/local/mysql |
||
COMPILATION_COMMENT |
Comment about compilation environment | |||
CPACK_MONOLITHIC_INSTALL |
Whether package build produces single file | OFF |
||
DEFAULT_CHARSET |
The default server character set | latin1 |
||
DEFAULT_COLLATION |
The default server collation | latin1_swedish_ci |
||
DISABLE_PSI_COND |
Exclude Performance Schema condition instrumentation | OFF |
5.7.3 | |
DISABLE_PSI_FILE |
Exclude Performance Schema file instrumentation | OFF |
5.7.3 | |
DISABLE_PSI_IDLE |
Exclude Performance Schema idle instrumentation | OFF |
5.7.3 | |
DISABLE_PSI_MEMORY |
Exclude Performance Schema memory instrumentation | OFF |
5.7.3 | |
DISABLE_PSI_METADATA |
Exclude Performance Schema metadata instrumentation | OFF |
5.7.3 | |
DISABLE_PSI_MUTEX |
Exclude Performance Schema mutex instrumentation | OFF |
5.7.3 | |
DISABLE_PSI_PS |
Exclude the performance schema prepared statements | OFF |
5.7.3 | |
DISABLE_PSI_RWLOCK |
Exclude Performance Schema rwlock instrumentation | OFF |
5.7.3 | |
DISABLE_PSI_SOCKET |
Exclude Performance Schema socket instrumentation | OFF |
5.7.3 | |
DISABLE_PSI_SP |
Exclude Performance Schema stored program instrumentation | OFF |
5.7.3 | |
DISABLE_PSI_STAGE |
Exclude Performance Schema stage instrumentation | OFF |
5.7.3 | |
DISABLE_PSI_STATEMENT |
Exclude Performance Schema statement instrumentation | OFF |
5.7.3 | |
DISABLE_PSI_STATEMENT_DIGEST |
Exclude Performance Schema statements_digest instrumentation | OFF |
5.7.3 | |
DISABLE_PSI_TABLE |
Exclude Performance Schema table instrumentation | OFF |
5.7.3 | |
DISABLE_PSI_THREAD |
Exclude the performance schema thread instrumentation | OFF |
5.7.3 | |
DISABLE_PSI_TRANSACTION |
Exclude the performance schema transaction instrumentation | OFF |
5.7.3 | |
DOWNLOAD_BOOST |
Whether to download the Boost library | OFF |
5.7.5 | |
DOWNLOAD_BOOST_TIMEOUT |
Timeout in seconds for downloading the Boost library | 600 |
5.7.6 | |
ENABLED_LOCAL_INFILE |
Whether to enable LOCAL for LOAD DATA | OFF |
||
ENABLED_PROFILING |
Whether to enable query profiling code | ON |
||
ENABLE_DEBUG_SYNC |
Whether to enable Debug Sync support | ON |
5.7.1 | |
ENABLE_DOWNLOADS |
Whether to download optional files | OFF |
||
ENABLE_DTRACE |
Whether to include DTrace support | |||
ENABLE_GCOV |
Whether to include gcov support | |||
ENABLE_GPROF |
Enable gprof (optimized Linux builds only) | OFF |
||
FORCE_UNSUPPORTED_COMPILER |
Whether to permit unsupported compiler | OFF |
5.7.5 | |
IGNORE_AIO_CHECK |
With -DBUILD_CONFIG=mysql_release, ignore libaio check | OFF |
||
INNODB_PAGE_ATOMIC_REF_COUNT |
Enable or disable atomic page reference counting | ON |
5.7.4 | 5.7.5 |
INSTALL_BINDIR |
User executables directory | PREFIX/bin |
||
INSTALL_DOCDIR |
Documentation directory | PREFIX/docs |
||
INSTALL_DOCREADMEDIR |
README file directory | PREFIX |
||
INSTALL_INCLUDEDIR |
Header file directory | PREFIX/include |
||
INSTALL_INFODIR |
Info file directory | PREFIX/docs |
||
INSTALL_LAYOUT |
Select predefined installation layout | STANDALONE |
||
INSTALL_LIBDIR |
Library file directory | PREFIX/lib |
||
INSTALL_MANDIR |
Manual page directory | PREFIX/man |
||
INSTALL_MYSQLKEYRINGDIR |
Directory for keyring_file plugin data file | platform specific |
5.7.11 | |
INSTALL_MYSQLSHAREDIR |
Shared data directory | PREFIX/share |
||
INSTALL_MYSQLTESTDIR |
mysql-test directory | PREFIX/mysql-test |
||
INSTALL_PKGCONFIGDIR |
Directory for mysqlclient.pc pkg-config file | INSTALL_LIBDIR/pkgconfig |
5.7.9 | |
INSTALL_PLUGINDIR |
Plugin directory | PREFIX/lib/plugin |
||
INSTALL_SBINDIR |
Server executable directory | PREFIX/bin |
||
INSTALL_SCRIPTDIR |
Scripts directory | PREFIX/scripts |
||
INSTALL_SECURE_FILE_PRIVDIR |
secure_file_priv default value | platform specific |
5.7.6 | |
INSTALL_SECURE_FILE_PRIV_EMBEDDEDDIR |
secure_file_priv default value for libmysqld | 5.7.8 | ||
INSTALL_SHAREDIR |
aclocal/mysql.m4 installation directory | PREFIX/share |
||
INSTALL_SQLBENCHDIR |
sql-bench directory | PREFIX |
5.7.8 | |
INSTALL_SUPPORTFILESDIR |
Extra support files directory | PREFIX/support-files |
||
MAX_INDEXES |
Maximum indexes per table | 64 |
5.7.1 | |
MUTEX_TYPE |
InnoDB mutex type | event |
5.7.2 | |
MYSQLX_TCP_PORT |
TCP/IP port number used by X Plugin | 33060 |
5.7.17 | |
MYSQLX_UNIX_ADDR |
Unix socket file used by X Plugin | /tmp/mysqlx.sock |
5.7.15 | |
MYSQL_DATADIR |
Data directory | |||
MYSQL_MAINTAINER_MODE |
Whether to enable MySQL maintainer-specific development environment | OFF |
||
MYSQL_PROJECT_NAME |
Windows/OS X project name | MySQL |
||
MYSQL_TCP_PORT |
TCP/IP port number | 3306 |
||
MYSQL_UNIX_ADDR |
Unix socket file | /tmp/mysql.sock |
||
ODBC_INCLUDES |
ODBC includes directory | |||
ODBC_LIB_DIR |
ODBC library directory | |||
OPTIMIZER_TRACE |
Whether to support optimizer tracing | |||
REPRODUCIBLE_BUILD |
Take extra care to create a build result independent of build location and time | 5.7.19 | ||
SUNPRO_CXX_LIBRARY |
Client link library on Solaris 10+ | 5.7.5 | ||
SYSCONFDIR |
Option file directory | |||
SYSTEMD_PID_DIR |
Directory for PID file under systemd | /var/run/mysqld |
5.7.6 | |
SYSTEMD_SERVICE_NAME |
Name of MySQL service under systemd | mysqld |
5.7.6 | |
TMPDIR |
tmpdir default value | 5.7.4 | ||
WIN_DEBUG_NO_INLINE |
Whether to disable function inlining | OFF |
5.7.6 | |
WITHOUT_xxx_STORAGE_ENGINE |
Exclude storage engine xxx from build | |||
WITH_ASAN |
Enable AddressSanitizer | OFF |
5.7.3 | |
WITH_ASAN_SCOPE |
Enable AddressSanitizer -fsanitize-address-use-after-scope Clang flag | OFF |
5.7.21 | |
WITH_AUTHENTICATION_LDAP |
Whether to report error if LDAP authentication plugins cannot be built | OFF |
5.7.19 | |
WITH_AUTHENTICATION_PAM |
Build PAM authentication plugin | OFF |
||
WITH_AWS_SDK |
Location of Amazon Web Services software development kit | 5.7.19 | ||
WITH_BOOST |
The location of the Boost library sources | 5.7.5 | ||
WITH_CLIENT_PROTOCOL_TRACING |
Build client-side protocol tracing framework | ON |
5.7.2 | |
WITH_CURL |
Location of curl library | 5.7.19 | ||
WITH_DEBUG |
Whether to include debugging support | OFF |
||
WITH_DEFAULT_COMPILER_OPTIONS |
Whether to use default compiler options | ON |
||
WITH_DEFAULT_FEATURE_SET |
Whether to use default feature set | ON |
||
WITH_EDITLINE |
Which libedit/editline library to use | bundled |
5.7.2 | |
WITH_EMBEDDED_SERVER |
Whether to build embedded server | OFF |
||
WITH_EMBEDDED_SHARED_LIBRARY |
Whether to build a shared embedded server library | OFF |
5.7.4 | |
WITH_EXTRA_CHARSETS |
Which extra character sets to include | all |
||
WITH_GMOCK |
Path to googlemock distribution | |||
WITH_INNODB_EXTRA_DEBUG |
Whether to include extra debugging support for InnoDB. | OFF |
5.7.2 | |
WITH_INNODB_MEMCACHED |
Whether to generate memcached shared libraries. | OFF |
||
WITH_KEYRING_TEST |
Build the keyring test program | OFF |
5.7.11 | |
WITH_LIBEVENT |
Which libevent library to use | bundled |
||
WITH_LIBWRAP |
Whether to include libwrap (TCP wrappers) support | OFF |
||
WITH_LZ4 |
Type of LZ4 library support | bundled |
5.7.14 | |
WITH_MECAB |
Compiles MeCab | 5.7.6 | ||
WITH_MSAN |
Enable MemorySanitizer | OFF |
5.7.4 | |
WITH_MSCRT_DEBUG |
Enable Visual Studio CRT memory leak tracing | OFF |
5.7.6 | |
WITH_NDBCLUSTER |
Build the NDB storage engine; alias for WITH_NDBCLUSTER_STORAGE_ENGINE | ON |
||
WITH_NDBCLUSTER_STORAGE_ENGINE |
Build the NDB storage engine | ON |
||
WITH_NDB_TEST |
Include NDB API test programs. | OFF |
||
WITH_NUMA |
Set NUMA memory allocation policy | 5.7.17 | ||
WITH_PROTOBUF |
Which Protocol Buffers package to use | bundled |
5.7.12 | |
WITH_RAPID |
Whether to build rapid development cycle plugins | ON |
5.7.12 | |
WITH_SSL |
Type of SSL support | system |
||
WITH_SYSTEMD |
Enable installation of systemd support files | OFF |
5.7.6 | |
WITH_TEST_TRACE_PLUGIN |
Build test protocol trace plugin | OFF |
5.7.2 | |
WITH_UBSAN |
Enable Undefined Behavior Sanitizer | OFF |
5.7.6 | |
WITH_UNIT_TESTS |
Compile MySQL with unit tests | ON |
||
WITH_UNIXODBC |
Enable unixODBC support | OFF |
||
WITH_VALGRIND |
Whether to compile in Valgrind header files | OFF |
||
WITH_ZLIB |
Type of zlib support | bundled |
||
WITH_xxx_STORAGE_ENGINE |
Compile storage engine xxx statically into server |
This option configures a source distribution with the same build options used by Oracle to produce binary distributions for official MySQL releases.
The type of build to produce:
RelWithDebInfo: Enable optimizations and generate debugging information. This is the default MySQL build type.Debug: Disable optimizations and generate debugging information. This build type is also used if theWITH_DEBUGoption is enabled. That is,-DWITH_DEBUG=1has the same effect as-DCMAKE_BUILD_TYPE=Debug.
-DCPACK_MONOLITHIC_INSTALL=boolThis option affects whether the make package operation produces multiple installation package files or a single file. If disabled, the operation produces multiple installation package files, which may be useful if you want to install only a subset of a full MySQL installation. If enabled, it produces a single file for installing everything.
The CMAKE_INSTALL_PREFIX option
indicates the base installation directory. Other options with
names of the form
INSTALL_ that
indicate component locations are interpreted relative to the
prefix and their values are relative pathnames. Their values
should not include the prefix.
xxx
-DCMAKE_INSTALL_PREFIX=dir_nameThe installation base directory.
This value can be set at server startup with the
--basediroption.Where to install user programs.
Where to install documentation.
-DINSTALL_DOCREADMEDIR=dir_nameWhere to install
READMEfiles.Where to install header files.
Where to install Info files.
Select a predefined installation layout:
STANDALONE: Same layout as used for.tar.gzand.zippackages. This is the default.RPM: Layout similar to RPM packages.SVR4: Solaris package layout.DEB: DEB package layout (experimental).
You can select a predefined layout but modify individual component installation locations by specifying other options. For example:
cmake . -DINSTALL_LAYOUT=SVR4 -DMYSQL_DATADIR=/var/mysql/data
The
INSTALL_LAYOUTvalue determines the default value of thesecure_file_priv,keyring_encrypted_file_data, andkeyring_file_datasystem variables. See the descriptions of those variables in Section 5.1.7, “Server System Variables”, and Section 6.4.4.11, “Keyring System Variables”.Where to install library files.
Where to install manual pages.
-DINSTALL_MYSQLKEYRINGDIR=dir_pathThe default directory to use as the location of the
keyring_fileplugin data file. The default value is platform specific and depends on the value of theINSTALL_LAYOUTCMake option; see the description of thekeyring_file_datasystem variable in Section 5.1.7, “Server System Variables”.This option was added in MySQL 5.7.11.
-DINSTALL_MYSQLSHAREDIR=dir_nameWhere to install shared data files.
-DINSTALL_MYSQLTESTDIR=dir_nameWhere to install the
mysql-testdirectory. To suppress installation of this directory, explicitly set the option to the empty value (-DINSTALL_MYSQLTESTDIR=).-DINSTALL_PKGCONFIGDIR=dir_nameThe directory in which to install the
mysqlclient.pcfile for use by pkg-config. The default value isINSTALL_LIBDIR/pkgconfig, unlessINSTALL_LIBDIRends with/mysql, in which case that is removed first.The location of the plugin directory.
This value can be set at server startup with the
--plugin_diroption.Where to install the mysqld server.
Where to install mysql_install_db.
-DINSTALL_SECURE_FILE_PRIVDIR=dir_nameThe default value for the
secure_file_privsystem variable. The default value is platform specific and depends on the value of theINSTALL_LAYOUTCMake option; see the description of thesecure_file_privsystem variable in Section 5.1.7, “Server System Variables”.To set the value for the
libmysqldembedded server, useINSTALL_SECURE_FILE_PRIV_EMBEDDEDDIR.-DINSTALL_SECURE_FILE_PRIV_EMBEDDEDDIR=dir_nameThe default value for the
secure_file_privsystem variable, for thelibmysqldembedded server.NoteThe
libmysqldembedded server library is deprecated as of MySQL 5.7.19 and will be removed in MySQL 8.0.Where to install
aclocal/mysql.m4.-DINSTALL_SQLBENCHDIR=dir_nameWhere to install the
sql-benchdirectory. To suppress installation of this directory, explicitly set the option to the empty value (-DINSTALL_SQLBENCHDIR=).The
sql-benchdirectory is no longer included in MYSQL distributions, so theINSTALL_SQLBENCHDIR=option is removed as well.-DINSTALL_SUPPORTFILESDIR=dir_nameWhere to install extra support files.
The location of the MySQL data directory.
This value can be set at server startup with the
--datadiroption.The location of the ODBC includes directory, and may be used while configuring Connector/ODBC.
The location of the ODBC library directory, and may be used while configuring Connector/ODBC.
The default
my.cnfoption file directory.This location cannot be set at server startup, but you can start the server with a given option file using the
--defaults-file=option, wherefile_namefile_nameis the full path name to the file.The name of the directory in which to create the PID file when MySQL is managed by systemd. The default is
/var/run/mysqld; this might be changed implicitly according to theINSTALL_LAYOUTvalue.This option is ignored unless
WITH_SYSTEMDis enabled.The name of the MySQL service to use when MySQL is managed by systemd. The default is
mysqld; this might be changed implicitly according to theINSTALL_LAYOUTvalue.This option is ignored unless
WITH_SYSTEMDis enabled.The default location to use for the
tmpdirsystem variable. If unspecified, the value defaults toP_tmpdirin<stdio.h>.
Storage engines are built as plugins. You can build a plugin as
a static module (compiled into the server) or a dynamic module
(built as a dynamic library that must be installed into the
server using the INSTALL PLUGIN
statement or the --plugin-load
option before it can be used). Some plugins might not support
static or dynamic building.
The InnoDB,
MyISAM,
MERGE,
MEMORY, and
CSV engines are mandatory (always
compiled into the server) and need not be installed explicitly.
To compile a storage engine statically into the server, use
-DWITH_.
Some permissible engine_STORAGE_ENGINE=1engine values are
ARCHIVE, BLACKHOLE,
EXAMPLE, FEDERATED,
NDB or NDBCLUSTER
(NDB), and
PARTITION (partitioning support). Examples:
-DWITH_ARCHIVE_STORAGE_ENGINE=1 -DWITH_BLACKHOLE_STORAGE_ENGINE=1
WITH_NDBCLUSTER_STORAGE_ENGINE
is supported only when building NDB Cluster using the NDB
Cluster sources. It cannot be used to enable clustering
support in other MySQL source trees or distributions. In NDB
Cluster source distributions, it is enabled by default. See
Section 21.2.3.4, “Building NDB Cluster from Source on Linux”, and
Section 21.2.4.2, “Compiling and Installing NDB Cluster from Source on Windows”, for
more information.
It is not possible to compile without Performance Schema support. If it is desired to compile without particular types of instrumentation, that can be done with the following CMake options:
DISABLE_PSI_COND DISABLE_PSI_FILE DISABLE_PSI_IDLE DISABLE_PSI_MEMORY DISABLE_PSI_METADATA DISABLE_PSI_MUTEX DISABLE_PSI_PS DISABLE_PSI_RWLOCK DISABLE_PSI_SOCKET DISABLE_PSI_SP DISABLE_PSI_STAGE DISABLE_PSI_STATEMENT DISABLE_PSI_STATEMENT_DIGEST DISABLE_PSI_TABLE DISABLE_PSI_THREAD DISABLE_PSI_TRANSACTION
For example, to compile without mutex instrumentation,
configure MySQL using the
-DDISABLE_PSI_MUTEX=1 option.
To exclude a storage engine from the build, use
-DWITH_.
Examples:
engine_STORAGE_ENGINE=0
-DWITH_EXAMPLE_STORAGE_ENGINE=0 -DWITH_FEDERATED_STORAGE_ENGINE=0 -DWITH_PARTITION_STORAGE_ENGINE=0
It is also possible to exclude a storage engine from the build
using
-DWITHOUT_
(but
engine_STORAGE_ENGINE=1-DWITH_
is preferred). Examples:
engine_STORAGE_ENGINE=0
-DWITHOUT_EXAMPLE_STORAGE_ENGINE=1 -DWITHOUT_FEDERATED_STORAGE_ENGINE=1 -DWITHOUT_PARTITION_STORAGE_ENGINE=1
If neither
-DWITH_
nor
engine_STORAGE_ENGINE-DWITHOUT_
are specified for a given storage engine, the engine is built as
a shared module, or excluded if it cannot be built as a shared
module.
engine_STORAGE_ENGINE
A descriptive comment about the compilation environment.
-DDEFAULT_CHARSET=charset_nameThe server character set. By default, MySQL uses the
latin1(cp1252 West European) character set.charset_namemay be one ofbinary,armscii8,ascii,big5,cp1250,cp1251,cp1256,cp1257,cp850,cp852,cp866,cp932,dec8,eucjpms,euckr,gb2312,gbk,geostd8,greek,hebrew,hp8,keybcs2,koi8r,koi8u,latin1,latin2,latin5,latin7,macce,macroman,sjis,swe7,tis620,ucs2,ujis,utf8,utf8mb4,utf16,utf16le,utf32. The permissible character sets are listed in thecmake/character_sets.cmakefile as the value ofCHARSETS_AVAILABLE.This value can be set at server startup with the
--character_set_serveroption.-DDEFAULT_COLLATION=collation_nameThe server collation. By default, MySQL uses
latin1_swedish_ci. Use theSHOW COLLATIONstatement to determine which collations are available for each character set.This value can be set at server startup with the
--collation_serveroption.Whether to exclude the Performance Schema condition instrumentation. The default is
OFF(include).Whether to exclude the Performance Schema file instrumentation. The default is
OFF(include).Whether to exclude the Performance Schema idle instrumentation. The default is
OFF(include).Whether to exclude the Performance Schema memory instrumentation. The default is
OFF(include).Whether to exclude the Performance Schema metadata instrumentation. The default is
OFF(include).Whether to exclude the Performance Schema mutex instrumentation. The default is
OFF(include).Whether to exclude the Performance Schema rwlock instrumentation. The default is
OFF(include).Whether to exclude the Performance Schema socket instrumentation. The default is
OFF(include).Whether to exclude the Performance Schema stored program instrumentation. The default is
OFF(include).Whether to exclude the Performance Schema stage instrumentation. The default is
OFF(include).Whether to exclude the Performance Schema statement instrumentation. The default is
OFF(include).-DDISABLE_PSI_STATEMENT_DIGEST=boolWhether to exclude the Performance Schema statement_digest instrumentation. The default is
OFF(include).Whether to exclude the Performance Schema table instrumentation. The default is
OFF(include).Exclude the performance schema prepared statements instances instrumentation. The default is
OFF(include).Exclude the performance schema thread instrumentation. The default is
OFF(include).Only disable threads when building without any instrumentation, because other instrumentations have a dependency on threads.
-DDISABLE_PSI_TRANSACTION=boolExclude the performance schema transaction instrumentation. The default is
OFF(include).Whether to download the Boost library. The default is
OFF.See the
WITH_BOOSToption for additional discussion about using Boost.-DDOWNLOAD_BOOST_TIMEOUT=secondsThe timeout in seconds for downloading the Boost library. The default is 600 seconds.
See the
WITH_BOOSToption for additional discussion about using Boost.-
Note
As of MySQL 5.7.18,
ENABLE_DEBUG_SYNCis removed and enablingWITH_DEBUGenables Debug Sync.Whether to compile the Debug Sync facility into the server. This facility is used for testing and debugging. This option is enabled by default, but has no effect unless MySQL is configured with debugging enabled. If debugging is enabled and you want to disable Debug Sync, use
-DENABLE_DEBUG_SYNC=0.When compiled in, Debug Sync is disabled by default at runtime. To enable it, start mysqld with the
--debug-sync-timeout=option, whereNNis a timeout value greater than 0. (The default value is 0, which disables Debug Sync.)Nbecomes the default timeout for individual synchronization points.Sync debug checking for the
InnoDBstorage engine is available when debugging support is compiled in using theWITH_DEBUGoption.For a description of the Debug Sync facility and how to use synchronization points, see MySQL Internals: Test Synchronization.
Whether to download optional files. For example, with this option enabled, CMake downloads the Google Test distribution that is used by the test suite to run unit tests.
Whether to include support for DTrace probes. For information about DTrace, wee Section 5.8, “Tracing mysqld Using DTrace”
This option is deprecated because support for DTrace is deprecated in MySQL 5.7 and is removed in MySQL 8.0.
Whether to include gcov support (Linux only).
Whether to enable
gprof(optimized Linux builds only).This option controls the compiled-in default
LOCALcapability for the MySQL client library. Clients that make no explicit arrangements therefore haveLOCALcapability disabled or enabled according to theENABLED_LOCAL_INFILEsetting specified at MySQL build time.By default, the client library in MySQL binary distributions is compiled with
ENABLED_LOCAL_INFILEenabled. If you compile MySQL from source, configure it withENABLED_LOCAL_INFILEdisabled or enabled based on whether clients that make no explicit arrangements should haveLOCALcapability disabled or enabled, respectively.ENABLED_LOCAL_INFILEcontrols the default for client-sideLOCALcapability. For the server, thelocal_infilesystem variable controls server-sideLOCALcapability. To explicitly cause the server to refuse or permitLOAD DATA LOCALstatements (regardless of how client programs and libraries are configured at build time or runtime), start mysqld withlocal_infiledisabled or enabled, respectively.local_infilecan also be set at runtime. See Section 6.1.6, “Security Issues with LOAD DATA LOCAL”.Whether to enable query profiling code (for the
SHOW PROFILEandSHOW PROFILESstatements).-DFORCE_UNSUPPORTED_COMPILER=boolBy default, CMake checks for minimum versions of supported compilers: Visual Studio 2013 (Windows); GCC 4.4 or Clang 3.3 (Linux); Developer Studio 12.5 (Solaris server); Developer Studio 12.2 or GCC 4.4 (Solaris client library); Clang 3.3 (macOS), Clang 3.3 (FreeBSD). To disable this check, use
-DFORCE_UNSUPPORTED_COMPILER=ON.If the
-DBUILD_CONFIG=mysql_releaseoption is given on Linux, thelibaiolibrary must be linked in by default. If you do not havelibaioor do not want to install it, you can suppress the check for it by specifying-DIGNORE_AIO_CHECK=1.-DINNODB_PAGE_ATOMIC_REF_COUNT=boolThis option is obsolete.
The maximum number of indexes per table. The default is 64. The maximum is 255. Values smaller than 64 are ignored and the default of 64 is used.
Whether to enable a MySQL maintainer-specific development environment. If enabled, this option causes compiler warnings to become errors.
The mutex type used by
InnoDB. Options include:event: Use event mutexes. This is the default value and the originalInnoDBmutex implementation.sys: Use POSIX mutexes on UNIX systems. UseCRITICAL_SECTIONonjects on Windows, if available.futex: Use Linux futexes instead of condition variables to schedule waiting threads.
The port number on which X Plugin listens for TCP/IP connections. The default is 33060.
This value can be set at server startup with the
mysqlx_portsystem variable.The Unix socket file path on which the server listens for X Plugin socket connections. This must be an absolute path name. The default is
/tmp/mysqlx.sock.This value can be set at server startup with the
mysqlx_portsystem variable.For Windows or macOS, the project name to incorporate into the project file name.
The port number on which the server listens for TCP/IP connections. The default is 3306.
This value can be set at server startup with the
--portoption.The Unix socket file path on which the server listens for socket connections. This must be an absolute path name. The default is
/tmp/mysql.sock.This value can be set at server startup with the
--socketoption.Whether to support optimizer tracing. See MySQL Internals: Tracing the Optimizer.
For builds on Linux systems, this option controls whether to take extra care to create a build result independent of build location and time.
This option was added in MySQL 5.7.19.
Whether to disable function inlining on Windows. The default is off (inlining enabled).
Whether to enable the AddressSanitizer, for compilers that support it. The default is off.
Whether to enable the AddressSanitizer
-fsanitize-address-use-after-scopeClang flag for use-after-scope detection. The default is off. To use this option,-DWITH_ASANmust also be enabled.-DWITH_AUTHENTICATION_LDAP=boolWhether to report an error if the LDAP authentication plugins cannot be built:
If this option is disabled (the default), the LDAP plugins are built if the required header files and libraries are found. If they are not, CMake displays a note about it.
If this option is enabled, a failure to find the required header file andlibraries causes CMake to produce an error, preventing the server from being built.
For information about LDAP authentication, see Section 6.4.1.9, “LDAP Pluggable Authentication”. This option was added in MySQL 5.7.19.
-DWITH_AUTHENTICATION_PAM=boolWhether to build the PAM authentication plugin, for source trees that include this plugin. (See Section 6.4.1.7, “PAM Pluggable Authentication”.) If this option is specified and the plugin cannot be compiled, the build fails.
The location of the Amazon Web Services software development kit.
This option was added in MySQL 5.7.19.
The Boost library is required to build MySQL. These CMake options enable control over the library source location, and whether to download it automatically:
-DWITH_BOOST=specifies the Boost library directory location. It is also possible to specify the Boost location by setting thepath_nameBOOST_ROOTorWITH_BOOSTenvironment variable.As of MySQL 5.7.11,
-DWITH_BOOST=systemis permitted and indicates that the correct version of Boost is installed on the compilation host in the standard location. In this case, the installed version of Boost is used rather than any version included with a MySQL source distribution.-DDOWNLOAD_BOOST=specifies whether to download the Boost source if it is not present in the specified location. The default isboolOFF.-DDOWNLOAD_BOOST_TIMEOUT=the timeout in seconds for downloading the Boost library. The default is 600 seconds.seconds
For example, if you normally build MySQL placing the object output in the
bldsubdirectory of your MySQL source tree, you can build with Boost like this:mkdir bld cd bld cmake .. -DDOWNLOAD_BOOST=ON -DWITH_BOOST=$HOME/my_boost
This causes Boost to be downloaded into the
my_boostdirectory under your home directory. If the required Boost version is already there, no download is done. If the required Boost version changes, the newer version is downloaded.If Boost is already installed locally and your compiler finds the Boost header files on its own, it may not be necessary to specify the preceding CMake options. However, if the version of Boost required by MySQL changes and the locally installed version has not been upgraded, you may have build problems. Using the CMake options should give you a successful build.
With the above settings that allow Boost download into a specified location, when the required Boost version changes, you need to remove the
bldfolder, recreate it, and perform the cmake step again. Otherwise, the new Boost version might not get downloaded, and compilation might fail.-DWITH_CLIENT_PROTOCOL_TRACING=boolWhether to build the client-side protocol tracing framework into the client library. By default, this option is enabled.
For information about writing protocol trace client plugins, see Section 28.2.4.11, “Writing Protocol Trace Plugins”.
See also the
WITH_TEST_TRACE_PLUGINoption.The location of the curl library.
curl_typecan besystem(use the system curl library) or a path name to the curl library.This option was added in MySQL 5.7.19.
Whether to include debugging support.
Configuring MySQL with debugging support enables you to use the
--debug="d,parser_debug"option when you start the server. This causes the Bison parser that is used to process SQL statements to dump a parser trace to the server's standard error output. Typically, this output is written to the error log.Sync debug checking for the
InnoDBstorage engine is defined underUNIV_DEBUGand is available when debugging support is compiled in using theWITH_DEBUGoption. When debugging support is compiled in, theinnodb_sync_debugconfiguration option can be used to enable or disableInnoDBsync debug checking.As of MySQL 5.7.18, enabling
WITH_DEBUGalso enables Debug Sync. For a description of the Debug Sync facility and how to use synchronization points, see MySQL Internals: Test Synchronization.-DWITH_DEFAULT_FEATURE_SET=boolWhether to use the flags from
cmake/build_configurations/feature_set.cmake.Which
libedit/editlinelibrary to use. The permitted values arebundled(the default) andsystem.WITH_EDITLINEreplacesWITH_LIBEDIT, which has been removed.Whether to build the
libmysqldembedded server library.NoteThe
libmysqldembedded server library is deprecated as of MySQL 5.7.17 and has been removed in MySQL 8.0.-DWITH_EMBEDDED_SHARED_LIBRARY=boolWhether to build a shared
libmysqldembedded server library.NoteThe
libmysqldembedded server library is deprecated as of MySQL 5.7.17 and has been removed in MySQL 8.0.Which extra character sets to include:
all: All character sets. This is the default.complex: Complex character sets.none: No extra character sets.
-DWITH_INNODB_EXTRA_DEBUG=boolWhether to include extra InnoDB debugging support.
Enabling
WITH_INNODB_EXTRA_DEBUGturns on extra InnoDB debug checks. This option can only be enabled whenWITH_DEBUGis enabled.The path to the googlemock distribution, for use with Google Test-based unit tests. The option value is the path to the distribution Zip file. Alternatively, set the
WITH_GMOCKenvironment variable to the path name. It is also possible to use-DENABLE_DOWNLOADS=1and CMake will download the distribution from GitHub.If you build MySQL without the Google Test-based unit tests (by configuring wihout
WITH_GMOCK), CMake displays a message indicating how to download it.Whether to generate memcached shared libraries (
libmemcached.soandinnodb_engine.so).Whether to build the test program that accompanies the
keyring_fileplugin. The default isOFF. Test file source code is located in theplugin/keyring/keyring-testdirectory.This option was added in MySQL 5.7.11.
Which
libeventlibrary to use. Permitted values arebundled(default),system, andyes. If you specifysystemoryes, the systemlibeventlibrary is used if present. If the system library is not found, the bundledlibeventlibrary is used. Thelibeventlibrary is required byInnoDBmemcached.Whether to include
libwrap(TCP wrappers) support.The
WITH_LZ4indicates the source ofzlibsupport:bundled: Use theLZ4library bundled with the distribution. This is the default.system: Use the systemLZ4library. IfWITH_LZ4is set to this value, the lz4_decompress utility is not built. In this case, the system lz4 command can be used instead.
Whether to enable MemorySanitizer, for compilers that support it. The default is off.
For this option to have an effect if enabled, all libraries linked to MySQL must also have been compiled with the option enabled.
-DWITH_MECAB={disabled|system|path_name}Use this option to compile the MeCab parser. If you have installed MeCab to its default installation directory, set
-DWITH_MECAB=system. Thesystemoption applies to MeCab installations performed from source or from binaries using a native package management utility. If you installed MeCab to a custom installation directory, specify the path to the MeCab installation. For example,-DWITH_MECAB=/opt/mecab. If thesystemoption does not work, specifying the MeCab installation path should work in all cases.For related information, see Section 12.9.9, “MeCab Full-Text Parser Plugin”.
Whether to enable Visual Studio CRT memory leak tracing. The default is
OFF.Explicitly set the NUMA memory allocation policy. CMake sets the default
WITH_NUMAvalue based on whether the current platform hasNUMAsupport. For platforms without NUMA support, CMake behaves as follows:With no NUMA option (the normal case), CMake continues normally, producing only this warning: NUMA library missing or required version not available
With
-DWITH_NUMA=ON, CMake aborts with this error: NUMA library missing or required version not available
This option was added in MySQL 5.7.17.
Which Protocol Buffers package to use.
protobuf_typecan be one of the following values:bundled: Use the package bundled with the distribution. This is the default.system: Use the package installed on the system.
Other values are ignored, with a fallback to
bundled.This option was added in MySQL 5.7.12.
Whether to build the rapid development cycle plugins. When enabled, a
rapiddirectory is created in the build tree containing these plugins. When disabled, norapiddirectory is created in the build tree. The default isON, unless therapiddirectory is removed from the source tree, in which case the default becomesOFF. This option was added in MySQL 5.7.12.-DWITH_SSL={|ssl_typepath_name}For support of encrypted connections, entropy for random number generation, and other encryption-related operations, MySQL must be built using an SSL library. This option specifies which SSL library to use.
ssl_typecan be one of the following values:yes: Use the system OpenSSL library if present, else the library bundled with the distribution.bundled: Use the SSL library bundled with the distribution. This is the default prior to MySQL 5.7.28. As of 5.7.28, this is no longer a permitted value and the default issystem.system: Use the system OpenSSL library. This is the default as of MySQL 5.7.28.
path_nameis the path name to the OpenSSL installation to use. This can be preferable to using thessl_typevalue ofsystembecause it can prevent CMake from detecting and using an older or incorrect OpenSSL version installed on the system. (Another permitted way to do the same thing is to setWITH_SSLtosystemand set theCMAKE_PREFIX_PATHoption topath_name.)
For additional information about configuring the SSL library, see Section 2.9.6, “Configuring SSL Library Support”.
Whether to enable installation of systemd support files. By default, this option is disabled. When enabled, systemd support files are installed, and scripts such as mysqld_safe and the System V initialization script are not installed. On platforms where systemd is not available, enabling
WITH_SYSTEMDresults in an error from CMake.For more information about using systemd, see Section 2.5.10, “Managing MySQL Server with systemd”. That section also includes information about specifying options previously specified in
[mysqld_safe]option groups. Because mysqld_safe is not installed when systemd is used, such options must be specified another way.Whether to build the test protocol trace client plugin (see Section 28.2.4.11.1, “Using the Test Protocol Trace Plugin”). By default, this option is disabled. Enabling this option has no effect unless the
WITH_CLIENT_PROTOCOL_TRACINGoption is enabled. If MySQL is configured with both options enabled, thelibmysqlclientclient library is built with the test protocol trace plugin built in, and all the standard MySQL clients load the plugin. However, even when the test plugin is enabled, it has no effect by default. Control over the plugin is afforded using environment variables; see Section 28.2.4.11.1, “Using the Test Protocol Trace Plugin”.NoteDo not enable the
WITH_TEST_TRACE_PLUGINoption if you want to use your own protocol trace plugins because only one such plugin can be loaded at a time and an error occurs for attempts to load a second one. If you have already built MySQL with the test protocol trace plugin enabled to see how it works, you must rebuild MySQL without it before you can use your own plugins.For information about writing trace plugins, see Section 28.2.4.11, “Writing Protocol Trace Plugins”.
Whether to enable the Undefined Behavior Sanitizer, for compilers that support it. The default is off.
If enabled, compile MySQL with unit tests. The default is ON unless the server is not being compiled.
Enables unixODBC support, for Connector/ODBC.
Whether to compile in the Valgrind header files, which exposes the Valgrind API to MySQL code. The default is
OFF.To generate a Valgrind-aware debug build,
-DWITH_VALGRIND=1normally is combined with-DWITH_DEBUG=1. See Building Debug Configurations.Some features require that the server be built with compression library support, such as the
COMPRESS()andUNCOMPRESS()functions, and compression of the client/server protocol. TheWITH_ZLIBindicates the source ofzlibsupport:bundled: Use thezliblibrary bundled with the distribution. This is the default.system: Use the systemzliblibrary.
Flags for the C Compiler.
Flags for the C++ Compiler.
-DWITH_DEFAULT_COMPILER_OPTIONS=boolWhether to use the flags from
cmake/build_configurations/compiler_options.cmake.NoteAll optimization flags were carefully chosen and tested by the MySQL build team. Overriding them can lead to unexpected results and is done at your own risk.
-DSUNPRO_CXX_LIBRARY=""lib_nameEnable linking against
libCstdinstead ofstlport4on Solaris 10 or later. This works only for client code because the server depends on C++98.
To specify your own C and C++ compiler flags, for flags that do
not affect optimization, use the
CMAKE_C_FLAGS and
CMAKE_CXX_FLAGS CMake options.
When providing your own compiler flags, you might want to
specify CMAKE_BUILD_TYPE as well.
For example, to create a 32-bit release build on a 64-bit Linux machine, do this:
mkdir bld cd bld cmake .. -DCMAKE_C_FLAGS=-m32 \ -DCMAKE_CXX_FLAGS=-m32 \ -DCMAKE_BUILD_TYPE=RelWithDebInfo
If you set flags that affect optimization
(-O), you must
set the
numberCMAKE_C_FLAGS_
and/or
build_typeCMAKE_CXX_FLAGS_
options, where build_typebuild_type corresponds
to the CMAKE_BUILD_TYPE value. To
specify a different optimization for the default build type
(RelWithDebInfo) set the
CMAKE_C_FLAGS_RELWITHDEBINFO and
CMAKE_CXX_FLAGS_RELWITHDEBINFO options. For
example, to compile on Linux with -O3 and with
debug symbols, do this:
cmake .. -DCMAKE_C_FLAGS_RELWITHDEBINFO="-O3 -g" \ -DCMAKE_CXX_FLAGS_RELWITHDEBINFO="-O3 -g"
The following options are for use when building NDB Cluster with the NDB Cluster sources; they are not currently supported when using sources from the MySQL 5.6 Server tree.
Perform the build using the memcached (version 1.6 or later) installed in the system directory indicated by
dir_name. Files from this installation that are used in the build include the memcached binary, header files, and libraries, as well as thememcached_utilitieslibrary and the header fileengine_testapp.h.You must leave this option unset when building
ndbmemcacheusing the bundled memcached sources (WITH_BUNDLED_MEMCACHEDoption); in other words, the bundled sources are used by default).While additional CMake options—such as for SASL authorization and for providing
dtracesupport—are available for use when compiling memcached from external sources, these options are currently not enabled for the memcached sources bundled with NDB Cluster.-DWITH_BUNDLED_LIBEVENT={ON|OFF}Use the
libeventincluded in the NDB Cluster sources when building NDB Cluster withndbmemcachedsupport. Enabled by default.OFFcauses the system'slibeventto be used instead.-DWITH_BUNDLED_MEMCACHED={ON|OFF}Build the memcached sources included in the NDB Cluster source tree, then use the resulting memcached server when building the
ndbmemcacheengine. In this case, make install places the memcached binary in the installationbindirectory, and thendbmemcacheengine shared library filendb_engine.soin the installationlibdirectory.This option is ON by default.
Sets the classpath for building NDB Cluster Connector for Java. The default is empty. This option is ignored if
-DWITH_NDB_JAVA=OFFis used.Enables error injection in the
NDBkernel. For testing only; not intended for use in building production binaries. The default isOFF.-DWITH_NDBCLUSTER_STORAGE_ENGINE={ON|OFF}Build and link in support for the
NDB(NDBCLUSTER) storage engine in mysqld. The default isON.This is an alias for
WITH_NDBCLUSTER_STORAGE_ENGINE.Build the multithreaded data node executable ndbmtd. The default is
ON.Enable binary logging by default in the mysqld built using this option. ON by default.
Enable building the debug versions of the NDB Cluster binaries. OFF by default.
Enable building NDB Cluster with Java support, including
ClusterJ.This option is ON by default. If you do not wish to compile NDB Cluster with Java support, you must disable it explicitly by specifying
-DWITH_NDB_JAVA=OFFwhen running CMake. Otherwise, if Java cannot be found, configuration of the build fails.Causes the NDB Cluster management server (ndb_mgmd) that is built to use this
portby default. If this option is unset, the resulting management server tries to use port 1186 by default.If enabled, include a set of NDB API test programs. The default is OFF.
The solution to many problems involves reconfiguring. If you do reconfigure, take note of the following:
If CMake is run after it has previously been run, it may use information that was gathered during its previous invocation. This information is stored in
CMakeCache.txt. When CMake starts, it looks for that file and reads its contents if it exists, on the assumption that the information is still correct. That assumption is invalid when you reconfigure.Each time you run CMake, you must run make again to recompile. However, you may want to remove old object files from previous builds first because they were compiled using different configuration options.
To prevent old object files or configuration information from being used, run the following commands before re-running CMake:
On Unix:
shell>make cleanshell>rm CMakeCache.txt
On Windows:
shell>devenv MySQL.sln /cleanshell>del CMakeCache.txt
If you build outside of the source tree, remove and recreate your build directory before re-running CMake. For instructions on building outside of the source tree, see How to Build MySQL Server with CMake.
On some systems, warnings may occur due to differences in system include files. The following list describes other problems that have been found to occur most often when compiling MySQL:
To define which C and C++ compilers to use, you can define the
CCandCXXenvironment variables. For example:shell>
CC=gccshell>CXX=g++shell>export CC CXXTo specify your own C and C++ compiler flags, use the
CMAKE_C_FLAGSandCMAKE_CXX_FLAGSCMake options. See Compiler Flags.To see what flags you might need to specify, invoke mysql_config with the
--cflagsand--cxxflagsoptions.To see what commands are executed during the compile stage, after using CMake to configure MySQL, run make VERBOSE=1 rather than just make.
If compilation fails, check whether the
MYSQL_MAINTAINER_MODEoption is enabled. This mode causes compiler warnings to become errors, so disabling it may enable compilation to proceed.If your compile fails with errors such as any of the following, you must upgrade your version of make to GNU make:
make: Fatal error in reader: Makefile, line 18: Badly formed macro assignment
Or:
make: file `Makefile' line 18: Must be a separator (:
Or:
pthread.h: No such file or directory
Solaris and FreeBSD are known to have troublesome make programs.
GNU make 3.75 is known to work.
The
sql_yacc.ccfile is generated fromsql_yacc.yy. Normally, the build process does not need to createsql_yacc.ccbecause MySQL comes with a pregenerated copy. However, if you do need to re-create it, you might encounter this error:"sql_yacc.yy", line
xxxfatal: default action causes potential...This is a sign that your version of yacc is deficient. You probably need to install a recent version of bison (the GNU version of yacc) and use that instead.
Versions of bison older than 1.75 may report this error:
sql_yacc.yy:#####: fatal error: maximum table size (32767) exceeded
The maximum table size is not actually exceeded; the error is caused by bugs in older versions of bison.
For information about acquiring or updating tools, see the system requirements in Section 2.9, “Installing MySQL from Source”.
Third-party tools that need to determine the MySQL version from
the MySQL source can read the VERSION file in
the top-level source directory. The file lists the pieces of the
version separately. For example, if the version is MySQL
5.7.4-m14, the file looks like this:
MYSQL_VERSION_MAJOR=5 MYSQL_VERSION_MINOR=7 MYSQL_VERSION_PATCH=4 MYSQL_VERSION_EXTRA=-m14
If the source is not for a General Availablility (GA) release, the
MYSQL_VERSION_EXTRA value will be nonempty. For
the example, the value corresponds to Milestone 14.
To construct a five-digit number from the version components, use this formula:
MYSQL_VERSION_MAJOR*10000 + MYSQL_VERSION_MINOR*100 + MYSQL_VERSION_PATCH
This section discusses tasks that you should perform after installing MySQL:
If necessary, initialize the data directory and create the MySQL grant tables. For some MySQL installation methods, data directory initialization may be done for you automatically:
Windows installation operations performed by MySQL Installer.
Installation on Linux using a server RPM or Debian distribution from Oracle.
Installation using the native packaging system on many platforms, including Debian Linux, Ubuntu Linux, Gentoo Linux, and others.
Installation on OS X using a DMG distribution.
For other platforms and installation types, you must initialize the data directory manually. These include installation from generic binary and source distributions on Unix and Unix-like system, and installation from a ZIP Archive package on Windows. For instructions, see Section 2.10.1, “Initializing the Data Directory”.
Start the server and make sure that it can be accessed. For instructions, see Section 2.10.2, “Starting the Server”, and Section 2.10.3, “Testing the Server”.
Assign passwords to the initial
rootaccount in the grant tables, if that was not already done during data directory initialization. Passwords prevent unauthorized access to the MySQL server. For instructions, see Section 2.10.4, “Securing the Initial MySQL Account”.Optionally, arrange for the server to start and stop automatically when your system starts and stops. For instructions, see Section 2.10.5, “Starting and Stopping MySQL Automatically”.
Optionally, populate time zone tables to enable recognition of named time zones. For instructions, see Section 5.1.12, “MySQL Server Time Zone Support”.
When you are ready to create additional user accounts, you can find information on the MySQL access control system and account management in Section 6.2, “Access Control and Account Management”.
After MySQL is installed, the data directory must be initialized,
including the tables in the mysql system
database:
For some MySQL installation methods, data directory initialization is automatic, as described in Section 2.10, “Postinstallation Setup and Testing”.
For other installation methods, you must initialize the data directory manually. These include installation from generic binary and source distributions on Unix and Unix-like systems, and installation from a ZIP Archive package on Windows.
This section describes how to initialize the data directory manually for MySQL installation methods for which data directory initialization is not automatic. For some suggested commands that enable testing whether the server is accessible and working properly, see Section 2.10.3, “Testing the Server”.
In the examples shown here, the server is intended to run under
the user ID of the mysql login account.
Either create the account if it does not exist (see
Create a mysql User and Group), or
substitute the name of a different existing login account that
you plan to use for running the server.
Change location to the top-level directory of your MySQL installation, which is typically
/usr/local/mysql(adjust the path name for your system as necessary):cd /usr/local/mysql
Within the directory you will find several files and subdirectories, including the
binsubdirectory that contains the server as well as client and utility programs.The
secure_file_privsystem variable limits import and export operations to a specific directory. Create a directory whose location can be specified as the value of that variable:mkdir mysql-files
Grant directory user and group ownership to the
mysqluser andmysqlgroup, and set the directory permissions appropriately:chown mysql:mysql mysql-files chmod 750 mysql-files
Use the server to initialize the data directory, including the
mysqldatabase containing the initial MySQL grant tables that determine how users are permitted to connect to the server. For example:bin/mysqld --initialize --user=mysql
For important information about the command, especially regarding command options you might use, see Data Directory Initialization Procedure. For details about how the server performs initialization, see Server Actions During Data Directory Initialization.
Typically, data directory initialization need be done only after you first install MySQL. (For upgrades to an existing installation, perform the upgrade procedure instead; see Section 2.11, “Upgrading MySQL”.) However, the command that initializes the data directory does not overwrite any existing
mysqldatabase tables, so it is safe to run in any circumstances.NoteInitialization of the data directory might fail if required system libraries are missing. For example, you might see an error like this:
bin/mysqld: error while loading shared libraries: libnuma.so.1: cannot open shared object file: No such file or directory
If this happens, you must install the missing libraries manually or with your system's package manager. Then retry the data directory initialization command.
If you want to deploy the server with automatic support for secure connections, use the mysql_ssl_rsa_setup utility to create default SSL and RSA files:
bin/mysql_ssl_rsa_setup
For more information, see Section 4.4.5, “mysql_ssl_rsa_setup — Create SSL/RSA Files”.
In the absence of any option files, the server starts with its default settings. (See Section 5.1.2, “Server Configuration Defaults”.) To explicitly specify options that the MySQL server should use at startup, put them in an option file such as
/etc/my.cnfor/etc/mysql/my.cnf. (See Section 4.2.2.2, “Using Option Files”.) For example, you can use an option file to set thesecure_file_privsystem variable.To arrange for MySQL to start without manual intervention at system boot time, see Section 2.10.5, “Starting and Stopping MySQL Automatically”.
Data directory initialization creates time zone tables in the
mysqldatabase but does not populate them. To do so, use the instructions in Section 5.1.12, “MySQL Server Time Zone Support”.
Change location to the top-level directory of your MySQL
installation, which is typically
/usr/local/mysql (adjust the path name for
your system as necessary):
cd /usr/local/mysql
To initialize the data directory, invoke
mysqld with the
--initialize or
--initialize-insecure option,
depending on whether you want the server to generate a random
initial password for the 'root'@'localhost'
account, or to create that account with no password:
Use
--initializefor “secure by default” installation (that is, including generation of a random initialrootpassword). In this case, the password is marked as expired and you will need to choose a new one.With
--initialize-insecure, norootpassword is generated. This is insecure; it is assumed that you will assign a password to the account in timely fashion before putting the server into production use.
For instructions on assigning a new
'root'@'localhost' password, see
Post-Initialization root Password Assignment.
The server writes any messages (including any initial password) to its standard error output. This may be redirected to the error log, so look there if you do not see the messages on your screen. For information about the error log, including where it is located, see Section 5.4.2, “The Error Log”.
On Windows, use the --console
option to direct messages to the console.
On Unix and Unix-like systems, it is important for the database
directories and files to be owned by the
mysql login account so that the server has
read and write access to them when you run it later. To ensure
this, start mysqld from the system
root account and include the
--user option as shown here:
bin/mysqld --initialize --user=mysql bin/mysqld --initialize-insecure --user=mysql
Alternatively, execute mysqld while logged in
as mysql, in which case you can omit the
--user option from the command.
On Windows, use one of these commands:
bin\mysqld --initialize --console bin\mysqld --initialize-insecure --console
It might be necessary to specify other options such as
--basedir or
--datadir if
mysqld cannot identify the correct locations
for the installation directory or data directory. For example
(enter the command on a single line):
bin/mysqld --initialize --user=mysql --basedir=/opt/mysql/mysql --datadir=/opt/mysql/mysql/data
Alternatively, put the relevant option settings in an option
file and pass the name of that file to
mysqld. For Unix and Unix-like systems,
suppose that the option file name is
/opt/mysql/mysql/etc/my.cnf. Put these
lines in the file:
[mysqld] basedir=/opt/mysql/mysql datadir=/opt/mysql/mysql/data
Then invoke mysqld as follows (enter the
command on a single line with the
--defaults-file option first):
bin/mysqld --defaults-file=/opt/mysql/mysql/etc/my.cnf --initialize --user=mysql
On Windows, suppose that C:\my.ini contains
these lines:
[mysqld] basedir=C:\\Program Files\\MySQL\\MySQL Server 5.7 datadir=D:\\MySQLdata
Then invoke mysqld as follows (enter the
command on a single line with the
--defaults-file option first):
bin\mysqld --defaults-file=C:\my.ini --initialize --console
The data directory initialization sequence performed by the server does not substitute for the actions performed by mysql_secure_installation and mysql_ssl_rsa_setup. See Section 4.4.4, “mysql_secure_installation — Improve MySQL Installation Security”, and Section 4.4.5, “mysql_ssl_rsa_setup — Create SSL/RSA Files”.
When invoked with the
--initialize or
--initialize-insecure option,
mysqld performs the following actions during
the data directory initialization sequence:
The server checks for the existence of the data directory as follows:
If no data directory exists, the server creates it.
If the data directory exists but is not empty (that is, it contains files or subdirectories), the server exits after producing an error message:
[ERROR] --initialize specified but the data directory exists. Aborting.
In this case, remove or rename the data directory and try again.
As of MySQL 5.7.11, an existing data directory is permitted to be nonempty if every entry either has a name that begins with a period (
.) or is named using an--ignore-db-diroption.NoteAvoid the use of the
--ignore-db-diroption, which has been deprecated since MySQL 5.7.16.
Within the data directory, the server creates the
mysqlsystem database and its tables, including the grant tables, time zone tables, and server-side help tables. See Section 5.3, “The mysql System Database”.The server initializes the system tablespace and related data structures needed to manage
InnoDBtables.NoteAfter mysqld sets up the
InnoDBsystem tablespace, certain changes to tablespace characteristics require setting up a whole new instance. Qualifying changes include the file name of the first file in the system tablespace and the number of undo logs. If you do not want to use the default values, make sure that the settings for theinnodb_data_file_pathandinnodb_log_file_sizeconfiguration parameters are in place in the MySQL configuration file before running mysqld. Also make sure to specify as necessary other parameters that affect the creation and location ofInnoDBfiles, such asinnodb_data_home_dirandinnodb_log_group_home_dir.If those options are in your configuration file but that file is not in a location that MySQL reads by default, specify the file location using the
--defaults-extra-fileoption when you run mysqld.The server creates a
'root'@'localhost'superuser account and other reserved accounts (see Section 6.2.8, “Reserved Accounts”). Some reserved accounts are locked and cannot be used by clients, but'root'@'localhost'is intended for administrative use and you should assign it a password.Server actions with respect to a password for the
'root'@'localhost'account depend on how you invoke it:With
--initializebut not--initialize-insecure, the server generates a random password, marks it as expired, and writes a message displaying the password:[Warning] A temporary password is generated for root@localhost: iTag*AfrH5ej
With
--initialize-insecure, (either with or without--initializebecause--initialize-insecureimplies--initialize), the server does not generate a password or mark it expired, and writes a warning message:[Warning] root@localhost is created with an empty password ! Please consider switching off the --initialize-insecure option.
For instructions on assigning a new
'root'@'localhost'password, see Post-Initialization root Password Assignment.The server populates the server-side help tables used for the
HELPstatement (see Section 13.8.3, “HELP Syntax”). The server does not populate the time zone tables. To do so manually, see Section 5.1.12, “MySQL Server Time Zone Support”.If the
init_filesystem variable was given to name a file of SQL statements, the server executes the statements in the file. This option enables you to perform custom bootstrapping sequences.When the server operates in bootstrap mode, some functionality is unavailable that limits the statements permitted in the file. These include statements that relate to account management (such as
CREATE USERorGRANT), replication, and global transaction identifiers.The server exits.
After you initialize the data directory by starting the server
with --initialize or
--initialize-insecure, start the
server normally (that is, without either of those options) and
assign the 'root'@'localhost' account a new
password:
Start the server. For instructions, see Section 2.10.2, “Starting the Server”.
Connect to the server:
If you used
--initializebut not--initialize-insecureto initialize the data directory, connect to the server asroot:mysql -u root -p
Then, at the password prompt, enter the random password that the server generated during the initialization sequence:
Enter password:
(enter the random root password here)Look in the server error log if you do not know this password.
If you used
--initialize-insecureto initialize the data directory, connect to the server asrootwithout a password:mysql -u root --skip-password
After connecting, use an
ALTER USERstatement to assign a newrootpassword:ALTER USER 'root'@'localhost' IDENTIFIED BY '
root-password';
See also Section 2.10.4, “Securing the Initial MySQL Account”.
Attempts to connect to the host 127.0.0.1
normally resolve to the localhost account.
However, this fails if the server is run with the
--skip-name-resolve option. If
you plan to do that, make sure that an account exists that can
accept a connection. For example, to be able to connect as
root using
--host=127.0.0.1 or
--host=::1, create these accounts:
CREATE USER 'root'@'127.0.0.1' IDENTIFIED BY 'root-password'; CREATE USER 'root'@'::1' IDENTIFIED BY 'root-password';
It is possible to put those statements in a file to be
executed using the init_file
system variable, as discussed in
Server Actions During Data Directory Initialization.
This section describes how start the server on Unix and Unix-like systems. (For Windows, see Section 2.3.4.5, “Starting the Server for the First Time”.) For some suggested commands that you can use to test whether the server is accessible and working properly, see Section 2.10.3, “Testing the Server”.
Start the MySQL server like this if your installation includes mysqld_safe:
shell> bin/mysqld_safe --user=mysql &
For Linux systems on which MySQL is installed using RPM packages, server startup and shutdown is managed using systemd rather than mysqld_safe, and mysqld_safe is not installed. See Section 2.5.10, “Managing MySQL Server with systemd”.
Start the server like this if your installation includes systemd support:
shell> systemctl start mysqld
Substitute the appropriate service name if it differs from
mysqld (for example, mysql
on SLES systems).
It is important that the MySQL server be run using an unprivileged
(non-root) login account. To ensure this, run
mysqld_safe as root and
include the --user option as
shown. Otherwise, you should execute the program while logged in
as mysql, in which case you can omit the
--user option from the
command.
For further instructions for running MySQL as an unprivileged user, see Section 6.1.5, “How to Run MySQL as a Normal User”.
If the command fails immediately and prints mysqld
ended, look for information in the error log (which by
default is the
host_name.err
If the server is unable to access the data directory it starts or
read the grant tables in the mysql database, it
writes a message to its error log. Such problems can occur if you
neglected to create the grant tables by initializing the data
directory before proceeding to this step, or if you ran the
command that initializes the data directory without the
--user option. Remove the
data directory and run the command with the
--user option.
If you have other problems starting the server, see Section 2.10.2.1, “Troubleshooting Problems Starting the MySQL Server”. For more information about mysqld_safe, see Section 4.3.2, “mysqld_safe — MySQL Server Startup Script”. For more information about systemd support, see Section 2.5.10, “Managing MySQL Server with systemd”.
This section provides troubleshooting suggestions for problems starting the server. For additional suggestions for Windows systems, see Section 2.3.5, “Troubleshooting a Microsoft Windows MySQL Server Installation”.
If you have problems starting the server, here are some things to try:
Check the error log to see why the server does not start. Log files are located in the data directory (typically
C:\Program Files\MySQL\MySQL Server 5.7\dataon Windows,/usr/local/mysql/datafor a Unix/Linux binary distribution, and/usr/local/varfor a Unix/Linux source distribution). Look in the data directory for files with names of the formhost_name.errhost_name.loghost_nameis the name of your server host. Then examine the last few lines of these files. Usetailto display them:shell>
tailshell>host_name.errtailhost_name.logSpecify any special options needed by the storage engines you are using. You can create a
my.cnffile and specify startup options for the engines that you plan to use. If you are going to use storage engines that support transactional tables (InnoDB,NDB), be sure that you have them configured the way you want before starting the server. If you are usingInnoDBtables, see Section 14.8, “InnoDB Configuration” for guidelines and Section 14.14, “InnoDB Startup Options and System Variables” for option syntax.Although storage engines use default values for options that you omit, Oracle recommends that you review the available options and specify explicit values for any options whose defaults are not appropriate for your installation.
Make sure that the server knows where to find the data directory. The mysqld server uses this directory as its current directory. This is where it expects to find databases and where it expects to write log files. The server also writes the pid (process ID) file in the data directory.
The default data directory location is hardcoded when the server is compiled. To determine what the default path settings are, invoke mysqld with the
--verboseand--helpoptions. If the data directory is located somewhere else on your system, specify that location with the--datadiroption to mysqld or mysqld_safe, on the command line or in an option file. Otherwise, the server will not work properly. As an alternative to the--datadiroption, you can specify mysqld the location of the base directory under which MySQL is installed with the--basedir, and mysqld looks for thedatadirectory there.To check the effect of specifying path options, invoke mysqld with those options followed by the
--verboseand--helpoptions. For example, if you change location to the directory where mysqld is installed and then run the following command, it shows the effect of starting the server with a base directory of/usr/local:shell>
./mysqld --basedir=/usr/local --verbose --helpYou can specify other options such as
--datadiras well, but--verboseand--helpmust be the last options.Once you determine the path settings you want, start the server without
--verboseand--help.If mysqld is currently running, you can find out what path settings it is using by executing this command:
shell>
mysqladmin variablesOr:
shell>
mysqladmin -hhost_namevariableshost_nameis the name of the MySQL server host.Make sure that the server can access the data directory. The ownership and permissions of the data directory and its contents must allow the server to read and modify them.
If you get
Errcode 13(which meansPermission denied) when starting mysqld, this means that the privileges of the data directory or its contents do not permit server access. In this case, you change the permissions for the involved files and directories so that the server has the right to use them. You can also start the server asroot, but this raises security issues and should be avoided.Change location to the data directory and check the ownership of the data directory and its contents to make sure the server has access. For example, if the data directory is
/usr/local/mysql/var, use this command:shell>
ls -la /usr/local/mysql/varIf the data directory or its files or subdirectories are not owned by the login account that you use for running the server, change their ownership to that account. If the account is named
mysql, use these commands:shell>
chown -R mysql /usr/local/mysql/varshell>chgrp -R mysql /usr/local/mysql/varEven with correct ownership, MySQL might fail to start up if there is other security software running on your system that manages application access to various parts of the file system. In this case, reconfigure that software to enable mysqld to access the directories it uses during normal operation.
Verify that the network interfaces the server wants to use are available.
If either of the following errors occur, it means that some other program (perhaps another mysqld server) is using the TCP/IP port or Unix socket file that mysqld is trying to use:
Can't start server: Bind on TCP/IP port: Address already in use Can't start server: Bind on unix socket...
Use ps to determine whether you have another mysqld server running. If so, shut down the server before starting mysqld again. (If another server is running, and you really want to run multiple servers, you can find information about how to do so in Section 5.7, “Running Multiple MySQL Instances on One Machine”.)
If no other server is running, execute the command
telnet. (The default MySQL port number is 3306.) Then press Enter a couple of times. If you do not get an error message likeyour_host_nametcp_ip_port_numbertelnet: Unable to connect to remote host: Connection refused, some other program is using the TCP/IP port that mysqld is trying to use. Track down what program this is and disable it, or tell mysqld to listen to a different port with the--portoption. In this case, specify the same non-default port number for client programs when connecting to the server using TCP/IP.Another reason the port might be inaccessible is that you have a firewall running that blocks connections to it. If so, modify the firewall settings to permit access to the port.
If the server starts but you cannot connect to it, make sure that you have an entry in
/etc/hoststhat looks like this:127.0.0.1 localhost
If you cannot get mysqld to start, try to make a trace file to find the problem by using the
--debugoption. See Section 28.5.3, “The DBUG Package”.
After the data directory is initialized and you have started the
server, perform some simple tests to make sure that it works
satisfactorily. This section assumes that your current location is
the MySQL installation directory and that it has a
bin subdirectory containing the MySQL
programs used here. If that is not true, adjust the command path
names accordingly.
Alternatively, add the bin directory to your
PATH environment variable setting. That enables
your shell (command interpreter) to find MySQL programs properly,
so that you can run a program by typing only its name, not its
path name. See Section 4.2.6, “Setting Environment Variables”.
Use mysqladmin to verify that the server is running. The following commands provide simple tests to check whether the server is up and responding to connections:
shell>bin/mysqladmin versionshell>bin/mysqladmin variables
If you cannot connect to the server, specify a -u
root option to connect as root. If you
have assigned a password for the root account
already, you'll also need to specify -p on the
command line and enter the password when prompted. For example:
shell>bin/mysqladmin -u root -p versionEnter password:(enter root password here)
The output from mysqladmin version varies slightly depending on your platform and version of MySQL, but should be similar to that shown here:
shell> bin/mysqladmin version
mysqladmin Ver 14.12 Distrib 5.7.29, for pc-linux-gnu on i686
...
Server version 5.7.29
Protocol version 10
Connection Localhost via UNIX socket
UNIX socket /var/lib/mysql/mysql.sock
Uptime: 14 days 5 hours 5 min 21 sec
Threads: 1 Questions: 366 Slow queries: 0
Opens: 0 Flush tables: 1 Open tables: 19
Queries per second avg: 0.000
To see what else you can do with mysqladmin,
invoke it with the --help
option.
Verify that you can shut down the server (include a
-p option if the root account
has a password already):
shell> bin/mysqladmin -u root shutdown
Verify that you can start the server again. Do this by using mysqld_safe or by invoking mysqld directly. For example:
shell> bin/mysqld_safe --user=mysql &
If mysqld_safe fails, see Section 2.10.2.1, “Troubleshooting Problems Starting the MySQL Server”.
Run some simple tests to verify that you can retrieve information from the server. The output should be similar to that shown here.
Use mysqlshow to see what databases exist:
shell> bin/mysqlshow
+--------------------+
| Databases |
+--------------------+
| information_schema |
| mysql |
| performance_schema |
| sys |
+--------------------+
The list of installed databases may vary, but always includes at
least mysql and
information_schema.
If you specify a database name, mysqlshow displays a list of the tables within the database:
shell> bin/mysqlshow mysql
Database: mysql
+---------------------------+
| Tables |
+---------------------------+
| columns_priv |
| db |
| engine_cost |
| event |
| func |
| general_log |
| gtid_executed |
| help_category |
| help_keyword |
| help_relation |
| help_topic |
| innodb_index_stats |
| innodb_table_stats |
| ndb_binlog_index |
| plugin |
| proc |
| procs_priv |
| proxies_priv |
| server_cost |
| servers |
| slave_master_info |
| slave_relay_log_info |
| slave_worker_info |
| slow_log |
| tables_priv |
| time_zone |
| time_zone_leap_second |
| time_zone_name |
| time_zone_transition |
| time_zone_transition_type |
| user |
+---------------------------+
Use the mysql program to select information
from a table in the mysql database:
shell> bin/mysql -e "SELECT User, Host, plugin FROM mysql.user" mysql
+------+-----------+-----------------------+
| User | Host | plugin |
+------+-----------+-----------------------+
| root | localhost | mysql_native_password |
+------+-----------+-----------------------+
At this point, your server is running and you can access it. To tighten security if you have not yet assigned a password to the initial account, follow the instructions in Section 2.10.4, “Securing the Initial MySQL Account”.
For more information about mysql, mysqladmin, and mysqlshow, see Section 4.5.1, “mysql — The MySQL Command-Line Client”, Section 4.5.2, “mysqladmin — Client for Administering a MySQL Server”, and Section 4.5.7, “mysqlshow — Display Database, Table, and Column Information”.
The MySQL installation process involves initializing the data
directory, including the grant tables in the
mysql system database that define MySQL
accounts. For details, see
Section 2.10.1, “Initializing the Data Directory”.
This section describes how to assign a password to the initial
root account created during the MySQL
installation procedure, if you have not already done so.
Alternative means for performing the process described in this section:
On Windows, you can perform the process during installation with MySQL Installer (see Section 2.3.3, “MySQL Installer for Windows”).
On all platforms, the MySQL distribution includes mysql_secure_installation, a command-line utility that automates much of the process of securing a MySQL installation.
On all platforms, MySQL Workbench is available and offers the ability to manage user accounts (see Chapter 30, MySQL Workbench ).
A password may already be assigned to the initial account under these circumstances:
On Windows, installations performed using MySQL Installer give you the option of assigning a password.
Installation using the macOS installer generates an initial random password, which the installer displays to the user in a dialog box.
Installation using RPM packages generates an initial random password, which is written to the server error log.
Installations using Debian packages give you the option of assigning a password.
For data directory initialization performed manually using mysqld --initialize, mysqld generates an initial random password, marks it expired, and writes it to the server error log. See Section 2.10.1, “Initializing the Data Directory”.
The mysql.user grant table defines the initial
MySQL user account and its access privileges. Installation of
MySQL creates only a 'root'@'localhost'
superuser account that has all privileges and can do anything. If
the root account has an empty password, your
MySQL installation is unprotected: Anyone can connect to the MySQL
server as root without a
password and be granted all privileges.
The 'root'@'localhost' account also has a row
in the mysql.proxies_priv table that enables
granting the PROXY privilege for
''@'', that is, for all users and all hosts.
This enables root to set up proxy users, as
well as to delegate to other accounts the authority to set up
proxy users. See Section 6.2.14, “Proxy Users”.
To assign a password for the initial MySQL root
account, use the following procedure. Replace
root-password in the examples with the
password that you want to use.
Start the server if it is not running. For instructions, see Section 2.10.2, “Starting the Server”.
The initial root account may or may not have a
password. Choose whichever of the following procedures applies:
If the
rootaccount exists with an initial random password that has been expired, connect to the server asrootusing that password, then choose a new password. This is the case if the data directory was initialized using mysqld --initialize, either manually or using an installer that does not give you the option of specifying a password during the install operation. Because the password exists, you must use it to connect to the server. But because the password is expired, you cannot use the account for any purpose other than to choose a new password, until you do choose one.If you do not know the initial random password, look in the server error log.
Connect to the server as
rootusing the password:shell>
mysql -u root -pEnter password:(enter the random root password here)Choose a new password to replace the random password:
mysql>
ALTER USER 'root'@'localhost' IDENTIFIED BY 'root-password';
If the
rootaccount exists but has no password, connect to the server asrootusing no password, then assign a password. This is the case if you initialized the data directory using mysqld --initialize-insecure.Connect to the server as
rootusing no password:shell>
mysql -u root --skip-passwordAssign a password:
mysql>
ALTER USER 'root'@'localhost' IDENTIFIED BY 'root-password';
After assigning the root account a password,
you must supply that password whenever you connect to the server
using the account. For example, to connect to the server using the
mysql client, use this command:
shell>mysql -u root -pEnter password:(enter root password here)
To shut down the server with mysqladmin, use this command:
shell>mysqladmin -u root -p shutdownEnter password:(enter root password here)
For additional information about setting passwords, see
Section 6.2.10, “Assigning Account Passwords”. If you forget your
root password after setting it, see
Section B.4.3.2, “How to Reset the Root Password”.
To set up additional accounts, see Section 6.2.7, “Adding Accounts, Assigning Privileges, and Dropping Accounts”.
This section discusses methods for starting and stopping the MySQL server.
Generally, you start the mysqld server in one of these ways:
Invoke mysqld directly. This works on any platform.
On Windows, you can set up a MySQL service that runs automatically when Windows starts. See Section 2.3.4.8, “Starting MySQL as a Windows Service”.
On Unix and Unix-like systems, you can invoke mysqld_safe, which tries to determine the proper options for mysqld and then runs it with those options. See Section 4.3.2, “mysqld_safe — MySQL Server Startup Script”.
On Linux systems that support systemd, you can use it to control the server. See Section 2.5.10, “Managing MySQL Server with systemd”.
On systems that use System V-style run directories (that is,
/etc/init.dand run-level specific directories), invoke mysql.server. This script is used primarily at system startup and shutdown. It usually is installed under the namemysql. The mysql.server script starts the server by invoking mysqld_safe. See Section 4.3.3, “mysql.server — MySQL Server Startup Script”.On OS X, install a launchd daemon to enable automatic MySQL startup at system startup. The daemon starts the server by invoking mysqld_safe. For details, see Section 2.4.3, “Installing a MySQL Launch Daemon”. A MySQL Preference Pane also provides control for starting and stopping MySQL through the System Preferences. See Section 2.4.4, “Installing and Using the MySQL Preference Pane”.
On Solaris, use the service management framework (SMF) system to initiate and control MySQL startup.
systemd, the mysqld_safe and mysql.server scripts, Solaris SMF, and the OS X Startup Item (or MySQL Preference Pane) can be used to start the server manually, or automatically at system startup time. systemd, mysql.server, and the Startup Item also can be used to stop the server.
The following table shows which option groups the server and startup scripts read from option files.
Table 2.14 MySQL Startup Scripts and Supported Server Option Groups
| Script | Option Groups |
|---|---|
| mysqld | [mysqld], [server],
[mysqld- |
| mysqld_safe | [mysqld], [server],
[mysqld_safe] |
| mysql.server | [mysqld], [mysql.server],
[server] |
[mysqld-
means that groups with names like
major_version][mysqld-5.6] and
[mysqld-5.7] are read by servers
having versions 5.6.x, 5.7.x, and so
forth. This feature can be used to specify options that can be
read only by servers within a given release series.
For backward compatibility, mysql.server also
reads the [mysql_server] group and
mysqld_safe also reads the
[safe_mysqld] group. To be current, you should
update your option files to use the
[mysql.server] and
[mysqld_safe] groups instead.
For more information on MySQL configuration files and their structure and contents, see Section 4.2.2.2, “Using Option Files”.
- 2.11.1 Before You Begin
- 2.11.2 Upgrade Paths
- 2.11.3 Changes in MySQL 5.7
- 2.11.4 Upgrading MySQL Binary or Package-based Installations on Unix/Linux
- 2.11.5 Upgrading MySQL with the MySQL Yum Repository
- 2.11.6 Upgrading MySQL with the MySQL APT Repository
- 2.11.7 Upgrading MySQL with the MySQL SLES Repository
- 2.11.8 Upgrading MySQL on Windows
- 2.11.9 Upgrading a Docker Installation of MySQL
- 2.11.10 Upgrading MySQL with Directly-Downloaded RPM Packages
- 2.11.11 Upgrade Troubleshooting
- 2.11.12 Rebuilding or Repairing Tables or Indexes
- 2.11.13 Copying MySQL Databases to Another Machine
This section describes the steps to upgrade a MySQL installation.
Upgrading is a common procedure, as you pick up bug fixes within the same MySQL release series or significant features between major MySQL releases. You perform this procedure first on some test systems to make sure everything works smoothly, and then on the production systems.
In the following discussion, MySQL commands that must be run using
a MySQL account with administrative privileges include -u
on the command line to specify
the MySQL rootroot user. Commands that require a
password for root also include a
-p option. Because -p is
followed by no option value, such commands prompt for the
password. Type the password when prompted and press Enter.
SQL statements can be executed using the mysql
command-line client (connect as root to ensure
that you have the necessary privileges).
Review the information in this section before upgrading. Perform any recommended actions.
Protect your data by creating a backup. The backup should include the
mysqlsystem database, which contains the MySQL system tables. See Section 7.2, “Database Backup Methods”.Review Section 2.11.2, “Upgrade Paths” to ensure that your intended upgrade path is supported.
Review Section 2.11.3, “Changes in MySQL 5.7” for changes that you should be aware of before upgrading. Some changes may require action.
Review Section 1.4, “What Is New in MySQL 5.7” for deprecated and removed features. An upgrade may require changes with respect to those features if you use any of them.
Review Section 1.5, “Server and Status Variables and Options Added, Deprecated, or Removed in MySQL 5.7”. If you use deprecated or removed variables, an upgrade may require configuration changes.
Review the Release Notes for information about fixes, changes, and new features.
If you use replication, review Section 16.4.3, “Upgrading a Replication Setup”.
Upgrade procedures vary by platform and how the initial installation was performed. Use the procedure that applies to your current MySQL installation:
For binary and package-based installations on non-Windows platforms, refer to Section 2.11.4, “Upgrading MySQL Binary or Package-based Installations on Unix/Linux”.
NoteFor supported Linux distributions, the preferred method for upgrading package-based installations is to use the MySQL software repositories (MySQL Yum Repository, MySQL APT Repository, and MySQL SLES Repository).
For installations on an Enterprise Linux platform or Fedora using the MySQL Yum Repository, refer to Section 2.11.5, “Upgrading MySQL with the MySQL Yum Repository”.
For installations on Ubuntu using the MySQL APT repository, refer to Section 2.11.6, “Upgrading MySQL with the MySQL APT Repository”.
For installations on SLES using the MySQL SLES repository, refer to Section 2.11.7, “Upgrading MySQL with the MySQL SLES Repository”.
For installations performed using Docker, refer to Section 2.11.9, “Upgrading a Docker Installation of MySQL”.
For installations on Windows, refer to Section 2.11.8, “Upgrading MySQL on Windows”.
If your MySQL installation contains a large amount of data that might take a long time to convert after an in-place upgrade, it may be useful to create a test instance for assessing the conversions that are required and the work involved to perform them. To create a test instance, make a copy of your MySQL instance that contains the
mysqldatabase and other databases without the data. Run the upgrade procedure on the test instance to assess the work involved to perform the actual data conversion.Rebuilding and reinstalling MySQL language interfaces is recommended when you install or upgrade to a new release of MySQL. This applies to MySQL interfaces such as PHP
mysqlextensions and the PerlDBD::mysqlmodule.
Upgrade is only supported between General Availability (GA) releases.
Upgrade from MySQL 5.6 to 5.7 is supported. Upgrading to the latest release is recommended before upgrading to the next version. For example, upgrade to the latest MySQL 5.6 release before upgrading to MySQL 5.7.
Upgrade that skips versions is not supported. For example, upgrading directly from MySQL 5.5 to 5.7 is not supported.
Upgrade within a release series is supported. For example, upgrading from MySQL 5.7.
xto 5.7.yis supported. Skipping a release is also supported. For example, upgrading from MySQL 5.7.xto 5.7.zis supported.
Before upgrading to MySQL 5.7, review the changes described in this section to identify those that apply to your current MySQL installation and applications. Perform any recommended actions.
Changes marked as Incompatible
change are incompatibilities with earlier versions of
MySQL, and may require your attention before
upgrading. Our aim is to avoid these changes, but
occasionally they are necessary to correct problems that would be
worse than an incompatibility between releases. If an upgrade
issue applicable to your installation involves an incompatibility,
follow the instructions given in the description. Sometimes this
involves dumping and reloading tables, or use of a statement such
as CHECK TABLE or
REPAIR TABLE.
For dump and reload instructions, see
Section 2.11.12, “Rebuilding or Repairing Tables or Indexes”. Any procedure that involves
REPAIR TABLE with the
USE_FRM option must be
done before upgrading. Use of this statement with a version of
MySQL different from the one used to create the table (that is,
using it after upgrading) may damage the table. See
Section 13.7.2.5, “REPAIR TABLE Syntax”.
Incompatible change: As of MySQL 5.7.12, the default
--early-plugin-loadvalue is empty. To load thekeyring_fileplugin, you must use an explicit--early-plugin-loadoption with a nonempty value.In MySQL 5.7.11, the default
--early-plugin-loadvalue was the name of thekeyring_fileplugin library file, so that plugin was loaded by default.InnoDBtablespace encryption requires thekeyring_fileplugin to be loaded prior toInnoDBinitialization, so this change of default--early-plugin-loadvalue introduces an incompatibility for upgrades from 5.7.11 to 5.7.12 or higher. Administrators who have encryptedInnoDBtablespaces must take explicit action to ensure continued loading of thekeyring_fileplugin: Start the server with an--early-plugin-loadoption that names the plugin library file. For additional information, see Section 6.4.4.1, “Keyring Plugin Installation”.Incompatible change: The
INFORMATION_SCHEMAhas tables that contain system and status variable information (see Section 24.11, “The INFORMATION_SCHEMA GLOBAL_VARIABLES and SESSION_VARIABLES Tables”, and Section 24.10, “The INFORMATION_SCHEMA GLOBAL_STATUS and SESSION_STATUS Tables”). As of MySQL 5.7.6, the Performance Schema also contains system and status variable tables (see Section 25.12.13, “Performance Schema System Variable Tables”, and Section 25.12.14, “Performance Schema Status Variable Tables”). The Performance Schema tables are intended to replace theINFORMATION_SCHEMAtables, which are deprecated as of MySQL 5.7.6 and will be removed in a future MySQL release.For advice on migrating away from the
INFORMATION_SCHEMAtables to the Performance Schema tables, see Section 25.20, “Migrating to Performance Schema System and Status Variable Tables”. To assist in the migration, you can use theshow_compatibility_56system variable, which affects how system and status variable information is provided by theINFORMATION_SCHEMAand Performance Schema tables, and also by theSHOW VARIABLESandSHOW STATUSstatements.show_compatibility_56is enabled by default in 5.7.6 and 5.7.7, and disabled by default in MySQL 5.7.8.For details about the effects of
show_compatibility_56, see Section 5.1.7, “Server System Variables” For better understanding, it is strongly recommended that you read also these sections:Incompatible change: As of MySQL 5.7.6, data directory initialization creates only a single
rootaccount,'root'@'localhost'. (See Section 2.10.1, “Initializing the Data Directory”.) An attempt to connect to the host127.0.0.1normally resolves to thelocalhostaccount. However, this fails if the server is run with the--skip-name-resolveoption. If you plan to do that, make sure that an account exists that can accept a connection. For example, to be able to connect asrootusing--host=127.0.0.1or--host=::1, create these accounts:CREATE USER 'root'@'127.0.0.1' IDENTIFIED BY '
root-password'; CREATE USER 'root'@'::1' IDENTIFIED BY 'root-password';Incompatible change: As of MySQL 5.7.6, for some Linux platforms, when MySQL is installed using RPM and Debian packages, server startup and shutdown now is managed using systemd rather than mysqld_safe, and mysqld_safe is not installed. This may require some adjustment to the manner in which you specify server options. For details, see Section 2.5.10, “Managing MySQL Server with systemd”.
Incompatible change: In MySQL 5.7.5, the executable binary version of mysql_install_db is located in the
bininstallation directory, whereas the Perl version was located in thescriptsinstallation directory. For upgrades from an older version of MySQL, you may find a version in both directories. To avoid confusion, remove the version in thescriptsdirectory. For fresh installations of MySQL 5.7.5 or later, mysql_install_db is only found in thebindirectory, and thescriptsdirectory is no longer present. Applications that expect to find mysql_install_db in thescriptsdirectory should be updated to look in thebindirectory instead.The location of mysql_install_db becomes less material as of MySQL 5.7.6 because as of that version it is deprecated in favor of mysqld --initialize (or mysqld --initialize-insecure). See Section 2.10.1, “Initializing the Data Directory”
Incompatible change: In MySQL 5.7.5, these SQL mode changes were made:
Strict SQL mode for transactional storage engines (
STRICT_TRANS_TABLES) is now enabled by default.Implementation of the
ONLY_FULL_GROUP_BYSQL mode has been made more sophisticated, to no longer reject deterministic queries that previously were rejected. In consequence,ONLY_FULL_GROUP_BYis now enabled by default, to prohibit nondeterministic queries containing expressions not guaranteed to be uniquely determined within a group.The changes to the default SQL mode result in a default
sql_modesystem variable value with these modes enabled:ONLY_FULL_GROUP_BY,STRICT_TRANS_TABLES,NO_ENGINE_SUBSTITUTION.The
ONLY_FULL_GROUP_BYmode is also now included in the modes comprised by theANSISQL mode.
If you find that having
ONLY_FULL_GROUP_BYenabled causes queries for existing applications to be rejected, either of these actions should restore operation:If it is possible to modify an offending query, do so, either so that nondeterministic nonaggregated columns are functionally dependent on
GROUP BYcolumns, or by referring to nonaggregated columns usingANY_VALUE().If it is not possible to modify an offending query (for example, if it is generated by a third-party application), set the
sql_modesystem variable at server startup to not enableONLY_FULL_GROUP_BY.
For more information about SQL modes and
GROUP BYqueries, see Section 5.1.10, “Server SQL Modes”, and Section 12.20.3, “MySQL Handling of GROUP BY”.
Incompatible change: The
Passwordcolumn of themysql.usersystem table was removed in MySQL 5.7.6. All credentials are stored in theauthentication_stringcolumn, including those formerly stored in thePasswordcolumn. If performing an in-place upgrade to MySQL 5.7.6 or later, run mysql_upgrade as directed by the in-place upgrade procedure to migrate thePasswordcolumn contents to theauthentication_stringcolumn.If performing a logical upgrade using a mysqldump dump file from a pre-5.7.6 MySQL installation, you must observe these conditions for the mysqldump command used to generate the dump file:
You must include the
--add-drop-tableoptionYou must not include the
--flush-privilegesoption
As outlined in the logical upgrade procedure, load the pre-5.7.6 dump file into the 5.7.6 (or later) server before running mysql_upgrade.
Incompatible change: As of MySQL 5.7.5, support for passwords that use the older pre-4.1 password hashing format is removed, which involves the following changes. Applications that use any feature no longer supported must be modified.
The
mysql_old_passwordauthentication plugin that used pre-4.1 password hash values is removed. Accounts that use this plugin are disabled at startup and the server writes an “unknown plugin” message to the error log. For instructions on upgrading accounts that use this plugin, see Section 6.4.1.3, “Migrating Away from Pre-4.1 Password Hashing and the mysql_old_password Plugin”.For the
old_passwordssystem variable, a value of 1 (produce pre-4.1 hash values) is no longer permitted.The
--secure-authoption to the server and client programs is the default, but is now a no-op. It is deprecated and will be removed in a future MySQL release.The
--skip-secure-authoption to the server and client programs is no longer supported and using it produces an error.The
secure_authsystem variable permits only a value of 1; a value of 0 is no longer permitted.The
OLD_PASSWORD()function is removed.
Incompatible change: In MySQL 5.6.6, the
YEAR(2)data type was deprecated. In MySQL 5.7.5, support forYEAR(2)is removed. Once you upgrade to MySQL 5.7.5 or higher, any remainingYEAR(2)columns must be converted toYEAR(4)to become usable again. For conversion strategies, see Section 11.3.4, “YEAR(2) Limitations and Migrating to YEAR(4)”. Running mysql_upgrade after upgrading is one of the possible conversion strategies.As of MySQL 5.7.7,
CHECK TABLE ... FOR UPGRADEreports a table as needing a rebuild if it contains old temporal columns in pre-5.6.4 format (TIME,DATETIME, andTIMESTAMPcolumns without support for fractional seconds precision) and theavoid_temporal_upgradesystem variable is disabled. This helps mysql_upgrade to detect and upgrade tables containing old temporal columns. Ifavoid_temporal_upgradeis enabled,FOR UPGRADEignores the old temporal columns present in the table; consequently, mysql_upgrade does not upgrade them.As of MySQL 5.7.7,
REPAIR TABLEupgrades a table if it contains old temporal columns in pre-5.6.4 format and theavoid_temporal_upgradesystem variable is disabled. Ifavoid_temporal_upgradeis enabled,REPAIR TABLEignores the old temporal columns present in the table and does not upgrade them.To check for tables that contain such temporal columns and need a rebuild, disable
avoid_temporal_upgradebefore executingCHECK TABLE ... FOR UPGRADE.To upgrade tables that contain such temporal columns, disable
avoid_temporal_upgradebefore executingREPAIR TABLEor mysql_upgrade.Incompatible change: As of MySQL 5.7.2, the server requires account rows in the
mysql.usersystem table to have a nonemptyplugincolumn value and disables accounts with an empty value. This requires that you upgrade yourmysql.usertable to fill in allpluginvalues. As of MySQL 5.7.6, use this procedure:If you plan to upgrade using the data directory from your existing MySQL installation:
Stop the old (MySQL 5.6) server
Upgrade the MySQL binaries in place by replacing the old binaries with the new ones
Start the MySQL 5.7 server normally (no special options)
Run mysql_upgrade to upgrade the system tables
Restart the MySQL 5.7 server
If you plan to upgrade by reloading a dump file generated from your existing MySQL installation:
To generate the dump file, run mysqldump with the
--add-drop-tableoption and without the--flush-privilegesoptionStop the old (MySQL 5.6) server
Upgrade the MySQL binaries in place (replace the old binaries with the new ones)
Start the MySQL 5.7 server normally (no special options)
Reload the dump file (mysql <
dump_file)Run mysql_upgrade to upgrade the system tables
Restart the MySQL 5.7 server
Before MySQL 5.7.6, the procedure is more involved:
If you plan to upgrade using the data directory from your existing MySQL installation:
Stop the old (MySQL 5.6) server
Upgrade the MySQL binaries in place (replace the old binaries with the new ones)
Restart the server with the
--skip-grant-tablesoption to disable privilege checkingRun mysql_upgrade to upgrade the system tables
Restart the server normally (without
--skip-grant-tables)
If you plan to upgrade by reloading a dump file generated from your existing MySQL installation:
To generate the dump file, run mysqldump without the
--flush-privilegesoptionStop the old (MySQL 5.6) server
Upgrade the MySQL binaries in place (replace the old binaries with the new ones)
Restart the server with the
--skip-grant-tablesoption to disable privilege checkingReload the dump file (mysql <
dump_file)Run mysql_upgrade to upgrade the system tables
Restart the server normally (without
--skip-grant-tables)
mysql_upgrade runs by default as the MySQL
rootuser. For the preceding procedures, if therootpassword is expired when you run mysql_upgrade, you will see a message that your password is expired and that mysql_upgrade failed as a result. To correct this, reset therootpassword to unexpire it and run mysql_upgrade again:shell>
mysql -u root -pEnter password:****<- enter root password here mysql>ALTER USER USER() IDENTIFIED BY 'root-password';# MySQL 5.7.6 and up mysql>SET PASSWORD = PASSWORD('root-password');# Before MySQL 5.7.6 mysql>quitshell>mysql_upgrade -pEnter password:****<- enter root password hereThe password-resetting statement normally does not work if the server is started with
--skip-grant-tables, but the first invocation of mysql_upgrade flushes the privileges, so when you run mysql, the statement is accepted.If mysql_upgrade itself expires the
rootpassword, you will need to reset the password again in the same manner.After following the preceding instructions, DBAs are advised also to convert accounts that use the
mysql_old_passwordauthentication plugin to usemysql_native_passwordinstead, because support formysql_old_passwordhas been removed. For account upgrade instructions, see Section 6.4.1.3, “Migrating Away from Pre-4.1 Password Hashing and the mysql_old_password Plugin”.Incompatible change: It is possible for a column
DEFAULTvalue to be valid for thesql_modevalue at table-creation time but invalid for thesql_modevalue when rows are inserted or updated. Example:SET sql_mode = ''; CREATE TABLE t (d DATE DEFAULT 0); SET sql_mode = 'NO_ZERO_DATE,STRICT_ALL_TABLES'; INSERT INTO t (d) VALUES(DEFAULT);
In this case, 0 should be accepted for the
CREATE TABLEbut rejected for theINSERT. However, previously the server did not evaluateDEFAULTvalues used for inserts or updates against the currentsql_mode. In the example, theINSERTsucceeds and inserts'0000-00-00'into theDATEcolumn.As of MySQL 5.7.2, the server applies the proper
sql_modechecks to generate a warning or error at insert or update time.A resulting incompatibility for replication if you use statement-based logging (
binlog_format=STATEMENT) is that if a slave is upgraded, a nonupgraded master will execute the preceding example without error, whereas theINSERTwill fail on the slave and replication will stop.To deal with this, stop all new statements on the master and wait until the slaves catch up. Then upgrade the slaves followed by the master. Alternatively, if you cannot stop new statements, temporarily change to row-based logging on the master (
binlog_format=ROW) and wait until all slaves have processed all binary logs produced up to the point of this change. Then upgrade the slaves followed by the master and change the master back to statement-based logging.Incompatible change: Several changes were made to the audit log plugin for better compatibility with Oracle Audit Vault. For upgrading purpose, the main issue is that the default format of the audit log file has changed: Information within
<AUDIT_RECORD>elements previously written using attributes now is written using subelements.Example of old
<AUDIT_RECORD>format:<AUDIT_RECORD TIMESTAMP="2013-04-15T15:27:27" NAME="Query" CONNECTION_ID="3" STATUS="0" SQLTEXT="SELECT 1" />
Example of new format:
<AUDIT_RECORD> <TIMESTAMP>2013-04-15T15:27:27 UTC</TIMESTAMP> <RECORD_ID>3998_2013-04-15T15:27:27</RECORD_ID> <NAME>Query</NAME> <CONNECTION_ID>3</CONNECTION_ID> <STATUS>0</STATUS> <STATUS_CODE>0</STATUS_CODE> <USER>root[root] @ localhost [127.0.0.1]</USER> <OS_LOGIN></OS_LOGIN> <HOST>localhost</HOST> <IP>127.0.0.1</IP> <COMMAND_CLASS>select</COMMAND_CLASS> <SQLTEXT>SELECT 1</SQLTEXT> </AUDIT_RECORD>
If you previously used an older version of the audit log plugin, use this procedure to avoid writing new-format log entries to an existing log file that contains old-format entries:
Stop the server.
Rename the current audit log file manually. This file will contain only old-format log entries.
Update the server and restart it. The audit log plugin will create a new log file, which will contain only new-format log entries.
For information about the audit log plugin, see Section 6.4.5, “MySQL Enterprise Audit”.
As of MySQL 5.7.7, the default connection timeout for a replication slave was changed from 3600 seconds (one hour) to 60 seconds (one minute). The new default is applied when a replication slave without a setting for the
slave_net_timeoutsystem variable is upgraded to MySQL 5.7. The default setting for the heartbeat interval, which regulates the heartbeat signal to stop the connection timeout occurring in the absence of data if the connection is still good, is calculated as half the value ofslave_net_timeout. The heartbeat interval is recorded in the slave's master info log (themysql.slave_master_infotable ormaster.infofile), and it is not changed automatically when the value or default setting ofslave_net_timeoutis changed. A MySQL 5.6 slave that used the default connection timeout and heartbeat interval, and was then upgraded to MySQL 5.7, therefore has a heartbeat interval that is much longer than the connection timeout.If the level of activity on the master is such that updates to the binary log are sent to the slave at least once every 60 seconds, this situation is not an issue. However, if no data is received from the master, because the heartbeat is not being sent, the connection timeout expires. The slave therefore thinks the connection to the master has been lost and makes multiple reconnection attempts (as controlled by the
MASTER_CONNECT_RETRYandMASTER_RETRY_COUNTsettings, which can also be seen in the master info log). The reconnection attempts spawn numerous zombie dump threads that the master must kill, causing the master's error log to contain multiple instances of the error ER_RPL_ZOMBIE_ENCOUNTERED. To avoid this issue, immediately before upgrading a replication slave to MySQL 5.7, check whether theslave_net_timeoutsystem variable is using the default setting. If so, issueCHANGE MASTER TOwith theMASTER_HEARTBEAT_PERIODoption, and set the heartbeat interval to 30 seconds, so that it works with the new connection timeout of 60 seconds that applies after the upgrade.
As of MySQL 5.7.24, the zlib library version bundled with MySQL was raised from version 1.2.3 to version 1.2.11.
The zlib
compressBound()function in zlib 1.2.11 returns a slightly higher estimate of the buffer size required to compress a given length of bytes than it did in zlib version 1.2.3. ThecompressBound()function is called byInnoDBfunctions that determine the maximum row size permitted when creating compressedInnoDBtables or inserting rows into compressedInnoDBtables. As a result,CREATE TABLE ... ROW_FORMAT=COMPRESSEDorINSERToperations with row sizes very close to the maximum row size that were successful in earlier releases could now fail.If you have compressed
InnoDBtables with large rows, it is recommended that you test compressed tableCREATE TABLEstatements on a MySQL 5.7 test instance prior to upgrading.Incompatible change: To simplify
InnoDBtablespace discovery during crash recovery, new redo log record types were introduced in MySQL 5.7.5. This enhancement changes the redo log format. Before performing an in-place upgrade, perform a clean shutdown using aninnodb_fast_shutdownsetting of0or1. A slow shutdown usinginnodb_fast_shutdown=0is a recommended step in In-Place Upgrade.Incompatible change: MySQL 5.7.8 and 5.7.9 undo logs may contain insufficient information about spatial columns, which could result in a upgrade failure (Bug #21508582). Before performing an in-place upgrade from MySQL 5.7.8 or 5.7.9 to 5.7.10 or higher, perform a slow shutdown using
innodb_fast_shutdown=0to clear the undo logs. A slow shutdown usinginnodb_fast_shutdown=0is a recommended step in In-Place Upgrade.Incompatible change: MySQL 5.7.8 undo logs may contain insufficient information about virtual columns and virtual column indexes, which could result in a upgrade failure (Bug #21869656). Before performing an in-place upgrade from MySQL 5.7.8 to MySQL 5.7.9 or higher, perform a slow shutdown using
innodb_fast_shutdown=0to clear the undo logs. A slow shutdown usinginnodb_fast_shutdown=0is a recommended step in In-Place Upgrade.Incompatible change: As of MySQL 5.7.9, the redo log header of the first redo log file (
ib_logfile0) includes a format version identifier and a text string that identifies the MySQL version that created the redo log files. This enhancement changes the redo log format, requiring that MySQL be shutdown cleanly using aninnodb_fast_shutdownsetting of0or1before performing an in-place upgrade to MySQL 5.7.9 or higher. A slow shutdown usinginnodb_fast_shutdown=0is a recommended step in In-Place Upgrade.In MySQL 5.7.9,
DYNAMICreplacesCOMPACTas the implicit default row format forInnoDBtables. A new configuration option,innodb_default_row_format, specifies the defaultInnoDBrow format. Permitted values includeDYNAMIC(the default),COMPACT, andREDUNDANT.After upgrading to 5.7.9, any new tables that you create use the row format defined by
innodb_default_row_formatunless you explicitly define a row format (ROW_FORMAT).For existing tables that do not explicitly define a
ROW_FORMAToption or that useROW_FORMAT=DEFAULT, any operation that rebuilds a table also silently changes the row format of the table to the format defined byinnodb_default_row_format. Otherwise, existing tables retain their current row format setting. For more information, see Defining the Row Format of a Table.Beginning with MySQL 5.7.6, the
InnoDBstorage engine uses its own built-in (“native”) partitioning handler for any new partitioned tables created usingInnoDB. PartitionedInnoDBtables created in previous versions of MySQL are not automatically upgraded. You can easily upgrade such tables to useInnoDBnative partitioning in MySQL 5.7.9 or later using either of the following methods:To upgrade an individual table from the generic partitioning handler to
InnoDBnative partitioning, execute the statementALTER TABLE.table_nameUPGRADE PARTITIONINGTo upgrade all
InnoDBtables that use the generic partitioning handler to use the native partitioning handler instead, run mysql_upgrade.
Incompatible change: The
GET_LOCK()function was reimplemented in MySQL 5.7.5 using the metadata locking (MDL) subsystem and its capabilities have been extended:Previously,
GET_LOCK()permitted acquisition of only one named lock at a time, and a secondGET_LOCK()call released any existing lock. NowGET_LOCK()permits acquisition of more than one simultaneous named lock and does not release existing locks.Applications that rely on the behavior of
GET_LOCK()releasing any previous lock must be modified for the new behavior.The capability of acquiring multiple locks introduces the possibility of deadlock among clients. The MDL subsystem detects deadlock and returns an
ER_USER_LOCK_DEADLOCKerror when this occurs.The MDL subsystem imposes a limit of 64 characters on lock names, so this limit now also applies to named locks. Previously, no length limit was enforced.
Locks acquired with
GET_LOCK()now appear in the Performance Schemametadata_lockstable. TheOBJECT_TYPEcolumn saysUSER LEVEL LOCKand theOBJECT_NAMEcolumn indicates the lock name.A new function,
RELEASE_ALL_LOCKS()permits release of all acquired named locks at once.
For more information, see Section 12.14, “Locking Functions”.
The optimizer now handles derived tables and views in the
FROMclause in consistent fashion to better avoid unnecessary materialization and to enable use of pushed-down conditions that produce more efficient execution plans. However, for statements such asDELETEorUPDATEthat modify tables, using the merge strategy for a derived table that previously was materialized can result in anER_UPDATE_TABLE_USEDerror:mysql>
DELETE FROM t1->WHERE id IN (SELECT id->FROM (SELECT t1.id->FROM t1 INNER JOIN t2 USING (id)->WHERE t2.status = 0) AS t);ERROR 1093 (HY000): You can't specify target table 't1' for update in FROM clauseThe error occurs when merging a derived table into the outer query block results in a statement that both selects from and modifies a table. (Materialization does not cause the problem because, in effect, it converts the derived table to a separate table.) To avoid this error, disable the
derived_mergeflag of theoptimizer_switchsystem variable before executing the statement:SET optimizer_switch = 'derived_merge=off';
The
derived_mergeflag controls whether the optimizer attempts to merge subqueries and views in theFROMclause into the outer query block, assuming that no other rule prevents merging. By default, the flag isonto enable merging. Setting the flag tooffprevents merging and avoids the error just described. For more information, see Section 8.2.2.4, “Optimizing Derived Tables and View References with Merging or Materialization”.Some keywords may be reserved in MySQL 5.7 that were not reserved in MySQL 5.6. See Section 9.3, “Keywords and Reserved Words”. This can cause words previously used as identifiers to become illegal. To fix affected statements, use identifier quoting. See Section 9.2, “Schema Object Names”.
After upgrading, it is recommended that you test optimizer hints specified in application code to ensure that the hints are still required to achieve the desired optimization strategy. Optimizer enhancements can sometimes render certain optimizer hints unnecessary. In some cases, an unnecessary optimizer hint may even be counterproductive.
In
UNIONstatements, to applyORDER BYorLIMITto an individualSELECT, place the clause inside the parentheses that enclose theSELECT:(SELECT a FROM t1 WHERE a=10 AND B=1 ORDER BY a LIMIT 10) UNION (SELECT a FROM t2 WHERE a=11 AND B=2 ORDER BY a LIMIT 10);
Previous versions of MySQL may permit such statements without parentheses. In MySQL 5.7, the requirement for parentheses is enforced.
This section describes how to upgrade MySQL binary and package-based installations on Unix/Linux. In-place and logical upgrade methods are described.
An in-place upgrade involves shutting down the old MySQL server, replacing the old MySQL binaries or packages with the new ones, restarting MySQL on the existing data directory, and upgrading any remaining parts of the existing installation that require upgrading.
If you upgrade an installation originally produced by installing multiple RPM packages, upgrade all the packages, not just some. For example, if you previously installed the server and client RPMs, do not upgrade just the server RPM.
For some Linux platforms, MySQL installation from RPM or Debian packages includes systemd support for managing MySQL server startup and shutdown. On these platforms, mysqld_safe is not installed. In such cases, use systemd for server startup and shutdown instead of the methods used in the following instructions. See Section 2.5.10, “Managing MySQL Server with systemd”.
To perform an in-place upgrade:
If you use XA transactions with
InnoDB, runXA RECOVERbefore upgrading to check for uncommitted XA transactions. If results are returned, either commit or rollback the XA transactions by issuing anXA COMMITorXA ROLLBACKstatement.Configure MySQL to perform a slow shutdown by setting
innodb_fast_shutdownto0. For example:mysql -u root -p --execute="SET GLOBAL innodb_fast_shutdown=0"
With a slow shutdown,
InnoDBperforms a full purge and change buffer merge before shutting down, which ensures that data files are fully prepared in case of file format differences between releases.Shut down the old MySQL server. For example:
mysqladmin -u root -p shutdown
Upgrade the MySQL binary installation or packages. If upgrading a binary installation, unpack the new MySQL binary distribution package. See Obtain and Unpack the Distribution. For package-based installations, install the new packages.
Start the MySQL 5.7 server, using the existing data directory. For example:
mysqld_safe --user=mysql --datadir=
/path/to/existing-datadir&Run mysql_upgrade. For example:
mysql_upgrade -u root -p
mysql_upgrade examines all tables in all databases for incompatibilities with the current version of MySQL. mysql_upgrade also upgrades the
mysqlsystem database so that you can take advantage of new privileges or capabilities.Notemysql_upgrade does not upgrade the contents of the time zone tables or help tables. For upgrade instructions, see Section 5.1.12, “MySQL Server Time Zone Support”, and Section 5.1.13, “Server-Side Help Support”.
Shut down and restart the MySQL server to ensure that any changes made to the system tables take effect. For example:
mysqladmin -u root -p shutdown mysqld_safe --user=mysql --datadir=
/path/to/existing-datadir&
A logical upgrade involves exporting SQL from the old MySQL instance using a backup or export utility such as mysqldump or mysqlpump, installing the new MySQL server, and applying the SQL to your new MySQL instance.
For some Linux platforms, MySQL installation from RPM or Debian packages includes systemd support for managing MySQL server startup and shutdown. On these platforms, mysqld_safe is not installed. In such cases, use systemd for server startup and shutdown instead of the methods used in the following instructions. See Section 2.5.10, “Managing MySQL Server with systemd”.
To perform a logical upgrade:
Review the information in Section 2.11.1, “Before You Begin”.
Export your existing data from the previous MySQL installation:
mysqldump -u root -p --add-drop-table --routines --events --all-databases --force > data-for-upgrade.sql
NoteUse the
--routinesand--eventsoptions with mysqldump (as shown above) if your databases include stored programs. The--all-databasesoption includes all databases in the dump, including themysqldatabase that holds the system tables.ImportantIf you have tables that contain generated columns, use the mysqldump utility provided with MySQL 5.7.9 or higher to create your dump files. The mysqldump utility provided in earlier releases uses incorrect syntax for generated column definitions (Bug #20769542). You can use the
INFORMATION_SCHEMA.COLUMNStable to identify tables with generated columns.Shut down the old MySQL server. For example:
mysqladmin -u root -p shutdown
Install MySQL 5.7. For installation instructions, see Chapter 2, Installing and Upgrading MySQL.
Initialize a new data directory, as described at Section 2.10.1, “Initializing the Data Directory”. For example:
mysqld --initialize --datadir=
/path/to/5.7-datadirCopy the temporary
'root'@'localhost'password displayed to your screen or written to your error log for later use.Start the MySQL 5.7 server, using the new data directory. For example:
mysqld_safe --user=mysql --datadir=
/path/to/5.7-datadir&Reset the
rootpassword:shell>
mysql -u root -pEnter password:****<- enter temporary root passwordmysql>
ALTER USER USER() IDENTIFIED BY 'your new password';Load the previously created dump file into the new MySQL server. For example:
mysql -u root -p --force < data-for-upgrade.sql
NoteIt is not recommended to load a dump file when GTIDs are enabled on the server (
gtid_mode=ON), if your dump file includes system tables. mysqldump issues DML instructions for the system tables which use the non-transactional MyISAM storage engine, and this combination is not permitted when GTIDs are enabled. Also be aware that loading a dump file from a server with GTIDs enabled, into another server with GTIDs enabled, causes different transaction identifiers to be generated.Run mysql_upgrade. For example:
mysql_upgrade -u root -p
mysql_upgrade examines all tables in all databases for incompatibilities with the current version of MySQL. mysql_upgrade also upgrades the
mysqlsystem database so that you can take advantage of new privileges or capabilities.Notemysql_upgrade does not upgrade the contents of the time zone tables or help tables. For upgrade instructions, see Section 5.1.12, “MySQL Server Time Zone Support”, and Section 5.1.13, “Server-Side Help Support”.
Shut down and restart the MySQL server to ensure that any changes made to the system tables take effect. For example:
mysqladmin -u root -p shutdown mysqld_safe --user=mysql --datadir=
/path/to/5.7-datadir&
For supported Yum-based platforms (see Section 2.5.1, “Installing MySQL on Linux Using the MySQL Yum Repository”, for a list), you can perform an in-place upgrade for MySQL (that is, replacing the old version and then running the new version using the old data files) with the MySQL Yum repository.
Before performing any update to MySQL, follow carefully the instructions in Section 2.11, “Upgrading MySQL”. Among other instructions discussed there, it is especially important to back up your database before the update.
The following instructions assume you have installed MySQL with the MySQL Yum repository or with an RPM package directly downloaded from MySQL Developer Zone's MySQL Download page; if that is not the case, following the instructions in Section 2.5.2, “Replacing a Third-Party Distribution of MySQL Using the MySQL Yum Repository”.
-
Selecting a Target Series
By default, the MySQL Yum repository updates MySQL to the latest version in the release series you have chosen during installation (see Selecting a Release Series for details), which means, for example, a 5.6.x installation will not be updated to a 5.7.x release automatically. To update to another release series, you need to first disable the subrepository for the series that has been selected (by default, or by yourself) and enable the subrepository for your target series. To do that, see the general instructions given in Selecting a Release Series. For upgrading from MySQL 5.6 to 5.7, perform the reverse of the steps illustrated in Selecting a Release Series, disabling the subrepository for the MySQL 5.6 series and enabling that for the MySQL 5.7 series.
As a general rule, to upgrade from one release series to another, go to the next series rather than skipping a series. For example, if you are currently running MySQL 5.5 and wish to upgrade to 5.7, upgrade to MySQL 5.6 first before upgrading to 5.7.
ImportantFor important information about upgrading from MySQL 5.6 to 5.7, see Upgrading from MySQL 5.6 to 5.7.
-
Upgrading MySQL
Upgrade MySQL and its components by the following command, for platforms that are not dnf-enabled:
sudo yum update mysql-server
For platforms that are dnf-enabled:
sudo dnf upgrade mysql-server
Alternatively, you can update MySQL by telling Yum to update everything on your system, which might take considerably more time. For platforms that are not dnf-enabled:
sudo yum update
For platforms that are dnf-enabled:
sudo dnf upgrade
-
Restarting MySQL
The MySQL server always restarts after an update by Yum. Once the server restarts, run mysql_upgrade to check and possibly resolve any incompatibilities between the old data and the upgraded software. mysql_upgrade also performs other functions; see Section 4.4.7, “mysql_upgrade — Check and Upgrade MySQL Tables” for details.
You can also update only a specific component. Use the following command to list all the installed packages for the MySQL components (for dnf-enabled systems, replace yum in the command with dnf):
sudo yum list installed | grep "^mysql"
After identifying the package name of the component of your
choice, update the package with the following command, replacing
package-name with the name of the
package. For platforms that are not dnf-enabled:
sudo yum update package-name
For dnf-enabled platforms:
sudo dnf upgrade package-name
Upgrading the Shared Client Libraries
After updating MySQL using the Yum repository, applications compiled with older versions of the shared client libraries should continue to work.
If you recompile applications and dynamically link them with the updated libraries: As typical with new versions of shared libraries where there are differences or additions in symbol versioning between the newer and older libraries (for example, between the newer, standard 5.7 shared client libraries and some older—prior or variant—versions of the shared libraries shipped natively by the Linux distributions' software repositories, or from some other sources), any applications compiled using the updated, newer shared libraries will require those updated libraries on systems where the applications are deployed. And, as expected, if those libraries are not in place, the applications requiring the shared libraries will fail. So, be sure to deploy the packages for the shared libraries from MySQL on those systems. To do this, add the MySQL Yum repository to the systems (see Adding the MySQL Yum Repository) and install the latest shared libraries using the instructions given in Installing Additional MySQL Products and Components with Yum.
On Debian and Ubuntu platforms, to perform an in-place upgrade of MySQL and its components, use the MySQL APT repository. See Upgrading MySQL with the MySQL APT Repository in A Quick Guide to Using the MySQL APT Repository.
On the SUSE Linux Enterprise Server (SLES) platform, to perform an in-place upgrade of MySQL and its components, use the MySQL SLES repository. See Upgrading MySQL with the MySQL SLES Repository in A Quick Guide to Using the MySQL SLES Repository.
There are two approaches for upgrading MySQL on Windows:
The approach you select depends on how the existing installation was performed. Before proceeding, review Section 2.11, “Upgrading MySQL” for additional information on upgrading MySQL that is not specific to Windows.
Whichever approach you choose, always back up your current MySQL installation before performing an upgrade. See Section 7.2, “Database Backup Methods”.
Upgrades between milestone releases (or from a milestone release to a GA release) are not supported. Significant development changes take place in milestone releases and you may encounter compatibility issues or problems starting the server. For instructions on how to perform a logical upgrade with a milestone release, see Logical Upgrade.
MySQL Installer does not support upgrades between Community releases and Commercial releases. If you require this type of upgrade, perform it using the ZIP archive approach.
Performing an upgrade with MySQL Installer is the best approach when the current server installation was performed with it and the upgrade is within the current release series. MySQL Installer does not support upgrades between release series, such as from 5.6 to 5.7, and it does not provide an upgrade indicator to prompt you to upgrade. For instructions on upgrading between release series, see Upgrading MySQL Using the Windows ZIP Distribution.
To perform an upgrade using MySQL Installer:
Start MySQL Installer.
From the dashboard, click Catalog to download the latest changes to the catalog. The installed server can be upgraded only if the dashboard displays an arrow next to the version number of the server.
Click Upgrade. All products that have a newer version now appear in a list.
NoteMySQL Installer deselects the server upgrade option for milestone releases (Pre-Release) in the same release series. In addition, it displays a warning to indicate that the upgrade is not supported, identifies the risks of continuing, and provides a summary of the steps to perform a logical upgrade manually. You can reselect server upgrade and proceed at your own risk.
Deselect all but the MySQL server product, unless you intend to upgrade other products at this time, and click .
Click to start the download. When the download finishes, click to begin the upgrade operation.
Configure the server.
To perform an upgrade using the Windows ZIP archive distribution:
Download the latest Windows ZIP Archive distribution of MySQL from https://dev.mysql.com/downloads/.
If the server is running, stop it. If the server is installed as a service, stop the service with the following command from the command prompt:
C:\>
SC STOPmysqld_service_nameAlternatively, use NET STOP
mysqld_service_name.If you are not running the MySQL server as a service, use mysqladmin to stop it. For example, before upgrading from MySQL 5.6 to 5.7, use mysqladmin from MySQL 5.6 as follows:
C:\>
"C:\Program Files\MySQL\MySQL Server 5.6\bin\mysqladmin" -u root shutdownNoteIf the MySQL
rootuser account has a password, invoke mysqladmin with the-poption and enter the password when prompted.Extract the ZIP archive. You may either overwrite your existing MySQL installation (usually located at
C:\mysql), or install it into a different directory, such asC:\mysql5. Overwriting the existing installation is recommended.Restart the server. For example, use the SC START
mysqld_service_nameor NET STARTmysqld_service_namecommand if you run MySQL as a service, or invoke mysqld directly otherwise.As Administrator, run mysql_upgrade to check your tables, attempt to repair them if necessary, and update your grant tables if they have changed so that you can take advantage of any new capabilities. See Section 4.4.7, “mysql_upgrade — Check and Upgrade MySQL Tables”.
If you encounter errors, see Section 2.3.5, “Troubleshooting a Microsoft Windows MySQL Server Installation”.
It is preferable to use the MySQL Yum repository or MySQL SLES Repository to upgrade MySQL on RPM-based platforms. However, if you have to upgrade MySQL using the RPM packages downloaded directly from the MySQL Developer Zone (see Section 2.5.5, “Installing MySQL on Linux Using RPM Packages from Oracle” for information on the packages), go to the folder that contains all the downloaded packages (and, preferably, no other RPM packages with similar names), and issue the following command:
yum install mysql-community-{server,client,common,libs}-*
Replace yum with zypper for SLES systems, and with dnf for dnf-enabled systems.
While it is much preferable to use a high-level package management tool like yum to install the packages, users who preferred direct rpm commands can replace the yum install command with the rpm -Uvh command; however, using rpm -Uvh instead makes the installation process more prone to failure, due to potential dependency issues the installation process might run into.
For an upgrade installation using RPM packages, the MySQL server is automatically restarted at the end of the installation if it was running when the upgrade installation began. If the server was not running when the upgrade installation began, you have to restart the server yourself after the upgrade installation is completed; do that with, for example, the follow command:
service mysqld start
Once the server restarts, run mysql_upgrade to check and possibly resolve any incompatibilities between the old data and the upgraded software. mysql_upgrade also performs other functions; see Section 4.4.7, “mysql_upgrade — Check and Upgrade MySQL Tables” for details.
Because of the dependency relationships among the RPM packages, all of the installed packages must be of the same version. Therefore, always update all your installed packages for MySQL. For example, do not just update the server without also upgrading the client, the common files for server and client libraries, and so on.
Migration and Upgrade from installations by older RPM packages. Some older versions of MySQL Server RPM packages have names in the form of MySQL-* (for example, MySQL-server-* and MySQL-client-*). The latest versions of RPMs, when installed using the standard package management tool (yum, dnf, or zypper), seamlessly upgrade those older installations, making it unnecessary to uninstall those old packages before installing the new ones. Here are some differences in behavior between the older and the current RPM packages:
Table 2.15 Differences Between the Previous and the Current RPM Packages for Installing MySQL
| Feature | Behavior of Previous Packages | Behavior of Current Packages |
|---|---|---|
| Service starts after installation is finished | Yes | No, unless it is an upgrade installation, and the server was running when the upgrade began. |
| Service name | mysql | For RHEL, Oracle Linux, CentOS, and Fedora: mysqld For SLES: mysql |
| Error log file | At
/var/lib/mysql/ |
For RHEL, Oracle Linux, CentOS, and Fedora: at
For SLES: at
|
Shipped with the /etc/my.cnf file |
No | Yes |
| Multilib support | No | Yes |
Installation of previous versions of MySQL using older
packages might have created a configuration file named
/usr/my.cnf. It is highly recommended
that you examine the contents of the file and migrate the
desired settings inside to the file
/etc/my.cnf file, then remove
/usr/my.cnf.
Upgrading to MySQL Enterprise Server. Upgrading from a community version to a commercial version of MySQL requires that you first uninstall the community version and then install the commercial version. In this case, you must restart the server manually after the upgrade.
Interoperability with operating system native MySQL packages.
Many Linux distributions ship MySQL as an integrated part of the
operating system. The latest versions of RPMs from Oracle, when
installed using the standard package management tool
(yum, dnf, or
zypper), will seamlessly upgrade and replace
the MySQL version that comes with the operating system, and the
package manager will automatically replace system compatibility
packages such as
mysql-community-libs-compat with relevant
new versions.
Upgrading from non-native MySQL packages. If you have installed MySQL with third-party packages NOT from your Linux distribution's native software repository (for example, packages directly downloaded from the vendor), you will need to uninstall all those packages before you can upgrade using the packages from Oracle.
If problems occur, such as that the new mysqld server does not start, verify that you do not have an old
my.cnffile from your previous installation. You can check this with the--print-defaultsoption (for example, mysqld --print-defaults). If this command displays anything other than the program name, you have an activemy.cnffile that affects server or client operation.If, after an upgrade, you experience problems with compiled client programs, such as
Commands out of syncor unexpected core dumps, you probably have used old header or library files when compiling your programs. In this case, check the date for yourmysql.hfile andlibmysqlclient.alibrary to verify that they are from the new MySQL distribution. If not, recompile your programs with the new headers and libraries. Recompilation might also be necessary for programs compiled against the shared client library if the library major version number has changed (for example, fromlibmysqlclient.so.15tolibmysqlclient.so.16).If you have created a user-defined function (UDF) with a given name and upgrade MySQL to a version that implements a new built-in function with the same name, the UDF becomes inaccessible. To correct this, use
DROP FUNCTIONto drop the UDF, and then useCREATE FUNCTIONto re-create the UDF with a different nonconflicting name. The same is true if the new version of MySQL implements a built-in function with the same name as an existing stored function. See Section 9.2.5, “Function Name Parsing and Resolution”, for the rules describing how the server interprets references to different kinds of functions.
This section describes how to rebuild or repair tables or indexes, which may be necessitated by:
Changes to how MySQL handles data types or character sets. For example, an error in a collation might have been corrected, necessitating a table rebuild to update the indexes for character columns that use the collation.
Required table repairs or upgrades reported by
CHECK TABLE, mysqlcheck, or mysql_upgrade.
Methods for rebuilding a table include:
If you are rebuilding tables because a different version of MySQL will not handle them after a binary (in-place) upgrade or downgrade, you must use the dump-and-reload method. Dump the tables before upgrading or downgrading using your original version of MySQL. Then reload the tables after upgrading or downgrading.
If you use the dump-and-reload method of rebuilding tables only for the purpose of rebuilding indexes, you can perform the dump either before or after upgrading or downgrading. Reloading still must be done afterward.
If you need to rebuild an InnoDB table
because a CHECK TABLE operation
indicates that a table upgrade is required, use
mysqldump to create a dump file and
mysql to reload the file. If the
CHECK TABLE operation indicates
that there is a corruption or causes InnoDB
to fail, refer to Section 14.21.2, “Forcing InnoDB Recovery” for
information about using the
innodb_force_recovery option to
restart InnoDB. To understand the type of
problem that CHECK TABLE may be
encountering, refer to the InnoDB notes in
Section 13.7.2.2, “CHECK TABLE Syntax”.
To rebuild a table by dumping and reloading it, use mysqldump to create a dump file and mysql to reload the file:
mysqldumpdb_namet1 > dump.sql mysqldb_name< dump.sql
To rebuild all the tables in a single database, specify the database name without any following table name:
mysqldumpdb_name> dump.sql mysqldb_name< dump.sql
To rebuild all tables in all databases, use the
--all-databases option:
mysqldump --all-databases > dump.sql mysql < dump.sql
To rebuild a table with ALTER
TABLE, use a “null” alteration; that is,
an ALTER TABLE statement that
“changes” the table to use the storage engine that
it already has. For example, if t1 is an
InnoDB table, use this statement:
ALTER TABLE t1 ENGINE = InnoDB;
If you are not sure which storage engine to specify in the
ALTER TABLE statement, use
SHOW CREATE TABLE to display the
table definition.
The REPAIR TABLE method is only
applicable to MyISAM,
ARCHIVE, and CSV tables.
You can use REPAIR TABLE if the
table checking operation indicates that there is a corruption or
that an upgrade is required. For example, to repair a
MyISAM table, use this statement:
REPAIR TABLE t1;
mysqlcheck --repair provides command-line
access to the REPAIR TABLE
statement. This can be a more convenient means of repairing
tables because you can use the
--databases or
--all-databases option to
repair all tables in specific databases or all databases,
respectively:
mysqlcheck --repair --databases db_name ...
mysqlcheck --repair --all-databases
In cases where you need to transfer databases between different architectures, you can use mysqldump to create a file containing SQL statements. You can then transfer the file to the other machine and feed it as input to the mysql client.
Use mysqldump --help to see what options are available.
The easiest (although not the fastest) way to move a database between two machines is to run the following commands on the machine on which the database is located:
mysqladmin -h 'other_hostname' createdb_namemysqldumpdb_name| mysql -h 'other_hostname'db_name
If you want to copy a database from a remote machine over a slow network, you can use these commands:
mysqladmin createdb_namemysqldump -h 'other_hostname' --compressdb_name| mysqldb_name
You can also store the dump in a file, transfer the file to the target machine, and then load the file into the database there. For example, you can dump a database to a compressed file on the source machine like this:
mysqldump --quickdb_name| gzip >db_name.gz
Transfer the file containing the database contents to the target machine and run these commands there:
mysqladmin createdb_namegunzip <db_name.gz | mysqldb_name
You can also use mysqldump and
mysqlimport to transfer the database. For large
tables, this is much faster than simply using
mysqldump. In the following commands,
DUMPDIR represents the full path name
of the directory you use to store the output from
mysqldump.
First, create the directory for the output files and dump the database:
mkdirDUMPDIRmysqldump --tab=DUMPDIRdb_name
Then transfer the files in the DUMPDIR
directory to some corresponding directory on the target machine
and load the files into MySQL there:
mysqladmin createdb_name# create database catDUMPDIR/*.sql | mysqldb_name# create tables in database mysqlimportdb_nameDUMPDIR/*.txt # load data into tables
Do not forget to copy the mysql database
because that is where the grant tables are stored. You might have
to run commands as the MySQL root user on the
new machine until you have the mysql database
in place.
After you import the mysql database on the new
machine, execute mysqladmin flush-privileges so
that the server reloads the grant table information.
You can copy the .frm,
.MYI, and .MYD files
for MyISAM tables between different
architectures that support the same floating-point format.
(MySQL takes care of any byte-swapping issues.) See
Section 15.2, “The MyISAM Storage Engine”.
This section describes the steps to downgrade a MySQL installation.
Downgrading is a less common operation than upgrade. Downgrading is typically performed because of a compatibility or performance issue that occurs on a production system, and was not uncovered during initial upgrade verification on the test systems. As with the upgrade procedure Section 2.11, “Upgrading MySQL”), perform and verify the downgrade procedure on some test systems first, before using it on a production system.
In the following discussion, MySQL commands that must be run using
a MySQL account with administrative privileges include -u
on the command line to specify
the MySQL rootroot user. Commands that require a
password for root also include a
-p option. Because -p is
followed by no option value, such commands prompt for the
password. Type the password when prompted and press Enter.
SQL statements can be executed using the mysql
command-line client (connect as root to ensure
that you have the necessary privileges).
Review the information in this section before downgrading. Perform any recommended actions.
Protect your data by taking a backup. The backup should include the
mysqldatabase, which contains the MySQL system tables. See Section 7.2, “Database Backup Methods”.Review Section 2.12.2, “Downgrade Paths” to ensure that your intended downgrade path is supported.
Review Section 2.12.3, “Downgrade Notes” for items that may require action before downgrading.
NoteThe downgrade procedures described in the following sections assume you are downgrading with data files created or modified by the newer MySQL version. However, if you did not modify your data after upgrading, downgrading using backups taken before upgrading to the new MySQL version is recommended. Many of the changes described in Section 2.12.3, “Downgrade Notes” that require action are not applicable when downgrading using backups taken before upgrading to the new MySQL version.
Use of new features, new configuration options, or new configuration option values that are not supported by a previous release may cause downgrade errors or failures. Before downgrading, reverse changes resulting from the use of new features and remove configuration settings that are not supported by the release you are downgrading to.
Downgrade is only supported between General Availability (GA) releases.
Downgrade from MySQL 5.7 to 5.6 is supported using the logical downgrade method.
Downgrade that skips versions is not supported. For example, downgrading directly from MySQL 5.7 to 5.5 is not supported.
Downgrade within a release series is supported. For example, downgrading from MySQL 5.7.
zto 5.7.yis supported. Skipping a release is also supported. For example, downgrading from MySQL 5.7.zto 5.7.xis supported.
Before downgrading from MySQL 5.7, review the information in this section. Some items may require action before downgrading.
System Table Changes
In MySQL 5.7.13, system table columns that store user@host string values were increased in length. Before downgrading to a previous release, ensure that there are no user@host values that exceed the previous 77 character length limit, and perform the following
mysqlsystem table alterations:ALTER TABLE mysql.proc MODIFY definer char(77) CHARACTER SET utf8 COLLATE utf8_bin NOT NULL DEFAULT ''; ALTER TABLE mysql.event MODIFY definer char(77) CHARACTER SET utf8 COLLATE utf8_bin NOT NULL DEFAULT ''; ALTER TABLE mysql.tables_priv MODIFY Grantor char(77) COLLATE utf8_bin NOT NULL DEFAULT ''; ALTER TABLE mysql.procs_priv MODIFY Grantor char(77) COLLATE utf8_bin NOT NULL DEFAULT '';
The maximum length of MySQL user names was increased from 16 characters to 32 characters in MySQL 5.7.8. Before downgrading to a previous release, ensure that there are no user names greater than 16 characters in length, and perform the following
mysqlsystem table alterations:ALTER TABLE mysql.tables_priv MODIFY User char(16) NOT NULL default ''; ALTER TABLE mysql.columns_priv MODIFY User char(16) NOT NULL default ''; ALTER TABLE mysql.user MODIFY User char(16) NOT NULL default ''; ALTER TABLE mysql.db MODIFY User char(16) NOT NULL default ''; ALTER TABLE mysql.procs_priv MODIFY User char(16) binary DEFAULT '' NOT NULL;
The
Passwordcolumn of themysql.usersystem table was removed in MySQL 5.7.6. All credentials are stored in theauthentication_stringcolumn, including those formerly stored in thePasswordcolumn. To make themysql.usertable compatible with previous releases, perform the following alterations before downgrading:ALTER TABLE mysql.user ADD Password char(41) character set latin1 collate latin1_bin NOT NULL default '' AFTER user; UPDATE mysql.user SET password = authentication_string WHERE LENGTH(authentication_string) = 41 AND plugin = 'mysql_native_password'; UPDATE mysql.user SET authentication_string = '' WHERE LENGTH(authentication_string) = 41 AND plugin = 'mysql_native_password';
The
help_*andtime_zone*system tables changed fromMyISAMtoInnoDBin MySQL 5.7.5. Before downgrading to a previous release, change each affected table back toMyISAMby running the following statements:ALTER TABLE mysql.help_category ENGINE='MyISAM' STATS_PERSISTENT=DEFAULT; ALTER TABLE mysql.help_keyword ENGINE='MyISAM' STATS_PERSISTENT=DEFAULT; ALTER TABLE mysql.help_relation ENGINE='MyISAM' STATS_PERSISTENT=DEFAULT; ALTER TABLE mysql.help_topic ENGINE='MyISAM' STATS_PERSISTENT=DEFAULT; ALTER TABLE mysql.time_zone ENGINE='MyISAM' STATS_PERSISTENT=DEFAULT; ALTER TABLE mysql.time_zone_leap_second ENGINE='MyISAM' STATS_PERSISTENT=DEFAULT; ALTER TABLE mysql.time_zone_name ENGINE='MyISAM' STATS_PERSISTENT=DEFAULT; ALTER TABLE mysql.time_zone_transition ENGINE='MyISAM' STATS_PERSISTENT=DEFAULT; ALTER TABLE mysql.time_zone_transition_type ENGINE='MyISAM' STATS_PERSISTENT=DEFAULT;
The
pluginandserverssystem tables changed fromMyISAMtoInnoDBin MySQL 5.7.6. Before downgrading to a previous release, change each affected table back toMyISAMby running the following statements:ALTER TABLE mysql.plugin ENGINE='MyISAM' STATS_PERSISTENT=DEFAULT; ALTER TABLE mysql.servers ENGINE='MyISAM' STATS_PERSISTENT=DEFAULT;
The definition of the
plugincolumn in themysql.usersystem table differs in MySQL 5.7. Before downgrading to a MySQL 5.6 server for versions 5.6.23 and higher, alter theplugincolumn definition using this statement:ALTER TABLE mysql.user MODIFY plugin CHAR(64) COLLATE utf8_bin DEFAULT 'mysql_native_password';
Before downgrading to a MySQL 5.6.22 server or older, alter the
plugincolumn definition using this statement:ALTER TABLE mysql.user MODIFY plugin CHAR(64) COLLATE utf8_bin DEFAULT '';
As of MySQL 5.7.7, the
sysschema is installed by default during data directory installation. Before downgrading to a previous version, it is recommended that you drop thesysschema:DROP DATABASE sys;
If you are downgrading to a release that includes the
sysschema, mysql_upgrade recreates thesysschema in a compatible form. Thesysschema is not included in MySQL 5.6.
InnoDB Changes
As of MySQL 5.7.5, the
FIL_PAGE_FLUSH_LSNfield, written to the first page of eachInnoDBsystem tablespace file and toInnoDBundo tablespace files, is only written to the first file of theInnoDBsystem tablespace (page number 0:0). As a result, if you have a multiple-file system tablespace and decide to downgrade from MySQL 5.7 to MySQL 5.6, you may encounter an invalid message on MySQL 5.6 startup stating that the log sequence numbersxandyin ibdata files do not match the log sequence numberyin the ib_logfiles. If you encounter this message, restart MySQL 5.6. The invalid message should no longer appear.To simplify
InnoDBtablespace discovery during crash recovery, new redo log record types were introduced in MySQL 5.7.5. This enhancement changes the redo log format. Before performing an in-place downgrade from MySQL 5.7.5 or later, perform a clean shutdown using aninnodb_fast_shutdownsetting of0or1. A slow shutdown usinginnodb_fast_shutdown=0is a recommended step in In-Place Downgrade.MySQL 5.7.8 and 5.7.9 undo logs could contain insufficient information about spatial columns (Bug #21508582). Before performing an in-place downgrade from MySQL 5.7.10 or higher to MySQL 5.7.9 or earlier, perform a slow shutdown using
innodb_fast_shutdown=0to clear the undo logs. A slow shutdown usinginnodb_fast_shutdown=0is a recommended step in In-Place Downgrade.MySQL 5.7.8 undo logs could contain insufficient information about virtual columns and virtual column indexes (Bug #21869656). Before performing an in-place downgrade from MySQL 5.7.9 or later to MySQL 5.7.8 or earlier, perform a slow shutdown using
innodb_fast_shutdown=0to clear the undo logs. A slow shutdown usinginnodb_fast_shutdown=0is a recommended step in In-Place Downgrade.As of MySQL 5.7.9, the redo log header of the first redo log file (
ib_logfile0) includes a format version identifier and a text string that identifies the MySQL version that created the redo log files. This enhancement changes the redo log format. To prevent older versions of MySQL from starting on redo log files created in MySQL 5.7.9 or later, the checksum for redo log checkpoint pages was changed. As a result, you must perform a slow shutdown of MySQL (using innodb_fast_shutdown=0) and remove the redo log files (theib_logfile*files) before performing an in-place downgrade. A slow shutdown usinginnodb_fast_shutdown=0and removing the redo log files are recommended steps in In-Place Downgrade.
Logging Changes
Support for sending the server error log to
syslogin MySQL 5.7.5 and up differs from older versions. If you usesyslogand downgrade to a version older than 5.7.5, you must stop using the relevant mysqld system variables and use the corresponding mysqld_safe command options instead. Suppose that you usesyslogby setting these system variables in the[mysqld]group of an option file:[mysqld] log_syslog=ON log_syslog_tag=mytag
To downgrade, remove those settings and add option settings in the
[mysqld_safe]option file group:[mysqld_safe] syslog syslog-tag=mytag
syslog-related system variables that have no corresponding mysqld_safe option cannot be used after a downgrade.
SQL Changes
A trigger can have triggers for different combinations of trigger event (
INSERT,UPDATE,DELETE) and action time (BEFORE,AFTER), but before MySQL 5.7.2 cannot have multiple triggers that have the same trigger event and action time. MySQL 5.7.2 lifts this limitation and multiple triggers are permitted. This change has implications for downgrades.If you downgrade a server that supports multiple triggers to an older version that does not, the downgrade has these effects:
For each table that has triggers, all trigger definitions remain in the
.TRGfile for the table. However, if there are multiple triggers with the same trigger event and action time, the server executes only one of them when the trigger event occurs. For information about.TRGfiles, see Table Trigger Storage.If triggers for the table are added or dropped subsequent to the downgrade, the server rewrites the table's
.TRGfile. The rewritten file retains only one trigger per combination of trigger event and action time; the others are lost.
To avoid these problems, modify your triggers before downgrading. For each table that has multiple triggers per combination of trigger event and action time, convert each such set of triggers to a single trigger as follows:
For each trigger, create a stored routine that contains all the code in the trigger. Values accessed using
NEWandOLDcan be passed to the routine using parameters. If the trigger needs a single result value from the code, you can put the code in a stored function and have the function return the value. If the trigger needs multiple result values from the code, you can put the code in a stored procedure and return the values usingOUTparameters.Drop all triggers for the table.
Create one new trigger for the table that invokes the stored routines just created. The effect for this trigger is thus the same as the multiple triggers it replaces.
This section describes how to downgrade MySQL binary and package-based installations on Unix/Linux. In-place and logical downgrade methods are described.
In-place downgrade involves shutting down the new MySQL version, replacing the new MySQL binaries or packages with the old ones, and restarting the old MySQL version on the existing data directory.
In-place downgrade is supported for downgrades between GA releases within the same release series.
In-place downgrade is not supported for MySQL APT, SLES, and Yum repository installations.
For some Linux platforms, MySQL installation from RPM or Debian packages includes systemd support for managing MySQL server startup and shutdown. On these platforms, mysqld_safe is not installed. In such cases, use systemd for server startup and shutdown instead of the methods used in the following instructions. See Section 2.5.10, “Managing MySQL Server with systemd”.
To perform an in-place downgrade:
Review the information in Section 2.12.1, “Before You Begin”.
If you use XA transactions with
InnoDB, runXA RECOVERbefore downgrading to check for uncommitted XA transactions. If results are returned, either commit or rollback the XA transactions by issuing anXA COMMITorXA ROLLBACKstatement.Configure MySQL to perform a slow shutdown by setting
innodb_fast_shutdownto0. For example:mysql -u root -p --execute="SET GLOBAL innodb_fast_shutdown=0"
With a slow shutdown,
InnoDBperforms a full purge and change buffer merge before shutting down, which ensures that data files are fully prepared in case of file format differences between releases.Shut down the newer MySQL server. For example:
mysqladmin -u root -p shutdown
After the slow shutdown, remove the
InnoDBredo log files (theib_logfile*files) from thedatadirectory to avoid downgrade issues related to redo log file format changes that may have occurred between releases.rm ib_logfile*
Downgrade the MySQL binaries or packages in-place by replacing the newer binaries or packages with the older ones.
Start the older (downgraded) MySQL server, using the existing data directory. For example:
mysqld_safe --user=mysql --datadir=
/path/to/existing-datadirRun mysql_upgrade. For example:
mysql_upgrade -u root -p
mysql_upgrade examines all tables in all databases for incompatibilities with the current version of MySQL, and attempts to repair the tables if problems are found.
Shut down and restart the MySQL server to ensure that any changes made to the system tables take effect. For example:
mysqladmin -u root -p shutdown mysqld_safe --user=mysql --datadir=
/path/to/existing-datadir
Logical downgrade involves using mysqldump to dump all tables from the new MySQL version, and then loading the dump file into the old MySQL version.
Logical downgrades are supported for downgrades between releases within the same release series and for downgrades to the previous release level. Only downgrades between General Availability (GA) releases are supported. Before proceeding, review Section 2.12.1, “Before You Begin”.
For some Linux platforms, MySQL installation from RPM or Debian packages includes systemd support for managing MySQL server startup and shutdown. On these platforms, mysqld_safe is not installed. In such cases, use systemd for server startup and shutdown instead of the methods used in the following instructions. See Section 2.5.10, “Managing MySQL Server with systemd”.
For MySQL APT, SLES, and Yum repository installations, only downgrades to the previous release level are supported. Where the instructions call for initializing an older instance, use the package management utility to remove MySQL 5.7 packages and install MySQL 5.6 packages.
To perform a logical downgrade:
Review the information in Section 2.12.1, “Before You Begin”.
Dump all databases. For example:
mysqldump -u root -p --add-drop-table --routines --events --all-databases --force > data-for-downgrade.sql
Shut down the newer MySQL server. For example:
mysqladmin -u root -p shutdown
To initialize a MySQL 5.7 instance, use mysqld with the
--initializeor--initialize-insecureoption.mysqld --initialize --user=mysql
Start the older MySQL server, using the new data directory. For example:
mysqld_safe --user=mysql --datadir=
/path/to/new-datadirLoad the dump file into the older MySQL server. For example:
mysql -u root -p --force < data-for-upgrade.sql
Run mysql_upgrade. For example:
mysql_upgrade -u root -p
mysql_upgrade examines all tables in all databases for incompatibilities with the current version of MySQL, and attempts to repair the tables if problems are found.
Shut down and restart the MySQL server to ensure that any changes made to the system tables take effect. For example:
mysqladmin -u root -p shutdown mysqld_safe --user=mysql --datadir=
/path/to/new-datadir
If you downgrade from one release series to another, there may be incompatibilities in table storage formats. In this case, use mysqldump to dump your tables before downgrading. After downgrading, reload the dump file using mysql or mysqlimport to re-create your tables. For examples, see Section 2.11.13, “Copying MySQL Databases to Another Machine”.
A typical symptom of a downward-incompatible table format change when you downgrade is that you cannot open tables. In that case, use the following procedure:
Stop the older MySQL server that you are downgrading to.
Restart the newer MySQL server you are downgrading from.
Dump any tables that were inaccessible to the older server by using mysqldump to create a dump file.
Stop the newer MySQL server and restart the older one.
Reload the dump file into the older server. Your tables should be accessible.
The Perl DBI module provides a generic interface
for database access. You can write a DBI script
that works with many different database engines without change. To
use DBI, you must install the
DBI module, as well as a DataBase Driver (DBD)
module for each type of database server you want to access. For
MySQL, this driver is the DBD::mysql module.
Perl support is not included with MySQL distributions. You can obtain the necessary modules from http://search.cpan.org for Unix, or by using the ActiveState ppm program on Windows. The following sections describe how to do this.
The DBI/DBD interface requires
Perl 5.6.0, and 5.6.1 or later is preferred. DBI does not
work if you have an older version of Perl. You should use
DBD::mysql 4.009 or higher. Although earlier
versions are available, they do not support the full functionality
of MySQL 5.7.
MySQL Perl support requires that you have installed MySQL client programming support (libraries and header files). Most installation methods install the necessary files. If you install MySQL from RPM files on Linux, be sure to install the developer RPM as well. The client programs are in the client RPM, but client programming support is in the developer RPM.
The files you need for Perl support can be obtained from the CPAN (Comprehensive Perl Archive Network) at http://search.cpan.org.
The easiest way to install Perl modules on Unix is to use the
CPAN module. For example:
shell>perl -MCPAN -e shellcpan>install DBIcpan>install DBD::mysql
The DBD::mysql installation runs a number of
tests. These tests attempt to connect to the local MySQL server
using the default user name and password. (The default user name
is your login name on Unix, and ODBC on
Windows. The default password is “no password.”) If
you cannot connect to the server with those values (for example,
if your account has a password), the tests fail. You can use
force install DBD::mysql to ignore the failed
tests.
DBI requires the
Data::Dumper module. It may be installed; if
not, you should install it before installing
DBI.
It is also possible to download the module distributions in the form of compressed tar archives and build the modules manually. For example, to unpack and build a DBI distribution, use a procedure such as this:
Unpack the distribution into the current directory:
shell>
gunzip < DBI-VERSION.tar.gz | tar xvf -This command creates a directory named
DBI-.VERSIONChange location into the top-level directory of the unpacked distribution:
shell>
cd DBI-VERSIONBuild the distribution and compile everything:
shell>
perl Makefile.PLshell>makeshell>make testshell>make install
The make test command is important because it
verifies that the module is working. Note that when you run that
command during the DBD::mysql installation to
exercise the interface code, the MySQL server must be running or
the test fails.
It is a good idea to rebuild and reinstall the
DBD::mysql distribution whenever you install a
new release of MySQL. This ensures that the latest versions of the
MySQL client libraries are installed correctly.
If you do not have access rights to install Perl modules in the system directory or if you want to install local Perl modules, the following reference may be useful: http://learn.perl.org/faq/perlfaq8.html#How-do-I-keep-my-own-module-library-directory-
On Windows, you should do the following to install the MySQL
DBD module with ActiveState Perl:
Get ActiveState Perl from http://www.activestate.com/Products/ActivePerl/ and install it.
Open a console window.
If necessary, set the
HTTP_proxyvariable. For example, you might try a setting like this:C:\>
set HTTP_proxy=my.proxy.com:3128Start the PPM program:
C:\>
C:\perl\bin\ppm.plIf you have not previously done so, install
DBI:ppm>
install DBIIf this succeeds, run the following command:
ppm>
install DBD-mysql
This procedure should work with ActiveState Perl 5.6 or higher.
If you cannot get the procedure to work, you should install the ODBC driver instead and connect to the MySQL server through ODBC:
use DBI;
$dbh= DBI->connect("DBI:ODBC:$dsn",$user,$password) ||
die "Got error $DBI::errstr when connecting to $dsn\n";
If Perl reports that it cannot find the
../mysql/mysql.so module, the problem is
probably that Perl cannot locate the
libmysqlclient.so shared library. You should
be able to fix this problem by one of the following methods:
Copy
libmysqlclient.soto the directory where your other shared libraries are located (probably/usr/libor/lib).Modify the
-Loptions used to compileDBD::mysqlto reflect the actual location oflibmysqlclient.so.On Linux, you can add the path name of the directory where
libmysqlclient.sois located to the/etc/ld.so.conffile.Add the path name of the directory where
libmysqlclient.sois located to theLD_RUN_PATHenvironment variable. Some systems useLD_LIBRARY_PATHinstead.
Note that you may also need to modify the -L
options if there are other libraries that the linker fails to
find. For example, if the linker cannot find
libc because it is in /lib
and the link command specifies -L/usr/lib, change
the -L option to -L/lib or add
-L/lib to the existing link command.
If you get the following errors from
DBD::mysql, you are probably using
gcc (or using an old binary compiled with
gcc):
/usr/bin/perl: can't resolve symbol '__moddi3' /usr/bin/perl: can't resolve symbol '__divdi3'
Add -L/usr/lib/gcc-lib/... -lgcc to the link
command when the mysql.so library gets built
(check the output from make for
mysql.so when you compile the Perl client).
The -L option should specify the path name of the
directory where libgcc.a is located on your
system.
Another cause of this problem may be that Perl and MySQL are not both compiled with gcc. In this case, you can solve the mismatch by compiling both with gcc.