Table of Contents
- 14.1 Introduction to InnoDB
- 14.2 Installing the InnoDB Storage Engine
- 14.3 Upgrading the InnoDB Storage Engine
- 14.4 Downgrading the InnoDB Storage Engine
- 14.5 InnoDB and the ACID Model
- 14.6 InnoDB Multi-Versioning
- 14.7 InnoDB Architecture
- 14.8 InnoDB In-Memory Structures
- 14.9 InnoDB On-Disk Structures
- 14.10 InnoDB Locking and Transaction Model
- 14.11 InnoDB Configuration
- 14.11.1 InnoDB Startup Configuration
- 14.11.2 InnoDB Buffer Pool Configuration
- 14.11.3 Configuring the Memory Allocator for InnoDB
- 14.11.4 Configuring Thread Concurrency for InnoDB
- 14.11.5 Configuring the Number of Background InnoDB I/O Threads
- 14.11.6 Using Asynchronous I/O on Linux
- 14.11.7 Configuring InnoDB I/O Capacity
- 14.11.8 Configuring Spin Lock Polling
- 14.11.9 Purge Configuration
- 14.11.10 Configuring Optimizer Statistics for InnoDB
- 14.12 InnoDB Table Compression
- 14.13 InnoDB File-Format Management
- 14.14 InnoDB Row Formats
- 14.15 InnoDB Disk I/O and File Space Management
- 14.16 InnoDB Fast Index Creation
- 14.17 InnoDB Startup Options and System Variables
- 14.18 InnoDB INFORMATION_SCHEMA Tables
- 14.19 InnoDB Integration with MySQL Performance Schema
- 14.20 InnoDB Monitors
- 14.21 InnoDB Backup and Recovery
- 14.22 InnoDB and MySQL Replication
- 14.23 InnoDB Troubleshooting
InnoDB is a general-purpose storage engine that
balances high reliability and high performance. Starting from MySQL
5.5.5, the default storage engine for new tables is
InnoDB rather than
MyISAM. Unless you have configured a
different default storage engine, issuing a
CREATE TABLE statement without an
ENGINE= clause creates an
InnoDB table. Given this change of default
behavior, MySQL 5.5 might be a logical point to evaluate whether
tables that use MyISAM could benefit from
switching to InnoDB.
InnoDB includes all the features that were part
of the InnoDB Plugin for MySQL 5.1, plus new features specific to
MySQL 5.5 and higher.
The mysql and
INFORMATION_SCHEMA databases that implement
some of the MySQL internals still use MyISAM.
In particular, you cannot switch the grant tables to use
InnoDB.
Key Advantages of InnoDB
Its DML operations follow the ACID model, with transactions featuring commit, rollback, and crash-recovery capabilities to protect user data. See Section 14.5, “InnoDB and the ACID Model” for more information.
Row-level locking and Oracle-style consistent reads increase multi-user concurrency and performance. See Section 14.10, “InnoDB Locking and Transaction Model” for more information.
InnoDBtables arrange your data on disk to optimize queries based on primary keys. EachInnoDBtable has a primary key index called the clustered index that organizes the data to minimize I/O for primary key lookups. See Section 14.9.2.1, “Clustered and Secondary Indexes” for more information.To maintain data integrity,
InnoDBsupportsFOREIGN KEYconstraints. With foreign keys, inserts, updates, and deletes are checked to ensure they do not result in inconsistencies across different tables. See Section 14.9.1.5, “InnoDB and FOREIGN KEY Constraints” for more information.
Table 14.1 InnoDB Storage Engine Features
| Feature | Support |
|---|---|
| B-tree indexes | Yes |
| Backup/point-in-time recovery (Implemented in the server, rather than in the storage engine.) | Yes |
| Cluster database support | No |
| Clustered indexes | Yes |
| Compressed data | Yes |
| Data caches | Yes |
| Encrypted data | Yes (Implemented in the server via encryption functions; In MySQL 5.7 and later, data-at-rest tablespace encryption is supported.) |
| Foreign key support | Yes |
| Full-text search indexes | Yes (InnoDB support for FULLTEXT indexes is available in MySQL 5.6 and later.) |
| Geospatial data type support | Yes |
| Geospatial indexing support | Yes (InnoDB support for geospatial indexing is available in MySQL 5.7 and later.) |
| Hash indexes | No (InnoDB utilizes hash indexes internally for its Adaptive Hash Index feature.) |
| Index caches | Yes |
| Locking granularity | Row |
| MVCC | Yes |
| Replication support (Implemented in the server, rather than in the storage engine.) | Yes |
| Storage limits | 64TB |
| T-tree indexes | No |
| Transactions | Yes |
| Update statistics for data dictionary | Yes |
To compare the features of InnoDB with other
storage engines provided with MySQL, see the Storage
Engine Features table in
Chapter 15, Alternative Storage Engines.
InnoDB Enhancements and New Features
The InnoDB storage engine in MySQL
5.5 releases includes a number performance improvements
that in MySQL 5.1 were only available by installing the
InnoDB Plugin. This latest
InnoDB offers new features, improved performance
and scalability, enhanced reliability and new capabilities for
flexibility and ease of use.
For information about InnoDB enhancements and new
features, refer to:
The
InnoDBenhancements list in Section 1.4, “What Is New in MySQL 5.5”.The Release Notes.
Additional InnoDB Information and Resources
For
InnoDB-related terms and definitions, see the MySQL Glossary.For a forum dedicated to the
InnoDBstorage engine, see MySQL Forums::InnoDB.InnoDBis published under the same GNU GPL License Version 2 (of June 1991) as MySQL. For more information on MySQL licensing, see http://www.mysql.com/company/legal/licensing/.
You may find InnoDB tables beneficial for the
following reasons:
If your server crashes because of a hardware or software issue, regardless of what was happening in the database at the time, you don't need to do anything special after restarting the database.
InnoDBcrash recovery automatically finalizes any changes that were committed before the time of the crash, and undoes any changes that were in process but not committed. Just restart and continue where you left off. This process is now much faster than in MySQL 5.1 and earlier.The
InnoDBstorage engine maintains its own buffer pool that caches table and index data in main memory as data is accessed. Frequently used data is processed directly from memory. This cache applies to many types of information and speeds up processing. On dedicated database servers, up to 80% of physical memory is often assigned to the buffer pool.If you split up related data into different tables, you can set up foreign keys that enforce referential integrity. Update or delete data, and the related data in other tables is updated or deleted automatically. Try to insert data into a secondary table without corresponding data in the primary table, and the bad data gets kicked out automatically.
If data becomes corrupted on disk or in memory, a checksum mechanism alerts you to the bogus data before you use it.
When you design your database with appropriate primary key columns for each table, operations involving those columns are automatically optimized. It is very fast to reference the primary key columns in
WHEREclauses,ORDER BYclauses,GROUP BYclauses, and join operations.Inserts, updates, deletes are optimized by an automatic mechanism called change buffering.
InnoDBnot only allows concurrent read and write access to the same table, it caches changed data to streamline disk I/O.Performance benefits are not limited to giant tables with long-running queries. When the same rows are accessed over and over from a table, a feature called the Adaptive Hash Index takes over to make these lookups even faster, as if they came out of a hash table.
You can freely mix
InnoDBtables with tables from other MySQL storage engines, even within the same statement. For example, you can use a join operation to combine data fromInnoDBandMEMORYtables in a single query.InnoDBhas been designed for CPU efficiency and maximum performance when processing large data volumes.InnoDBtables can handle large quantities of data, even on operating systems where file size is limited to 2GB.
For InnoDB-specific tuning techniques you can
apply in your application code, see
Section 8.5, “Optimizing for InnoDB Tables”.
This section describes best practices when using
InnoDB tables.
Specify a primary key for every table using the most frequently queried column or columns, or an auto-increment value if there is no obvious primary key.
Using joins wherever data is pulled from multiple tables based on identical ID values from those tables. For fast join performance, define foreign keys on the join columns, and declare those columns with the same data type in each table. Adding foreign keys ensures that referenced columns are indexed, which can improve performance. Foreign keys also propagate deletes or updates to all affected tables, and prevent insertion of data in a child table if the corresponding IDs are not present in the parent table.
Turning off autocommit. Committing hundreds of times a second puts a cap on performance (limited by the write speed of your storage device).
Grouping sets of related DML operations into transactions, by bracketing them with
START TRANSACTIONandCOMMITstatements. While you don't want to commit too often, you also don't want to issue huge batches ofINSERT,UPDATE, orDELETEstatements that run for hours without committing.Not using
LOCK TABLESstatements.InnoDBcan handle multiple sessions all reading and writing to the same table at once, without sacrificing reliability or high performance. To get exclusive write access to a set of rows, use theSELECT ... FOR UPDATEsyntax to lock just the rows you intend to update.Enabling the
innodb_file_per_tableoption to put the data and indexes for individual tables into separate files, instead of the system tablespace. This setting is required to use some of the other features, such as table compression.Evaluating whether your data and access patterns benefit from the
InnoDBtable compression feature. You can compressInnoDBtables without sacrificing read/write capability.Running your server with the option
--sql_mode=NO_ENGINE_SUBSTITUTIONto prevent tables being created with a different storage engine if there is an issue with the engine specified in theENGINE=clause ofCREATE TABLE.
To determine whether your server supports
InnoDB:
Issue the
SHOW ENGINESstatement to view the available MySQL storage engines. Look forDEFAULTin theInnoDBline.mysql> SHOW ENGINES;
Alternatively, query the
INFORMATION_SCHEMA.ENGINEStable.mysql> SELECT * FROM INFORMATION_SCHEMA.ENGINES;
(Now that
InnoDBis the default MySQL storage engine, only very specialized environments might not support it.)Issue a
SHOW VARIABLESstatement to confirm thatInnoDBis available.mysql> SHOW VARIABLES LIKE 'have_innodb';
If
InnoDBis not present, you have amysqldbinary that was compiled withoutInnoDBsupport and you need to get a different one.If
InnoDBis present but disabled, go back through your startup options and configuration file and get rid of any--skip-innodboption.
The ability to use the InnoDB
table compression feature
introduced in MySQL 5.5 and the new row format
require the use of a new InnoDB file format
called Barracuda. The
previous file format, used by the built-in InnoDB in MySQL 5.1 and earlier, is now called
Antelope and does not support
these features, but does support the other features introduced
with the InnoDB storage engine.
The InnoDB storage engine is upward compatible from standard
InnoDB as built in to, and distributed with,
MySQL. Existing databases can be used with the
InnoDB Storage Engine for MySQL. The new parameter
innodb_file_format can help
protect upward and downward compatibility between
InnoDB versions and database files, allowing
users to enable or disable use of new features that can only be
used with certain versions of InnoDB.
InnoDB since version 5.0.21 has a safety
feature that prevents it from opening tables that are in an
unknown format. However, the system tablespace may contain
references to new-format tables that confuse the built-in InnoDB in MySQL 5.1 and earlier. These
references are cleared in a
slow shutdown.
With previous versions of InnoDB, no error
would be returned until you try to access a table that is in a
format “too new” for the software. To provide early
feedback, InnoDB now checks the system
tablespace before startup to ensure that the file format used in
the database is supported by the storage engine. See
Section 14.13.2.1, “Compatibility Check When InnoDB Is Started” for
the details.
If InnoDB is not your default storage engine,
you can determine if your database server or applications work
correctly with InnoDB by restarting the server
with
--default-storage-engine=InnoDB
defined on the command line or with
default-storage-engine=innodb
defined in the [mysqld] section of your MySQL
server option file.
Since changing the default storage engine only affects new tables
as they are created, run all your application installation and
setup steps to confirm that everything installs properly. Then
exercise all the application features to make sure all the data
loading, editing, and querying features work. If a table relies on
a feature that is specific to another storage engine, you will
receive an error; add the
ENGINE=
clause to the other_engine_nameCREATE TABLE statement to avoid
the error.
If you did not make a deliberate decision about the storage
engine, and you want to preview how certain tables work when
created using InnoDB, issue the command
ALTER TABLE table_name ENGINE=InnoDB; for each
table. Or, to run test queries and other statements without
disturbing the original table, make a copy:
CREATE TABLE InnoDB_Table (...) ENGINE=InnoDB AS SELECT * FROM other_engine_table;
To assess performance with a full application under a realistic workload, install the latest MySQL server and run benchmarks.
Test the full application lifecycle, from installation, through heavy usage, and server restart. Kill the server process while the database is busy to simulate a power failure, and verify that the data is recovered successfully when you restart the server.
Test any replication configurations, especially if you use different MySQL versions and options on the master and slaves.
Oracle recommends InnoDB as the preferred
storage engine for typical database applications, from single-user
wikis and blogs running on a local system, to high-end
applications pushing the limits of performance. As of MySQL
5.5, InnoDB is the default storage
engine for new tables.
If you do not want to use InnoDB tables:
Start the server with the
--innodb=OFFor--skip-innodboption to disable theInnoDBstorage engine.Because the default storage engine is
InnoDB, the server will not start unless you also change thedefault_storage_enginesystem variable to set the default to some other available engine.To prevent the server from crashing when the
InnoDB-relatedinformation_schematables are queried, also disable the plugins associated with those tables. Specify in the[mysqld]section of the MySQL configuration file:loose-innodb-trx=0 loose-innodb-locks=0 loose-innodb-lock-waits=0 loose-innodb-cmp=0 loose-innodb-cmp-per-index=0 loose-innodb-cmp-per-index-reset=0 loose-innodb-cmp-reset=0 loose-innodb-cmpmem=0 loose-innodb-cmpmem-reset=0 loose-innodb-buffer-page=0 loose-innodb-buffer-page-lru=0 loose-innodb-buffer-pool-stats=0
Oracle acknowledges that certain Third Party and Open Source software has been used to develop or is incorporated in the InnoDB storage engine. This appendix includes required third-party license information.
Oracle gratefully acknowledges the following contributions from Google, Inc. to improve InnoDB performance:
Replacing InnoDB's use of Pthreads mutexes with calls to GCC atomic builtins. This change means that InnoDB mutex and rw-lock operations take less CPU time, and improves throughput on those platforms where the atomic operations are available.
Controlling InnoDB
I/Ocapacity, as discussed in Section 14.11.7, “Configuring InnoDB I/O Capacity”. InnoDB performs various tasks in the background. Historically, InnoDB has used a hard coded value as the totalI/Ocapacity of the server. With this change, user can control the number ofI/Ooperations that can be performed per second based on their own workload.
Changes from the Google contributions were incorporated in the
following source code files: btr0cur.c,
btr0sea.c, buf0buf.c,
buf0buf.ic, ha_innodb.cc,
log0log.c, log0log.h,
os0sync.h, row0sel.c,
srv0srv.c, srv0srv.h,
srv0start.c, sync0arr.c,
sync0rw.c, sync0rw.h,
sync0rw.ic, sync0sync.c,
sync0sync.h, sync0sync.ic,
and univ.i.
These contributions are incorporated subject to the conditions
contained in the file COPYING.Google, which are
reproduced here.
Copyright (c) 2008, 2009, Google Inc.
All rights reserved.
Redistribution and use in source and binary forms, with or without
modification, are permitted provided that the following conditions
are met:
* Redistributions of source code must retain the above copyright
notice, this list of conditions and the following disclaimer.
* Redistributions in binary form must reproduce the above
copyright notice, this list of conditions and the following
disclaimer in the documentation and/or other materials
provided with the distribution.
* Neither the name of the Google Inc. nor the names of its
contributors may be used to endorse or promote products
derived from this software without specific prior written
permission.
THIS SOFTWARE IS PROVIDED BY THE COPYRIGHT HOLDERS AND CONTRIBUTORS
"AS IS" AND ANY EXPRESS OR IMPLIED WARRANTIES, INCLUDING, BUT NOT
LIMITED TO, THE IMPLIED WARRANTIES OF MERCHANTABILITY AND FITNESS
FOR A PARTICULAR PURPOSE ARE DISCLAIMED. IN NO EVENT SHALL THE
COPYRIGHT OWNER OR CONTRIBUTORS BE LIABLE FOR ANY DIRECT, INDIRECT,
INCIDENTAL, SPECIAL, EXEMPLARY, OR CONSEQUENTIAL DAMAGES (INCLUDING,
BUT NOT LIMITED TO, PROCUREMENT OF SUBSTITUTE GOODS OR SERVICES;
LOSS OF USE, DATA, OR PROFITS; OR BUSINESS INTERRUPTION) HOWEVER
CAUSED AND ON ANY THEORY OF LIABILITY, WHETHER IN CONTRACT, STRICT
LIABILITY, OR TORT (INCLUDING NEGLIGENCE OR OTHERWISE) ARISING IN
ANY WAY OUT OF THE USE OF THIS SOFTWARE, EVEN IF ADVISED OF THE
POSSIBILITY OF SUCH DAMAGE.
Oracle gratefully acknowledges the contribution of Percona, Inc. to improve InnoDB performance by implementing configurable background threads, as discussed in Section 14.11.5, “Configuring the Number of Background InnoDB I/O Threads”. InnoDB uses background threads to service various types of I/O requests. The change provides another way to make InnoDB more scalable on high end systems.
Changes from the Percona, Inc. contribution were incorporated in
the following source code files: ha_innodb.cc,
os0file.c, os0file.h,
srv0srv.c, srv0srv.h, and
srv0start.c.
This contribution is incorporated subject to the conditions
contained in the file COPYING.Percona, which
are reproduced here.
Copyright (c) 2008, 2009, Percona Inc.
All rights reserved.
Redistribution and use in source and binary forms, with or without
modification, are permitted provided that the following conditions
are met:
* Redistributions of source code must retain the above copyright
notice, this list of conditions and the following disclaimer.
* Redistributions in binary form must reproduce the above
copyright notice, this list of conditions and the following
disclaimer in the documentation and/or other materials
provided with the distribution.
* Neither the name of the Percona Inc. nor the names of its
contributors may be used to endorse or promote products
derived from this software without specific prior written
permission.
THIS SOFTWARE IS PROVIDED BY THE COPYRIGHT HOLDERS AND CONTRIBUTORS
"AS IS" AND ANY EXPRESS OR IMPLIED WARRANTIES, INCLUDING, BUT NOT
LIMITED TO, THE IMPLIED WARRANTIES OF MERCHANTABILITY AND FITNESS
FOR A PARTICULAR PURPOSE ARE DISCLAIMED. IN NO EVENT SHALL THE
COPYRIGHT OWNER OR CONTRIBUTORS BE LIABLE FOR ANY DIRECT, INDIRECT,
INCIDENTAL, SPECIAL, EXEMPLARY, OR CONSEQUENTIAL DAMAGES (INCLUDING,
BUT NOT LIMITED TO, PROCUREMENT OF SUBSTITUTE GOODS OR SERVICES;
LOSS OF USE, DATA, OR PROFITS; OR BUSINESS INTERRUPTION) HOWEVER
CAUSED AND ON ANY THEORY OF LIABILITY, WHETHER IN CONTRACT, STRICT
LIABILITY, OR TORT (INCLUDING NEGLIGENCE OR OTHERWISE) ARISING IN
ANY WAY OUT OF THE USE OF THIS SOFTWARE, EVEN IF ADVISED OF THE
POSSIBILITY OF SUCH DAMAGE.
Oracle gratefully acknowledges the following contributions from Sun Microsystems, Inc. to improve InnoDB performance:
Introducing the
PAUSEinstruction inside spin loops. This change increases performance in high concurrency, CPU-bound workloads.Enabling inlining of functions and prefetch with Sun Studio.
Changes from the Sun Microsystems, Inc. contribution were
incorporated in the following source code files:
univ.i, ut0ut.c, and
ut0ut.h.
This contribution is incorporated subject to the conditions
contained in the file COPYING.Sun_Microsystems,
which are reproduced here.
Copyright (c) 2009, Sun Microsystems, Inc.
All rights reserved.
Redistribution and use in source and binary forms, with or without
modification, are permitted provided that the following conditions
are met:
* Redistributions of source code must retain the above copyright
notice, this list of conditions and the following disclaimer.
* Redistributions in binary form must reproduce the above
copyright notice, this list of conditions and the following
disclaimer in the documentation and/or other materials
provided with the distribution.
* Neither the name of Sun Microsystems, Inc. nor the names of its
contributors may be used to endorse or promote products
derived from this software without specific prior written
permission.
THIS SOFTWARE IS PROVIDED BY THE COPYRIGHT HOLDERS AND CONTRIBUTORS
"AS IS" AND ANY EXPRESS OR IMPLIED WARRANTIES, INCLUDING, BUT NOT
LIMITED TO, THE IMPLIED WARRANTIES OF MERCHANTABILITY AND FITNESS
FOR A PARTICULAR PURPOSE ARE DISCLAIMED. IN NO EVENT SHALL THE
COPYRIGHT OWNER OR CONTRIBUTORS BE LIABLE FOR ANY DIRECT, INDIRECT,
INCIDENTAL, SPECIAL, EXEMPLARY, OR CONSEQUENTIAL DAMAGES (INCLUDING,
BUT NOT LIMITED TO, PROCUREMENT OF SUBSTITUTE GOODS OR SERVICES;
LOSS OF USE, DATA, OR PROFITS; OR BUSINESS INTERRUPTION) HOWEVER
CAUSED AND ON ANY THEORY OF LIABILITY, WHETHER IN CONTRACT, STRICT
LIABILITY, OR TORT (INCLUDING NEGLIGENCE OR OTHERWISE) ARISING IN
ANY WAY OUT OF THE USE OF THIS SOFTWARE, EVEN IF ADVISED OF THE
POSSIBILITY OF SUCH DAMAGE.
When you use the InnoDB storage engine 1.1 and above, with MySQL 5.5 and above, you do not need to do anything special to install: everything comes configured as part of the MySQL source and binary distributions. This is a change from earlier releases of the InnoDB Plugin, where you were required to match up MySQL and InnoDB version numbers and update your build and configuration processes.
The InnoDB storage engine is included in the MySQL distribution, starting from MySQL 5.1.38. From MySQL 5.1.46 and up, this is the only download location for the InnoDB storage engine; it is not available from the InnoDB website.
If you used any scripts or configuration files with the earlier
InnoDB storage engine from the InnoDB website, be aware that the filename
of the shared library as supplied by MySQL is
ha_innodb_plugin.so or
ha_innodb_plugin.dll, as opposed to
ha_innodb.so or ha_innodb.dll
in the older Plugin downloaded from the InnoDB website. You might
need to change the applicable file names in your startup or
configuration scripts.
Because the InnoDB storage engine has now replaced the built-in InnoDB,
you no longer need to specify options like
--ignore-builtin-innodb and
--plugin-load during startup.
To take best advantage of current InnoDB features, we recommend specifying the following options in your configuration file:
innodb_file_per_table=1 innodb_file_format=barracuda innodb_strict_mode=1
For information about these features, see
Section 14.17, “InnoDB Startup Options and System Variables”,
Section 14.13, “InnoDB File-Format Management”, and
innodb_strict_mode. You might need
to continue to use the previous values for these parameters in some
replication and similar configurations involving both new and older
versions of MySQL.
Prior to MySQL 5.5, some upgrade scenarios involved upgrading the separate instance of InnoDB known as the InnoDB Plugin. In MySQL 5.5 and higher, the features of the InnoDB Plugin have been folded back into built-in InnoDB, so the upgrade procedure for InnoDB is the same as the one for the MySQL server. For details, see Section 2.11, “Upgrading MySQL”.
Prior to MySQL 5.5, some downgrade scenarios involved switching the separate instance of InnoDB known as the InnoDB Plugin back to the built-in InnoDB storage engine. In MySQL 5.5 and higher, the features of the InnoDB Plugin have been folded back into built-in InnoDB, so the downgrade procedure for InnoDB is the same as the one for the MySQL server. For details, see Section 2.12, “Downgrading MySQL”.
The ACID model is a set of database
design principles that emphasize aspects of reliability that are
important for business data and mission-critical applications. MySQL
includes components such as the InnoDB storage
engine that adhere closely to the ACID model, so that data is not
corrupted and results are not distorted by exceptional conditions
such as software crashes and hardware malfunctions. When you rely on
ACID-compliant features, you do not need to reinvent the wheel of
consistency checking and crash recovery mechanisms. In cases where
you have additional software safeguards, ultra-reliable hardware, or
an application that can tolerate a small amount of data loss or
inconsistency, you can adjust MySQL settings to trade some of the
ACID reliability for greater performance or throughput.
The following sections discuss how MySQL features, in particular the
InnoDB storage engine, interact with the
categories of the ACID model:
A: atomicity.
C: consistency.
I:: isolation.
D: durability.
Atomicity
The atomicity aspect of the ACID
model mainly involves InnoDB
transactions. Related MySQL
features include:
Consistency
The consistency aspect of the ACID
model mainly involves internal InnoDB processing
to protect data from crashes. Related MySQL features include:
InnoDBdoublewrite buffer.InnoDBcrash recovery.
Isolation
The isolation aspect of the ACID
model mainly involves InnoDB
transactions, in particular
the isolation level that
applies to each transaction. Related MySQL features include:
Autocommit setting.
SET ISOLATION LEVELstatement.The low-level details of
InnoDBlocking. During performance tuning, you see these details throughINFORMATION_SCHEMAtables.
Durability
The durability aspect of the ACID model involves MySQL software features interacting with your particular hardware configuration. Because of the many possibilities depending on the capabilities of your CPU, network, and storage devices, this aspect is the most complicated to provide concrete guidelines for. (And those guidelines might take the form of buy “new hardware”.) Related MySQL features include:
InnoDBdoublewrite buffer, turned on and off by theinnodb_doublewriteconfiguration option.Configuration option
innodb_flush_log_at_trx_commit.Configuration option
sync_binlog.Configuration option
innodb_file_per_table.Write buffer in a storage device, such as a disk drive, SSD, or RAID array.
Battery-backed cache in a storage device.
The operating system used to run MySQL, in particular its support for the
fsync()system call.Uninterruptible power supply (UPS) protecting the electrical power to all computer servers and storage devices that run MySQL servers and store MySQL data.
Your backup strategy, such as frequency and types of backups, and backup retention periods.
For distributed or hosted data applications, the particular characteristics of the data centers where the hardware for the MySQL servers is located, and network connections between the data centers.
InnoDB is a
multi-versioned storage engine: it
keeps information about old versions of changed rows, to support
transactional features such as concurrency and
rollback. This information is
stored in the tablespace in a data structure called a
rollback segment (after
an analogous data structure in Oracle). InnoDB
uses the information in the rollback segment to perform the undo
operations needed in a transaction rollback. It also uses the
information to build earlier versions of a row for a
consistent read.
Internally, InnoDB adds three fields to each row
stored in the database. A 6-byte DB_TRX_ID field
indicates the transaction identifier for the last transaction that
inserted or updated the row. Also, a deletion is treated internally
as an update where a special bit in the row is set to mark it as
deleted. Each row also contains a 7-byte
DB_ROLL_PTR field called the roll pointer. The
roll pointer points to an undo log record written to the rollback
segment. If the row was updated, the undo log record contains the
information necessary to rebuild the content of the row before it
was updated. A 6-byte DB_ROW_ID field contains a
row ID that increases monotonically as new rows are inserted. If
InnoDB generates a clustered index automatically,
the index contains row ID values. Otherwise, the
DB_ROW_ID column does not appear in any index.
Undo logs in the rollback segment are divided into insert and update
undo logs. Insert undo logs are needed only in transaction rollback
and can be discarded as soon as the transaction commits. Update undo
logs are used also in consistent reads, but they can be discarded
only after there is no transaction present for which
InnoDB has assigned a snapshot that in a
consistent read could need the information in the update undo log to
build an earlier version of a database row.
Commit your transactions regularly, including those transactions
that issue only consistent reads. Otherwise,
InnoDB cannot discard data from the update undo
logs, and the rollback segment may grow too big, filling up your
tablespace.
The physical size of an undo log record in the rollback segment is typically smaller than the corresponding inserted or updated row. You can use this information to calculate the space needed for your rollback segment.
In the InnoDB multi-versioning scheme, a row is
not physically removed from the database immediately when you delete
it with an SQL statement. InnoDB only physically
removes the corresponding row and its index records when it discards
the update undo log record written for the deletion. This removal
operation is called a purge, and
it is quite fast, usually taking the same order of time as the SQL
statement that did the deletion.
If you insert and delete rows in smallish batches at about the same
rate in the table, the purge thread can start to lag behind and the
table can grow bigger and bigger because of all the
“dead” rows, making everything disk-bound and very
slow. In such a case, throttle new row operations, and allocate more
resources to the purge thread by tuning the
innodb_max_purge_lag system
variable. See Section 14.17, “InnoDB Startup Options and System Variables” for more
information.
InnoDB multiversion concurrency control (MVCC)
treats secondary indexes differently than clustered indexes.
Records in a clustered index are updated in-place, and their
hidden system columns point undo log entries from which earlier
versions of records can be reconstructed. Unlike clustered index
records, secondary index records do not contain hidden system
columns nor are they updated in-place.
When a secondary index column is updated, old secondary index
records are delete-marked, new records are inserted, and
delete-marked records are eventually purged. When a secondary
index record is delete-marked or the secondary index page is
updated by a newer transaction, InnoDB looks up
the database record in the clustered index. In the clustered
index, the record's DB_TRX_ID is checked, and
the correct version of the record is retrieved from the undo log
if the record was modified after the reading transaction was
initiated.
If a secondary index record is marked for deletion or the
secondary index page is updated by a newer transaction, the
covering index
technique is not used. Instead of returning values from the index
structure, InnoDB looks up the record in the
clustered index.
The following diagram shows in-memory and on-disk structures that
comprise the InnoDB storage engine
architecture. For information about each structure, see
Section 14.8, “InnoDB In-Memory Structures”, and
Section 14.9, “InnoDB On-Disk Structures”.
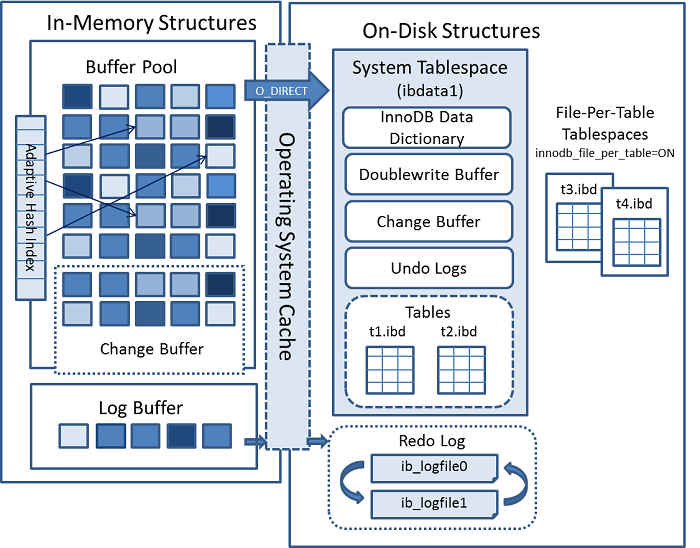
This section describes InnoDB in-memory
structures and related topics.
The buffer pool is an area in main memory where
InnoDB caches table and index data as it is
accessed. The buffer pool permits frequently used data to be
processed directly from memory, which speeds up processing. On
dedicated servers, up to 80% of physical memory is often assigned to
the buffer pool.
For efficiency of high-volume read operations, the buffer pool is divided into pages that can potentially hold multiple rows. For efficiency of cache management, the buffer pool is implemented as a linked list of pages; data that is rarely used is aged out of the cache using a variation of the LRU algorithm.
Knowing how to take advantage of the buffer pool to keep frequently accessed data in memory is an important aspect of MySQL tuning.
The buffer pool is managed as a list using a variation of the least recently used (LRU) algorithm. When room is needed to add a new page to the buffer pool, the least recently used page is evicted and a new page is added to the middle of the list. This midpoint insertion strategy treats the list as two sublists:
At the head, a sublist of new (“young”) pages that were accessed recently
At the tail, a sublist of old pages that were accessed less recently
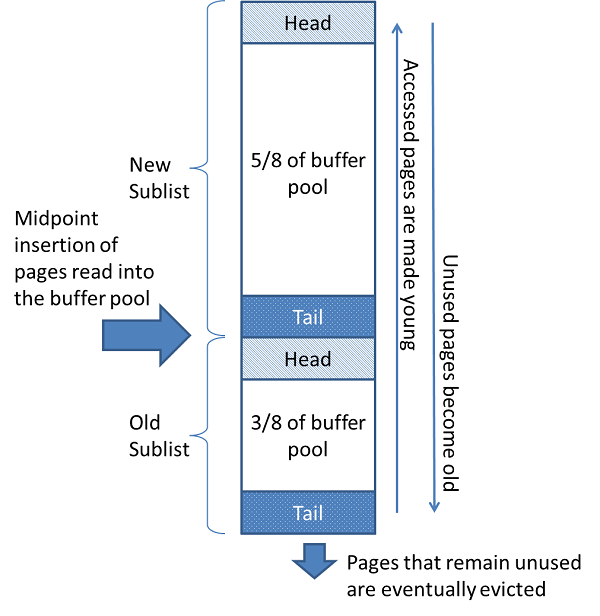
The algorithm keeps heavily pages in the new sublist. The old sublist contains less-used pages; these pages are candidates for eviction.
By default, the algorithm operates as follows:
3/8 of the buffer pool is devoted to the old sublist.
The midpoint of the list is the boundary where the tail of the new sublist meets the head of the old sublist.
When
InnoDBreads a page into the buffer pool, it initially inserts it at the midpoint (the head of the old sublist). A page can be read because it is required for a user-initiated operation such as an SQL query, or as part of a read-ahead operation performed automatically byInnoDB.Accessing a page in the old sublist makes it “young”, moving it to the head of the new sublist. If the page was read because it was required by a user-initiated operation, the first access occurs immediately and the page is made young. If the page was read due to a read-ahead operation, the first access does not occur immediately, and might not occur at all before the page is evicted.
As the database operates, pages in the buffer pool that are not accessed “age” by moving toward the tail of the list. Pages in both the new and old sublists age as other pages are made new. Pages in the old sublist also age as pages are inserted at the midpoint. Eventually, a page that remains unused reaches the tail of the old sublist and is evicted.
By default, pages read by queries are immediately moved into the
new sublist, meaning they stay in the buffer pool longer. A table
scan, performed for a mysqldump operation or a
SELECT statement with no
WHERE clause, for example, can bring a large
amount of data into the buffer pool and evict an equivalent amount
of older data, even if the new data is never used again.
Similarly, pages that are loaded by the read-ahead background
thread and accessed only once are moved to the head of the new
list. These situations can push frequently used pages to the old
sublist where they become subject to eviction. For information
about optimizing this behavior, see
Section 14.11.2.2, “Making the Buffer Pool Scan Resistant”, and
Section 14.11.2.3, “Configuring InnoDB Buffer Pool Prefetching (Read-Ahead)”.
InnoDB Standard Monitor output contains several
fields in the BUFFER POOL AND MEMORY section
regarding operation of the buffer pool LRU algorithm. For details,
see Monitoring the Buffer Pool Using the InnoDB Standard Monitor.
You can configure the various aspects of the buffer pool to improve performance.
Ideally, you set the size of the buffer pool to as large a value as practical, leaving enough memory for other processes on the server to run without excessive paging. The larger the buffer pool, the more
InnoDBacts like an in-memory database, reading data from disk once and then accessing the data from memory during subsequent reads. Buffer pool size is configured using theinnodb_buffer_pool_sizeconfiguration option.On 64-bit systems with sufficient memory, you can split the buffer pool into multiple parts to minimize contention for memory structures among concurrent operations. For details, see Section 14.11.2.1, “Configuring Multiple Buffer Pool Instances”.
You can keep frequently accessed data in memory regardless of sudden spikes of activity from operations that would bring large amounts of infrequently accessed data into the buffer pool. For details, see Section 14.11.2.2, “Making the Buffer Pool Scan Resistant”.
You can control when and how to perform read-ahead requests to prefetch pages into the buffer pool asynchronously in anticipation that the pages will be needed soon. For details, see Section 14.11.2.3, “Configuring InnoDB Buffer Pool Prefetching (Read-Ahead)”.
You can control when background flushing occurs and whether or not the rate of flushing is dynamically adjusted based on workload. For details, see Section 14.11.2.4, “Configuring Buffer Pool Flushing”.
InnoDB Standard Monitor output, which can be
accessed using
SHOW
ENGINE INNODB STATUS, provides metrics regarding
operation of the buffer pool. Buffer pool metrics are located in
the BUFFER POOL AND MEMORY section of
InnoDB Standard Monitor output and appear
similar to the following:
---------------------- BUFFER POOL AND MEMORY ---------------------- Total memory allocated 2217738240; in additional pool allocated 0 Dictionary memory allocated 121719 Buffer pool size 131072 Free buffers 129937 Database pages 1134 Old database pages 211 Modified db pages 187 Pending reads 0 Pending writes: LRU 0, flush list 0, single page 0 Pages made young 0, not young 0 0.00 youngs/s, 0.00 non-youngs/s Pages read 426, created 708, written 768 0.00 reads/s, 40.99 creates/s, 50.49 writes/s Buffer pool hit rate 1000 / 1000, young-making rate 0 / 1000 not 0 / 1000 Pages read ahead 0.00/s, evicted without access 0.00/s, Random read ahead 0.00/s LRU len: 1134, unzip_LRU len: 0 I/O sum[0]:cur[0], unzip sum[0]:cur[0]
The following table describes buffer pool metrics reported by the
InnoDB Standard Monitor.
Per second averages provided in InnoDB
Standard Monitor output are based on the elapsed time since
InnoDB Standard Monitor output was last
printed.
Table 14.2 InnoDB Buffer Pool Metrics
| Name | Description |
|---|---|
| Total memory allocated | The total memory allocated for the buffer pool in bytes. |
| additional pool allocated | The total memory allocated for the additional pool in bytes. |
| Dictionary memory allocated | The total memory allocated for the InnoDB data
dictionary in bytes. |
| Buffer pool size | The total size in pages allocated to the buffer pool. |
| Free buffers | The total size in pages of the buffer pool free list. |
| Database pages | The total size in pages of the buffer pool LRU list. |
| Old database pages | The total size in pages of the buffer pool old LRU sublist. |
| Modified db pages | The current number of pages modified in the buffer pool. |
| Pending reads | The number of buffer pool pages waiting to be read into the buffer pool. |
| Pending writes LRU | The number of old dirty pages within the buffer pool to be written from the bottom of the LRU list. |
| Pending writes flush list | The number of buffer pool pages to be flushed during checkpointing. |
| Pending writes single page | The number of pending independent page writes within the buffer pool. |
| Pages made young | The total number of pages made young in the buffer pool LRU list (moved to the head of sublist of “new” pages). |
| Pages made not young | The total number of pages not made young in the buffer pool LRU list (pages that have remained in the “old” sublist without being made young). |
| youngs/s | The per second average of accesses to old pages in the buffer pool LRU list that have resulted in making pages young. See the notes that follow this table for more information. |
| non-youngs/s | The per second average of accesses to old pages in the buffer pool LRU list that have resulted in not making pages young. See the notes that follow this table for more information. |
| Pages read | The total number of pages read from the buffer pool. |
| Pages created | The total number of pages created within the buffer pool. |
| Pages written | The total number of pages written from the buffer pool. |
| reads/s | The per second average number of buffer pool page reads per second. |
| creates/s | The per second average number of buffer pool pages created per second. |
| writes/s | The per second average number of buffer pool page writes per second. |
| Buffer pool hit rate | The buffer pool page hit rate for pages read from the buffer pool memory vs from disk storage. |
| young-making rate | The average hit rate at which page accesses have resulted in making pages young. See the notes that follow this table for more information. |
| not (young-making rate) | The average hit rate at which page accesses have not resulted in making pages young. See the notes that follow this table for more information. |
| Pages read ahead | The per second average of read ahead operations. |
| Pages evicted without access | The per second average of the pages evicted without being accessed from the buffer pool. |
| Random read ahead | The per second average of random read ahead operations. |
| LRU len | The total size in pages of the buffer pool LRU list. |
| unzip_LRU len | The total size in pages of the buffer pool unzip_LRU list. |
| I/O sum | The total number of buffer pool LRU list pages accessed, for the last 50 seconds. |
| I/O cur | The total number of buffer pool LRU list pages accessed. |
| I/O unzip sum | The total number of buffer pool unzip_LRU list pages accessed. |
| I/O unzip cur | The total number of buffer pool unzip_LRU list pages accessed. |
Notes:
The
youngs/smetric is applicable only to old pages. It is based on the number of accesses to pages and not the number of pages. There can be multiple accesses to a given page, all of which are counted. If you see very lowyoungs/svalues when there are no large scans occurring, you might need to reduce the delay time or increase the percentage of the buffer pool used for the old sublist. Increasing the percentage makes the old sublist larger, so pages in that sublist take longer to move to the tail, which increases the likelihood that those pages will be accessed again and made young.The
non-youngs/smetric is applicable only to old pages. It is based on the number of accesses to pages and not the number of pages. There can be multiple accesses to a given page, all of which are counted. If you do not see a highernon-youngs/svalue when performing large table scans (and a higheryoungs/svalue), increase the delay value.The
young-makingrate accounts for accesses to all buffer pool pages, not just accesses to pages in the old sublist. Theyoung-makingrate andnotrate do not normally add up to the overall buffer pool hit rate. Page hits in the old sublist cause pages to move to the new sublist, but page hits in the new sublist cause pages to move to the head of the list only if they are a certain distance from the head.not (young-making rate)is the average hit rate at which page accesses have not resulted in making pages young due to the delay defined byinnodb_old_blocks_timenot being met, or due to page hits in the new sublist that did not result in pages being moved to the head. This rate accounts for accesses to all buffer pool pages, not just accesses to pages in the old sublist.
Buffer pool server status
variables and the
INNODB_BUFFER_POOL_STATS table
provide many of the same buffer pool metrics found in
InnoDB Standard Monitor output. For more
information, see
Example 14.6, “Querying the INNODB_BUFFER_POOL_STATS Table”.
The change buffer is a special data structure that caches changes to
secondary index pages
when those pages are not in the
buffer pool. The buffered
changes, which may result from
INSERT,
UPDATE, or
DELETE operations (DML), are merged
later when the pages are loaded into the buffer pool by other read
operations.
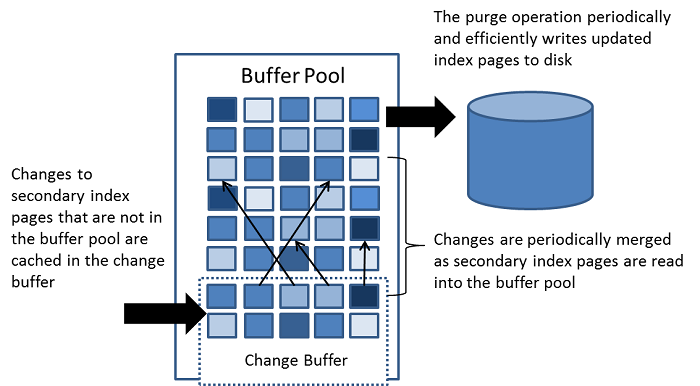
Unlike clustered indexes, secondary indexes are usually nonunique, and inserts into secondary indexes happen in a relatively random order. Similarly, deletes and updates may affect secondary index pages that are not adjacently located in an index tree. Merging cached changes at a later time, when affected pages are read into the buffer pool by other operations, avoids substantial random access I/O that would be required to read secondary index pages into the buffer pool from disk.
Periodically, the purge operation that runs when the system is mostly idle, or during a slow shutdown, writes the updated index pages to disk. The purge operation can write disk blocks for a series of index values more efficiently than if each value were written to disk immediately.
Change buffer merging may take several hours when there are many affected rows and numerous secondary indexes to update. During this time, disk I/O is increased, which can cause a significant slowdown for disk-bound queries. Change buffer merging may also continue to occur after a transaction is committed, and even after a server shutdown and restart (see Section 14.23.2, “Forcing InnoDB Recovery” for more information).
In memory, the change buffer occupies part of the buffer pool. On disk, the change buffer is part of the system tablespace, where index changes are buffered when the database server is shut down.
The type of data cached in the change buffer is governed by the
innodb_change_buffering variable.
For more information, see
Configuring Change Buffering.
For answers to frequently asked questions about the change buffer, see Section A.15, “MySQL 5.5 FAQ: InnoDB Change Buffer”.
When INSERT,
UPDATE, and
DELETE operations are performed on
a table, the values of indexed columns (particularly the values of
secondary keys) are often in an unsorted order, requiring
substantial I/O to bring secondary indexes up to date. The
change buffer caches
changes to secondary index entries when the relevant
page is not in the
buffer pool, thus avoiding
expensive I/O operations by not immediately reading in the page
from disk. The buffered changes are merged when the page is loaded
into the buffer pool, and the updated page is later flushed to
disk. The InnoDB main thread merges buffered
changes when the server is nearly idle, and during a
slow shutdown.
Because it can result in fewer disk reads and writes, the change buffer feature is most valuable for workloads that are I/O-bound, for example applications with a high volume of DML operations such as bulk inserts.
However, the change buffer occupies a part of the buffer pool, reducing the memory available to cache data pages. If the working set almost fits in the buffer pool, or if your tables have relatively few secondary indexes, it may be useful to disable change buffering. If the working data set fits entirely within the buffer pool, change buffering does not impose extra overhead, because it only applies to pages that are not in the buffer pool.
You can control the extent to which InnoDB
performs change buffering using the
innodb_change_buffering
configuration parameter. You can enable or disable buffering for
inserts, delete operations (when index records are initially
marked for deletion) and purge operations (when index records are
physically deleted). An update operation is a combination of an
insert and a delete. The default
innodb_change_buffering value is
all.
Permitted innodb_change_buffering
values include:
allThe default value: buffer inserts, delete-marking operations, and purges.
noneDo not buffer any operations.
insertsBuffer insert operations.
deletesBuffer delete-marking operations.
changesBuffer both inserts and delete-marking operations.
purgesBuffer physical deletion operations that happen in the background.
You can set the
innodb_change_buffering variable
in the MySQL option file (my.cnf or
my.ini) or change it dynamically with the
SET GLOBAL
statement, which requires privileges sufficient to set global
system variables. See
Section 5.1.8.1, “System Variable Privileges”. Changing the setting
affects the buffering of new operations; the merging of existing
buffered entries is not affected.
The following options are available for change buffer monitoring:
InnoDBStandard Monitor output includes status information for the change buffer. To view monitor data, issue theSHOW ENGINE INNODB STATUScommand.mysql>
SHOW ENGINE INNODB STATUS\GChange buffer status information is located under the
INSERT BUFFER AND ADAPTIVE HASH INDEXheading and appears similar to the following:------------------------------------- INSERT BUFFER AND ADAPTIVE HASH INDEX ------------------------------------- Ibuf: size 1, free list len 0, seg size 2, 0 merges merged operations: insert 0, delete mark 0, delete 0 discarded operations: insert 0, delete mark 0, delete 0 Hash table size 276707, node heap has 1 buffer(s) 15.81 hash searches/s, 46.33 non-hash searches/s
For more information, see Section 14.20.3, “InnoDB Standard Monitor and Lock Monitor Output”.
The
INFORMATION_SCHEMA.INNODB_BUFFER_PAGEtable provides metadata about each page in the buffer pool, including change buffer index and change buffer bitmap pages. Change buffer pages are identified byPAGE_TYPE.IBUF_INDEXis the page type for change buffer index pages, andIBUF_BITMAPis the page type for change buffer bitmap pages.WarningQuerying the
INNODB_BUFFER_PAGEtable can introduce significant performance overhead. To avoid impacting performance, reproduce the issue you want to investigate on a test instance and run your queries on the test instance.For example, you can query the
INNODB_BUFFER_PAGEtable to determine the approximate number ofIBUF_INDEXandIBUF_BITMAPpages as a percentage of total buffer pool pages.mysql>
SELECT (SELECT COUNT(*) FROM INFORMATION_SCHEMA.INNODB_BUFFER_PAGEWHERE PAGE_TYPE LIKE 'IBUF%') AS change_buffer_pages,(SELECT COUNT(*) FROM INFORMATION_SCHEMA.INNODB_BUFFER_PAGE) AS total_pages,(SELECT ((change_buffer_pages/total_pages)*100))AS change_buffer_page_percentage;+---------------------+-------------+-------------------------------+ | change_buffer_pages | total_pages | change_buffer_page_percentage | +---------------------+-------------+-------------------------------+ | 25 | 8192 | 0.3052 | +---------------------+-------------+-------------------------------+For information about other data provided by the
INNODB_BUFFER_PAGEtable, see Section 21.29.1, “The INFORMATION_SCHEMA INNODB_BUFFER_PAGE Table”. For related usage information, see Section 14.18.3, “InnoDB INFORMATION_SCHEMA Buffer Pool Tables”.Performance Schema provides change buffer mutex wait instrumentation for advanced performance monitoring. To view change buffer instrumentation, issue the following query (Performance Schema must be enabled):
mysql>
SELECT * FROM performance_schema.setup_instrumentsWHERE NAME LIKE '%wait/synch/mutex/innodb/ibuf%';+-------------------------------------------------------+---------+-------+ | NAME | ENABLED | TIMED | +-------------------------------------------------------+---------+-------+ | wait/synch/mutex/innodb/ibuf_bitmap_mutex | YES | YES | | wait/synch/mutex/innodb/ibuf_mutex | YES | YES | | wait/synch/mutex/innodb/ibuf_pessimistic_insert_mutex | YES | YES | +-------------------------------------------------------+---------+-------+For information about monitoring
InnoDBmutex waits, see Section 14.19.1, “Monitoring InnoDB Mutex Waits Using Performance Schema”.
The adaptive hash index feature enables InnoDB
to perform more like an in-memory database on systems with
appropriate combinations of workload and sufficient memory for the
buffer pool without sacrificing transactional features or
reliability. The adaptive hash index feature is enabled by the
innodb_adaptive_hash_index
variable, or turned off at server startup by
--skip-innodb-adaptive-hash-index.
Based on the observed pattern of searches, a hash index is built using a prefix of the index key. The prefix can be any length, and it may be that only some values in the B-tree appear in the hash index. Hash indexes are built on demand for the pages of the index that are accessed often.
If a table fits almost entirely in main memory, a hash index can
speed up queries by enabling direct lookup of any element, turning
the index value into a sort of pointer. InnoDB
has a mechanism that monitors index searches. If
InnoDB notices that queries could benefit from
building a hash index, it does so automatically.
With some workloads, the speedup from hash index lookups greatly
outweighs the extra work to monitor index lookups and maintain the
hash index structure. Access to the adaptive hash index can
sometimes become a source of contention under heavy workloads,
such as multiple concurrent joins. Queries with
LIKE operators and %
wildcards also tend not to benefit. For workloads that do not
benefit from the adaptive hash index feature, turning it off
reduces unnecessary performance overhead. Because it is difficult
to predict in advance whether the adaptive hash index feature is
appropriate for a particular system and workload, consider running
benchmarks with it enabled and disabled.
You can monitor adaptive hash index use and contention in the
SEMAPHORES section of
SHOW ENGINE INNODB
STATUS output. If there are numerous threads waiting on
an RW-latch created in btr0sea.c, it might be
useful to disable the adaptive hash index feature.
For information about the performance characteristics of hash indexes, see Section 8.3.8, “Comparison of B-Tree and Hash Indexes”.
The log buffer is the memory area that holds data to be written to
the log files on disk. Log buffer size is defined by the
innodb_log_buffer_size variable.
The default size is 16MB. The contents of the log buffer are
periodically flushed to disk. A large log buffer enables large
transactions to run without the need to write redo log data to
disk before the transactions commit. Thus, if you have
transactions that update, insert, or delete many rows, increasing
the size of the log buffer saves disk I/O.
The
innodb_flush_log_at_trx_commit
variable controls how the contents of the log buffer are written
and flushed to disk. The
innodb_flush_log_at_timeout
variable controls log flushing frequency.
For related information, see Memory Configuration, and Section 8.5.3, “Optimizing InnoDB Redo Logging”.
This section describes InnoDB on-disk structures
and related topics.
This section covers topics related to InnoDB
tables.
To create an InnoDB table, use the
CREATE TABLE statement.
CREATE TABLE t1 (a INT, b CHAR (20), PRIMARY KEY (a)) ENGINE=InnoDB;
You do not need to specify the ENGINE=InnoDB
clause if InnoDB is defined as the default
storage engine, which it is by default. To check the default
storage engine, issue the following statement:
mysql> SELECT @@default_storage_engine;
+--------------------------+
| @@default_storage_engine |
+--------------------------+
| InnoDB |
+--------------------------+
You might still use ENGINE=InnoDB clause if you
plan to use mysqldump or replication to replay
the CREATE TABLE statement on a
server where the default storage engine is not
InnoDB.
An InnoDB table and its indexes can be created
in the system
tablespace or in a
file-per-table
tablespace. When
innodb_file_per_table is enabled,
an InnoDB table is implicitly created in an
individual file-per-table tablespace. Conversely, when
innodb_file_per_table is
disabled, an InnoDB table is implicitly created
in the InnoDB system tablespace.
When you create an InnoDB table, MySQL creates
a .frm file in the database
directory under the MySQL data directory. For more information
about .frm files, see
InnoDB Tables and .frm Files. For a table created in a
file-per-table tablespace, MySQL also creates an
.ibd tablespace file in the
database directory. A table created in the
InnoDBsystem tablespace is created in an
existing ibdata file, which
resides in the MySQL data directory.
Internally, InnoDB adds an entry for each table
to the InnoDB data dictionary. The entry
includes the database name. For example, if table
t1 is created in the test
database, the data dictionary entry for the database name is
'test/t1'. This means you can create a table of
the same name (t1) in a different database, and
the table names do not collide inside InnoDB.
MySQL stores data dictionary information for tables in
.frm files in database
directories. Unlike other MySQL storage engines,
InnoDB also encodes information about the
table in its own internal data dictionary inside the system
tablespace. When MySQL drops a table or a database, it deletes
one or more .frm files as well as the
corresponding entries inside the InnoDB data
dictionary. You cannot move InnoDB tables
between databases simply by moving the .frm
files. For information about moving InnoDB
tables, see Section 14.9.1.2, “Moving or Copying InnoDB Tables”.
The default row format of
an InnoDB table is
Compact. Although this row format is fine for
basic experimentation, consider using the
Dynamic
or
Compressed
row format to take advantage of InnoDB
features such as table compression and efficient off-page
storage of long column values. Using these row formats requires
that innodb_file_per_table is
enabled and that
innodb_file_format is set to
Barracuda:
SET GLOBAL innodb_file_per_table=1; SET GLOBAL innodb_file_format=barracuda; CREATE TABLE t3 (a INT, b CHAR (20), PRIMARY KEY (a)) ROW_FORMAT=DYNAMIC; CREATE TABLE t4 (a INT, b CHAR (20), PRIMARY KEY (a)) ROW_FORMAT=COMPRESSED;
For more information about InnoDB row
formats, see Section 14.14, “InnoDB Row Formats”. For how to
determine the row format of an InnoDB table
and the physical characteristics of InnoDB
row formats, see Section 14.14, “InnoDB Row Formats”.
Always define a primary
key for an InnoDB table, specifying
the column or columns that:
Are referenced by the most important queries.
Are never left blank.
Never have duplicate values.
Rarely if ever change value once inserted.
For example, in a table containing information about people, you
would not create a primary key on (firstname,
lastname) because more than one person can have the
same name, some people have blank last names, and sometimes
people change their names. With so many constraints, often there
is not an obvious set of columns to use as a primary key, so you
create a new column with a numeric ID to serve as all or part of
the primary key. You can declare an
auto-increment column
so that ascending values are filled in automatically as rows are
inserted:
# The value of ID can act like a pointer between related items in different tables. CREATE TABLE t5 (id INT AUTO_INCREMENT, b CHAR (20), PRIMARY KEY (id)); # The primary key can consist of more than one column. Any autoinc column must come first. CREATE TABLE t6 (id INT AUTO_INCREMENT, a INT, b CHAR (20), PRIMARY KEY (id,a));
Although the table works correctly without defining a primary
key, the primary key is involved with many aspects of
performance and is a crucial design aspect for any large or
frequently used table. It is recommended that you always specify
a primary key in the CREATE TABLE
statement. If you create the table, load data, and then run
ALTER TABLE to add a primary key
later, that operation is much slower than defining the primary
key when creating the table.
To view the properties of an InnoDB table,
issue a SHOW TABLE STATUS
statement:
mysql> SHOW TABLE STATUS FROM test LIKE 't%' \G;
*************************** 1. row ***************************
Name: t1
Engine: InnoDB
Version: 10
Row_format: Compact
Rows: 0
Avg_row_length: 0
Data_length: 16384
Max_data_length: 0
Index_length: 0
Data_free: 41943040
Auto_increment: NULL
Create_time: 2015-03-16 16:42:17
Update_time: NULL
Check_time: NULL
Collation: latin1_swedish_ci
Checksum: NULL
Create_options:
Comment:
1 row in set (0.00 sec)
For information about SHOW TABLE
STATUS output, see
Section 13.7.5.37, “SHOW TABLE STATUS Syntax”.
This section describes techniques for moving or copying some or all
InnoDB tables to a different server or instance.
For example, you might move an entire MySQL instance to a larger,
faster server; you might clone an entire MySQL instance to a new
replication slave server; you might copy individual tables to
another instance to develop and test an application, or to a data
warehouse server to produce reports.
On Windows, InnoDB always stores database and
table names internally in lowercase. To move databases in a binary
format from Unix to Windows or from Windows to Unix, create all
databases and tables using lowercase names. A convenient way to
accomplish this is to add the following line to the
[mysqld] section of your
my.cnf or my.ini file
before creating any databases or tables:
[mysqld] lower_case_table_names=1
Techniques for moving or copying InnoDB tables
include:
Copying Data Files (Cold Backup Method)
You can move an InnoDB database simply by copying
all the relevant files listed under "Cold Backups" in
Section 14.21.1, “InnoDB Backup”.
InnoDB data and log files are binary-compatible
on all platforms having the same floating-point number format. If
the floating-point formats differ but you have not used
FLOAT or
DOUBLE data types in your tables,
then the procedure is the same: simply copy the relevant files.
Export and Import (mysqldump)
You can use mysqldump to dump your tables on one machine and then import the dump files on the other machine. Using this method, it does not matter whether the formats differ or if your tables contain floating-point data.
One way to increase the performance of this method is to switch off autocommit mode when importing data, assuming that the tablespace has enough space for the big rollback segment that the import transactions generate. Do the commit only after importing a whole table or a segment of a table.
If you have MyISAM tables that you want
to convert to InnoDB for better
reliability and scalability, review the following guidelines and
tips before converting.
As you transition away from MyISAM tables,
lower the value of the
key_buffer_size configuration
option to free memory no longer needed for caching results.
Increase the value of the
innodb_buffer_pool_size
configuration option, which performs a similar role of allocating
cache memory for InnoDB tables. The
InnoDB buffer
pool caches both table data and index data, speeding up
lookups for queries and keeping query results in memory for reuse.
For guidance regarding buffer pool size configuration, see
Section 8.12.4.1, “How MySQL Uses Memory”.
On a busy server, run benchmarks with the query cache turned off.
The InnoDB buffer pool provides similar
benefits, so the query cache might be tying up memory
unnecessarily. For information about the query cache, see
Section 8.10.3, “The MySQL Query Cache”.
Because MyISAM tables do not support
transactions, you might
not have paid much attention to the
autocommit configuration option
and the COMMIT and
ROLLBACK
statements. These keywords are important to allow multiple
sessions to read and write InnoDB tables
concurrently, providing substantial scalability benefits in
write-heavy workloads.
While a transaction is open, the system keeps a snapshot of the data as seen at the beginning of the transaction, which can cause substantial overhead if the system inserts, updates, and deletes millions of rows while a stray transaction keeps running. Thus, take care to avoid transactions that run for too long:
If you are using a mysql session for interactive experiments, always
COMMIT(to finalize the changes) orROLLBACK(to undo the changes) when finished. Close down interactive sessions rather than leave them open for long periods, to avoid keeping transactions open for long periods by accident.Make sure that any error handlers in your application also
ROLLBACKincomplete changes orCOMMITcompleted changes.ROLLBACKis a relatively expensive operation, becauseINSERT,UPDATE, andDELETEoperations are written toInnoDBtables prior to theCOMMIT, with the expectation that most changes are committed successfully and rollbacks are rare. When experimenting with large volumes of data, avoid making changes to large numbers of rows and then rolling back those changes.When loading large volumes of data with a sequence of
INSERTstatements, periodicallyCOMMITthe results to avoid having transactions that last for hours. In typical load operations for data warehousing, if something goes wrong, you truncate the table (usingTRUNCATE TABLE) and start over from the beginning rather than doing aROLLBACK.
The preceding tips save memory and disk space that can be wasted
during too-long transactions. When transactions are shorter than
they should be, the problem is excessive I/O. With each
COMMIT, MySQL makes sure each
change is safely recorded to disk, which involves some I/O.
For most operations on
InnoDBtables, you should use the settingautocommit=0. From an efficiency perspective, this avoids unnecessary I/O when you issue large numbers of consecutiveINSERT,UPDATE, orDELETEstatements. From a safety perspective, this allows you to issue aROLLBACKstatement to recover lost or garbled data if you make a mistake on the mysql command line, or in an exception handler in your application.The time when
autocommit=1is suitable forInnoDBtables is when running a sequence of queries for generating reports or analyzing statistics. In this situation, there is no I/O penalty related toCOMMITorROLLBACK, andInnoDBcan automatically optimize the read-only workload.If you make a series of related changes, finalize all the changes at once with a single
COMMITat the end. For example, if you insert related pieces of information into several tables, do a singleCOMMITafter making all the changes. Or if you run many consecutiveINSERTstatements, do a singleCOMMITafter all the data is loaded; if you are doing millions ofINSERTstatements, perhaps split up the huge transaction by issuing aCOMMITevery ten thousand or hundred thousand records, so the transaction does not grow too large.Remember that even a
SELECTstatement opens a transaction, so after running some report or debugging queries in an interactive mysql session, either issue aCOMMITor close the mysql session.
You might see warning messages referring to
“deadlocks” in the MySQL error log, or the output of
SHOW ENGINE INNODB
STATUS. Despite the scary-sounding name, a
deadlock is not a serious
issue for InnoDB tables, and often does not
require any corrective action. When two transactions start
modifying multiple tables, accessing the tables in a different
order, they can reach a state where each transaction is waiting
for the other and neither can proceed. MySQL immediately detects
this condition and cancels (rolls
back) the “smaller” transaction, allowing the
other to proceed.
Your applications do need error-handling logic to restart a transaction that is forcibly cancelled like this. When you re-issue the same SQL statements as before, the original timing issue no longer applies. Either the other transaction has already finished and yours can proceed, or the other transaction is still in progress and your transaction waits until it finishes.
If deadlock warnings occur constantly, you might review the application code to reorder the SQL operations in a consistent way, or to shorten the transactions.
For more information, see Section 14.10.5, “Deadlocks in InnoDB”.
To get the best performance from InnoDB tables,
you can adjust a number of parameters related to storage layout.
When you convert MyISAM tables that are large,
frequently accessed, and hold vital data, investigate and consider
the innodb_file_per_table and
innodb_file_format configuration
options, and the
ROW_FORMAT
and KEY_BLOCK_SIZE clauses of the
CREATE TABLE statement.
During your initial experiments, the most important setting is
innodb_file_per_table. When this
setting is enabled, new InnoDB tables are
implicitly created in
file-per-table
tablespaces. In contrast with the InnoDB system
tablespace, file-per-table tablespaces allow disk space to be
reclaimed by the operating system when a table is truncated or
dropped. File-per-table tablespaces also support the
Barracuda file format and
associated features such as table compression and efficient
off-page storage for long variable-length columns. For more
information, see Section 14.9.3.2, “File-Per-Table Tablespaces”.
To convert a non-InnoDB table to use
InnoDB use ALTER
TABLE:
ALTER TABLE table_name ENGINE=InnoDB;
Do not convert MySQL system tables in the
mysql database (such as
user or host) to the
InnoDB type. This is an unsupported
operation. The system tables must always be of the
MyISAM type.
You might make an InnoDB table that is a clone
of a MyISAM table, rather than using ALTER
TABLE to perform conversion, to test the old and new
table side-by-side before switching.
Create an empty InnoDB table with identical
column and index definitions. Use SHOW CREATE TABLE
to see the full
table_name\GCREATE TABLE statement to use.
Change the ENGINE clause to
ENGINE=INNODB.
To transfer a large volume of data into an empty
InnoDB table created as shown in the previous
section, insert the rows with INSERT INTO
.
innodb_table SELECT * FROM
myisam_table ORDER BY
primary_key_columns
You can also create the indexes for the InnoDB
table after inserting the data. Historically, creating new
secondary indexes was a slow operation for InnoDB, but now you can
create the indexes after the data is loaded with relatively little
overhead from the index creation step.
If you have UNIQUE constraints on secondary
keys, you can speed up a table import by turning off the
uniqueness checks temporarily during the import operation:
SET unique_checks=0;
... import operation ...
SET unique_checks=1;
For big tables, this saves disk I/O because
InnoDB can use its
change buffer to write
secondary index records as a batch. Be certain that the data
contains no duplicate keys.
unique_checks permits but does
not require storage engines to ignore duplicate keys.
For better control over the insertion process, you can insert big tables in pieces:
INSERT INTO newtable SELECT * FROM oldtable WHERE yourkey >somethingAND yourkey <=somethingelse;
After all records are inserted, you can rename the tables.
During the conversion of big tables, increase the size of the
InnoDB buffer pool to reduce disk I/O, to a
maximum of 80% of physical memory. You can also increase the size
of InnoDB log files.
If you intend to make several temporary copies of your data in
InnoDB tables during the conversion process, it
is recommended that you create the tables in file-per-table
tablespaces so that you can reclaim the disk space when you drop
the tables. When the
innodb_file_per_table
configuration option is enabled (the default), newly created
InnoDB tables are implicitly created in
file-per-table tablespaces.
Whether you convert the MyISAM table directly
or create a cloned InnoDB table, make sure that
you have sufficient disk space to hold both the old and new tables
during the process.
InnoDB tables require
more disk space than MyISAM tables.
If an ALTER TABLE operation runs
out of space, it starts a rollback, and that can take hours if it
is disk-bound. For inserts, InnoDB uses the
insert buffer to merge secondary index records to indexes in
batches. That saves a lot of disk I/O. For rollback, no such
mechanism is used, and the rollback can take 30 times longer than
the insertion.
In the case of a runaway rollback, if you do not have valuable data in your database, it may be advisable to kill the database process rather than wait for millions of disk I/O operations to complete. For the complete procedure, see Section 14.23.2, “Forcing InnoDB Recovery”.
The PRIMARY KEY clause is a critical factor
affecting the performance of MySQL queries and the space usage for
tables and indexes. The primary key uniquely identifies a row in a
table. Every row in the table must have a primary key value, and
no two rows can have the same primary key value.
These are guidelines for the primary key, followed by more detailed explanations.
Declare a
PRIMARY KEYfor each table. Typically, it is the most important column that you refer to inWHEREclauses when looking up a single row.Declare the
PRIMARY KEYclause in the originalCREATE TABLEstatement, rather than adding it later through anALTER TABLEstatement.Choose the column and its data type carefully. Prefer numeric columns over character or string ones.
Consider using an auto-increment column if there is not another stable, unique, non-null, numeric column to use.
An auto-increment column is also a good choice if there is any doubt whether the value of the primary key column could ever change. Changing the value of a primary key column is an expensive operation, possibly involving rearranging data within the table and within each secondary index.
Consider adding a primary key to any table that does not already have one. Use the smallest practical numeric type based on the maximum projected size of the table. This can make each row slightly more compact, which can yield substantial space savings for large tables. The space savings are multiplied if the table has any secondary indexes, because the primary key value is repeated in each secondary index entry. In addition to reducing data size on disk, a small primary key also lets more data fit into the buffer pool, speeding up all kinds of operations and improving concurrency.
If the table already has a primary key on some longer column, such
as a VARCHAR, consider adding a new unsigned
AUTO_INCREMENT column and switching the primary
key to that, even if that column is not referenced in queries.
This design change can produce substantial space savings in the
secondary indexes. You can designate the former primary key
columns as UNIQUE NOT NULL to enforce the same
constraints as the PRIMARY KEY clause, that is,
to prevent duplicate or null values across all those columns.
If you spread related information across multiple tables, typically each table uses the same column for its primary key. For example, a personnel database might have several tables, each with a primary key of employee number. A sales database might have some tables with a primary key of customer number, and other tables with a primary key of order number. Because lookups using the primary key are very fast, you can construct efficient join queries for such tables.
If you leave the PRIMARY KEY clause out
entirely, MySQL creates an invisible one for you. It is a 6-byte
value that might be longer than you need, thus wasting space.
Because it is hidden, you cannot refer to it in queries.
The reliability and scalability features of
InnoDB require more disk storage than
equivalent MyISAM tables. You might change the
column and index definitions slightly, for better space
utilization, reduced I/O and memory consumption when processing
result sets, and better query optimization plans making efficient
use of index lookups.
If you do set up a numeric ID column for the primary key, use that
value to cross-reference with related values in any other tables,
particularly for join queries.
For example, rather than accepting a country name as input and
doing queries searching for the same name, do one lookup to
determine the country ID, then do other queries (or a single join
query) to look up relevant information across several tables.
Rather than storing a customer or catalog item number as a string
of digits, potentially using up several bytes, convert it to a
numeric ID for storing and querying. A 4-byte unsigned
INT column can index over 4 billion
items (with the US meaning of billion: 1000 million). For the
ranges of the different integer types, see
Section 11.2.1, “Integer Types (Exact Value) - INTEGER, INT, SMALLINT, TINYINT,
MEDIUMINT, BIGINT”.
InnoDB files require more care and planning
than MyISAM files do.
You must not delete the ibdata files that represent the
InnoDBsystem tablespace.Methods of moving or copying
InnoDBtables to a different server are described in Section 14.9.1.2, “Moving or Copying InnoDB Tables”.
InnoDB provides a configurable locking
mechanism that can significantly improve scalability and
performance of SQL statements that add rows to tables with
AUTO_INCREMENT columns. To use the
AUTO_INCREMENT mechanism with an
InnoDB table, an
AUTO_INCREMENT column must be defined as part
of an index such that it is possible to perform the equivalent of
an indexed SELECT
MAX( lookup on the
table to obtain the maximum column value. Typically, this is
achieved by making the column the first column of some table
index.
ai_col)
This section describes the behavior of
AUTO_INCREMENT lock modes, usage implications
for different AUTO_INCREMENT lock mode
settings, and how InnoDB initializes the
AUTO_INCREMENT counter.
This section describes the behavior of
AUTO_INCREMENT lock modes used to generate
auto-increment values, and how each lock mode affects
replication. Auto-increment lock modes are configured at startup
using the
innodb_autoinc_lock_mode
configuration parameter.
The following terms are used in describing
innodb_autoinc_lock_mode
settings:
“
INSERT-like” statementsAll statements that generate new rows in a table, including
INSERT,INSERT ... SELECT,REPLACE,REPLACE ... SELECT, andLOAD DATA. Includes “simple-inserts”, “bulk-inserts”, and “mixed-mode” inserts.“Simple inserts”
Statements for which the number of rows to be inserted can be determined in advance (when the statement is initially processed). This includes single-row and multiple-row
INSERTandREPLACEstatements that do not have a nested subquery, but notINSERT ... ON DUPLICATE KEY UPDATE.“Bulk inserts”
Statements for which the number of rows to be inserted (and the number of required auto-increment values) is not known in advance. This includes
INSERT ... SELECT,REPLACE ... SELECT, andLOAD DATAstatements, but not plainINSERT.InnoDBassigns new values for theAUTO_INCREMENTcolumn one at a time as each row is processed.“Mixed-mode inserts”
These are “simple insert” statements that specify the auto-increment value for some (but not all) of the new rows. An example follows, where
c1is anAUTO_INCREMENTcolumn of tablet1:INSERT INTO t1 (c1,c2) VALUES (1,'a'), (NULL,'b'), (5,'c'), (NULL,'d');
Another type of “mixed-mode insert” is
INSERT ... ON DUPLICATE KEY UPDATE, which in the worst case is in effect anINSERTfollowed by aUPDATE, where the allocated value for theAUTO_INCREMENTcolumn may or may not be used during the update phase.
There are three possible settings for the
innodb_autoinc_lock_mode
configuration parameter. The settings are 0, 1, or 2, for
“traditional”, “consecutive”, or
“interleaved” lock mode, respectively.
innodb_autoinc_lock_mode = 0(“traditional” lock mode)The traditional lock mode provides the same behavior that existed before the
innodb_autoinc_lock_modeconfiguration parameter was introduced in MySQL 5.1. The traditional lock mode option is provided for backward compatibility, performance testing, and working around issues with “mixed-mode inserts”, due to possible differences in semantics.In this lock mode, all “INSERT-like” statements obtain a special table-level
AUTO-INClock for inserts into tables withAUTO_INCREMENTcolumns. This lock is normally held to the end of the statement (not to the end of the transaction) to ensure that auto-increment values are assigned in a predictable and repeatable order for a given sequence ofINSERTstatements, and to ensure that auto-increment values assigned by any given statement are consecutive.In the case of statement-based replication, this means that when an SQL statement is replicated on a slave server, the same values are used for the auto-increment column as on the master server. The result of execution of multiple
INSERTstatements is deterministic, and the slave reproduces the same data as on the master. If auto-increment values generated by multipleINSERTstatements were interleaved, the result of two concurrentINSERTstatements would be nondeterministic, and could not reliably be propagated to a slave server using statement-based replication.To make this clear, consider an example that uses this table:
CREATE TABLE t1 ( c1 INT(11) NOT NULL AUTO_INCREMENT, c2 VARCHAR(10) DEFAULT NULL, PRIMARY KEY (c1) ) ENGINE=InnoDB;
Suppose that there are two transactions running, each inserting rows into a table with an
AUTO_INCREMENTcolumn. One transaction is using anINSERT ... SELECTstatement that inserts 1000 rows, and another is using a simpleINSERTstatement that inserts one row:Tx1: INSERT INTO t1 (c2) SELECT 1000 rows from another table ... Tx2: INSERT INTO t1 (c2) VALUES ('xxx');InnoDBcannot tell in advance how many rows are retrieved from theSELECTin theINSERTstatement in Tx1, and it assigns the auto-increment values one at a time as the statement proceeds. With a table-level lock, held to the end of the statement, only oneINSERTstatement referring to tablet1can execute at a time, and the generation of auto-increment numbers by different statements is not interleaved. The auto-increment value generated by the Tx1INSERT ... SELECTstatement is consecutive, and the (single) auto-increment value used by theINSERTstatement in Tx2 is either be smaller or larger than all those used for Tx1, depending on which statement executes first.As long as the SQL statements execute in the same order when replayed from the binary log (when using statement-based replication, or in recovery scenarios), the results are the same as they were when Tx1 and Tx2 first ran. Thus, table-level locks held until the end of a statement make
INSERTstatements using auto-increment safe for use with statement-based replication. However, those table-level locks limit concurrency and scalability when multiple transactions are executing insert statements at the same time.In the preceding example, if there were no table-level lock, the value of the auto-increment column used for the
INSERTin Tx2 depends on precisely when the statement executes. If theINSERTof Tx2 executes while theINSERTof Tx1 is running (rather than before it starts or after it completes), the specific auto-increment values assigned by the twoINSERTstatements are nondeterministic, and may vary from run to run.Under the consecutive lock mode,
InnoDBcan avoid using table-levelAUTO-INClocks for “simple insert” statements where the number of rows is known in advance, and still preserve deterministic execution and safety for statement-based replication.If you are not using the binary log to replay SQL statements as part of recovery or replication, the interleaved lock mode can be used to eliminate all use of table-level
AUTO-INClocks for even greater concurrency and performance, at the cost of permitting gaps in auto-increment numbers assigned by a statement and potentially having the numbers assigned by concurrently executing statements interleaved.innodb_autoinc_lock_mode = 1(“consecutive” lock mode)This is the default lock mode. In this mode, “bulk inserts” use the special
AUTO-INCtable-level lock and hold it until the end of the statement. This applies to allINSERT ... SELECT,REPLACE ... SELECT, andLOAD DATAstatements. Only one statement holding theAUTO-INClock can execute at a time. If the source table of the bulk insert operation is different from the target table, theAUTO-INClock on the target table is taken after a shared lock is taken on the first row selected from the source table. If the source and target of the bulk insert operation are the same table, theAUTO-INClock is taken after shared locks are taken on all selected rows.“Simple inserts” (for which the number of rows to be inserted is known in advance) avoid table-level
AUTO-INClocks by obtaining the required number of auto-increment values under the control of a mutex (a light-weight lock) that is only held for the duration of the allocation process, not until the statement completes. No table-levelAUTO-INClock is used unless anAUTO-INClock is held by another transaction. If another transaction holds anAUTO-INClock, a “simple insert” waits for theAUTO-INClock, as if it were a “bulk insert”.This lock mode ensures that, in the presence of
INSERTstatements where the number of rows is not known in advance (and where auto-increment numbers are assigned as the statement progresses), all auto-increment values assigned by any “INSERT-like” statement are consecutive, and operations are safe for statement-based replication.Simply put, this lock mode significantly improves scalability while being safe for use with statement-based replication. Further, as with “traditional” lock mode, auto-increment numbers assigned by any given statement are consecutive. There is no change in semantics compared to “traditional” mode for any statement that uses auto-increment, with one important exception.
The exception is for “mixed-mode inserts”, where the user provides explicit values for an
AUTO_INCREMENTcolumn for some, but not all, rows in a multiple-row “simple insert”. For such inserts,InnoDBallocates more auto-increment values than the number of rows to be inserted. However, all values automatically assigned are consecutively generated (and thus higher than) the auto-increment value generated by the most recently executed previous statement. “Excess” numbers are lost.innodb_autoinc_lock_mode = 2(“interleaved” lock mode)In this lock mode, no “
INSERT-like” statements use the table-levelAUTO-INClock, and multiple statements can execute at the same time. This is the fastest and most scalable lock mode, but it is not safe when using statement-based replication or recovery scenarios when SQL statements are replayed from the binary log.In this lock mode, auto-increment values are guaranteed to be unique and monotonically increasing across all concurrently executing “
INSERT-like” statements. However, because multiple statements can be generating numbers at the same time (that is, allocation of numbers is interleaved across statements), the values generated for the rows inserted by any given statement may not be consecutive.If the only statements executing are “simple inserts” where the number of rows to be inserted is known ahead of time, there are no gaps in the numbers generated for a single statement, except for “mixed-mode inserts”. However, when “bulk inserts” are executed, there may be gaps in the auto-increment values assigned by any given statement.
Using auto-increment with replication
If you are using statement-based replication, set
innodb_autoinc_lock_modeto 0 or 1 and use the same value on the master and its slaves. Auto-increment values are not ensured to be the same on the slaves as on the master if you useinnodb_autoinc_lock_mode= 2 (“interleaved”) or configurations where the master and slaves do not use the same lock mode.If you are using row-based or mixed-format replication, all of the auto-increment lock modes are safe, since row-based replication is not sensitive to the order of execution of the SQL statements (and the mixed format uses row-based replication for any statements that are unsafe for statement-based replication).
“Lost” auto-increment values and sequence gaps
In all lock modes (0, 1, and 2), if a transaction that generated auto-increment values rolls back, those auto-increment values are “lost”. Once a value is generated for an auto-increment column, it cannot be rolled back, whether or not the “
INSERT-like” statement is completed, and whether or not the containing transaction is rolled back. Such lost values are not reused. Thus, there may be gaps in the values stored in anAUTO_INCREMENTcolumn of a table.Specifying NULL or 0 for the
AUTO_INCREMENTcolumnIn all lock modes (0, 1, and 2), if a user specifies NULL or 0 for the
AUTO_INCREMENTcolumn in anINSERT,InnoDBtreats the row as if the value was not specified and generates a new value for it.Assigning a negative value to the
AUTO_INCREMENTcolumnIn all lock modes (0, 1, and 2), the behavior of the auto-increment mechanism is not defined if you assign a negative value to the
AUTO_INCREMENTcolumn.If the
AUTO_INCREMENTvalue becomes larger than the maximum integer for the specified integer typeIn all lock modes (0, 1, and 2), the behavior of the auto-increment mechanism is not defined if the value becomes larger than the maximum integer that can be stored in the specified integer type.
Gaps in auto-increment values for “bulk inserts”
With
innodb_autoinc_lock_modeset to 0 (“traditional”) or 1 (“consecutive”), the auto-increment values generated by any given statement are consecutive, without gaps, because the table-levelAUTO-INClock is held until the end of the statement, and only one such statement can execute at a time.With
innodb_autoinc_lock_modeset to 2 (“interleaved”), there may be gaps in the auto-increment values generated by “bulk inserts,” but only if there are concurrently executing “INSERT-like” statements.For lock modes 1 or 2, gaps may occur between successive statements because for bulk inserts the exact number of auto-increment values required by each statement may not be known and overestimation is possible.
Auto-increment values assigned by “mixed-mode inserts”
Consider a “mixed-mode insert,” where a “simple insert” specifies the auto-increment value for some (but not all) resulting rows. Such a statement behaves differently in lock modes 0, 1, and 2. For example, assume
c1is anAUTO_INCREMENTcolumn of tablet1, and that the most recent automatically generated sequence number is 100.mysql>
CREATE TABLE t1 (->c1 INT UNSIGNED NOT NULL AUTO_INCREMENT PRIMARY KEY,->c2 CHAR(1)->) ENGINE = INNODB;Now, consider the following “mixed-mode insert” statement:
mysql>
INSERT INTO t1 (c1,c2) VALUES (1,'a'), (NULL,'b'), (5,'c'), (NULL,'d');With
innodb_autoinc_lock_modeset to 0 (“traditional”), the four new rows are:mysql>
SELECT c1, c2 FROM t1 ORDER BY c2;+-----+------+ | c1 | c2 | +-----+------+ | 1 | a | | 101 | b | | 5 | c | | 102 | d | +-----+------+The next available auto-increment value is 103 because the auto-increment values are allocated one at a time, not all at once at the beginning of statement execution. This result is true whether or not there are concurrently executing “
INSERT-like” statements (of any type).With
innodb_autoinc_lock_modeset to 1 (“consecutive”), the four new rows are also:mysql>
SELECT c1, c2 FROM t1 ORDER BY c2;+-----+------+ | c1 | c2 | +-----+------+ | 1 | a | | 101 | b | | 5 | c | | 102 | d | +-----+------+However, in this case, the next available auto-increment value is 105, not 103 because four auto-increment values are allocated at the time the statement is processed, but only two are used. This result is true whether or not there are concurrently executing “
INSERT-like” statements (of any type).With
innodb_autoinc_lock_modeset to mode 2 (“interleaved”), the four new rows are:mysql>
SELECT c1, c2 FROM t1 ORDER BY c2;+-----+------+ | c1 | c2 | +-----+------+ | 1 | a | |x| b | | 5 | c | |y| d | +-----+------+The values of
xandyare unique and larger than any previously generated rows. However, the specific values ofxandydepend on the number of auto-increment values generated by concurrently executing statements.Finally, consider the following statement, issued when the most-recently generated sequence number is 100:
mysql>
INSERT INTO t1 (c1,c2) VALUES (1,'a'), (NULL,'b'), (101,'c'), (NULL,'d');With any
innodb_autoinc_lock_modesetting, this statement generates a duplicate-key error 23000 (Can't write; duplicate key in table) because 101 is allocated for the row(NULL, 'b')and insertion of the row(101, 'c')fails.Modifying
AUTO_INCREMENTcolumn values in the middle of a sequence ofINSERTstatementsIn all lock modes (0, 1, and 2), modifying an
AUTO_INCREMENTcolumn value in the middle of a sequence ofINSERTstatements could lead to “Duplicate entry” errors. For example, if you perform anUPDATEoperation that changes anAUTO_INCREMENTcolumn value to a value larger than the current maximum auto-increment value, subsequentINSERToperations that do not specify an unused auto-increment value could encounter “Duplicate entry” errors. This behavior is demonstrated in the following example.mysql>
CREATE TABLE t1 (->c1 INT NOT NULL AUTO_INCREMENT,->PRIMARY KEY (c1)->) ENGINE = InnoDB;mysql>INSERT INTO t1 VALUES(0), (0), (3);mysql>SELECT c1 FROM t1;+----+ | c1 | +----+ | 1 | | 2 | | 3 | +----+ mysql>UPDATE t1 SET c1 = 4 WHERE c1 = 1;mysql>SELECT c1 FROM t1;+----+ | c1 | +----+ | 2 | | 3 | | 4 | +----+ mysql>INSERT INTO t1 VALUES(0);ERROR 1062 (23000): Duplicate entry '4' for key 'PRIMARY'
This section describes how InnoDB initializes
AUTO_INCREMENT counters.
If you specify an AUTO_INCREMENT column for
an InnoDB table, the table handle in the
InnoDB data dictionary contains a special
counter called the auto-increment counter that is used in
assigning new values for the column. This counter is stored only
in main memory, not on disk.
To initialize an auto-increment counter after a server restart,
InnoDB executes the equivalent of the
following statement on the first insert into a table containing
an AUTO_INCREMENT column.
SELECT MAX(ai_col) FROM table_name FOR UPDATE;
InnoDB increments the value retrieved by the
statement and assigns it to the column and to the auto-increment
counter for the table. By default, the value is incremented by
1. This default can be overridden by the
auto_increment_increment
configuration setting.
If the table is empty, InnoDB uses the value
1. This default can be overridden by the
auto_increment_offset
configuration setting.
If a SHOW TABLE STATUS statement
examines the table before the auto-increment counter is
initialized, InnoDB initializes but does not
increment the value. The value is stored for use by later
inserts. This initialization uses a normal exclusive-locking
read on the table and the lock lasts to the end of the
transaction. InnoDB follows the same
procedure for initializing the auto-increment counter for a
newly created table.
After the auto-increment counter has been initialized, if you do
not explicitly specify a value for an
AUTO_INCREMENT column,
InnoDB increments the counter and assigns the
new value to the column. If you insert a row that explicitly
specifies the column value, and the value is greater than the
current counter value, the counter is set to the specified
column value.
InnoDB uses the in-memory auto-increment
counter as long as the server runs. When the server is stopped
and restarted, InnoDB reinitializes the
counter for each table for the first
INSERT to the table, as described
earlier.
A server restart also cancels the effect of the
AUTO_INCREMENT =
table option in NCREATE TABLE and
ALTER TABLE statements, which you
can use with InnoDB tables to set the initial
counter value or alter the current counter value.
How the InnoDB storage engine handles foreign
key constraints is described under the following topics in this
section:
For foreign key usage information and examples, see Section 13.1.17.6, “Using FOREIGN KEY Constraints”.
Foreign key definitions for InnoDB tables are
subject to the following conditions:
InnoDBpermits a foreign key to reference any index column or group of columns. However, in the referenced table, there must be an index where the referenced columns are the first columns in the same order. Hidden columns thatInnoDBadds to an index are also considered (see Section 14.9.2.1, “Clustered and Secondary Indexes”).InnoDBdoes not currently support foreign keys for tables with user-defined partitioning. This means that no user-partitionedInnoDBtable may contain foreign key references or columns referenced by foreign keys.InnoDBallows a foreign key constraint to reference a nonunique key. This is anInnoDBextension to standard SQL.
Referential actions for foreign keys of
InnoDB tables are subject to the following
conditions:
While
SET DEFAULTis allowed by the MySQL Server, it is rejected as invalid byInnoDB.CREATE TABLEandALTER TABLEstatements using this clause are not allowed for InnoDB tables.If there are several rows in the parent table that have the same referenced key value,
InnoDBacts in foreign key checks as if the other parent rows with the same key value do not exist. For example, if you have defined aRESTRICTtype constraint, and there is a child row with several parent rows,InnoDBdoes not permit the deletion of any of those parent rows.InnoDBperforms cascading operations through a depth-first algorithm, based on records in the indexes corresponding to the foreign key constraints.If
ON UPDATE CASCADEorON UPDATE SET NULLrecurses to update the same table it has previously updated during the cascade, it acts likeRESTRICT. This means that you cannot use self-referentialON UPDATE CASCADEorON UPDATE SET NULLoperations. This is to prevent infinite loops resulting from cascaded updates. A self-referentialON DELETE SET NULL, on the other hand, is possible, as is a self-referentialON DELETE CASCADE. Cascading operations may not be nested more than 15 levels deep.Like MySQL in general, in an SQL statement that inserts, deletes, or updates many rows,
InnoDBchecksUNIQUEandFOREIGN KEYconstraints row-by-row. When performing foreign key checks,InnoDBsets shared row-level locks on child or parent records it has to look at.InnoDBchecks foreign key constraints immediately; the check is not deferred to transaction commit. According to the SQL standard, the default behavior should be deferred checking. That is, constraints are only checked after the entire SQL statement has been processed. UntilInnoDBimplements deferred constraint checking, some things are impossible, such as deleting a record that refers to itself using a foreign key.
Limits on InnoDB tables are described under the
following topics in this section:
Do not convert MySQL system tables in the
mysql database from MyISAM
to InnoDB tables. This is an unsupported
operation. If you do this, MySQL does not restart until you
restore the old system tables from a backup or regenerate them
by reinitializing the data directory (see
Section 2.10.1, “Initializing the Data Directory”).
Before using NFS with InnoDB, review
potential issues outlined in Using NFS with MySQL.
A table can contain a maximum of 1000 columns.
A table can contain a maximum of 64 secondary indexes.
By default, the index key prefix length limit is 767 bytes. See Section 13.1.13, “CREATE INDEX Syntax”. For example, you might hit this limit with a column prefix index of more than 255 characters on a
TEXTorVARCHARcolumn, assuming autf8mb3character set and the maximum of 3 bytes for each character. When theinnodb_large_prefixconfiguration option is enabled, the index key prefix length limit is raised to 3072 bytes forInnoDBtables that useDYNAMICorCOMPRESSEDrow format.If you specify an index key prefix length that exceeds the limit, the length is silently reduced to the maximum length.
When
innodb_large_prefixis enabled, attempting to create an index key prefix with a length greater than 3072 bytes for aDYNAMICorCOMPRESSEDtable causes anER_INDEX_COLUMN_TOO_LONGerror.The limits that apply to index key prefixes also apply to full-column index keys.
A maximum of 16 columns is permitted for multicolumn indexes. Exceeding the limit returns an error.
ERROR 1070 (42000): Too many key parts specified; max 16 parts allowed
The maximum row length, except for variable-length columns (
VARBINARY,VARCHAR,BLOBandTEXT), is slightly less than half of a page. That is, the maximum row length is about 8000 bytes.LONGBLOBandLONGTEXTcolumns must be less than 4GB, and the total row length, includingBLOBandTEXTcolumns, must be less than 4GB.If a row is less than half a page long, all of it is stored locally within the page. If it exceeds half a page, variable-length columns are chosen for external off-page storage until the row fits within half a page, as described in Section 14.15.2, “File Space Management”.
The row size for
BLOBcolumns that are chosen for external off-page storage should not exceed 10% of the combined redo log file size. If the row size exceeds 10% of the combined redo log file size,InnoDBcould overwrite the most recent checkpoint which may result in lost data during crash recovery. (Bug#69477).Although
InnoDBsupports row sizes larger than 65,535 bytes internally, MySQL itself imposes a row-size limit of 65,535 for the combined size of all columns:mysql>
CREATE TABLE t (a VARCHAR(8000), b VARCHAR(10000),->c VARCHAR(10000), d VARCHAR(10000), e VARCHAR(10000),->f VARCHAR(10000), g VARCHAR(10000)) ENGINE=InnoDB;ERROR 1118 (42000): Row size too large. The maximum row size for the used table type, not counting BLOBs, is 65535. You have to change some columns to TEXT or BLOBsSee Section 8.4.7, “Limits on Table Column Count and Row Size”.
On some older operating systems, files must be less than 2GB. This is not a limitation of
InnoDBitself, but if you require a large tablespace, configure it using several smaller data files rather than one large data file.The combined size of the
InnoDBlog files must be less than 4GB.The minimum tablespace size is slightly larger than 10MB. The maximum tablespace size is four billion pages (64TB). This is also the maximum size for a table.
Tablespace files cannot exceed 4GB on Windows 32-bit systems (Bug #80149).
The path of a tablespace file, including the file name, cannot exceed the
MAX_PATHlimit on Windows. Prior to Windows 10, theMAX_PATHlimit is 260 characters. As of Windows 10, version 1607,MAX_PATHlimitations are removed from common Win32 file and directory functions, but you must enable the new behavior.The default page size in
InnoDBis 16KB.Changing the page size is not a supported operation and there is no guarantee that
InnoDBfunctions normally with a page size other than 16KB. Problems compiling or runningInnoDBmay occur. In particular,ROW_FORMAT=COMPRESSEDin the Barracuda file format assumes that the page size is at most 16KB and uses 14-bit pointers.A version of
InnoDBbuilt for one page size cannot use data files or log files from a version built for a different page size. This limitation could affect restore or downgrade operations using data from MySQL 5.6, which does support page sizes other than 16KB.
InnoDBtables do not supportFULLTEXTindexes.InnoDBtables support spatial data types, but not indexes on them.
ANALYZE TABLEdetermines index cardinality (as displayed in theCardinalitycolumn ofSHOW INDEXoutput) by performing random dives on each of the index trees and updating index cardinality estimates accordingly. Because these are only estimates, repeated runs ofANALYZE TABLEcould produce different numbers. This makesANALYZE TABLEfast onInnoDBtables but not 100% accurate because it does not take all rows into account.You can change the number of random dives by modifying the
innodb_stats_sample_pagessystem variable.MySQL uses index cardinality estimates in join optimization. If a join is not optimized in the right way, try using
ANALYZE TABLE. In the few cases thatANALYZE TABLEdoes not produce values good enough for your particular tables, you can useFORCE INDEXwith your queries to force the use of a particular index, or set themax_seeks_for_keysystem variable to ensure that MySQL prefers index lookups over table scans. See Section B.4.5, “Optimizer-Related Issues”.If statements or transactions are running on a table, and
ANALYZE TABLEis run on the same table followed by a secondANALYZE TABLEoperation, the secondANALYZE TABLEoperation is blocked until the statements or transactions are completed. This behavior occurs becauseANALYZE TABLEmarks the currently loaded table definition as obsolete whenANALYZE TABLEis finished running. New statements or transactions (including a secondANALYZE TABLEstatement) must load the new table definition into the table cache, which cannot occur until currently running statements or transactions are completed and the old table definition is purged. Loading multiple concurrent table definitions is not supported.SHOW TABLE STATUSdoes not give accurate statistics onInnoDBtables except for the physical size reserved by the table. The row count is only a rough estimate used in SQL optimization.InnoDBdoes not keep an internal count of rows in a table because concurrent transactions might “see” different numbers of rows at the same time. Consequently,SELECT COUNT(*)statements only count rows visible to the current transaction.For information about how
InnoDBprocessesSELECT COUNT(*)statements, refer to theCOUNT()description in Section 12.17.1, “Aggregate (GROUP BY) Function Descriptions”.On Windows,
InnoDBalways stores database and table names internally in lowercase. To move databases in a binary format from Unix to Windows or from Windows to Unix, create all databases and tables using lowercase names.An
AUTO_INCREMENTcolumnai_colmust be defined as part of an index such that it is possible to perform the equivalent of an indexedSELECT MAX(lookup on the table to obtain the maximum column value. Typically, this is achieved by making the column the first column of some table index.ai_col)InnoDBsets an exclusive lock on the end of the index associated with theAUTO_INCREMENTcolumn while initializing a previously specifiedAUTO_INCREMENTcolumn on a table.With
innodb_autoinc_lock_mode=0,InnoDBuses a specialAUTO-INCtable lock mode where the lock is obtained and held to the end of the current SQL statement while accessing the auto-increment counter. Other clients cannot insert into the table while theAUTO-INCtable lock is held. The same behavior occurs for “bulk inserts” withinnodb_autoinc_lock_mode=1. Table-levelAUTO-INClocks are not used withinnodb_autoinc_lock_mode=2. For more information, See Section 14.9.1.4, “AUTO_INCREMENT Handling in InnoDB”.When you restart the MySQL server,
InnoDBmay reuse an old value that was generated for anAUTO_INCREMENTcolumn but never stored (that is, a value that was generated during an old transaction that was rolled back).When an
AUTO_INCREMENTinteger column runs out of values, a subsequentINSERToperation returns a duplicate-key error. This is general MySQL behavior.DELETE FROMdoes not regenerate the table but instead deletes all rows, one by one.tbl_nameUnder some conditions,
TRUNCATEfor antbl_nameInnoDBtable is mapped toDELETE FROM. See Section 13.1.33, “TRUNCATE TABLE Syntax”.tbl_nameCascaded foreign key actions do not activate triggers.
You cannot create a table with a column name that matches the name of an internal
InnoDBcolumn (includingDB_ROW_ID,DB_TRX_ID,DB_ROLL_PTR, andDB_MIX_ID). This restriction applies to use of the names in any letter case.mysql>
CREATE TABLE t1 (c1 INT, db_row_id INT) ENGINE=INNODB;ERROR 1166 (42000): Incorrect column name 'db_row_id'
LOCK TABLESacquires two locks on each table ifinnodb_table_locks=1(the default). In addition to a table lock on the MySQL layer, it also acquires anInnoDBtable lock. Versions of MySQL before 4.1.2 did not acquireInnoDBtable locks; the old behavior can be selected by settinginnodb_table_locks=0. If noInnoDBtable lock is acquired,LOCK TABLEScompletes even if some records of the tables are being locked by other transactions.As of MySQL 5.5.3,
innodb_table_locks=0has no effect for tables locked explicitly withLOCK TABLES ... WRITE. It still has an effect for tables locked for read or write byLOCK TABLES ... WRITEimplicitly (for example, through triggers) or byLOCK TABLES ... READ.All
InnoDBlocks held by a transaction are released when the transaction is committed or aborted. Thus, it does not make much sense to invokeLOCK TABLESonInnoDBtables inautocommit=1mode because the acquiredInnoDBtable locks would be released immediately.You cannot lock additional tables in the middle of a transaction because
LOCK TABLESperforms an implicitCOMMITandUNLOCK TABLES.For limits associated with concurrent read-write transactions, see Section 14.9.7, “Undo Logs”.
This section covers topics related to InnoDB
indexes.
Every InnoDB table has a special index called
the clustered index
where the data for the rows is stored. Typically, the clustered
index is synonymous with the
primary key. To get the
best performance from queries, inserts, and other database
operations, you must understand how InnoDB uses
the clustered index to optimize the most common lookup and DML
operations for each table.
When you define a
PRIMARY KEYon your table,InnoDBuses it as the clustered index. Define a primary key for each table that you create. If there is no logical unique and non-null column or set of columns, add a new auto-increment column, whose values are filled in automatically.If you do not define a
PRIMARY KEYfor your table, MySQL locates the firstUNIQUEindex where all the key columns areNOT NULLandInnoDBuses it as the clustered index.If the table has no
PRIMARY KEYor suitableUNIQUEindex,InnoDBinternally generates a hidden clustered index namedGEN_CLUST_INDEXon a synthetic column containing row ID values. The rows are ordered by the ID thatInnoDBassigns to the rows in such a table. The row ID is a 6-byte field that increases monotonically as new rows are inserted. Thus, the rows ordered by the row ID are physically in insertion order.
Accessing a row through the clustered index is fast because the index search leads directly to the page with all the row data. If a table is large, the clustered index architecture often saves a disk I/O operation when compared to storage organizations that store row data using a different page from the index record.
All indexes other than the clustered index are known as
secondary indexes.
In InnoDB, each record in a secondary index
contains the primary key columns for the row, as well as the
columns specified for the secondary index.
InnoDB uses this primary key value to search
for the row in the clustered index.
If the primary key is long, the secondary indexes use more space, so it is advantageous to have a short primary key.
For guidelines to take advantage of InnoDB
clustered and secondary indexes, see
Section 8.3, “Optimization and Indexes”.
All InnoDB indexes are
B-trees where the index records
are stored in the leaf pages of the tree. The default size of an
index page is 16KB.
When new records are inserted into an InnoDB
clustered index,
InnoDB tries to leave 1/16 of the page free for
future insertions and updates of the index records. If index
records are inserted in a sequential order (ascending or
descending), the resulting index pages are about 15/16 full. If
records are inserted in a random order, the pages are from 1/2 to
15/16 full. If the fill
factor of an index page drops below 1/2,
InnoDB tries to contract the index tree to free
the page.
Changing the InnoDB page size is not a
supported operation and there is no guarantee that
InnoDB functions normally with a page size
other than 16KB. Problems compiling or running
InnoDB may occur. In particular,
ROW_FORMAT=COMPRESSED in the Barracuda file
format assumes that the page size is at most 16KB and uses 14-bit
pointers.
An instance using a particular InnoDB page size
cannot use data files or log files from an instance that uses a
different page size.
This section covers topics related to InnoDB
tablespaces.
The system tablespace is the storage area for the
InnoDB data dictionary, the doublewrite buffer,
the change buffer, and undo logs. It may also contain table and
index data if tables are created in the system tablespace rather
than file-per-table tablespaces.
The system tablespace can have one or more data files. By default,
a single system tablespace data file, named
ibdata1, is created in the data directory.
The size and number of system tablespace data files is defined by
the innodb_data_file_path startup
option. For configuration information, see
System Tablespace Data File Configuration.
Additional information about the system tablespace is provided under the following topics in the section:
This section describes how to increase or decrease the size of the system tablespace.
Increasing the Size of the System Tablespace
The easiest way to increase the size of the system tablespace is
to configure it to be auto-extending. To do so, specify the
autoextend attribute for the last data file
in the innodb_data_file_path
setting, and restart the server. For example:
innodb_data_file_path=ibdata1:10MB:autoextend
When the autoextend attribute is specified,
the data file automatically increases in size by 8MB increments
as space is required. The
innodb_autoextend_increment
variable controls the increment size.
You can also increase system tablespace size by adding another data file. To do so:
Stop the MySQL server.
If the last data file in the
innodb_data_file_pathsetting is defined with theautoextendattribute, remove it, and modify the size attribute to reflect the current data file size. To determine the appropriate data file size to specify, check your file system for the file size, and round that value down to the closest MB value, where a MB is equal to 1024 x 1024.Append a new data file to the
innodb_data_file_pathsetting, optionally specifying theautoextendattribute. Theautoextendattribute can be specified only for the last data file in theinnodb_data_file_pathsetting.Start the MySQL server.
For example, this tablespace has one auto-extending data file:
innodb_data_home_dir = innodb_data_file_path = /ibdata/ibdata1:10M:autoextend
Suppose that the data file has grown to 988MB over time. This is
the innodb_data_file_path
setting after modifying the size attribute to reflect the
current data file size, and after specifying a new 50MB
auto-extending data file:
innodb_data_home_dir = innodb_data_file_path = /ibdata/ibdata1:988M;/disk2/ibdata2:50M:autoextend
When adding a new data file, do not specify an existing file
name. InnoDB creates and initializes the new
data file when you start the server.
You cannot increase the size of an existing system tablespace
data file by changing its size attribute. For example,
changing the
innodb_data_file_path setting
from ibdata1:10M:autoextend to
ibdata1:12M:autoextend produces the
following error when starting the server:
[ERROR] [MY-012263] [InnoDB] The Auto-extending innodb_system data file './ibdata1' is of a different size 640 pages (rounded down to MB) than specified in the .cnf file: initial 768 pages, max 0 (relevant if non-zero) pages!
The error indicates that the existing data file size
(expressed in InnoDB pages) is different
from the size specified in the configuration file. If you
encounter this error, restore the previous
innodb_data_file_path
setting, and refer to the system tablespace resizing
instructions.
InnoDB page size is defined by the
innodb_page_size variable.
The default is 16384 bytes.
Decreasing the Size of the InnoDB System Tablespace
You cannot remove a data file from the system tablespace. To decrease the system tablespace size, use this procedure:
Use mysqldump to dump all your
InnoDBtables.Stop the server.
Remove all the existing tablespace files, including the
ibdataandib_logfiles. If you want to keep a backup copy of the information, then copy all theib*files to another location before the removing the files in your MySQL installation.Remove any
.frmfiles forInnoDBtables.Configure a new tablespace.
Restart the server.
Import the dump files.
You can use raw disk partitions as data files in the
InnoDB
system tablespace.
This technique enables nonbuffered I/O on Windows and on some
Linux and Unix systems without file system overhead. Perform
tests with and without raw partitions to verify whether this
change actually improves performance on your system.
When you use a raw disk partition, ensure that the user ID that
runs the MySQL server has read and write privileges for that
partition. For example, if you run the server as the
mysql user, the partition must be readable
and writeable by mysql. If you run the server
with the --memlock option, the
server must be run as root, so the partition
must be readable and writeable by root.
The procedures described below involve option file modification. For additional information, see Section 4.2.2.2, “Using Option Files”.
Allocating a Raw Disk Partition on Linux and Unix Systems
When you create a new data file, specify the keyword
newrawimmediately after the data file size for theinnodb_data_file_pathoption. The partition must be at least as large as the size that you specify. Note that 1MB inInnoDBis 1024 × 1024 bytes, whereas 1MB in disk specifications usually means 1,000,000 bytes.[mysqld] innodb_data_home_dir= innodb_data_file_path=/dev/hdd1:3Gnewraw;/dev/hdd2:2Gnewraw
Restart the server.
InnoDBnotices thenewrawkeyword and initializes the new partition. However, do not create or change anyInnoDBtables yet. Otherwise, when you next restart the server,InnoDBreinitializes the partition and your changes are lost. (As a safety measureInnoDBprevents users from modifying data when any partition withnewrawis specified.)After
InnoDBhas initialized the new partition, stop the server, changenewrawin the data file specification toraw:[mysqld] innodb_data_home_dir= innodb_data_file_path=/dev/hdd1:3Graw;/dev/hdd2:2Graw
Restart the server.
InnoDBnow permits changes to be made.
Allocating a Raw Disk Partition on Windows
On Windows systems, the same steps and accompanying guidelines
described for Linux and Unix systems apply except that the
innodb_data_file_path setting
differs slightly on Windows.
When you create a new data file, specify the keyword
newrawimmediately after the data file size for theinnodb_data_file_pathoption:[mysqld] innodb_data_home_dir= innodb_data_file_path=//./D::10Gnewraw
The
//./corresponds to the Windows syntax of\\.\for accessing physical drives. In the example above,D:is the drive letter of the partition.Restart the server.
InnoDBnotices thenewrawkeyword and initializes the new partition.After
InnoDBhas initialized the new partition, stop the server, changenewrawin the data file specification toraw:[mysqld] innodb_data_home_dir= innodb_data_file_path=//./D::10Graw
Restart the server.
InnoDBnow permits changes to be made.
By default, InnoDB tables are stored in the
system tablespace.
As an alternative, you can store each InnoDB
table in its own data file. This feature is called
“file-per-table tablespaces” because each table has
its own tablespace data file (.ibd file).
This feature is controlled by the
innodb_file_per_table
configuration option.
Advantages
You can reclaim disk space when truncating or dropping a table stored in a file-per-table tablespace. Truncating or dropping tables stored in the shared system tablespace creates free space internally in the system tablespace data files (ibdata files) which can only be used for new
InnoDBdata.Similarly, a table-copying
ALTER TABLEoperation on table that resides in a shared tablespace can increase the amount of space used by the tablespace. Such operations may require as much additional space as the data in the table plus indexes. The additional space required for the table-copyingALTER TABLEoperation is not released back to the operating system as it is for file-per-table tablespaces.The
TRUNCATE TABLEoperation is faster when run on tables stored in file-per-table tablespaces.You can store specific tables on separate storage devices, for I/O optimization, space management, or backup purposes.
You can run
OPTIMIZE TABLEto compact or recreate a file-per-table tablespace. When you run anOPTIMIZE TABLE,InnoDBcreates a new.ibdfile with a temporary name, using only the space required to store actual data. When the optimization is complete,InnoDBremoves the old.ibdfile and replaces it with the new one. If the previous.ibdfile grew significantly but the actual data only accounted for a portion of its size, runningOPTIMIZE TABLEcan reclaim the unused space.You can move individual
InnoDBtables rather than entire databases.Tables created in file-per-table tablespaces use the Barracuda file format. The Barracuda file format enables features such as compressed and dynamic row formats. Tables created in the system tablespace cannot use these features. To take advantage of these features for an existing table, enable the
innodb_file_per_tablesetting and runALTER TABLEto place the table in a file-per-table tablespace. Before converting tables, refer to Section 14.9.1.3, “Converting Tables from MyISAM to InnoDB”.tENGINE=INNODBYou can enable more efficient storage for tables with large
BLOBorTEXTcolumns using the dynamic row format.File-per-table tablespaces may improve chances for a successful recovery and save time when a corruption occurs, when a server cannot be restarted, or when backup and binary logs are unavailable.
You can back up or restore individual tables quickly using the MySQL Enterprise Backup product, without interrupting the use of other
InnoDBtables. This is beneficial if you have tables that require backup less frequently or on a different backup schedule. See Making a Partial Backup for details.File-per-table tablespaces are convenient for per-table status reporting when copying or backing up tables.
You can monitor table size at a file system level, without accessing MySQL.
Common Linux file systems do not permit concurrent writes to a single file when
innodb_flush_methodis set toO_DIRECT. As a result, there are possible performance improvements when usinginnodb_file_per_tablein conjunction withinnodb_flush_method.The system tablespace stores the
InnoDBdata dictionary and undo logs, and has a 64TB size limit. By comparison, each file-per-table tablespace has a 64TB size limit, which provides room for growth. See Section 14.9.1.6, “Limits on InnoDB Tables” for related information.
Potential Disadvantages
With file-per-table tablespaces, each table may have unused space, which can only be utilized by rows of the same table. This could lead to wasted space if not properly managed.
fsyncoperations must run on each open table rather than on a single file. Because there is a separatefsyncoperation for each file, write operations on multiple tables cannot be combined into a single I/O operation. This may requireInnoDBto perform a higher total number offsyncoperations.mysqld must keep one open file handle per table, which may impact performance if you have numerous tables in file-per-table tablespaces.
More file descriptors are used.
If backward compatibility with MySQL 5.1 is a concern, be aware that enabling
innodb_file_per_tablemeans that table-copyingALTER TABLEoperations implicitly moves a table that resides in the system tablespace to a file-per-table tablespace.For example, when restructuring the clustered index, the table is re-created using the current setting for
innodb_file_per_table. This behavior does not apply when adding or droppingInnoDBsecondary indexes. When a secondary index is created without rebuilding the table, the index is stored in the same file as the table data, regardless of the currentinnodb_file_per_tablesetting.If many tables are growing there is potential for more fragmentation which can impede
DROP TABLEand table scan performance. However, when fragmentation is managed, having files in their own tablespace can improve performance.The buffer pool is scanned when dropping a file-per-table tablespace, which can take several seconds for buffer pools that are tens of gigabytes in size. The scan is performed with a broad internal lock, which may delay other operations. Tables in the system tablespace are not affected.
The
innodb_autoextend_incrementvariable, which defines increment size (in MB) for extending the size of an auto-extending shared tablespace file when it becomes full, does not apply to file-per-table tablespace files, which are auto-extending regardless of theinnodb_autoextend_incrementsetting. The initial extensions are by small amounts, after which extensions occur in increments of 4MB.
To enable file-per-table tablespaces, start the server with the
--innodb-file-per-table option.
For example, add a line to the [mysqld]
section of my.cnf:
[mysqld] innodb_file_per_table=1
With innodb_file_per_table
enabled, InnoDB stores each newly created
table into its own
tbl_name.ibdMyISAM storage engine
does, but MyISAM divides the table into a
tbl_name.MYDtbl_name.MYIInnoDB, the data and the
indexes are stored together in the .ibd
file. The
tbl_name.frm
If you remove the
innodb_file_per_table line from
my.cnf and restart the server, newly
created InnoDB tables are created inside the
shared tablespace files again.
To move a table from the system tablespace to its own
tablespace, change the
innodb_file_per_table setting
and rebuild the table:
SET GLOBAL innodb_file_per_table=1;
ALTER TABLE table_name ENGINE=InnoDB;
InnoDB requires the shared tablespace to
store its internal data dictionary and undo logs. The
.ibd files alone are not sufficient for
InnoDB to operate.
When a table is moved out of the system tablespace into its
own .ibd file, the data files that make
up the system tablespace remain the same size. The space
formerly occupied by the table can be reused for new
InnoDB data, but is not reclaimed for use
by the operating system. When moving large
InnoDB tables out of the system tablespace,
where disk space is limited, you might prefer to turn on
innodb_file_per_table and
then recreate the entire instance using the
mysqldump command.
You cannot freely move .ibd files between
database directories as you can with MyISAM
table files. The table definition stored in the
InnoDB shared tablespace includes the
database name. The transaction IDs and log sequence numbers
stored in the tablespace files also differ between databases.
To move an .ibd file and the associated
table from one database to another, use a
RENAME TABLE statement:
RENAME TABLEdb1.tbl_nameTOdb2.tbl_name;
If you have a “clean” backup of an
.ibd file, you can restore it to the MySQL
installation from which it originated as follows:
The table must not have been dropped or truncated since you copied the
.ibdfile, because doing so changes the table ID stored inside the tablespace.Issue this
ALTER TABLEstatement to delete the current.ibdfile:ALTER TABLE
tbl_nameDISCARD TABLESPACE;Copy the backup
.ibdfile to the proper database directory.Issue this
ALTER TABLEstatement to tellInnoDBto use the new.ibdfile for the table:ALTER TABLE
tbl_nameIMPORT TABLESPACE;
In this context, a “clean”
.ibd file backup is one for which the
following requirements are satisfied:
There are no uncommitted modifications by transactions in the
.ibdfile.There are no unmerged change buffer entries in the
.ibdfile.Purge has removed all delete-marked index records from the
.ibdfile.mysqld has flushed all modified pages of the
.ibdfile from the buffer pool to the file.
You can make a clean backup .ibd file using
the following method:
Stop all activity from the mysqld server and commit all transactions.
Wait until
SHOW ENGINE INNODB STATUSshows that there are no active transactions in the database, and the main thread status ofInnoDBisWaiting for server activity. Then you can make a copy of the.ibdfile.
Another method for making a clean copy of an
.ibd file is to use the MySQL Enterprise
Backup product:
Use MySQL Enterprise Backup to back up the
InnoDBinstallation.Start a second mysqld server on the backup and let it clean up the
.ibdfiles in the backup.
The InnoDB data dictionary is comprised of
internal system tables that contain metadata used to keep track of
objects such as tables, indexes, and table columns. The metadata
is physically located in the InnoDB system
tablespace. For historical reasons, data dictionary metadata
overlaps to some degree with information stored in
InnoDB table metadata files
(.frm files).
The doublewrite buffer is a storage area located in the system
tablespace where InnoDB writes pages that are
flushed from the InnoDB buffer pool, before the
pages are written to their proper positions in the data file. Only
after flushing and writing pages to the doublewrite buffer, does
InnoDB write pages to their proper positions.
If there is an operating system, storage subsystem, or
mysqld process crash in the middle of a page
write, InnoDB can later find a good copy of the
page from the doublewrite buffer during crash recovery.
Although data is always written twice, the doublewrite buffer does
not require twice as much I/O overhead or twice as many I/O
operations. Data is written to the doublewrite buffer itself as a
large sequential chunk, with a single fsync()
call to the operating system.
The doublewrite buffer is enabled by default. To disable the
doublewrite buffer, set
innodb_doublewrite to 0.
The redo log is a disk-based data structure used during crash recovery to correct data written by incomplete transactions. During normal operations, the redo log encodes requests to change table data that result from SQL statements or low-level API calls. Modifications that did not finish updating the data files before an unexpected shutdown are replayed automatically during initialization, and before the connections are accepted. For information about the role of the redo log in crash recovery, see Section 14.21.2, “InnoDB Recovery”.
By default, the redo log is physically represented on disk by two
files named ib_logfile0 and
ib_logfile1. MySQL writes to the redo log
files in a circular fashion. Data in the redo log is encoded in
terms of records affected; this data is collectively referred to
as redo. The passage of data through the redo log is represented
by an ever-increasing LSN value.
For related information, see Redo Log File Configuration, and Section 8.5.3, “Optimizing InnoDB Redo Logging”.
To change the number or the size of your
InnoDB redo
log files, perform the following steps:
If
innodb_fast_shutdownis set to 2, setinnodb_fast_shutdownto 1:mysql>
SET GLOBAL innodb_fast_shutdown = 1;After ensuring that
innodb_fast_shutdownis not set to 2, stop the MySQL server and make sure that it shuts down without errors (to ensure that there is no information for outstanding transactions in the log).Copy the old log files into a safe place in case something went wrong during the shutdown and you need them to recover the tablespace.
Delete the old log files from the log file directory.
Edit
my.cnfto change the log file configuration.Start the MySQL server again. mysqld sees that no
InnoDBlog files exist at startup and creates new ones.
InnoDB, like any other
ACID-compliant database engine,
flushes the redo log of a
transaction before it is committed. InnoDB
uses group commit
functionality to group multiple such flush requests together to
avoid one flush for each commit. With group commit,
InnoDB issues a single write to the redo log
file to perform the commit action for multiple user transactions
that commit at about the same time, significantly improving
throughput.
Group commit in InnoDB worked in earlier
releases of MySQL and works once again with MySQL 5.1 with the
InnoDB Plugin, and MySQL 5.5 and higher. The
introduction of support for the distributed transactions and Two
Phase Commit (2PC) in MySQL 5.0 interfered with the
InnoDB group commit functionality. This issue
is now resolved.
The group commit functionality inside InnoDB
works with the Two Phase Commit protocol in MySQL. Re-enabling
of the group commit functionality fully ensures that the
ordering of commit in the MySQL binary log and the
InnoDB logfile is the same as it was before.
It means it is safe to use the MySQL Enterprise Backup product
with InnoDB 1.0.4 (that is, the
InnoDB Plugin with MySQL 5.1) and above.
For more information about performance of
COMMIT and other transactional operations,
see Section 8.5.2, “Optimizing InnoDB Transaction Management”.
An undo log is a collection of undo log records associated with a single read-write transaction. An undo log record contains information about how to undo the latest change by a transaction to a clustered index record. If another transaction needs to see the original data as part of a consistent read operation, the unmodified data is retrieved from undo log records. Undo logs exist within undo log segments, which are contained within rollback segments. Rollback segments are physically part of the system tablespace.
InnoDB supports 128 rollback segments. The
innodb_rollback_segments variable
defines the number of rollback segments used by
InnoDB.
Each rollback segment supports up to 1024 transactions, depending on the number of undo logs assigned to each transaction. (The 1024 value is the number of undo slots in a rollback segment.) A transaction is assigned up to two undo logs, one for each of the following operation types:
Undo logs are assigned as needed. For example, a transaction that
performs INSERT,
UPDATE, and
DELETE operations is assigned two
undo logs. A transaction that performs only
INSERT operations is assigned a
single undo log. Undo logs are assigned to a transaction from a
single rollback segment that is also assigned to the transaction.
An undo log assigned to a transaction remains tied to the
transaction for its duration. For example, an undo log assigned to
a transaction for an INSERT
operation is used for all INSERT
operations performed by that transaction.
Given the factors described above, the following formulas can be
used to estimate the number of concurrent read-write transactions
that InnoDB is capable of supporting.
A transaction can encounter a concurrent transaction limit error
before reaching the number of concurrent read-write transactions
that InnoDB is capable of supporting. This
occurs when the rollback segment assigned to a transaction runs
out of undo slots. In such cases, try rerunning the transaction.
If each transaction performs either an
INSERTor anUPDATEorDELETEoperation, the number of concurrent read-write transactions thatInnoDBis capable of supporting is:1024 *
innodb_rollback_segmentsIf each transaction performs an
INSERTand anUPDATEorDELETEoperation, the number of concurrent read-write transactions thatInnoDBis capable of supporting is:(1024 / 2) *
innodb_rollback_segments
To implement a large-scale, busy, or highly reliable database
application, to port substantial code from a different database
system, or to tune MySQL performance, it is important to understand
InnoDB locking and the InnoDB
transaction model.
This section discusses several topics related to
InnoDB locking and the InnoDB
transaction model with which you should be familiar.
Section 14.10.1, “InnoDB Locking” describes lock types used by
InnoDB.Section 14.10.2, “InnoDB Transaction Model” describes transaction isolation levels and the locking strategies used by each. It also discusses the use of
autocommit, consistent non-locking reads, and locking reads.Section 14.10.3, “Locks Set by Different SQL Statements in InnoDB” discusses specific types of locks set in
InnoDBfor various statements.Section 14.10.4, “Phantom Rows” describes how
InnoDBuses next-key locking to avoid phantom rows.Section 14.10.5, “Deadlocks in InnoDB” provides a deadlock example, discusses deadlock detection and rollback, and provides tips for minimizing and handling deadlocks in
InnoDB.
This section describes lock types used by
InnoDB.
InnoDB implements standard row-level locking
where there are two types of locks,
shared (S)
locks and exclusive
(X) locks.
A shared (
S) lock permits the transaction that holds the lock to read a row.An exclusive (
X) lock permits the transaction that holds the lock to update or delete a row.
If transaction T1 holds a shared
(S) lock on row r, then
requests from some distinct transaction T2
for a lock on row r are handled as follows:
A request by
T2for anSlock can be granted immediately. As a result, bothT1andT2hold anSlock onr.A request by
T2for anXlock cannot be granted immediately.
If a transaction T1 holds an exclusive
(X) lock on row r, a
request from some distinct transaction T2 for
a lock of either type on r cannot be granted
immediately. Instead, transaction T2 has to
wait for transaction T1 to release its lock
on row r.
InnoDB supports multiple
granularity locking which permits coexistence of row
locks and table locks. For example, a statement such as
LOCK TABLES ...
WRITE takes an exclusive lock (an X
lock) on the specified table. To make locking at multiple
granularity levels practical, InnoDB uses
intention locks.
Intention locks are table-level locks that indicate which type
of lock (shared or exclusive) a transaction requires later for a
row in a table. There are two types of intention locks:
An intention shared lock (
IS) indicates that a transaction intends to set a shared lock on individual rows in a table.An intention exclusive lock (
IX) indicates that a transaction intends to set an exclusive lock on individual rows in a table.
For example, SELECT ...
LOCK IN SHARE MODE sets an IS lock,
and SELECT ... FOR
UPDATE sets an IX lock.
The intention locking protocol is as follows:
Before a transaction can acquire a shared lock on a row in a table, it must first acquire an
ISlock or stronger on the table.Before a transaction can acquire an exclusive lock on a row in a table, it must first acquire an
IXlock on the table.
Table-level lock type compatibility is summarized in the following matrix.
X |
IX |
S |
IS |
|
|---|---|---|---|---|
X |
Conflict | Conflict | Conflict | Conflict |
IX |
Conflict | Compatible | Conflict | Compatible |
S |
Conflict | Conflict | Compatible | Compatible |
IS |
Conflict | Compatible | Compatible | Compatible |
A lock is granted to a requesting transaction if it is compatible with existing locks, but not if it conflicts with existing locks. A transaction waits until the conflicting existing lock is released. If a lock request conflicts with an existing lock and cannot be granted because it would cause deadlock, an error occurs.
Intention locks do not block anything except full table requests
(for example, LOCK
TABLES ... WRITE). The main purpose of intention locks
is to show that someone is locking a row, or going to lock a row
in the table.
Transaction data for an intention lock appears similar to the
following in SHOW
ENGINE INNODB STATUS and
InnoDB monitor
output:
TABLE LOCK table `test`.`t` trx id 10080 lock mode IX
A record lock is a lock on an index record. For example,
SELECT c1 FROM t WHERE c1 = 10 FOR UPDATE;
prevents any other transaction from inserting, updating, or
deleting rows where the value of t.c1 is
10.
Record locks always lock index records, even if a table is
defined with no indexes. For such cases,
InnoDB creates a hidden clustered index and
uses this index for record locking. See
Section 14.9.2.1, “Clustered and Secondary Indexes”.
Transaction data for a record lock appears similar to the
following in SHOW
ENGINE INNODB STATUS and
InnoDB monitor
output:
RECORD LOCKS space id 58 page no 3 n bits 72 index `PRIMARY` of table `test`.`t` trx id 10078 lock_mode X locks rec but not gap Record lock, heap no 2 PHYSICAL RECORD: n_fields 3; compact format; info bits 0 0: len 4; hex 8000000a; asc ;; 1: len 6; hex 00000000274f; asc 'O;; 2: len 7; hex b60000019d0110; asc ;;
A gap lock is a lock on a gap between index records, or a lock
on the gap before the first or after the last index record. For
example, SELECT c1 FROM t WHERE c1 BETWEEN 10 and 20
FOR UPDATE; prevents other transactions from inserting
a value of 15 into column
t.c1, whether or not there was already any
such value in the column, because the gaps between all existing
values in the range are locked.
A gap might span a single index value, multiple index values, or even be empty.
Gap locks are part of the tradeoff between performance and concurrency, and are used in some transaction isolation levels and not others.
Gap locking is not needed for statements that lock rows using a
unique index to search for a unique row. (This does not include
the case that the search condition includes only some columns of
a multiple-column unique index; in that case, gap locking does
occur.) For example, if the id column has a
unique index, the following statement uses only an index-record
lock for the row having id value 100 and it
does not matter whether other sessions insert rows in the
preceding gap:
SELECT * FROM child WHERE id = 100;
If id is not indexed or has a nonunique
index, the statement does lock the preceding gap.
It is also worth noting here that conflicting locks can be held on a gap by different transactions. For example, transaction A can hold a shared gap lock (gap S-lock) on a gap while transaction B holds an exclusive gap lock (gap X-lock) on the same gap. The reason conflicting gap locks are allowed is that if a record is purged from an index, the gap locks held on the record by different transactions must be merged.
Gap locks in InnoDB are “purely
inhibitive”, which means that their only purpose is to
prevent other transactions from inserting to the gap. Gap locks
can co-exist. A gap lock taken by one transaction does not
prevent another transaction from taking a gap lock on the same
gap. There is no difference between shared and exclusive gap
locks. They do not conflict with each other, and they perform
the same function.
Gap locking can be disabled explicitly. This occurs if you
change the transaction isolation level to
READ COMMITTED or enable the
innodb_locks_unsafe_for_binlog
system variable. Under these circumstances, gap locking is
disabled for searches and index scans and is used only for
foreign-key constraint checking and duplicate-key checking.
There are also other effects of using the
READ COMMITTED isolation
level or enabling
innodb_locks_unsafe_for_binlog.
Record locks for nonmatching rows are released after MySQL has
evaluated the WHERE condition. For
UPDATE statements, InnoDB
does a “semi-consistent” read, such that it returns
the latest committed version to MySQL so that MySQL can
determine whether the row matches the WHERE
condition of the UPDATE.
A next-key lock is a combination of a record lock on the index record and a gap lock on the gap before the index record.
InnoDB performs row-level locking in such a
way that when it searches or scans a table index, it sets shared
or exclusive locks on the index records it encounters. Thus, the
row-level locks are actually index-record locks. A next-key lock
on an index record also affects the “gap” before
that index record. That is, a next-key lock is an index-record
lock plus a gap lock on the gap preceding the index record. If
one session has a shared or exclusive lock on record
R in an index, another session cannot insert
a new index record in the gap immediately before
R in the index order.
Suppose that an index contains the values 10, 11, 13, and 20. The possible next-key locks for this index cover the following intervals, where a round bracket denotes exclusion of the interval endpoint and a square bracket denotes inclusion of the endpoint:
(negative infinity, 10] (10, 11] (11, 13] (13, 20] (20, positive infinity)
For the last interval, the next-key lock locks the gap above the largest value in the index and the “supremum” pseudo-record having a value higher than any value actually in the index. The supremum is not a real index record, so, in effect, this next-key lock locks only the gap following the largest index value.
By default, InnoDB operates in
REPEATABLE READ transaction
isolation level and with the
innodb_locks_unsafe_for_binlog
system variable disabled. In this case,
InnoDB uses next-key locks for searches and
index scans, which prevents phantom rows (see
Section 14.10.4, “Phantom Rows”).
Transaction data for a next-key lock appears similar to the
following in SHOW
ENGINE INNODB STATUS and
InnoDB monitor
output:
RECORD LOCKS space id 58 page no 3 n bits 72 index `PRIMARY` of table `test`.`t` trx id 10080 lock_mode X Record lock, heap no 1 PHYSICAL RECORD: n_fields 1; compact format; info bits 0 0: len 8; hex 73757072656d756d; asc supremum;; Record lock, heap no 2 PHYSICAL RECORD: n_fields 3; compact format; info bits 0 0: len 4; hex 8000000a; asc ;; 1: len 6; hex 00000000274f; asc 'O;; 2: len 7; hex b60000019d0110; asc ;;
An insert intention lock is a type of gap lock set by
INSERT operations prior to row
insertion. This lock signals the intent to insert in such a way
that multiple transactions inserting into the same index gap
need not wait for each other if they are not inserting at the
same position within the gap. Suppose that there are index
records with values of 4 and 7. Separate transactions that
attempt to insert values of 5 and 6, respectively, each lock the
gap between 4 and 7 with insert intention locks prior to
obtaining the exclusive lock on the inserted row, but do not
block each other because the rows are nonconflicting.
The following example demonstrates a transaction taking an insert intention lock prior to obtaining an exclusive lock on the inserted record. The example involves two clients, A and B.
Client A creates a table containing two index records (90 and 102) and then starts a transaction that places an exclusive lock on index records with an ID greater than 100. The exclusive lock includes a gap lock before record 102:
mysql>CREATE TABLE child (id int(11) NOT NULL, PRIMARY KEY(id)) ENGINE=InnoDB;mysql>INSERT INTO child (id) values (90),(102);mysql>START TRANSACTION;mysql>SELECT * FROM child WHERE id > 100 FOR UPDATE;+-----+ | id | +-----+ | 102 | +-----+
Client B begins a transaction to insert a record into the gap. The transaction takes an insert intention lock while it waits to obtain an exclusive lock.
mysql>START TRANSACTION;mysql>INSERT INTO child (id) VALUES (101);
Transaction data for an insert intention lock appears similar to
the following in
SHOW ENGINE INNODB
STATUS and
InnoDB monitor
output:
RECORD LOCKS space id 31 page no 3 n bits 72 index `PRIMARY` of table `test`.`child`
trx id 8731 lock_mode X locks gap before rec insert intention waiting
Record lock, heap no 3 PHYSICAL RECORD: n_fields 3; compact format; info bits 0
0: len 4; hex 80000066; asc f;;
1: len 6; hex 000000002215; asc " ;;
2: len 7; hex 9000000172011c; asc r ;;...
An AUTO-INC lock is a special table-level
lock taken by transactions inserting into tables with
AUTO_INCREMENT columns. In the simplest case,
if one transaction is inserting values into the table, any other
transactions must wait to do their own inserts into that table,
so that rows inserted by the first transaction receive
consecutive primary key values.
The innodb_autoinc_lock_mode
configuration option controls the algorithm used for
auto-increment locking. It allows you to choose how to trade off
between predictable sequences of auto-increment values and
maximum concurrency for insert operations.
For more information, see Section 14.9.1.4, “AUTO_INCREMENT Handling in InnoDB”.
In the InnoDB transaction model, the goal is to
combine the best properties of a
multi-versioning database with
traditional two-phase locking. InnoDB performs
locking at the row level and runs queries as nonlocking
consistent reads by
default, in the style of Oracle. The lock information in
InnoDB is stored space-efficiently so that lock
escalation is not needed. Typically, several users are permitted
to lock every row in InnoDB tables, or any
random subset of the rows, without causing
InnoDB memory exhaustion.
Transaction isolation is one of the foundations of database processing. Isolation is the I in the acronym ACID; the isolation level is the setting that fine-tunes the balance between performance and reliability, consistency, and reproducibility of results when multiple transactions are making changes and performing queries at the same time.
InnoDB offers all four transaction isolation
levels described by the SQL:1992 standard:
READ UNCOMMITTED,
READ COMMITTED,
REPEATABLE READ, and
SERIALIZABLE. The default
isolation level for InnoDB is
REPEATABLE READ.
A user can change the isolation level for a single session or
for all subsequent connections with the SET
TRANSACTION statement. To set the server's default
isolation level for all connections, use the
--transaction-isolation option on
the command line or in an option file. For detailed information
about isolation levels and level-setting syntax, see
Section 13.3.6, “SET TRANSACTION Syntax”.
InnoDB supports each of the transaction
isolation levels described here using different locking
strategies. You can enforce a high degree of consistency with
the default REPEATABLE READ
level, for operations on crucial data where ACID compliance is
important. Or you can relax the consistency rules with
READ COMMITTED or even
READ UNCOMMITTED, in
situations such as bulk reporting where precise consistency and
repeatable results are less important than minimizing the amount
of overhead for locking.
SERIALIZABLE enforces even
stricter rules than REPEATABLE
READ, and is used mainly in specialized situations,
such as with XA transactions and for troubleshooting issues with
concurrency and deadlocks.
The following list describes how MySQL supports the different transaction levels. The list goes from the most commonly used level to the least used.
This is the default isolation level for
InnoDB. Consistent reads within the same transaction read the snapshot established by the first read. This means that if you issue several plain (nonlocking)SELECTstatements within the same transaction, theseSELECTstatements are consistent also with respect to each other. See Section 14.10.2.3, “Consistent Nonlocking Reads”.For locking reads (
SELECTwithFOR UPDATEorLOCK IN SHARE MODE),UPDATE, andDELETEstatements, locking depends on whether the statement uses a unique index with a unique search condition, or a range-type search condition.For a unique index with a unique search condition,
InnoDBlocks only the index record found, not the gap before it.For other search conditions,
InnoDBlocks the index range scanned, using gap locks or next-key locks to block insertions by other sessions into the gaps covered by the range. For information about gap locks and next-key locks, see Section 14.10.1, “InnoDB Locking”.
Each consistent read, even within the same transaction, sets and reads its own fresh snapshot. For information about consistent reads, see Section 14.10.2.3, “Consistent Nonlocking Reads”.
For locking reads (
SELECTwithFOR UPDATEorLOCK IN SHARE MODE),UPDATEstatements, andDELETEstatements,InnoDBlocks only index records, not the gaps before them, and thus permits the free insertion of new records next to locked records. Gap locking is only used for foreign-key constraint checking and duplicate-key checking.Because gap locking is disabled, phantom problems may occur, as other sessions can insert new rows into the gaps. For information about phantoms, see Section 14.10.4, “Phantom Rows”.
Only row-based binary logging is supported with the
READ COMMITTEDisolation level. If you useREAD COMMITTEDwithbinlog_format=MIXED, the server automatically uses row-based logging.Using
READ COMMITTEDhas additional effects:For
UPDATEorDELETEstatements,InnoDBholds locks only for rows that it updates or deletes. Record locks for nonmatching rows are released after MySQL has evaluated theWHEREcondition. This greatly reduces the probability of deadlocks, but they can still happen.For
UPDATEstatements, if a row is already locked,InnoDBperforms a “semi-consistent” read, returning the latest committed version to MySQL so that MySQL can determine whether the row matches theWHEREcondition of theUPDATE. If the row matches (must be updated), MySQL reads the row again and this timeInnoDBeither locks it or waits for a lock on it.
Consider the following example, beginning with this table:
CREATE TABLE t (a INT NOT NULL, b INT) ENGINE = InnoDB; INSERT INTO t VALUES (1,2),(2,3),(3,2),(4,3),(5,2); COMMIT;
In this case, the table has no indexes, so searches and index scans use the hidden clustered index for record locking (see Section 14.9.2.1, “Clustered and Secondary Indexes”) rather than indexed columns.
Suppose that one session performs an
UPDATEusing these statements:# Session A START TRANSACTION; UPDATE t SET b = 5 WHERE b = 3;
Suppose also that a second session performs an
UPDATEby executing this statement following those of the first session:# Session B UPDATE t SET b = 4 WHERE b = 2;
As
InnoDBexecutes eachUPDATE, it first acquires an exclusive lock for each row that it reads, and then determines whether to modify it. IfInnoDBdoes not modify the row, it releases the lock. Otherwise,InnoDBretains the lock until the end of the transaction. This affects transaction processing as follows.When using the default
REPEATABLE READisolation level, the firstUPDATEacquires an x-lock on each row that it reads and does not release any of them:x-lock(1,2); retain x-lock x-lock(2,3); update(2,3) to (2,5); retain x-lock x-lock(3,2); retain x-lock x-lock(4,3); update(4,3) to (4,5); retain x-lock x-lock(5,2); retain x-lock
The second
UPDATEblocks as soon as it tries to acquire any locks (because first update has retained locks on all rows), and does not proceed until the firstUPDATEcommits or rolls back:x-lock(1,2); block and wait for first UPDATE to commit or roll back
If
READ COMMITTEDis used instead, the firstUPDATEacquires an x-lock on each row that it reads and releases those for rows that it does not modify:x-lock(1,2); unlock(1,2) x-lock(2,3); update(2,3) to (2,5); retain x-lock x-lock(3,2); unlock(3,2) x-lock(4,3); update(4,3) to (4,5); retain x-lock x-lock(5,2); unlock(5,2)
For the second
UPDATE,InnoDBdoes a “semi-consistent” read, returning the latest committed version of each row that it reads to MySQL so that MySQL can determine whether the row matches theWHEREcondition of theUPDATE:x-lock(1,2); update(1,2) to (1,4); retain x-lock x-lock(2,3); unlock(2,3) x-lock(3,2); update(3,2) to (3,4); retain x-lock x-lock(4,3); unlock(4,3) x-lock(5,2); update(5,2) to (5,4); retain x-lock
However, if the
WHEREcondition includes an indexed column, andInnoDBuses the index, only the indexed column is considered when taking and retaining record locks. In the following example, the firstUPDATEtakes and retains an x-lock on each row where b = 2. The secondUPDATEblocks when it tries to acquire x-locks on the same records, as it also uses the index defined on column b.CREATE TABLE t (a INT NOT NULL, b INT, c INT, INDEX (b)) ENGINE = InnoDB; INSERT INTO t VALUES (1,2,3),(2,2,4); COMMIT; # Session A START TRANSACTION; UPDATE t SET b = 3 WHERE b = 2 AND c = 3; # Session B UPDATE t SET b = 4 WHERE b = 2 AND c = 4;
The effects of using the
READ COMMITTEDisolation level are the same as enabling theinnodb_locks_unsafe_for_binlogconfiguration option, with these exceptions:Enabling
innodb_locks_unsafe_for_binlogis a global setting and affects all sessions, whereas the isolation level can be set globally for all sessions, or individually per session.innodb_locks_unsafe_for_binlogcan be set only at server startup, whereas the isolation level can be set at startup or changed at runtime.
READ COMMITTEDtherefore offers finer and more flexible control thaninnodb_locks_unsafe_for_binlog.SELECTstatements are performed in a nonlocking fashion, but a possible earlier version of a row might be used. Thus, using this isolation level, such reads are not consistent. This is also called a “dirty read.” Otherwise, this isolation level works likeREAD COMMITTED.This level is like
REPEATABLE READ, butInnoDBimplicitly converts all plainSELECTstatements toSELECT ... LOCK IN SHARE MODEifautocommitis disabled. Ifautocommitis enabled, theSELECTis its own transaction. It therefore is known to be read only and can be serialized if performed as a consistent (nonlocking) read and need not block for other transactions. (To force a plainSELECTto block if other transactions have modified the selected rows, disableautocommit.)
In InnoDB, all user activity occurs inside a
transaction. If autocommit mode
is enabled, each SQL statement forms a single transaction on its
own. By default, MySQL starts the session for each new
connection with autocommit
enabled, so MySQL does a commit after each SQL statement if that
statement did not return an error. If a statement returns an
error, the commit or rollback behavior depends on the error. See
Section 14.23.4, “InnoDB Error Handling”.
A session that has autocommit
enabled can perform a multiple-statement transaction by starting
it with an explicit
START
TRANSACTION or
BEGIN
statement and ending it with a
COMMIT or
ROLLBACK
statement. See Section 13.3.1, “START TRANSACTION, COMMIT, and ROLLBACK Syntax”.
If autocommit mode is disabled
within a session with SET autocommit = 0, the
session always has a transaction open. A
COMMIT or
ROLLBACK
statement ends the current transaction and a new one starts.
If a session that has
autocommit disabled ends
without explicitly committing the final transaction, MySQL rolls
back that transaction.
Some statements implicitly end a transaction, as if you had done
a COMMIT before executing the
statement. For details, see Section 13.3.3, “Statements That Cause an Implicit Commit”.
A COMMIT means that the changes
made in the current transaction are made permanent and become
visible to other sessions. A
ROLLBACK
statement, on the other hand, cancels all modifications made by
the current transaction. Both
COMMIT and
ROLLBACK
release all InnoDB locks that were set during
the current transaction.
By default, connection to the MySQL server begins with autocommit mode enabled, which automatically commits every SQL statement as you execute it. This mode of operation might be unfamiliar if you have experience with other database systems, where it is standard practice to issue a sequence of DML statements and commit them or roll them back all together.
To use multiple-statement
transactions, switch
autocommit off with the SQL statement SET autocommit
= 0 and end each transaction with
COMMIT or
ROLLBACK as
appropriate. To leave autocommit on, begin each transaction
with START
TRANSACTION and end it with
COMMIT or
ROLLBACK.
The following example shows two transactions. The first is
committed; the second is rolled back.
shell> mysql test
mysql>CREATE TABLE customer (a INT, b CHAR (20), INDEX (a));Query OK, 0 rows affected (0.00 sec) mysql>-- Do a transaction with autocommit turned on.mysql>START TRANSACTION;Query OK, 0 rows affected (0.00 sec) mysql>INSERT INTO customer VALUES (10, 'Heikki');Query OK, 1 row affected (0.00 sec) mysql>COMMIT;Query OK, 0 rows affected (0.00 sec) mysql>-- Do another transaction with autocommit turned off.mysql>SET autocommit=0;Query OK, 0 rows affected (0.00 sec) mysql>INSERT INTO customer VALUES (15, 'John');Query OK, 1 row affected (0.00 sec) mysql>INSERT INTO customer VALUES (20, 'Paul');Query OK, 1 row affected (0.00 sec) mysql>DELETE FROM customer WHERE b = 'Heikki';Query OK, 1 row affected (0.00 sec) mysql>-- Now we undo those last 2 inserts and the delete.mysql>ROLLBACK;Query OK, 0 rows affected (0.00 sec) mysql>SELECT * FROM customer;+------+--------+ | a | b | +------+--------+ | 10 | Heikki | +------+--------+ 1 row in set (0.00 sec) mysql>
Transactions in Client-Side Languages
In APIs such as PHP, Perl DBI, JDBC, ODBC, or the standard C
call interface of MySQL, you can send transaction control
statements such as COMMIT to
the MySQL server as strings just like any other SQL statements
such as SELECT or
INSERT. Some APIs also offer
separate special transaction commit and rollback functions or
methods.
A consistent read
means that InnoDB uses multi-versioning to
present to a query a snapshot of the database at a point in
time. The query sees the changes made by transactions that
committed before that point of time, and no changes made by
later or uncommitted transactions. The exception to this rule is
that the query sees the changes made by earlier statements
within the same transaction. This exception causes the following
anomaly: If you update some rows in a table, a
SELECT sees the latest version of
the updated rows, but it might also see older versions of any
rows. If other sessions simultaneously update the same table,
the anomaly means that you might see the table in a state that
never existed in the database.
If the transaction
isolation level is
REPEATABLE READ (the default
level), all consistent reads within the same transaction read
the snapshot established by the first such read in that
transaction. You can get a fresher snapshot for your queries by
committing the current transaction and after that issuing new
queries.
With READ COMMITTED isolation
level, each consistent read within a transaction sets and reads
its own fresh snapshot.
Consistent read is the default mode in which
InnoDB processes
SELECT statements in
READ COMMITTED and
REPEATABLE READ isolation
levels. A consistent read does not set any locks on the tables
it accesses, and therefore other sessions are free to modify
those tables at the same time a consistent read is being
performed on the table.
Suppose that you are running in the default
REPEATABLE READ isolation
level. When you issue a consistent read (that is, an ordinary
SELECT statement),
InnoDB gives your transaction a timepoint
according to which your query sees the database. If another
transaction deletes a row and commits after your timepoint was
assigned, you do not see the row as having been deleted. Inserts
and updates are treated similarly.
The snapshot of the database state applies to
SELECT statements within a
transaction, not necessarily to
DML statements. If you insert
or modify some rows and then commit that transaction, a
DELETE or
UPDATE statement issued from
another concurrent REPEATABLE READ
transaction could affect those just-committed rows, even
though the session could not query them. If a transaction does
update or delete rows committed by a different transaction,
those changes do become visible to the current transaction.
For example, you might encounter a situation like the
following:
SELECT COUNT(c1) FROM t1 WHERE c1 = 'xyz'; -- Returns 0: no rows match. DELETE FROM t1 WHERE c1 = 'xyz'; -- Deletes several rows recently committed by other transaction. SELECT COUNT(c2) FROM t1 WHERE c2 = 'abc'; -- Returns 0: no rows match. UPDATE t1 SET c2 = 'cba' WHERE c2 = 'abc'; -- Affects 10 rows: another txn just committed 10 rows with 'abc' values. SELECT COUNT(c2) FROM t1 WHERE c2 = 'cba'; -- Returns 10: this txn can now see the rows it just updated.
You can advance your timepoint by committing your transaction
and then doing another SELECT or
START TRANSACTION WITH
CONSISTENT SNAPSHOT.
This is called multi-versioned concurrency control.
In the following example, session A sees the row inserted by B only when B has committed the insert and A has committed as well, so that the timepoint is advanced past the commit of B.
Session A Session B
SET autocommit=0; SET autocommit=0;
time
| SELECT * FROM t;
| empty set
| INSERT INTO t VALUES (1, 2);
|
v SELECT * FROM t;
empty set
COMMIT;
SELECT * FROM t;
empty set
COMMIT;
SELECT * FROM t;
---------------------
| 1 | 2 |
---------------------
If you want to see the “freshest” state of the
database, use either the READ
COMMITTED isolation level or a
locking read:
SELECT * FROM t LOCK IN SHARE MODE;
With READ COMMITTED isolation
level, each consistent read within a transaction sets and reads
its own fresh snapshot. With LOCK IN SHARE
MODE, a locking read occurs instead: A
SELECT blocks until the transaction
containing the freshest rows ends (see
Section 14.10.2.4, “Locking Reads”).
Consistent read does not work over certain DDL statements:
Consistent read does not work over
DROP TABLE, because MySQL cannot use a table that has been dropped andInnoDBdestroys the table.Consistent read does not work over
ALTER TABLE, because that statement makes a temporary copy of the original table and deletes the original table when the temporary copy is built. When you reissue a consistent read within a transaction, rows in the new table are not visible because those rows did not exist when the transaction's snapshot was taken.
The type of read varies for selects in clauses like
INSERT INTO ...
SELECT, UPDATE
... (SELECT), and
CREATE TABLE ...
SELECT that do not specify FOR
UPDATE or LOCK IN SHARE MODE:
By default,
InnoDBuses stronger locks and theSELECTpart acts likeREAD COMMITTED, where each consistent read, even within the same transaction, sets and reads its own fresh snapshot.To use a consistent read in such cases, enable the
innodb_locks_unsafe_for_binlogoption and set the isolation level of the transaction toREAD UNCOMMITTED,READ COMMITTED, orREPEATABLE READ(that is, anything other thanSERIALIZABLE). In this case, no locks are set on rows read from the selected table.
If you query data and then insert or update related data within
the same transaction, the regular SELECT
statement does not give enough protection. Other transactions
can update or delete the same rows you just queried.
InnoDB supports two types of
locking reads that
offer extra safety:
Sets a shared mode lock on any rows that are read. Other sessions can read the rows, but cannot modify them until your transaction commits. If any of these rows were changed by another transaction that has not yet committed, your query waits until that transaction ends and then uses the latest values.
For index records the search encounters, locks the rows and any associated index entries, the same as if you issued an
UPDATEstatement for those rows. Other transactions are blocked from updating those rows, from doingSELECT ... LOCK IN SHARE MODE, or from reading the data in certain transaction isolation levels. Consistent reads ignore any locks set on the records that exist in the read view. (Old versions of a record cannot be locked; they are reconstructed by applying undo logs on an in-memory copy of the record.)
These clauses are primarily useful when dealing with tree-structured or graph-structured data, either in a single table or split across multiple tables. You traverse edges or tree branches from one place to another, while reserving the right to come back and change any of these “pointer” values.
All locks set by LOCK IN SHARE MODE and
FOR UPDATE queries are released when the
transaction is committed or rolled back.
Locking reads are only possible when autocommit is disabled
(either by beginning transaction with
START
TRANSACTION or by setting
autocommit to 0.
A locking read clause in an outer statement does not lock the
rows of a table in a nested subquery unless a locking read
clause is also specified in the subquery. For example, the
following statement does not lock rows in table
t2.
SELECT * FROM t1 WHERE c1 = (SELECT c1 FROM t2) FOR UPDATE;
To lock rows in table t2, add a locking read
clause to the subquery:
SELECT * FROM t1 WHERE c1 = (SELECT c1 FROM t2 FOR UPDATE) FOR UPDATE;
Suppose that you want to insert a new row into a table
child, and make sure that the child row has
a parent row in table parent. Your
application code can ensure referential integrity throughout
this sequence of operations.
First, use a consistent read to query the table
PARENT and verify that the parent row
exists. Can you safely insert the child row to table
CHILD? No, because some other session could
delete the parent row in the moment between your
SELECT and your INSERT,
without you being aware of it.
To avoid this potential issue, perform the
SELECT using LOCK IN
SHARE MODE:
SELECT * FROM parent WHERE NAME = 'Jones' LOCK IN SHARE MODE;
After the LOCK IN SHARE MODE query returns
the parent 'Jones', you can safely add the
child record to the CHILD table and commit
the transaction. Any transaction that tries to acquire an
exclusive lock in the applicable row in the
PARENT table waits until you are finished,
that is, until the data in all tables is in a consistent
state.
For another example, consider an integer counter field in a
table CHILD_CODES, used to assign a unique
identifier to each child added to table
CHILD. Do not use either consistent read or
a shared mode read to read the present value of the counter,
because two users of the database could see the same value for
the counter, and a duplicate-key error occurs if two
transactions attempt to add rows with the same identifier to
the CHILD table.
Here, LOCK IN SHARE MODE is not a good
solution because if two users read the counter at the same
time, at least one of them ends up in deadlock when it
attempts to update the counter.
To implement reading and incrementing the counter, first
perform a locking read of the counter using FOR
UPDATE, and then increment the counter. For example:
SELECT counter_field FROM child_codes FOR UPDATE; UPDATE child_codes SET counter_field = counter_field + 1;
A SELECT ... FOR
UPDATE reads the latest available data, setting
exclusive locks on each row it reads. Thus, it sets the same
locks a searched SQL UPDATE
would set on the rows.
The preceding description is merely an example of how
SELECT ... FOR
UPDATE works. In MySQL, the specific task of
generating a unique identifier actually can be accomplished
using only a single access to the table:
UPDATE child_codes SET counter_field = LAST_INSERT_ID(counter_field + 1); SELECT LAST_INSERT_ID();
The SELECT statement merely
retrieves the identifier information (specific to the current
connection). It does not access any table.
A locking read, an
UPDATE, or a
DELETE generally set record locks
on every index record that is scanned in the processing of the SQL
statement. It does not matter whether there are
WHERE conditions in the statement that would
exclude the row. InnoDB does not remember the
exact WHERE condition, but only knows which
index ranges were scanned. The locks are normally
next-key locks that also
block inserts into the “gap” immediately before the
record. However, gap locking
can be disabled explicitly, which causes next-key locking not to
be used. For more information, see
Section 14.10.1, “InnoDB Locking”. The transaction isolation level
also can affect which locks are set; see
Section 14.10.2.1, “Transaction Isolation Levels”.
If a secondary index is used in a search and index record locks to
be set are exclusive, InnoDB also retrieves the
corresponding clustered index records and sets locks on them.
If you have no indexes suitable for your statement and MySQL must scan the entire table to process the statement, every row of the table becomes locked, which in turn blocks all inserts by other users to the table. It is important to create good indexes so that your queries do not unnecessarily scan many rows.
InnoDB sets specific types of locks as follows.
SELECT ... FROMis a consistent read, reading a snapshot of the database and setting no locks unless the transaction isolation level is set toSERIALIZABLE. ForSERIALIZABLElevel, the search sets shared next-key locks on the index records it encounters. However, only an index record lock is required for statements that lock rows using a unique index to search for a unique row.For locking reads (
SELECTwithFOR UPDATEorLOCK IN SHARE MODE),UPDATE, andDELETEstatements, the locks that are taken depend on whether the statement uses a unique index with a unique search condition, or a range-type search condition.For a unique index with a unique search condition,
InnoDBlocks only the index record found, not the gap before it.For other search conditions, and for non-unique indexes,
InnoDBlocks the index range scanned, using gap locks or next-key locks to block insertions by other sessions into the gaps covered by the range. For information about gap locks and next-key locks, see Section 14.10.1, “InnoDB Locking”.
For index records the search encounters,
SELECT ... FOR UPDATEblocks other sessions from doingSELECT ... LOCK IN SHARE MODEor from reading in certain transaction isolation levels. Consistent reads ignore any locks set on the records that exist in the read view.UPDATE ... WHERE ...sets an exclusive next-key lock on every record the search encounters. However, only an index record lock is required for statements that lock rows using a unique index to search for a unique row.When
UPDATEmodifies a clustered index record, implicit locks are taken on affected secondary index records. TheUPDATEoperation also takes shared locks on affected secondary index records when performing duplicate check scans prior to inserting new secondary index records, and when inserting new secondary index records.DELETE FROM ... WHERE ...sets an exclusive next-key lock on every record the search encounters. However, only an index record lock is required for statements that lock rows using a unique index to search for a unique row.INSERTsets an exclusive lock on the inserted row. This lock is an index-record lock, not a next-key lock (that is, there is no gap lock) and does not prevent other sessions from inserting into the gap before the inserted row.Prior to inserting the row, a type of gap lock called an insert intention gap lock is set. This lock signals the intent to insert in such a way that multiple transactions inserting into the same index gap need not wait for each other if they are not inserting at the same position within the gap. Suppose that there are index records with values of 4 and 7. Separate transactions that attempt to insert values of 5 and 6 each lock the gap between 4 and 7 with insert intention locks prior to obtaining the exclusive lock on the inserted row, but do not block each other because the rows are nonconflicting.
If a duplicate-key error occurs, a shared lock on the duplicate index record is set. This use of a shared lock can result in deadlock should there be multiple sessions trying to insert the same row if another session already has an exclusive lock. This can occur if another session deletes the row. Suppose that an
InnoDBtablet1has the following structure:CREATE TABLE t1 (i INT, PRIMARY KEY (i)) ENGINE = InnoDB;
Now suppose that three sessions perform the following operations in order:
Session 1:
START TRANSACTION; INSERT INTO t1 VALUES(1);
Session 2:
START TRANSACTION; INSERT INTO t1 VALUES(1);
Session 3:
START TRANSACTION; INSERT INTO t1 VALUES(1);
Session 1:
ROLLBACK;
The first operation by session 1 acquires an exclusive lock for the row. The operations by sessions 2 and 3 both result in a duplicate-key error and they both request a shared lock for the row. When session 1 rolls back, it releases its exclusive lock on the row and the queued shared lock requests for sessions 2 and 3 are granted. At this point, sessions 2 and 3 deadlock: Neither can acquire an exclusive lock for the row because of the shared lock held by the other.
A similar situation occurs if the table already contains a row with key value 1 and three sessions perform the following operations in order:
Session 1:
START TRANSACTION; DELETE FROM t1 WHERE i = 1;
Session 2:
START TRANSACTION; INSERT INTO t1 VALUES(1);
Session 3:
START TRANSACTION; INSERT INTO t1 VALUES(1);
Session 1:
COMMIT;
The first operation by session 1 acquires an exclusive lock for the row. The operations by sessions 2 and 3 both result in a duplicate-key error and they both request a shared lock for the row. When session 1 commits, it releases its exclusive lock on the row and the queued shared lock requests for sessions 2 and 3 are granted. At this point, sessions 2 and 3 deadlock: Neither can acquire an exclusive lock for the row because of the shared lock held by the other.
INSERT ... ON DUPLICATE KEY UPDATEdiffers from a simpleINSERTin that an exclusive lock rather than a shared lock is placed on the row to be updated when a duplicate-key error occurs. An exclusive index-record lock is taken for a duplicate primary key value. An exclusive next-key lock is taken for a duplicate unique key value.REPLACEis done like anINSERTif there is no collision on a unique key. Otherwise, an exclusive next-key lock is placed on the row to be replaced.INSERT INTO T SELECT ... FROM S WHERE ...sets an exclusive index record lock (without a gap lock) on each row inserted intoT. If the transaction isolation level isREAD COMMITTED, orinnodb_locks_unsafe_for_binlogis enabled and the transaction isolation level is notSERIALIZABLE,InnoDBdoes the search onSas a consistent read (no locks). Otherwise,InnoDBsets shared next-key locks on rows fromS.InnoDBhas to set locks in the latter case: During roll-forward recovery using a statement-based binary log, every SQL statement must be executed in exactly the same way it was done originally.CREATE TABLE ... SELECT ...performs theSELECTwith shared next-key locks or as a consistent read, as forINSERT ... SELECT.When a
SELECTis used in the constructsREPLACE INTO t SELECT ... FROM s WHERE ...orUPDATE t ... WHERE col IN (SELECT ... FROM s ...),InnoDBsets shared next-key locks on rows from tables.While initializing a previously specified
AUTO_INCREMENTcolumn on a table,InnoDBsets an exclusive lock on the end of the index associated with theAUTO_INCREMENTcolumn. In accessing the auto-increment counter,InnoDBuses a specificAUTO-INCtable lock mode where the lock lasts only to the end of the current SQL statement, not to the end of the entire transaction. Other sessions cannot insert into the table while theAUTO-INCtable lock is held; see Section 14.10.2, “InnoDB Transaction Model”.InnoDBfetches the value of a previously initializedAUTO_INCREMENTcolumn without setting any locks.If a
FOREIGN KEYconstraint is defined on a table, any insert, update, or delete that requires the constraint condition to be checked sets shared record-level locks on the records that it looks at to check the constraint.InnoDBalso sets these locks in the case where the constraint fails.LOCK TABLESsets table locks, but it is the higher MySQL layer above theInnoDBlayer that sets these locks.InnoDBis aware of table locks ifinnodb_table_locks = 1(the default) andautocommit = 0, and the MySQL layer aboveInnoDBknows about row-level locks.Otherwise,
InnoDB's automatic deadlock detection cannot detect deadlocks where such table locks are involved. Also, because in this case the higher MySQL layer does not know about row-level locks, it is possible to get a table lock on a table where another session currently has row-level locks. However, this does not endanger transaction integrity, as discussed in Section 14.10.5.2, “Deadlock Detection and Rollback”. See also Section 14.9.1.6, “Limits on InnoDB Tables”.
The so-called phantom
problem occurs within a transaction when the same query produces
different sets of rows at different times. For example, if a
SELECT is executed twice, but
returns a row the second time that was not returned the first
time, the row is a “phantom” row.
Suppose that there is an index on the id column
of the child table and that you want to read
and lock all rows from the table having an identifier value larger
than 100, with the intention of updating some column in the
selected rows later:
SELECT * FROM child WHERE id > 100 FOR UPDATE;
The query scans the index starting from the first record where
id is bigger than 100. Let the table contain
rows having id values of 90 and 102. If the
locks set on the index records in the scanned range do not lock
out inserts made in the gaps (in this case, the gap between 90 and
102), another session can insert a new row into the table with an
id of 101. If you were to execute the same
SELECT within the same transaction,
you would see a new row with an id of 101 (a
“phantom”) in the result set returned by the query.
If we regard a set of rows as a data item, the new phantom child
would violate the isolation principle of transactions that a
transaction should be able to run so that the data it has read
does not change during the transaction.
To prevent phantoms, InnoDB uses an algorithm
called next-key locking that
combines index-row locking with gap locking.
InnoDB performs row-level locking in such a way
that when it searches or scans a table index, it sets shared or
exclusive locks on the index records it encounters. Thus, the
row-level locks are actually index-record locks. In addition, a
next-key lock on an index record also affects the
“gap” before that index record. That is, a next-key
lock is an index-record lock plus a gap lock on the gap preceding
the index record. If one session has a shared or exclusive lock on
record R in an index, another session cannot
insert a new index record in the gap immediately before
R in the index order.
When InnoDB scans an index, it can also lock
the gap after the last record in the index. Just that happens in
the preceding example: To prevent any insert into the table where
id would be bigger than 100, the locks set by
InnoDB include a lock on the gap following
id value 102.
You can use next-key locking to implement a uniqueness check in your application: If you read your data in share mode and do not see a duplicate for a row you are going to insert, then you can safely insert your row and know that the next-key lock set on the successor of your row during the read prevents anyone meanwhile inserting a duplicate for your row. Thus, the next-key locking enables you to “lock” the nonexistence of something in your table.
Gap locking can be disabled as discussed in Section 14.10.1, “InnoDB Locking”. This may cause phantom problems because other sessions can insert new rows into the gaps when gap locking is disabled.
A deadlock is a situation where different transactions are unable to proceed because each holds a lock that the other needs. Because both transactions are waiting for a resource to become available, neither ever release the locks it holds.
A deadlock can occur when transactions lock rows in multiple
tables (through statements such as
UPDATE or
SELECT ... FOR
UPDATE), but in the opposite order. A deadlock can also
occur when such statements lock ranges of index records and gaps,
with each transaction acquiring some locks but not others due to a
timing issue. For a deadlock example, see
Section 14.10.5.1, “An InnoDB Deadlock Example”.
To reduce the possibility of deadlocks, use transactions rather
than LOCK TABLES statements; keep
transactions that insert or update data small enough that they do
not stay open for long periods of time; when different
transactions update multiple tables or large ranges of rows, use
the same order of operations (such as
SELECT ... FOR
UPDATE) in each transaction; create indexes on the
columns used in SELECT ...
FOR UPDATE and
UPDATE ... WHERE
statements. The possibility of deadlocks is not affected by the
isolation level, because the isolation level changes the behavior
of read operations, while deadlocks occur because of write
operations. For more information about avoiding and recovering
from deadlock conditions, see
Section 14.10.5.3, “How to Minimize and Handle Deadlocks”.
If a deadlock does occur, InnoDB detects the
condition and rolls back one of the transactions (the victim).
Thus, even if your application logic is correct, you must still
handle the case where a transaction must be retried. To see the
last deadlock in an InnoDB user transaction,
use the SHOW ENGINE
INNODB STATUS command. If frequent deadlocks highlight a
problem with transaction structure or application error handling,
run with the
innodb_print_all_deadlocks
setting enabled to print information about all deadlocks to the
mysqld error log. For more information about
how deadlocks are automatically detected and handled, see
Section 14.10.5.2, “Deadlock Detection and Rollback”.
The following example illustrates how an error can occur when a lock request would cause a deadlock. The example involves two clients, A and B.
First, client A creates a table containing one row, and then
begins a transaction. Within the transaction, A obtains an
S lock on the row by selecting it in share
mode:
mysql>CREATE TABLE t (i INT) ENGINE = InnoDB;Query OK, 0 rows affected (1.07 sec) mysql>INSERT INTO t (i) VALUES(1);Query OK, 1 row affected (0.09 sec) mysql>START TRANSACTION;Query OK, 0 rows affected (0.00 sec) mysql>SELECT * FROM t WHERE i = 1 LOCK IN SHARE MODE;+------+ | i | +------+ | 1 | +------+
Next, client B begins a transaction and attempts to delete the row from the table:
mysql>START TRANSACTION;Query OK, 0 rows affected (0.00 sec) mysql>DELETE FROM t WHERE i = 1;
The delete operation requires an X lock. The
lock cannot be granted because it is incompatible with the
S lock that client A holds, so the request
goes on the queue of lock requests for the row and client B
blocks.
Finally, client A also attempts to delete the row from the table:
mysql> DELETE FROM t WHERE i = 1;
ERROR 1213 (40001): Deadlock found when trying to get lock;
try restarting transaction
Deadlock occurs here because client A needs an
X lock to delete the row. However, that lock
request cannot be granted because client B already has a request
for an X lock and is waiting for client A to
release its S lock. Nor can the
S lock held by A be upgraded to an
X lock because of the prior request by B for
an X lock. As a result,
InnoDB generates an error for one of the
clients and releases its locks. The client returns this error:
ERROR 1213 (40001): Deadlock found when trying to get lock; try restarting transaction
At that point, the lock request for the other client can be granted and it deletes the row from the table.
InnoDB automatically detects transaction
deadlocks and rolls back a
transaction or transactions to break the deadlock.
InnoDB tries to pick small transactions to
roll back, where the size of a transaction is determined by the
number of rows inserted, updated, or deleted.
InnoDB is aware of table locks if
innodb_table_locks = 1 (the default) and
autocommit = 0, and the MySQL
layer above it knows about row-level locks. Otherwise,
InnoDB cannot detect deadlocks where a table
lock set by a MySQL LOCK TABLES
statement or a lock set by a storage engine other than
InnoDB is involved. Resolve these situations
by setting the value of the
innodb_lock_wait_timeout system
variable.
When InnoDB performs a complete rollback of a
transaction, all locks set by the transaction are released.
However, if just a single SQL statement is rolled back as a
result of an error, some of the locks set by the statement may
be preserved. This happens because InnoDB
stores row locks in a format such that it cannot know afterward
which lock was set by which statement.
If a SELECT calls a stored
function in a transaction, and a statement within the function
fails, that statement rolls back. Furthermore, if
ROLLBACK is
executed after that, the entire transaction rolls back.
If the LATEST DETECTED DEADLOCK section of
InnoDB Monitor output includes a message
stating, “TOO DEEP OR LONG SEARCH IN THE LOCK
TABLE WAITS-FOR GRAPH, WE WILL ROLL BACK FOLLOWING
TRANSACTION,” this indicates that the number
of transactions on the wait-for list has reached a limit of 200.
A wait-for list that exceeds 200 transactions is treated as a
deadlock and the transaction attempting to check the wait-for
list is rolled back. The same error may also occur if the
locking thread must look at more than 1,000,000 locks owned by
transactions on the wait-for list.
For techniques to organize database operations to avoid deadlocks, see Section 14.10.5, “Deadlocks in InnoDB”.
This section builds on the conceptual information about deadlocks in Section 14.10.5.2, “Deadlock Detection and Rollback”. It explains how to organize database operations to minimize deadlocks and the subsequent error handling required in applications.
Deadlocks are a classic problem in transactional databases, but they are not dangerous unless they are so frequent that you cannot run certain transactions at all. Normally, you must write your applications so that they are always prepared to re-issue a transaction if it gets rolled back because of a deadlock.
InnoDB uses automatic row-level locking. You
can get deadlocks even in the case of transactions that just
insert or delete a single row. That is because these operations
are not really “atomic”; they automatically set
locks on the (possibly several) index records of the row
inserted or deleted.
You can cope with deadlocks and reduce the likelihood of their occurrence with the following techniques:
At any time, issue the
SHOW ENGINE INNODB STATUScommand to determine the cause of the most recent deadlock. That can help you to tune your application to avoid deadlocks.If frequent deadlock warnings cause concern, collect more extensive debugging information by enabling the
innodb_print_all_deadlocksconfiguration option. Information about each deadlock, not just the latest one, is recorded in the MySQL error log. Disable this option when you are finished debugging.Always be prepared to re-issue a transaction if it fails due to deadlock. Deadlocks are not dangerous. Just try again.
Keep transactions small and short in duration to make them less prone to collision.
Commit transactions immediately after making a set of related changes to make them less prone to collision. In particular, do not leave an interactive mysql session open for a long time with an uncommitted transaction.
If you use locking reads (
SELECT ... FOR UPDATEorSELECT ... LOCK IN SHARE MODE), try using a lower isolation level such asREAD COMMITTED.When modifying multiple tables within a transaction, or different sets of rows in the same table, do those operations in a consistent order each time. Then transactions form well-defined queues and do not deadlock. For example, organize database operations into functions within your application, or call stored routines, rather than coding multiple similar sequences of
INSERT,UPDATE, andDELETEstatements in different places.Add well-chosen indexes to your tables. Then your queries need to scan fewer index records and consequently set fewer locks. Use
EXPLAIN SELECTto determine which indexes the MySQL server regards as the most appropriate for your queries.Use less locking. If you can afford to permit a
SELECTto return data from an old snapshot, do not add the clauseFOR UPDATEorLOCK IN SHARE MODEto it. Using theREAD COMMITTEDisolation level is good here, because each consistent read within the same transaction reads from its own fresh snapshot.If nothing else helps, serialize your transactions with table-level locks. The correct way to use
LOCK TABLESwith transactional tables, such asInnoDBtables, is to begin a transaction withSET autocommit = 0(notSTART TRANSACTION) followed byLOCK TABLES, and to not callUNLOCK TABLESuntil you commit the transaction explicitly. For example, if you need to write to tablet1and read from tablet2, you can do this:SET autocommit=0; LOCK TABLES t1 WRITE, t2 READ, ...;
... do something with tables t1 and t2 here ...COMMIT; UNLOCK TABLES;Table-level locks prevent concurrent updates to the table, avoiding deadlocks at the expense of less responsiveness for a busy system.
Another way to serialize transactions is to create an auxiliary “semaphore” table that contains just a single row. Have each transaction update that row before accessing other tables. In that way, all transactions happen in a serial fashion. Note that the
InnoDBinstant deadlock detection algorithm also works in this case, because the serializing lock is a row-level lock. With MySQL table-level locks, the timeout method must be used to resolve deadlocks.
- 14.11.1 InnoDB Startup Configuration
- 14.11.2 InnoDB Buffer Pool Configuration
- 14.11.3 Configuring the Memory Allocator for InnoDB
- 14.11.4 Configuring Thread Concurrency for InnoDB
- 14.11.5 Configuring the Number of Background InnoDB I/O Threads
- 14.11.6 Using Asynchronous I/O on Linux
- 14.11.7 Configuring InnoDB I/O Capacity
- 14.11.8 Configuring Spin Lock Polling
- 14.11.9 Purge Configuration
- 14.11.10 Configuring Optimizer Statistics for InnoDB
This section provides configuration information and procedures for
InnoDB initialization, startup, and various
components and features of the InnoDB storage
engine. For information about optimizing database operations for
InnoDB tables, see
Section 8.5, “Optimizing for InnoDB Tables”.
The first decisions to make about InnoDB
configuration involve the configuration of data files, log files,
and memory buffers. It is recommended that you define data file,
log file, and page size configuration before creating the
InnoDB instance. Modifying data file or log
file configuration after the InnoDB instance is
created may involve a non-trivial procedure.
In addition to these topics, this section provides information
about specifying InnoDB options in a
configuration file, viewing InnoDB
initialization information, and important storage considerations.
Because MySQL uses data file and log file configuration settings
to initialize the InnoDB instance, it is
recommended that you define these settings in a configuration
file that MySQL reads at startup, prior to initializing
InnoDB for the first time.
InnoDB is initialized when the MySQL server
is started, and the first initialization of
InnoDB normally occurs the first time you
start the MySQL server.
You can place InnoDB options in the
[mysqld] group of any option file that your
server reads when it starts. The locations of MySQL option files
are described in Section 4.2.2.2, “Using Option Files”.
To make sure that mysqld reads options only
from a specific file, use the
--defaults-file option as the
first option on the command line when starting the server:
mysqld --defaults-file=path_to_configuration_file
To view InnoDB initialization information
during startup, start mysqld from a command
prompt. When mysqld is started from a command
prompt, initialization information is printed to the console.
For example, on Windows, if mysqld is located
in C:\Program Files\MySQL\MySQL Server
5.5\bin, start the MySQL server like
this:
C:\> "C:\Program Files\MySQL\MySQL Server 5.5\bin\mysqld" --console
On Unix-like systems, mysqld is located in
the bin directory of your MySQL
installation:
shell> bin/mysqld --user=mysql &
If you do not send server output to the console, check the error
log after startup to see the initialization information
InnoDB printed during the startup process.
For information about starting MySQL using other methods, see Section 2.10.5, “Starting and Stopping MySQL Automatically”.
InnoDB does not open all user tables and
associated data files at startup. However,
InnoDB does check for the existence of
tablespace files (*.ibd files) that are
referenced in the data dictionary. If a tablespace file is not
found, InnoDB logs an error and continues
the startup sequence. Tablespace files that are referenced in
the redo log may be opened during crash recovery for redo
application.
Review the following storage-related considerations before proceeding with your startup configuration.
In some cases, database performance improves if the data is not all placed on the same physical disk. Putting log files on a different disk from data is very often beneficial for performance. For example, you can place system tablespace data files and log files on different disks. You can also use raw disk partitions (raw devices) for
InnoDBdata files, which may speed up I/O. See Using Raw Disk Partitions for the System Tablespace.InnoDBis a transaction-safe (ACID compliant) storage engine for MySQL that has commit, rollback, and crash-recovery capabilities to protect user data. However, it cannot do so if the underlying operating system or hardware does not work as advertised. Many operating systems or disk subsystems may delay or reorder write operations to improve performance. On some operating systems, the veryfsync()system call that should wait until all unwritten data for a file has been flushed might actually return before the data has been flushed to stable storage. Because of this, an operating system crash or a power outage may destroy recently committed data, or in the worst case, even corrupt the database because of write operations having been reordered. If data integrity is important to you, perform some “pull-the-plug” tests before using anything in production. On OS X 10.3 and higher,InnoDBuses a specialfcntl()file flush method. Under Linux, it is advisable to disable the write-back cache.On ATA/SATA disk drives, a command such
hdparm -W0 /dev/hdamay work to disable the write-back cache. Beware that some drives or disk controllers may be unable to disable the write-back cache.With regard to
InnoDBrecovery capabilities that protect user data,InnoDBuses a file flush technique involving a structure called the doublewrite buffer, which is enabled by default (innodb_doublewrite=ON). The doublewrite buffer adds safety to recovery following a crash or power outage, and improves performance on most varieties of Unix by reducing the need forfsync()operations. It is recommended that theinnodb_doublewriteoption remains enabled if you are concerned with data integrity or possible failures. For additional information about the doublewrite buffer, see Section 14.15.1, “InnoDB Disk I/O”.Before using NFS with
InnoDB, review potential issues outlined in Using NFS with MySQL.Running MySQL server on a 4K sector hard drive on Windows is not supported with
innodb_flush_method=async_unbuffered, which is the default setting. The workaround is to useinnodb_flush_method=normal.
The innodb_data_file_path
startup option defines the name, size, and attributes of
InnoDB system tablespace data files. If you
do not configure this option prior to initializing the MySQL
server, the default behavior is to create a single
auto-extending data file, slightly larger than 10MB, named
ibdata1:
mysql> SHOW VARIABLES LIKE 'innodb_data_file_path';
+-----------------------+------------------------+
| Variable_name | Value |
+-----------------------+------------------------+
| innodb_data_file_path | ibdata1:10M:autoextend |
+-----------------------+------------------------+
The full data file specification syntax includes the file name,
file size, autoextend attribute, and
max attribute:
file_name:file_size[:autoextend[:max:max_file_size]]
File sizes are specified in kilobytes, megabytes, or gigabytes
by appending K, M or
G to the size value. If specifying the data
file size in kilobytes, do so in multiples of 1024. Otherwise,
kilobyte values are rounded to nearest megabyte (MB) boundary.
The sum of file sizes must be, at a minimum, slightly larger
than 10MB.
You can specify more than one data file using a semicolon-separated list. For example:
[mysqld] innodb_data_file_path=ibdata1:50M;ibdata2:50M:autoextend
The autoextend and max
attributes can be used only for the data file that is specified
last.
When the autoextend attribute is specified,
the data file automatically increases in size by 8MB increments
as space is required. The
innodb_autoextend_increment
variable controls the increment size.
To specify a maximum size for an auto-extending data file, use
the max attribute following the
autoextend attribute. Use the
max attribute only in cases where
constraining disk usage is of critical importance. The following
configuration permits ibdata1 to grow to a
limit of 500MB:
[mysqld] innodb_data_file_path=ibdata1:10M:autoextend:max:500M
If your disk becomes full, you can add a data file on another disk. For instructions, see Resizing the System Tablespace.
The size limit for individual files is determined by your operating system. You can set the file size to more than 4GB on operating systems that support large files. You can also use raw disk partitions as data files. See Using Raw Disk Partitions for the System Tablespace.
InnoDB is not aware of the file system
maximum file size, so be cautious on file systems where the
maximum file size is a small value such as 2GB.
System tablespace files are created in the data directory by
default (datadir). To specify
an alternate location, use the
innodb_data_home_dir option.
For example, to create a system tablespace data file in a
directory named myibdata, use this
configuration:
[mysqld] innodb_data_home_dir = /myibdata/ innodb_data_file_path=ibdata1:50M:autoextend
A trailing slash is required when specifying a value for
innodb_data_home_dir.
InnoDB does not create directories, so ensure
that the specified directory exists before you start the server.
Also, ensure sure that the MySQL server has the proper access
rights to create files in the directory.
InnoDB forms the directory path for each data
file by textually concatenating the value of
innodb_data_home_dir to the
data file name. If
innodb_data_home_dir is not
defined, the default value is “./”, which is the
data directory. (The MySQL server changes its current working
directory to the data directory when it begins executing.)
If you specify
innodb_data_home_dir as an
empty string, you can specify absolute paths for data files
listed in the
innodb_data_file_path value.
The following configuration is equivalent to the preceding one:
[mysqld] innodb_data_home_dir = innodb_data_file_path=/myibdata/ibdata1:50M:autoextend
By default, InnoDB creates two 5MB redo log
files in the data directory named
ib_logfile0 and
ib_logfile1.
The following options can be used to modify the default configuration:
innodb_log_group_home_dirdefines directory path to theInnoDBlog files (the redo logs). If this option is not configured,InnoDBlog files are created in the MySQL data directory (datadir).You might use this option to place
InnoDBlog files in a different physical storage location thanInnoDBdata files to avoid potential I/O resource conflicts. For example:[mysqld] innodb_log_group_home_dir = /dr3/iblogs
NoteInnoDBdoes not create directories, so make sure that the log directory exists before you start the server. Use the Unix or DOSmkdircommand to create any necessary directories.Make sure that the MySQL server has the proper access rights to create files in the log directory. More generally, the server must have access rights in any directory where it needs to create log files.
innodb_log_files_in_groupdefines the number of log files in the log group. The default and recommended value is 2.innodb_log_file_sizedefines the size in bytes of each log file in the log group. The combined size of log files (innodb_log_file_size*innodb_log_files_in_group) cannot exceed a maximum value that is slightly less than 4GB. A pair of 2047 MB log files, for example, approaches the limit but does not exceed it. The default log file size is 5MB. Generally, the combined size of the log files should be large enough that the server can smooth out peaks and troughs in workload activity, which often means that there is enough redo log space to handle more than an hour of write activity. The larger the value, the less checkpoint flush activity is needed in the buffer pool, saving disk I/O. For additional information, see Section 8.5.3, “Optimizing InnoDB Redo Logging”.
MySQL allocates memory to various caches and buffers to improve
performance of database operations. When allocating memory for
InnoDB, always consider memory required by
the operating system, memory allocated to other applications,
and memory allocated for other MySQL buffers and caches. For
example, if you use MyISAM tables, consider
the amount of memory allocated for the key buffer
(key_buffer_size). For an
overview of MySQL buffers and caches, see
Section 8.12.4.1, “How MySQL Uses Memory”.
Buffers specific to InnoDB are configured
using the following parameters:
innodb_buffer_pool_sizedefines size of the buffer pool, which is the memory area that holds cached data forInnoDBtables, indexes, and other auxiliary buffers. The size of the buffer pool is important for system performance, and it is typically recommended thatinnodb_buffer_pool_sizeis configured to 50 to 75 percent of system memory. The default buffer pool size is 128MB. For additional guidance, see Section 8.12.4.1, “How MySQL Uses Memory”. For information about how to configureInnoDBbuffer pool size, see Configuring InnoDB Buffer Pool Size. Buffer pool size can be configured at startup.On systems with a large amount of memory, you can improve concurrency by dividing the buffer pool into multiple buffer pool instances. The number of buffer pool instances is controlled by the by
innodb_buffer_pool_instancesoption. By default,InnoDBcreates one buffer pool instance. The number of buffer pool instances can be configured at startup. For more information, see Section 14.11.2.1, “Configuring Multiple Buffer Pool Instances”.innodb_additional_mem_pool_sizedefines size in bytes of a memory poolInnoDBuses to store data dictionary information and other internal data structures. The more tables you have in your application, the more memory you allocate here. IfInnoDBruns out of memory in this pool, it starts to allocate memory from the operating system and writes warning messages to the MySQL error log. The default value is 8MB.innodb_log_buffer_sizedefines the size in bytes of the buffer thatInnoDBuses to write to the log files on disk. The default size is 8MB. A large log buffer enables large transactions to run without a need to write the log to disk before the transactions commit. If you have transactions that update, insert, or delete many rows, you might consider increasing the size of the log buffer to save disk I/O.innodb_log_buffer_sizecan be configured at startup. For related information, see Section 8.5.3, “Optimizing InnoDB Redo Logging”.
On 32-bit GNU/Linux x86, be careful not to set memory usage
too high. glibc may permit the process heap
to grow over thread stacks, which crashes your server. It is a
risk if the memory allocated to the mysqld
process for global and per-thread buffers and caches is close
to or exceeds 2GB.
A formula similar to the following that calculates global and per-thread memory allocation for MySQL can be used to estimate MySQL memory usage. You may need to modify the formula to account for buffers and caches in your MySQL version and configuration. For an overview of MySQL buffers and caches, see Section 8.12.4.1, “How MySQL Uses Memory”.
innodb_buffer_pool_size + key_buffer_size + max_connections*(sort_buffer_size+read_buffer_size+binlog_cache_size) + max_connections*2MB
Each thread uses a stack (often 2MB, but only 256KB in MySQL
binaries provided by Oracle Corporation.) and in the worst
case also uses sort_buffer_size +
read_buffer_size additional memory.
On Linux, if the kernel is enabled for large page support,
InnoDB can use large pages to allocate memory
for its buffer pool and additional memory pool. See
Section 8.12.4.2, “Enabling Large Page Support”.
This section provides configuration and tuning information for the
InnoDB buffer pool.
For systems with buffer pools in the multi-gigabyte range,
dividing the buffer pool into separate instances can improve
concurrency, by reducing contention as different threads read
and write to cached pages. This feature is typically intended
for systems with a buffer
pool size in the multi-gigabyte range. Multiple buffer
pool instances are configured using the
innodb_buffer_pool_instances
configuration option, and you might also adjust the
innodb_buffer_pool_size value.
When the InnoDB buffer pool is large, many
data requests can be satisfied by retrieving from memory. You
might encounter bottlenecks from multiple threads trying to
access the buffer pool at once. You can enable multiple buffer
pools to minimize this contention. Each page that is stored in
or read from the buffer pool is assigned to one of the buffer
pools randomly, using a hashing function. Each buffer pool
manages its own free lists, flush lists, LRUs, and all other
data structures connected to a buffer pool, and is protected by
its own buffer pool mutex.
To enable multiple buffer pool instances, set the
innodb_buffer_pool_instances configuration
option to a value greater than 1 (the default) up to 64 (the
maximum). This option takes effect only when you set
innodb_buffer_pool_size to a size of 1GB or
more. The total size you specify is divided among all the buffer
pools. For best efficiency, specify a combination of
innodb_buffer_pool_instances
and innodb_buffer_pool_size so
that each buffer pool instance is at least 1GB.
Rather than using a strict LRU
algorithm, InnoDB uses a technique to
minimize the amount of data that is brought into the
buffer pool and never
accessed again. The goal is to make sure that frequently
accessed (“hot”) pages remain in the buffer pool,
even as read-ahead and
full table scans
bring in new blocks that might or might not be accessed
afterward.
Newly read blocks are inserted into the middle of the LRU list.
All newly read pages are inserted at a location that by default
is 3/8 from the tail of the LRU list. The
pages are moved to the front of the list (the most-recently used
end) when they are accessed in the buffer pool for the first
time. Thus, pages that are never accessed never make it to the
front portion of the LRU list, and “age out” sooner
than with a strict LRU approach. This arrangement divides the
LRU list into two segments, where the pages downstream of the
insertion point are considered “old” and are
desirable victims for LRU eviction.
For an explanation of the inner workings of the
InnoDB buffer pool and specifics about the
LRU algorithm, see Section 14.8.1, “Buffer Pool”.
You can control the insertion point in the LRU list and choose
whether InnoDB applies the same optimization
to blocks brought into the buffer pool by table or index scans.
The configuration parameter
innodb_old_blocks_pct controls
the percentage of “old” blocks in the LRU list. The
default value of
innodb_old_blocks_pct is
37, corresponding to the original fixed ratio
of 3/8. The value range is 5 (new pages in
the buffer pool age out very quickly) to 95
(only 5% of the buffer pool is reserved for hot pages, making
the algorithm close to the familiar LRU strategy).
The optimization that keeps the buffer pool from being churned
by read-ahead can avoid similar problems due to table or index
scans. In these scans, a data page is typically accessed a few
times in quick succession and is never touched again. The
configuration parameter
innodb_old_blocks_time
specifies the time window (in milliseconds) after the first
access to a page during which it can be accessed without being
moved to the front (most-recently used end) of the LRU list. The
default value of
innodb_old_blocks_time is
0, corresponding to the original behavior of
moving a page to the most-recently used end of the buffer pool
list when it is first accessed in the buffer pool. Increasing
this value makes more and more blocks likely to age out faster
from the buffer pool.
Both innodb_old_blocks_pct and
innodb_old_blocks_time can be
specified in the MySQL option file (my.cnf or
my.ini) or changed at runtime with the
SET
GLOBAL statement. Changing the value at runtime
requires privileges sufficient to set global system variables.
See Section 5.1.8.1, “System Variable Privileges”.
To help you gauge the effect of setting these parameters, the
SHOW ENGINE INNODB STATUS command reports
buffer pool statistics. For details, see
Monitoring the Buffer Pool Using the InnoDB Standard Monitor.
Because the effects of these parameters can vary widely based on your hardware configuration, your data, and the details of your workload, always benchmark to verify the effectiveness before changing these settings in any performance-critical or production environment.
In mixed workloads where most of the activity is OLTP type with
periodic batch reporting queries which result in large scans,
setting the value of
innodb_old_blocks_time during
the batch runs can help keep the working set of the normal
workload in the buffer pool.
When scanning large tables that cannot fit entirely in the
buffer pool, setting
innodb_old_blocks_pct to a
small value keeps the data that is only read once from consuming
a significant portion of the buffer pool. For example, setting
innodb_old_blocks_pct=5 restricts this data
that is only read once to 5% of the buffer pool.
When scanning small tables that do fit into memory, there is
less overhead for moving pages around within the buffer pool, so
you can leave
innodb_old_blocks_pct at its
default value, or even higher, such as
innodb_old_blocks_pct=50.
The effect of the
innodb_old_blocks_time
parameter is harder to predict than the
innodb_old_blocks_pct
parameter, is relatively small, and varies more with the
workload. To arrive at an optimal value, conduct your own
benchmarks if the performance improvement from adjusting
innodb_old_blocks_pct is not
sufficient.
A read-ahead request is
an I/O request to prefetch multiple pages in the
buffer pool
asynchronously, in anticipation that these pages will be needed
soon. The requests bring in all the pages in one
extent.
InnoDB uses two read-ahead algorithms to
improve I/O performance:
Linear read-ahead is a
technique that predicts what pages might be needed soon based on
pages in the buffer pool being accessed sequentially. You
control when InnoDB performs a read-ahead
operation by adjusting the number of sequential page accesses
required to trigger an asynchronous read request, using the
configuration parameter
innodb_read_ahead_threshold.
Before this parameter was added, InnoDB would
only calculate whether to issue an asynchronous prefetch request
for the entire next extent when it read the last page of the
current extent.
The configuration parameter
innodb_read_ahead_threshold
controls how sensitive InnoDB is in detecting
patterns of sequential page access. If the number of pages read
sequentially from an extent is greater than or equal to
innodb_read_ahead_threshold,
InnoDB initiates an asynchronous read-ahead
operation of the entire following extent.
innodb_read_ahead_threshold can
be set to any value from 0-64. The default value is 56. The
higher the value, the more strict the access pattern check. For
example, if you set the value to 48, InnoDB
triggers a linear read-ahead request only when 48 pages in the
current extent have been accessed sequentially. If the value is
8, InnoDB triggers an asynchronous read-ahead
even if as few as 8 pages in the extent are accessed
sequentially. You can set the value of this parameter in the
MySQL configuration
file, or change it dynamically with the
SET
GLOBAL statement, which requires privileges sufficient
to set global system variables. See
Section 5.1.8.1, “System Variable Privileges”.
Random read-ahead is a
technique that predicts when pages might be needed soon based on
pages already in the buffer pool, regardless of the order in
which those pages were read. If 13 consecutive pages from the
same extent are found in the buffer pool,
InnoDB asynchronously issues a request to
prefetch the remaining pages of the extent. To enable this
feature, set the configuration variable
innodb_random_read_ahead to
ON.
Random read-ahead functionality was removed from the
InnoDB Plugin (version 1.0.4) and was
therefore not included in MySQL 5.5.0 when InnoDB
Plugin became the “built-in” version of
InnoDB. Random read-ahead was reintroduced in
MySQL 5.1.59 and 5.5.16 and higher along with the
innodb_random_read_ahead
configuration option, which is disabled by default. To enable
this feature, set the configuration variable
innodb_random_read_ahead to
ON.
The SHOW ENGINE INNODB STATUS command
displays statistics to help you evaluate the effectiveness of
the read-ahead algorithm. Statistics include counter information
for the following global status variables:
This information can be useful when fine-tuning the
innodb_random_read_ahead
setting.
For more information about I/O performance, see Section 8.5.7, “Optimizing InnoDB Disk I/O” and Section 8.12.2, “Optimizing Disk I/O”.
InnoDB performs certain tasks in the
background, including flushing of dirty pages from the buffer
pool, a task performed by the master thread. Dirty pages are
those that have been modified but are not yet written to the
data files on disk. InnoDB aggressively
flushes buffer pool pages if the percentage of dirty pages in
the buffer pool reaches the
innodb_max_dirty_pages_pct
threshold.
InnoDB uses an adaptive flushing algorithm
to dynamically adjust the rate of flushing based on the speed
of redo log generation and the current rate of flushing. The
intent is to smooth overall performance by ensuring that
flushing activity keeps pace with the current workload.
Automatically adjusting the flushing rate helps avoid sudden
dips in throughput that can occur when bursts of I/O activity
due to buffer pool flushing affects the I/O capacity available
for ordinary read and write activity.
Sharp checkpoints, which are typically associated with
write-intensive workloads that generate a lot of redo entries,
can cause a sudden change in throughput, for example. A sharp
checkpoint occurs when InnoDB wants to
reuse a portion of a log file. Before doing so, all dirty
pages with redo entries in that portion of the log file must
be flushed. If log files become full, a sharp checkpoint
occurs, causing a temporary reduction in throughput. This
scenario can occur even if
innodb_max_dirty_pages_pct
threshold is not reached.
The adaptive flushing algorithm helps avoid such scenarios by tracking the number of dirty pages in the buffer pool and the rate at which redo log records are being generated. Based on this information, it decides how many dirty pages to flush from the buffer pool each second, which permits it to manage sudden changes in workload.
Internal benchmarking has shown that the algorithm not only
maintains throughput over time, but can also improve overall
throughput significantly. However, adaptive flushing can
affect the I/O pattern of a workload significantly and may not
be appropriate in all cases. If adaptive flushing is not
appropriate to the characteristics of your workload, you can
disable it. Adaptive flushing controlled by the
innodb_adaptive_flushing
variable, which is enabled by default.
Be aware that if flushing falls behind, the rate of buffer
pool flushing can exceed the I/O capacity available to
InnoDB, as defined by
innodb_io_capacity setting.
The innodb_io_capacity
setting is applicable to all buffer pool instances. When dirty
pages are flushed, I/O capacity is divided equally among
buffer pool instances.
When InnoDB was developed, the memory
allocators supplied with operating systems and run-time libraries
were often lacking in performance and scalability. At that time,
there were no memory allocator libraries tuned for multi-core
CPUs. Therefore, InnoDB implemented its own
memory allocator in the mem subsystem. This
allocator is guarded by a single mutex, which may become a
bottleneck.
InnoDB also implements a wrapper interface
around the system allocator (malloc and
free) that is likewise guarded by a single
mutex.
Today, as multi-core systems have become more widely available,
and as operating systems have matured, significant improvements
have been made in the memory allocators provided with operating
systems. These new memory allocators perform better and are more
scalable than they were in the past. Most workloads, especially
those where memory is frequently allocated and released (such as
multi-table joins), benefit from using a more highly tuned memory
allocator as opposed to the internal,
InnoDB-specific memory allocator.
You can control whether InnoDB uses its own
memory allocator or an allocator of the operating system, by
setting the value of the system configuration parameter
innodb_use_sys_malloc in the
MySQL option file (my.cnf or
my.ini). If set to ON or
1 (the default), InnoDB uses the
malloc and free functions of
the underlying system rather than manage memory pools itself. This
parameter is not dynamic, and takes effect only when the system is
started. To continue to use the InnoDB memory allocator, set
innodb_use_sys_malloc to
0.
When the InnoDB memory allocator is disabled,
InnoDB ignores the value of the parameter
innodb_additional_mem_pool_size.
The InnoDB memory allocator uses an
additional memory pool for satisfying allocation requests
without having to fall back to the system memory allocator. When
the InnoDB memory allocator is disabled, all
such allocation requests are fulfilled by the system memory
allocator.
On Unix-like systems that use dynamic linking, replacing the
memory allocator may be as easy as making the environment
variable LD_PRELOAD or
LD_LIBRARY_PATH point to the dynamic library
that implements the allocator. On other systems, some relinking
may be necessary. Please refer to the documentation of the
memory allocator library of your choice.
Since InnoDB cannot track all memory use when
the system memory allocator is used
(innodb_use_sys_malloc is
ON), the section “BUFFER POOL AND
MEMORY” in the output of the SHOW ENGINE INNODB
STATUS command only includes the buffer pool
statistics in the “Total memory allocated”. Any
memory allocated using the mem subsystem or
using ut_malloc is excluded.
For more information about the performance implications of
InnoDB memory usage, see
Section 8.10, “Buffering and Caching”.
InnoDB uses operating system
threads to process requests
from user transactions. (Transactions may issue many requests to
InnoDB before they commit or roll back.) On
modern operating systems and servers with multi-core processors,
where context switching is efficient, most workloads run well
without any limit on the number of concurrent threads. Scalability
improvements in MySQL 5.5 and up reduce the need to limit the
number of concurrently executing threads inside
InnoDB.
In situations where it is helpful to minimize context switching
between threads, InnoDB can use a number of
techniques to limit the number of concurrently executing operating
system threads (and thus the number of requests that are processed
at any one time). When InnoDB receives a new
request from a user session, if the number of threads concurrently
executing is at a pre-defined limit, the new request sleeps for a
short time before it tries again. A request that cannot be
rescheduled after the sleep is put in a first-in/first-out queue
and eventually is processed. Threads waiting for locks are not
counted in the number of concurrently executing threads.
You can limit the number of concurrent threads by setting the
configuration parameter
innodb_thread_concurrency. Once
the number of executing threads reaches this limit, additional
threads sleep for a number of microseconds, set by the
configuration parameter
innodb_thread_sleep_delay, before
being placed into the queue.
The default value for
innodb_thread_concurrency and the
implied default limit on the number of concurrent threads has been
changed in various releases of MySQL and
InnoDB. The default value of
innodb_thread_concurrency is
0, so that by default there is no limit on the
number of concurrently executing threads, as shown in
Table 14.3, “Changes to innodb_thread_concurrency”.
Table 14.3 Changes to innodb_thread_concurrency
| InnoDB Version | MySQL Version | Default value | Default limit of concurrent threads | Value to allow unlimited threads |
|---|---|---|---|---|
| Built-in | Earlier than 5.1.11 | 20 | No limit | 20 or higher |
| Built-in | 5.1.11 and newer | 8 | 8 | 0 |
| InnoDB before 1.0.3 | (corresponding to Plugin) | 8 | 8 | 0 |
| InnoDB 1.0.3 and newer | (corresponding to Plugin) | 0 | No limit | 0 |
InnoDB causes threads to sleep only when the
number of concurrent threads is limited. When there is no limit on
the number of threads, all contend equally to be scheduled. That
is, if innodb_thread_concurrency
is 0, the value of
innodb_thread_sleep_delay is
ignored.
When there is a limit on the number of threads (when
innodb_thread_concurrency is >
0), InnoDB reduces context switching overhead
by permitting multiple requests made during the execution of a
single SQL statement to enter
InnoDB without observing the limit set by
innodb_thread_concurrency. Since
an SQL statement (such as a join) may comprise multiple row
operations within InnoDB,
InnoDB assigns a specified number of
“tickets” that allow a thread to be scheduled
repeatedly with minimal overhead.
When a new SQL statement starts, a thread has no tickets, and it
must observe
innodb_thread_concurrency. Once
the thread is entitled to enter InnoDB, it is
assigned a number of tickets that it can use for subsequently
entering InnoDB to perform row operations. If
the tickets run out, the thread is evicted, and
innodb_thread_concurrency is
observed again which may place the thread back into the
first-in/first-out queue of waiting threads. When the thread is
once again entitled to enter InnoDB, tickets
are assigned again. The number of tickets assigned is specified by
the global option
innodb_concurrency_tickets, which
is 500 by default. A thread that is waiting for a lock is given
one ticket once the lock becomes available.
The correct values of these variables depend on your environment
and workload. Try a range of different values to determine what
value works for your applications. Before limiting the number of
concurrently executing threads, review configuration options that
may improve the performance of InnoDB on multi-core and
multi-processor computers, such as
innodb_use_sys_malloc and
innodb_adaptive_hash_index.
For general performance information about MySQL thread handling, see Section 8.12.5.1, “How MySQL Handles Client Connections”.
InnoDB uses background
threads to service various
types of I/O requests. You can configure the number of background
threads that service read and write I/O on data pages using the
innodb_read_io_threads and
innodb_write_io_threads
configuration parameters. These parameters signify the number of
background threads used for read and write requests, respectively.
They are effective on all supported platforms. You can set values
for these parameters in the MySQL option file
(my.cnf or my.ini); you
cannot change values dynamically. The default value for these
parameters is 4 and permissible values range
from 1-64.
These parameters replace innodb_file_io_threads
from earlier versions of MySQL. If you try to set a value for this
obsolete parameter, a warning is written to the log file and the
value is ignored. This parameter only applied to Windows
platforms. (On non-Windows platforms, there was only one thread
each for read and write.)
The purpose of these configuration options to make
InnoDB more scalable on high end systems. Each
background thread can handle up to 256 pending I/O requests. A
major source of background I/O is
read-ahead requests.
InnoDB tries to balance the load of incoming
requests in such way that most background threads share work
equally. InnoDB also attempts to allocate read
requests from the same extent to the same thread, to increase the
chances of coalescing the requests. If you have a high end I/O
subsystem and you see more than 64 ×
innodb_read_io_threads pending
read requests in SHOW ENGINE INNODB STATUS
output, you might improve performance by increasing the value of
innodb_read_io_threads.
On Linux systems, InnoDB uses the asynchronous
I/O subsystem by default to perform read-ahead and write requests
for data file pages, which changes the way that
InnoDB background threads service these types
of I/O requests. For more information, see
Section 14.11.6, “Using Asynchronous I/O on Linux”.
For more information about InnoDB I/O
performance, see Section 8.5.7, “Optimizing InnoDB Disk I/O”.
InnoDB uses the asynchronous I/O subsystem
(native AIO) on Linux to perform read-ahead and write requests for
data file pages. This behavior is controlled by the
innodb_use_native_aio
configuration option, which applies to Linux systems only and is
enabled by default. On other Unix-like systems,
InnoDB uses synchronous I/O only. Historically,
InnoDB only used asynchronous I/O on Windows
systems. Using the asynchronous I/O subsystem on Linux requires
the libaio library.
With synchronous I/O, query threads queue I/O requests, and
InnoDB background threads retrieve the queued
requests one at a time, issuing a synchronous I/O call for each.
When an I/O request is completed and the I/O call returns, the
InnoDB background thread that is handling the
request calls an I/O completion routine and returns to process the
next request. The number of requests that can be processed in
parallel is n, where
n is the number of
InnoDB background threads. The number of
InnoDB background threads is controlled by
innodb_read_io_threads and
innodb_write_io_threads. See
Section 14.11.5, “Configuring the Number of Background InnoDB I/O Threads”.
With native AIO, query threads dispatch I/O requests directly to
the operating system, thereby removing the limit imposed by the
number of background threads. InnoDB background
threads wait for I/O events to signal completed requests. When a
request is completed, a background thread calls an I/O completion
routine and resumes waiting for I/O events.
The advantage of native AIO is scalability for heavily I/O-bound
systems that typically show many pending reads/writes in
SHOW ENGINE INNODB STATUS\G output. The
increase in parallel processing when using native AIO means that
the type of I/O scheduler or properties of the disk array
controller have a greater influence on I/O performance.
A potential disadvantage of native AIO for heavily I/O-bound systems is lack of control over the number of I/O write requests dispatched to the operating system at once. Too many I/O write requests dispatched to the operating system for parallel processing could, in some cases, result in I/O read starvation, depending on the amount of I/O activity and system capabilities.
If a problem with the asynchronous I/O subsystem in the OS
prevents InnoDB from starting, you can start
the server with
innodb_use_native_aio=0. This
option may also be disabled automatically during startup if
InnoDB detects a potential problem such as a
combination of tmpdir location,
tmpfs file system, and Linux kernel that does
not support asynchronous I/O on tmpfs.
The InnoDB master thread and other background
threads perform various tasks in the background, most of which are
I/O related, such as flushing dirty pages from the buffer pool or
writing changes from the insert buffer to the appropriate
secondary indexes. InnoDB attempts to perform
these tasks in a way that does not adversely affect the normal
working of the server. It tries to estimate the free I/O bandwidth
available and tune its activities to take advantage of this free
capacity. Historically, InnoDB used a hard
coded value of 100 IOPs (input/output operations per second)
as the total I/O capacity of the server.
The innodb_io_capacity variable
defines the overall I/O capacity available to
InnoDB. It should be set to approximately the
number of I/O operations that the system can perform per second.
The value depends on your system configuration. When
innodb_io_capacity is set,
InnoDB estimates the I/O bandwidth available
for background tasks based on the set value. Setting the value to
100 reverts to the old behavior.
You can set innodb_io_capacity to
a value of 100 or greater. The default value is
200, reflecting that the performance of typical
modern I/O devices is higher than in the early days of MySQL.
Typically, values around the previous default of 100 are
appropriate for consumer-level storage devices, such as hard
drives up to 7200 RPMs. Faster hard drives, RAID configurations,
and SSDs benefit from higher values.
You can set the
innodb_io_capacity value in the
MySQL option file (my.cnf or
my.ini) or change it dynamically with the
SET GLOBAL
statement, which requires privileges sufficient to set global
system variables. See
Section 5.1.8.1, “System Variable Privileges”.
For related information, see Section 8.5.7, “Optimizing InnoDB Disk I/O”.
InnoDB
mutexes and
rw-locks are typically
reserved for short intervals. On a multi-core system, it can be
more efficient for a thread to continuously check if it can
acquire a mutex or rw-lock for a period of time before it sleeps.
If the mutex or rw-lock becomes available during this period, the
thread can continue immediately, in the same time slice. However,
too-frequent polling of a shared object such as a mutex or rw-lock
by multiple threads can cause “cache ping pong”,
which results in processors invalidating portions of each
other's cache. InnoDB minimizes this issue
by forcing a random delay between polls to desychronize polling
activity. The random delay is implemented as a spin-wait loop.
The duration of a spin-wait loop is determined by the number of
PAUSE instructions that occur in the loop. That number is
generated by randomly selecting an integer ranging from 0 up to
but not including the
innodb_spin_wait_delay value, and
multiplying that value by 50. For example, an integer is randomly
selected from the following range for an
innodb_spin_wait_delay setting of
6:
{0,1,2,3,4,5}The selected integer is multiplied by 50, resulting in one of six possible PAUSE instruction values:
{0,50,100,150,200,250}
For that set of values, 250 is the maximum number of PAUSE
instructions that can occur in a spin-wait loop. An
innodb_spin_wait_delay setting of
5 results in a set of five possible values
{0,50,100,150,200}, where 200 is the maximum
number of PAUSE instructions, and so on. In this way, the
innodb_spin_wait_delay setting
controls the maximum delay between spin lock polls.
The duration of the delay loop depends on the C compiler and the
target processor. In the 100MHz Pentium era, an
innodb_spin_wait_delay unit was
calibrated to be equivalent to one microsecond. That time
equivalence did not hold, but PAUSE instruction duration has
remained fairly constant in terms of processor cycles relative to
other CPU instructions on most processor architectures.
On a system where all processor cores share a fast cache memory,
you might reduce the maximum delay or disable the busy loop
altogether by setting
innodb_spin_wait_delay=0. On a
system with multiple processor chips, the effect of cache
invalidation can be more significant and you might increase the
maximum delay.
The innodb_spin_wait_delay
variable is dynamic. It can be specified in a MySQL option file or
modified at runtime using a
SET GLOBAL
statement. Runtime modification requires privileges sufficient to
set global system variables. See
Section 5.1.8.1, “System Variable Privileges”.
Purge is a type of garbage collection that runs on a periodic
schedule. Purge parses and processes undo log pages from the
history list for the purpose of removing clustered and secondary
index records that were marked for deletion by previous
UPDATE or
DELETE operations and are no longer
required for MVCC or rollback. Purge frees undo log pages from the
history list after processing them.
By default, purge operations are performed by the
InnoDB master thread. Starting with MySQL
5.5, purge operations can performed by one or more
separate purge threads rather than as part of the
InnoDB master thread. The use of separate purge
threads improves scalability by allowing the main database
operations to run independently from maintenance work happening in
the background.
The number of purge threads is controlled by the
innodb_purge_threads variable. If
DML action is concentrated on a single table or a few tables, keep
the setting low so that the threads do not contend with each other
for access to the busy tables. If DML operations are spread across
many tables, increase the setting. The maximum number of purge
threads is 32.
innodb_purge_threads is a
non-dynamic variable, which means that you must restart the server
to configure it.
The innodb_purge_batch_size
variable defines the number of undo log pages that purge parses
and processes in one batch from the history list. The default
value is 20. In a multithreaded purge configuration, the
coordinator purge thread divides
innodb_purge_batch_size by
innodb_purge_threads and assigns
that number of pages to each purge thread.
The innodb_purge_batch_size
variable is intended for advanced performance tuning and
experimentation. Most users need not change
innodb_purge_batch_size from its
default value.
For more information about InnoDB I/O performance, see Section 8.5.7, “Optimizing InnoDB Disk I/O”.
The MySQL query optimizer uses estimated
statistics about key
distributions to choose the indexes for an execution plan, based
on the relative
selectivity of the index.
Certain operations cause InnoDB to sample random pages from each
index on a table to estimate the
cardinality of the index.
(This technique is known as
random dives.) These
operations include the ANALYZE
TABLE statement, the SHOW TABLE
STATUS statement, and accessing the table for the first
time after a restart.
To give you control over the quality of the statistics estimate
(and thus better information for the query optimizer), you can now
change the number of sampled pages using the parameter
innodb_stats_sample_pages.
Previously, the number of sampled pages was always 8, which could
be insufficient to produce an accurate estimate, leading to poor
index choices by the query optimizer. This technique is especially
important for large tables and tables used in
joins. Unnecessary
full table scans for
such tables can be a substantial performance issue.
You can set the global parameter
innodb_stats_sample_pages, at
runtime. The default value for this parameter is 8, preserving the
same behavior as in past releases.
The value of
innodb_stats_sample_pages
affects the index sampling for all tables
and indexes. There are the following potentially significant
impacts when you change the index sample size:
Small values like 1 or 2 can result in very inaccurate estimates of cardinality.
Increasing the
innodb_stats_sample_pagesvalue might require more disk reads. Values much larger than 8 (say, 100), can cause a big slowdown in the time it takes to open a table or executeSHOW TABLE STATUS.The optimizer might choose very different query plans based on different estimates of index selectivity.
To disable the cardinality estimation for metadata statements such
as SHOW TABLE STATUS or
SHOW INDEX, or when accessing the
INFORMATION_SCHEMA.TABLES or
INFORMATION_SCHEMA.STATISTICS tables,
execute the statement SET GLOBAL
innodb_stats_on_metadata=OFF. The ability to set this
option dynamically is also relatively new.
All InnoDB tables are opened, and the
statistics are re-estimated for all associated indexes, when the
mysql client starts with the
--auto-rehash setting on (the
default). To improve the start up time of the
mysql client, you can turn auto-rehash off
using the
--disable-auto-rehash
option. The auto-rehash feature enables
automatic name completion of database, table, and column names for
interactive users.
Whatever value of
innodb_stats_sample_pages works
best for a system, set the option and leave it at that value.
Choose a value that results in reasonably accurate estimates for
all tables in your database without requiring excessive I/O.
Because the statistics are automatically recalculated at various
times other than on execution of ANALYZE
TABLE, it does not make sense to increase the index
sample size, run ANALYZE TABLE,
then decrease sample size again. The more accurate statistics
calculated by ANALYZE running with a high value
of innodb_stats_sample_pages can
be wiped away later.
Although it is not possible to specify the sample size on a
per-table basis, smaller tables generally require fewer index
samples than larger tables do. If your database has many large
tables, consider using a higher value for
innodb_stats_sample_pages than if
you have mostly smaller tables.
ANALYZE TABLE complexity for
InnoDB tables is dependent on:
The number of pages sampled, as defined by
innodb_stats_sample_pages.The number of indexed columns in a table
The number of partitions. If a table has no partitions, the number of partitions is considered to be 1.
Using these parameters, an approximate formula for estimating
ANALYZE TABLE complexity would be:
innodb_stats_sample_pages *
number of indexed columns in a table * number of partitions
Typically, the greater the resulting value, the greater the
execution time for ANALYZE TABLE.
For more information about the
innodb_stats_sample_pages
configuration parameter, see
Section 14.11.10, “Configuring Optimizer Statistics for InnoDB”.
By using the SQL syntax and InnoDB configuration options for compression, you can create tables where the data is stored in compressed form. Compression can help to improve both raw performance and scalability. The compression means less data is transferred between disk and memory, and takes up less space on disk and in memory. The benefits are amplified for tables with secondary indexes, because index data is compressed also. Compression can be especially important for SSD storage devices, because they tend to have lower capacity than HDD devices.
Because processors and cache memories have increased in speed more than disk storage devices, many workloads are disk-bound. Data compression enables smaller database size, reduced I/O, and improved throughput, at the small cost of increased CPU utilization. Compression is especially valuable for read-intensive applications, on systems with enough RAM to keep frequently used data in memory.
An InnoDB table created with
ROW_FORMAT=COMPRESSED can use a smaller
page size on disk than the
usual 16KB default. Smaller pages require less I/O to read from
and write to disk, which is especially valuable for
SSD devices.
The page size is specified through the
KEY_BLOCK_SIZE parameter. The different page
size means the table must be in its own .ibd
file rather than in the
system tablespace,
which requires enabling the
innodb_file_per_table option. The level of
compression is the same regardless of the
KEY_BLOCK_SIZE value. As you specify smaller
values for KEY_BLOCK_SIZE, you get the I/O
benefits of increasingly smaller pages. But if you specify a value
that is too small, there is additional overhead to reorganize the
pages when data values cannot be compressed enough to fit multiple
rows in each page. There is a hard limit on how small
KEY_BLOCK_SIZE can be for a table, based on the
lengths of the key columns for each of its indexes. Specify a
value that is too small, and the CREATE
TABLE or ALTER TABLE
statement fails.
In the buffer pool, the compressed data is held in small pages,
with a page size based on the KEY_BLOCK_SIZE
value. For extracting or updating the column values, MySQL also
creates a 16KB page in the buffer pool with the uncompressed data.
Within the buffer pool, any updates to the uncompressed page are
also re-written back to the equivalent compressed page. You might
need to size your buffer pool to accommodate the additional data
of both compressed and uncompressed pages, although the
uncompressed pages are
evicted from the buffer pool
when space is needed, and then uncompressed again on the next
access.
Before creating a compressed table, make sure the
innodb_file_per_table
configuration option is enabled, and
innodb_file_format is set to
Barracuda. You can set these parameters in the
MySQL configuration
file my.cnf or
my.ini, or with the SET
statement without shutting down the MySQL server.
To enable compression for a table, you use the clauses
ROW_FORMAT=COMPRESSED,
KEY_BLOCK_SIZE, or both in a
CREATE TABLE or
ALTER TABLE statement.
To create a compressed table, you might use statements like these:
SET GLOBAL innodb_file_per_table=1; SET GLOBAL innodb_file_format=Barracuda; CREATE TABLE t1 (c1 INT PRIMARY KEY) ROW_FORMAT=COMPRESSED KEY_BLOCK_SIZE=8;
If you specify
ROW_FORMAT=COMPRESSED, you can omitKEY_BLOCK_SIZE; the default compressed page size of 8KB is used.If you specify
KEY_BLOCK_SIZE, you can omitROW_FORMAT=COMPRESSED; compression is enabled automatically.To determine the best value for
KEY_BLOCK_SIZE, typically you create several copies of the same table with different values for this clause, then measure the size of the resulting.ibdfiles and see how well each performs with a realistic workload.For additional performance-related configuration options, see Section 14.12.3, “Tuning Compression for InnoDB Tables”.
The default uncompressed size of InnoDB data
pages is 16KB. Depending on the
combination of option values, MySQL uses a page size of 1KB, 2KB,
4KB, 8KB, or 16KB for the .ibd file of the
table. The actual compression algorithm is not affected by the
KEY_BLOCK_SIZE value; the value determines how
large each compressed chunk is, which in turn affects how many
rows can be packed into each compressed page.
Setting KEY_BLOCK_SIZE=16 typically does not
result in much compression, since the normal InnoDB
page size is 16KB. This
setting may still be useful for tables with many long
BLOB,
VARCHAR or
TEXT columns, because such values
often do compress well, and might therefore require fewer
overflow pages as
described in Section 14.12.5, “How Compression Works for InnoDB Tables”.
All indexes of a table (including the
clustered index) are
compressed using the same page size, as specified in the
CREATE TABLE or
ALTER TABLE statement. Table
attributes such as ROW_FORMAT and
KEY_BLOCK_SIZE are not part of the
CREATE INDEX syntax, and are
ignored if they are specified (although you see them in the output
of the SHOW CREATE TABLE statement).
Restrictions on Compressed Tables
Because MySQL versions prior to 5.1 cannot process compressed
tables, using compression requires specifying the configuration
parameter
innodb_file_format=Barracuda, to
avoid accidentally introducing compatibility issues.
Table compression is also not available for the InnoDB
system tablespace.
The system tablespace (space 0, the ibdata*
files) can contain user data, but it also contains internal system
information, and therefore is never compressed. Thus, compression
applies only to tables (and indexes) stored in their own
tablespaces, that is, created with the
innodb_file_per_table option
enabled.
Compression applies to an entire table and all its associated
indexes, not to individual rows, despite the clause name
ROW_FORMAT.
Most often, the internal optimizations described in InnoDB Data Storage and Compression ensure that the system runs well with compressed data. However, because the efficiency of compression depends on the nature of your data, you can make decisions that affect the performance of compressed tables:
Which tables to compress.
What compressed page size to use.
Whether to adjust the size of the buffer pool based on run-time performance characteristics, such as the amount of time the system spends compressing and uncompressing data. Whether the workload is more like a data warehouse (primarily queries) or an OLTP system (mix of queries and DML).
If the system performs DML operations on compressed tables, and the way the data is distributed leads to expensive compression failures at runtime, you might adjust additional advanced configuration options.
Use the guidelines in this section to help make those architectural and configuration choices. When you are ready to conduct long-term testing and put compressed tables into production, see Section 14.12.4, “Monitoring InnoDB Table Compression at Runtime” for ways to verify the effectiveness of those choices under real-world conditions.
When to Use Compression
In general, compression works best on tables that include a reasonable number of character string columns and where the data is read far more often than it is written. Because there are no guaranteed ways to predict whether or not compression benefits a particular situation, always test with a specific workload and data set running on a representative configuration. Consider the following factors when deciding which tables to compress.
Data Characteristics and Compression
A key determinant of the efficiency of compression in reducing the
size of data files is the nature of the data itself. Recall that
compression works by identifying repeated strings of bytes in a
block of data. Completely randomized data is the worst case.
Typical data often has repeated values, and so compresses
effectively. Character strings often compress well, whether
defined in CHAR, VARCHAR,
TEXT or BLOB columns. On the
other hand, tables containing mostly binary data (integers or
floating point numbers) or data that is previously compressed (for
example JPEG or PNG images)
may not generally compress well, significantly or at all.
You choose whether to turn on compression for each InnoDB table. A table and all of its indexes use the same (compressed) page size. It might be that the primary key (clustered) index, which contains the data for all columns of a table, compresses more effectively than the secondary indexes. For those cases where there are long rows, the use of compression might result in long column values being stored “off-page”, as discussed in DYNAMIC Row Format. Those overflow pages may compress well. Given these considerations, for many applications, some tables compress more effectively than others, and you might find that your workload performs best only with a subset of tables compressed.
To determine whether or not to compress a particular table,
conduct experiments. You can get a rough estimate of how
efficiently your data can be compressed by using a utility that
implements LZ77 compression (such as gzip or
WinZip) on a copy of the .ibd
file for an uncompressed table. You can expect less
compression from a MySQL compressed table than from file-based
compression tools, because MySQL compresses data in chunks based
on the page size, 16KB by
default. In addition to user data, the page format includes some
internal system data that is not compressed. File-based
compression utilities can examine much larger chunks of data, and
so might find more repeated strings in a huge file than MySQL can
find in an individual page.
Another way to test compression on a specific table is to copy
some data from your uncompressed table to a similar, compressed
table (having all the same indexes) and look at the size of the
resulting .ibd file. For example:
USE test; SET GLOBAL innodb_file_per_table=1; SET GLOBAL innodb_file_format=Barracuda; SET GLOBAL autocommit=0; -- Create an uncompressed table with a million or two rows. CREATE TABLE big_table AS SELECT * FROM information_schema.columns; INSERT INTO big_table SELECT * FROM big_table; INSERT INTO big_table SELECT * FROM big_table; INSERT INTO big_table SELECT * FROM big_table; INSERT INTO big_table SELECT * FROM big_table; INSERT INTO big_table SELECT * FROM big_table; INSERT INTO big_table SELECT * FROM big_table; INSERT INTO big_table SELECT * FROM big_table; INSERT INTO big_table SELECT * FROM big_table; INSERT INTO big_table SELECT * FROM big_table; INSERT INTO big_table SELECT * FROM big_table; COMMIT; ALTER TABLE big_table ADD id int unsigned NOT NULL PRIMARY KEY auto_increment; SHOW CREATE TABLE big_table\G select count(id) from big_table; -- Check how much space is needed for the uncompressed table. \! ls -l data/test/big_table.ibd CREATE TABLE key_block_size_4 LIKE big_table; ALTER TABLE key_block_size_4 key_block_size=4 row_format=compressed; INSERT INTO key_block_size_4 SELECT * FROM big_table; commit; -- Check how much space is needed for a compressed table -- with particular compression settings. \! ls -l data/test/key_block_size_4.ibd
This experiment produced the following numbers, which of course could vary considerably depending on your table structure and data:
-rw-rw---- 1 cirrus staff 310378496 Jan 9 13:44 data/test/big_table.ibd -rw-rw---- 1 cirrus staff 83886080 Jan 9 15:10 data/test/key_block_size_4.ibd
To see whether compression is efficient for your particular
workload, use a MySQL
instance with no other compressed tables and run queries against
the INFORMATION_SCHEMA.INNODB_CMP
table. For exmaple, you examine the ratio of successful
compression operations to overall compression operations. (In the
INNODB_CMP table, compare
COMPRESS_OPS to
COMPRESS_OPS_OK. See
INNODB_CMP
for more information.) If a high percentage of compression
operations complete successfully, the table might be a good
candidate for compression.
Compression and Application and Schema Design
Decide whether to compress data in your application or in the table; do not use both types of compression for the same data. When you compress the data in the application and store the results in a compressed table, extra space savings are extremely unlikely, and the double compression just wastes CPU cycles.
Compressing in the Database
The InnoDB table compression is automatic and applies to all
columns and index values. The columns can still be tested with
operators such as LIKE, and sort operations can
still use indexes even when the index values are compressed.
Because indexes are often a significant fraction of the total size
of a database, compression could result in significant savings in
storage, I/O or processor time. The compression and decompression
operations happen on the database server, which likely is a
powerful system that is sized to handle the expected load.
Compressing in the Application
If you compress data such as text in your application, before it is inserted into the database, You might save overhead for data that does not compress well by compressing some columns and not others. This approach uses CPU cycles for compression and uncompression on the client machine rather than the database server, which might be appropriate for a distributed application with many clients, or where the client machine has spare CPU cycles.
Hybrid Approach
Of course, it is possible to combine these approaches. For some applications, it may be appropriate to use some compressed tables and some uncompressed tables. It may be best to externally compress some data (and store it in uncompressed InnoDB tables) and allow InnoDB to compress (some of) the other tables in the application. As always, up-front design and real-life testing are valuable in reaching the right decision.
Workload Characteristics and Compression
In addition to choosing which tables to compress (and the page
size), the workload is another key determinant of performance. If
the application is dominated by reads, rather than updates, fewer
pages need to be reorganized and recompressed after the index page
runs out of room for the per-page “modification log”
that InnoDB maintains for compressed data. If the updates
predominantly change non-indexed columns or those containing
BLOBs or large strings that happen to be stored
“off-page”, the overhead of compression may be
acceptable. If the only changes to a table are
INSERTs that use a monotonically increasing
primary key, and there are few secondary indexes, there is little
need to reorganize and recompress index pages. Since InnoDB can
“delete-mark” and delete rows on compressed pages
“in place” by modifying uncompressed data,
DELETE operations on a table are relatively
efficient.
For some environments, the time it takes to load data can be as important as run-time retrieval. Especially in data warehouse environments, many tables may be read-only or read-mostly. In those cases, it might or might not be acceptable to pay the price of compression in terms of increased load time, unless the resulting savings in fewer disk reads or in storage cost is significant.
Fundamentally, compression works best when the CPU time is available for compressing and uncompressing data. Thus, if your workload is I/O bound, rather than CPU-bound, you might find that compression can improve overall performance. When you test your application performance with different compression configurations, test on a platform similar to the planned configuration of the production system.
Configuration Characteristics and Compression
Reading and writing database pages from and to disk is the slowest aspect of system performance. Compression attempts to reduce I/O by using CPU time to compress and uncompress data, and is most effective when I/O is a relatively scarce resource compared to processor cycles.
This is often especially the case when running in a multi-user environment with fast, multi-core CPUs. When a page of a compressed table is in memory, InnoDB often uses an additional 16K in the buffer pool for an uncompressed copy of the page. The adaptive LRU algorithm in the InnoDB storage engine attempts to balance the use of memory between compressed and uncompressed pages to take into account whether the workload is running in an I/O-bound or CPU-bound manner. Still, a configuration with more memory dedicated to the InnoDB buffer pool tends to run better when using compressed tables than a configuration where memory is highly constrained.
Choosing the Compressed Page Size
The optimal setting of the compressed page size depends on the type and distribution of data that the table and its indexes contain. The compressed page size should always be bigger than the maximum record size, or operations may fail as noted in Compression of B-Tree Pages.
Setting the compressed page size too large wastes some space, but the pages do not have to be compressed as often. If the compressed page size is set too small, inserts or updates may require time-consuming recompression, and the B-tree nodes may have to be split more frequently, leading to bigger data files and less efficient indexing.
Typically, you set the compressed page size to 8K or 4K bytes.
Given that the maximum row size for an InnoDB table is around 8K,
KEY_BLOCK_SIZE=8 is usually a safe choice.
Overall application performance, CPU and I/O utilization and the size of disk files are good indicators of how effective compression is for your application. This section builds on the performance tuning advice from Section 14.12.3, “Tuning Compression for InnoDB Tables”, and shows how to find problems that might not turn up during initial testing.
To dig deeper into performance considerations for compressed tables, you can monitor compression performance at runtime using the Information Schema tables described in Example 14.1, “Using the Compression Information Schema Tables”. These tables reflect the internal use of memory and the rates of compression used overall.
The INNODB_CMP table reports
information about compression activity for each compressed page
size (KEY_BLOCK_SIZE) in use. The information
in these tables is system-wide: it summarizes the compression
statistics across all compressed tables in your database. You can
use this data to help decide whether or not to compress a table by
examining these tables when no other compressed tables are being
accessed. It involves relatively low overhead on the server, so
you might query it periodically on a production server to check
the overall efficiency of the compression feature.
The key statistics to consider are the number of, and amount of
time spent performing, compression and uncompression operations.
Since InnoDB must split B-tree
nodes when they are too full to contain the compressed data
following a modification, compare the number of
“successful” compression operations with the number
of such operations overall. Based on the information in the
INNODB_CMP tables and overall application
performance and hardware resource utilization, you might make
changes in your hardware configuration, adjust the size of the
InnoDB buffer pool, choose a different page size, or select a
different set of tables to compress.
If the amount of CPU time required for compressing and uncompressing is high, changing to faster CPUs, or those with more cores, can help improve performance with the same data, application workload and set of compressed tables. Increasing the size of the InnoDB buffer pool might also help performance, so that more uncompressed pages can stay in memory, reducing the need to uncompress pages that exist in memory only in compressed form.
A large number of compression operations overall (compared to the
number of INSERT, UPDATE and
DELETE operations in your application and the
size of the database) could indicate that some of your compressed
tables are being updated too heavily for effective compression. If
so, choose a larger page size, or be more selective about which
tables you compress.
If the number of “successful” compression operations
(COMPRESS_OPS_OK) is a high percentage of the
total number of compression operations
(COMPRESS_OPS), then the system is likely
performing well. If the ratio is low, then InnoDB is reorganizing,
recompressing, and splitting B-tree nodes more often than is
desirable. In this case, avoid compressing some tables, or
increase KEY_BLOCK_SIZE for some of the
compressed tables. You might turn off compression for tables that
cause the number of “compression failures” in your
application to be more than 1% or 2% of the total. (Such a failure
ratio might be acceptable during a temporary operation such as a
data load).
This section describes some internal implementation details about compression for InnoDB tables. The information presented here may be helpful in tuning for performance, but is not necessary to know for basic use of compression.
Compression Algorithms
Some operating systems implement compression at the file system level. Files are typically divided into fixed-size blocks that are compressed into variable-size blocks, which easily leads into fragmentation. Every time something inside a block is modified, the whole block is recompressed before it is written to disk. These properties make this compression technique unsuitable for use in an update-intensive database system.
InnoDB implements compression with the help of the well-known zlib library, which implements the LZ77 compression algorithm. This compression algorithm is mature, robust, and efficient in both CPU utilization and in reduction of data size. The algorithm is “lossless”, so that the original uncompressed data can always be reconstructed from the compressed form. LZ77 compression works by finding sequences of data that are repeated within the data to be compressed. The patterns of values in your data determine how well it compresses, but typical user data often compresses by 50% or more.
Prior to MySQL 5.5.62, InnoDB supports the
zlib library up to version 1.2.3. In MySQL
5.5.62 and later, InnoDB supports the
zlib library up to version 1.2.11.
Unlike compression performed by an application, or compression
features of some other database management systems, InnoDB
compression applies both to user data and to indexes. In many
cases, indexes can constitute 40-50% or more of the total database
size, so this difference is significant. When compression is
working well for a data set, the size of the InnoDB data files
(the .ibd files) is 25% to 50% of the
uncompressed size or possibly smaller. Depending on the
workload, this smaller
database can in turn lead to a reduction in I/O, and an increase
in throughput, at a modest cost in terms of increased CPU
utilization.
InnoDB Data Storage and Compression
All user data in InnoDB tables is stored in pages comprising a B-tree index (the clustered index). In some other database systems, this type of index is called an “index-organized table”. Each row in the index node contains the values of the (user-specified or system-generated) primary key and all the other columns of the table.
Secondary indexes in InnoDB tables are also B-trees, containing pairs of values: the index key and a pointer to a row in the clustered index. The pointer is in fact the value of the primary key of the table, which is used to access the clustered index if columns other than the index key and primary key are required. Secondary index records must always fit on a single B-tree page.
The compression of B-tree nodes (of both clustered and secondary
indexes) is handled differently from compression of
overflow pages used to
store long VARCHAR, BLOB, or
TEXT columns, as explained in the following
sections.
Compression of B-Tree Pages
Because they are frequently updated, B-tree pages require special treatment. It is important to minimize the number of times B-tree nodes are split, as well as to minimize the need to uncompress and recompress their content.
One technique InnoDB uses is to maintain some system information in the B-tree node in uncompressed form, thus facilitating certain in-place updates. For example, this allows rows to be delete-marked and deleted without any compression operation.
In addition, InnoDB attempts to avoid unnecessary uncompression and recompression of index pages when they are changed. Within each B-tree page, the system keeps an uncompressed “modification log” to record changes made to the page. Updates and inserts of small records may be written to this modification log without requiring the entire page to be completely reconstructed.
When the space for the modification log runs out, InnoDB uncompresses the page, applies the changes and recompresses the page. If recompression fails (a situation known as a compression failure), the B-tree nodes are split and the process is repeated until the update or insert succeeds.
Generally, InnoDB requires that each B-tree page can accommodate
at least two records. For compressed tables, this requirement has
been relaxed. Leaf pages of B-tree nodes (whether of the primary
key or secondary indexes) only need to accommodate one record, but
that record must fit in uncompressed form, in the per-page
modification log. Starting with InnoDB storage engine version 1.0.2, and
if innodb_strict_mode is
ON, the InnoDB storage engine checks the maximum row
size during CREATE TABLE or
CREATE INDEX. If the row does not
fit, the following error message is issued: ERROR HY000:
Too big row.
If you create a table when
innodb_strict_mode is OFF, and a
subsequent INSERT or UPDATE
statement attempts to create an index entry that does not fit in
the size of the compressed page, the operation fails with
ERROR 42000: Row size too large. (This error
message does not name the index for which the record is too large,
or mention the length of the index record or the maximum record
size on that particular index page.) To solve this problem,
rebuild the table with ALTER TABLE
and select a larger compressed page size
(KEY_BLOCK_SIZE), shorten any column prefix
indexes, or disable compression entirely with
ROW_FORMAT=DYNAMIC or
ROW_FORMAT=COMPACT.
Compressing BLOB, VARCHAR, and TEXT Columns
In an InnoDB table, BLOB,
VARCHAR, and
TEXT columns that are not part of
the primary key may be stored on separately allocated
overflow pages. We refer
to these columns as off-page
columns. Their values are stored on singly-linked lists of
overflow pages.
For tables created in ROW_FORMAT=DYNAMIC or
ROW_FORMAT=COMPRESSED, the values of
BLOB,
TEXT, or
VARCHAR columns may be stored fully
off-page, depending on their length and the length of the entire
row. For columns that are stored off-page, the clustered index
record only contains 20-byte pointers to the overflow pages, one
per column. Whether any columns are stored off-page depends on the
page size and the total size of the row. When the row is too long
to fit entirely within the page of the clustered index, MySQL
chooses the longest columns for off-page storage until the row
fits on the clustered index page. As noted above, if a row does
not fit by itself on a compressed page, an error occurs.
For tables created in ROW_FORMAT=DYNAMIC or
ROW_FORMAT=COMPRESSED,
TEXT and
BLOB columns that are less than
or equal to 40 bytes are always stored in-line.
Tables created in older versions of InnoDB use the
Antelope file format, which
supports only ROW_FORMAT=REDUNDANT and
ROW_FORMAT=COMPACT. In these formats, MySQL
stores the first 768 bytes of BLOB,
VARCHAR, and
TEXT columns in the clustered index
record along with the primary key. The 768-byte prefix is followed
by a 20-byte pointer to the overflow pages that contain the rest
of the column value.
When a table is in COMPRESSED format, all data
written to overflow pages is compressed “as is”; that
is, InnoDB applies the zlib compression algorithm to the entire
data item. Other than the data, compressed overflow pages contain
an uncompressed header and trailer comprising a page checksum and
a link to the next overflow page, among other things. Therefore,
very significant storage savings can be obtained for longer
BLOB, TEXT, or
VARCHAR columns if the data is highly
compressible, as is often the case with text data. Image data,
such as JPEG, is typically already compressed
and so does not benefit much from being stored in a compressed
table; the double compression can waste CPU cycles for little or
no space savings.
The overflow pages are of the same size as other pages. A row containing ten columns stored off-page occupies ten overflow pages, even if the total length of the columns is only 8K bytes. In an uncompressed table, ten uncompressed overflow pages occupy 160K bytes. In a compressed table with an 8K page size, they occupy only 80K bytes. Thus, it is often more efficient to use compressed table format for tables with long column values.
Using a 16K compressed page size can reduce storage and I/O costs
for BLOB,
VARCHAR, or
TEXT columns, because such data
often compress well, and might therefore require fewer overflow
pages, even though the B-tree nodes themselves take as many pages
as in the uncompressed form.
Compression and the InnoDB Buffer Pool
In a compressed InnoDB table, every compressed page (whether 1K, 2K, 4K or 8K) corresponds to an uncompressed page of 16K bytes. To access the data in a page, InnoDB reads the compressed page from disk if it is not already in the buffer pool, then uncompresses the page to its original form. This section describes how InnoDB manages the buffer pool with respect to pages of compressed tables.
To minimize I/O and to reduce the need to uncompress a page, at times the buffer pool contains both the compressed and uncompressed form of a database page. To make room for other required database pages, InnoDB may evict from the buffer pool an uncompressed page, while leaving the compressed page in memory. Or, if a page has not been accessed in a while, the compressed form of the page might be written to disk, to free space for other data. Thus, at any given time, the buffer pool might contain both the compressed and uncompressed forms of the page, or only the compressed form of the page, or neither.
InnoDB keeps track of which pages to keep in memory and which to evict using a least-recently-used (LRU) list, so that hot (frequently accessed) data tends to stay in memory. When compressed tables are accessed, MySQL uses an adaptive LRU algorithm to achieve an appropriate balance of compressed and uncompressed pages in memory. This adaptive algorithm is sensitive to whether the system is running in an I/O-bound or CPU-bound manner. The goal is to avoid spending too much processing time uncompressing pages when the CPU is busy, and to avoid doing excess I/O when the CPU has spare cycles that can be used for uncompressing compressed pages (that may already be in memory). When the system is I/O-bound, the algorithm prefers to evict the uncompressed copy of a page rather than both copies, to make more room for other disk pages to become memory resident. When the system is CPU-bound, MySQL prefers to evict both the compressed and uncompressed page, so that more memory can be used for “hot” pages and reducing the need to uncompress data in memory only in compressed form.
Compression and the InnoDB Redo Log Files
Before a compressed page is written to a
data file, MySQL writes a
copy of the page to the redo log (if it has been recompressed
since the last time it was written to the database). This is done
to ensure that redo logs are usable for
crash recovery, even in
the unlikely case that the zlib library is
upgraded and that change introduces a compatibility problem with
the compressed data. Therefore, some increase in the size of
log files, or a need for more
frequent checkpoints, can
be expected when using compression. The amount of increase in the
log file size or checkpoint frequency depends on the number of
times compressed pages are modified in a way that requires
reorganization and recompression.
Note that compressed tables use a different file format for the redo log and the per-table tablespaces than in MySQL 5.1 and earlier. The MySQL Enterprise Backup product supports this latest Barracuda file format for compressed InnoDB tables.
Specifying ROW_FORMAT=COMPRESSED or
KEY_BLOCK_SIZE in CREATE
TABLE or ALTER TABLE
statements produces the following warnings if the Barracuda file
format is not enabled. You can view them with the SHOW
WARNINGS statement.
| Level | Code | Message |
|---|---|---|
| Warning | 1478 | InnoDB: KEY_BLOCK_SIZE requires
innodb_file_per_table. |
| Warning | 1478 | InnoDB: KEY_BLOCK_SIZE requires innodb_file_format=1 |
| Warning | 1478 | InnoDB: ignoring
KEY_BLOCK_SIZE= |
| Warning | 1478 | InnoDB: ROW_FORMAT=COMPRESSED requires
innodb_file_per_table. |
| Warning | 1478 | InnoDB: assuming ROW_FORMAT=COMPACT. |
Notes:
By default, these messages are only warnings, not errors, and the table is created without compression, as if the options were not specified.
When
innodb_strict_modeis enabled, MySQL generates an error, not a warning, for these cases. The table is not created if the current configuration does not permit using compressed tables.
The “non-strict” behavior lets you import a
mysqldump file into a database that does not
support compressed tables, even if the source database contained
compressed tables. In that case, MySQL creates the table in
ROW_FORMAT=COMPACT instead of preventing the
operation.
To import the dump file into a new database, and have the tables
re-created as they exist in the original database, ensure the
server has the proper settings for the configuration parameters
innodb_file_format and
innodb_file_per_table.
The attribute KEY_BLOCK_SIZE is permitted only
when ROW_FORMAT is specified as
COMPRESSED or is omitted. Specifying a
KEY_BLOCK_SIZE with any other
ROW_FORMAT generates a warning that you can
view with SHOW WARNINGS. However, the table is
non-compressed; the specified KEY_BLOCK_SIZE is
ignored).
| Level | Code | Message |
|---|---|---|
| Warning | 1478 | InnoDB: ignoring KEY_BLOCK_SIZE= |
If you are running with
innodb_strict_mode enabled, the
combination of a KEY_BLOCK_SIZE with any
ROW_FORMAT other than
COMPRESSED generates an error, not a warning,
and the table is not created.
Table 14.4, “ROW_FORMAT and KEY_BLOCK_SIZE Options”
provides an overview the ROW_FORMAT and
KEY_BLOCK_SIZE options that are used with
CREATE TABLE or
ALTER TABLE.
Table 14.4 ROW_FORMAT and KEY_BLOCK_SIZE Options
| Option | Usage Notes | Description |
|---|---|---|
ROW_FORMAT=REDUNDANT |
Storage format used prior to MySQL 5.0.3 | Less efficient than ROW_FORMAT=COMPACT; for backward
compatibility |
ROW_FORMAT=COMPACT |
Default storage format since MySQL 5.0.3 | Stores a prefix of 768 bytes of long column values in the clustered index page, with the remaining bytes stored in an overflow page |
ROW_FORMAT=DYNAMIC |
Available only with
innodb_file_format=Barracuda |
Store values within the clustered index page if they fit; if not, stores only a 20-byte pointer to an overflow page (no prefix) |
ROW_FORMAT=COMPRESSED |
Available only with
innodb_file_format=Barracuda |
Compresses the table and indexes using zlib to default compressed page size of 8K bytes |
KEY_BLOCK_SIZE= |
Available only with
innodb_file_format=Barracuda |
Specifies compressed page size of 1, 2, 4, 8 or 16 kilobytes; implies
ROW_FORMAT=COMPRESSED |
Table 14.5, “CREATE/ALTER TABLE Warnings and Errors when InnoDB Strict Mode is OFF”
summarizes error conditions that occur with certain combinations
of configuration parameters and options on the
CREATE TABLE or
ALTER TABLE statements, and how the
options appear in the output of SHOW TABLE
STATUS.
When innodb_strict_mode is
OFF, InnoDB creates or alters the table, but
ignores certain settings as shown below. You can see the warning
messages in the MySQL error log. When
innodb_strict_mode is
ON, these specified combinations of options
generate errors, and the table is not created or altered. To see
the full description of the error condition, issue the
SHOW ERRORS statement: example:
mysql>CREATE TABLE x (id INT PRIMARY KEY, c INT)->ENGINE=INNODB KEY_BLOCK_SIZE=33333;ERROR 1005 (HY000): Can't create table 'test.x' (errno: 1478) mysql>SHOW ERRORS;+-------+------+-------------------------------------------+ | Level | Code | Message | +-------+------+-------------------------------------------+ | Error | 1478 | InnoDB: invalid KEY_BLOCK_SIZE=33333. | | Error | 1005 | Can't create table 'test.x' (errno: 1478) | +-------+------+-------------------------------------------+
Table 14.5 CREATE/ALTER TABLE Warnings and Errors when InnoDB Strict Mode is OFF
| Syntax | Warning or Error Condition | Resulting ROW_FORMAT, as shown in SHOW TABLE
STATUS |
|---|---|---|
ROW_FORMAT=REDUNDANT |
None | REDUNDANT |
ROW_FORMAT=COMPACT |
None | COMPACT |
ROW_FORMAT=COMPRESSED or
ROW_FORMAT=DYNAMIC or
KEY_BLOCK_SIZE is specified |
Ignored unless both
innodb_file_format=Barracuda
and innodb_file_per_table
are enabled |
COMPACT |
Invalid KEY_BLOCK_SIZE is specified (not 1, 2, 4, 8
or 16) |
KEY_BLOCK_SIZE is ignored |
the specified row format, or COMPACT by default |
ROW_FORMAT=COMPRESSED and valid
KEY_BLOCK_SIZE are specified |
None; KEY_BLOCK_SIZE specified is used, not the 8K
default |
COMPRESSED |
KEY_BLOCK_SIZE is specified with
REDUNDANT, COMPACT or
DYNAMIC row format |
KEY_BLOCK_SIZE is ignored |
REDUNDANT, COMPACT or
DYNAMIC |
ROW_FORMAT is not one of
REDUNDANT, COMPACT,
DYNAMIC or COMPRESSED |
Ignored if recognized by the MySQL parser. Otherwise, an error is issued. | COMPACT or N/A |
When innodb_strict_mode is
ON, the InnoDB storage engine rejects invalid
ROW_FORMAT or KEY_BLOCK_SIZE
parameters. For compatibility with earlier versions of MySQL,
strict mode is not enabled by default; instead, MySQL issues
warnings (not errors) for ignored invalid parameters.
Note that it is not possible to see the chosen
KEY_BLOCK_SIZE using SHOW TABLE
STATUS. The statement SHOW CREATE
TABLE displays the KEY_BLOCK_SIZE
(even if it was ignored when creating the table). The real
compressed page size of the table cannot be displayed by MySQL.
As InnoDB evolves, data file formats that are not
compatible with prior versions of InnoDB are
sometimes required to support new features. To help manage
compatibility in upgrade and downgrade situations, and systems that
run different versions of MySQL, InnoDB uses
named file formats. InnoDB currently supports two
named file formats, Antelope
and Barracuda.
Antelope is the original
InnoDBfile format, which previously did not have a name. It supports COMPACT and REDUNDANT row formats forInnoDBtables and is the default file format in MySQL 5.5 to ensure maximum compatibility with earlier MySQL versions that do not support the Barracuda file format.Barracuda is the newest file format. It supports all
InnoDBrow formats including the newer COMPRESSED and DYNAMIC row formats. The features associated with COMPRESSED and DYNAMIC row formats include compressed tables and efficient storage of off-page columns. See Section 14.14, “InnoDB Row Formats”.
This section discusses enabling InnoDB file
formats, verifying compatibility of different file formats between
MySQL releases, identifying the file format in use, and downgrading
the file format.
The innodb_file_format
configuration option enables an InnoDB file
format for
file-per-table
tablespaces.
Antelope is the default
innodb_file_format.
To preclude the use of features supported by the Barracuda file
that make your database inaccessible to the built-in
InnoDB in MySQL 5.1 and prior releases, set
innodb_file_format to
Antelope. Alternatively, you can disable
innodb_file_per_table to have new
tables created in the
system tablespace.
The system tablespace is stored in the original Antelope file
format.
You can set the value of
innodb_file_format on the command
line when you start mysqld, or in the option
file (my.cnf on Unix,
my.ini on Windows). You can also change it
dynamically with a SET GLOBAL statement.
SET GLOBAL innodb_file_format=Barracuda;
Although Oracle recommends using the Barracuda format for new tables where practical, in MySQL 5.5 the default file format is Antelope, for maximum compatibility with replication configurations containing earlier MySQL releases.
InnoDB incorporates several checks to guard against the possible crashes and data corruptions that might occur if you run an old release of the MySQL server on InnoDB data files that use a newer file format. These checks take place when the server is started, and when you first access a table. This section describes these checks, how you can control them, and error and warning conditions that might arise.
Backward Compatibility
You only need to consider backward file format compatibility when using a recent version of InnoDB (the InnoDB Plugin, or MySQL 5.5 and higher with InnoDB) alongside an older version (MySQL 5.1 or earlier, with the built-in InnoDB rather than the InnoDB Plugin). To minimize the chance of compatibility issues, you can standardize on the InnoDB Plugin for all your MySQL 5.1 and earlier database servers.
In general, a newer version of InnoDB may create a table or index that cannot safely be read or written with an older version of InnoDB without risk of crashes, hangs, wrong results or corruptions. MySQL 5.5 and higher with InnoDB includes a mechanism to guard against these conditions, and to help preserve compatibility among database files and versions of InnoDB. This mechanism lets you take advantage of some new features of an InnoDB release (such as performance improvements and bug fixes), and still preserve the option of using your database with a prior version of InnoDB, by preventing accidental use of new features that create downward-incompatible disk files.
If a version of InnoDB supports a particular file format (whether or not that format is the default), you can query and update any table that requires that format or an earlier format. Only the creation of new tables using new features is limited based on the particular file format enabled. Conversely, if a tablespace contains a table or index that uses a file format that is not supported, it cannot be accessed at all, even for read access.
The only way to “downgrade” an InnoDB tablespace to
the earlier Antelope file format is to copy the data to a new
table, in a tablespace that uses the earlier format. This can be
done with the ALTER TABLE
statement, as described in
Section 14.13.4, “Downgrading the File Format”.
The easiest way to determine the file format of an existing InnoDB
tablespace is to examine the properties of the table it contains,
using the SHOW TABLE STATUS command or querying
the table INFORMATION_SCHEMA.TABLES. If the
Row_format of the table is reported as
'Compressed' or 'Dynamic',
the tablespace containing the table uses the Barracuda format.
Otherwise, it uses the prior InnoDB file format, Antelope.
Internal Details
Every InnoDB file-per-table tablespace (represented by a
*.ibd file) file is labeled with a file format
identifier. The system tablespace (represented by the
ibdata files) is tagged with the
“highest” file format in use in a group of InnoDB
database files, and this tag is checked when the files are opened.
Creating a compressed table, or a table with
ROW_FORMAT=DYNAMIC, updates the file header of
the corresponding file-per-table .ibd file and
the table type in the InnoDB data dictionary with the identifier
for the Barracuda file format. From that point forward, the table
cannot be used with a version of InnoDB that does not support the
Barracuda file format. To protect against anomalous behavior,
InnoDB version 5.0.21 and later performs a compatibility check
when the table is opened. (In many cases, the
ALTER TABLE statement recreates a
table and thus changes its properties. The special case of adding
or dropping indexes without rebuilding the table is described in
Section 14.16, “InnoDB Fast Index Creation”.)
Definition of ib-file set
To avoid confusion, for the purposes of this discussion we define the term “ib-file set” to mean the set of operating system files that InnoDB manages as a unit. The ib-file set includes the following files:
The system tablespace (one or more
ibdatafiles) that contain internal system information (including internal catalogs and undo information) and may include user data and indexes.Zero or more single-table tablespaces (also called “file per table” files, named
*.ibdfiles).InnoDB log files; usually two,
ib_logfile0andib_logfile1. Used for crash recovery and in backups.
An “ib-file set” does not include the corresponding
.frm files that contain metadata about InnoDB
tables. The .frm files are created and
managed by MySQL, and can sometimes get out of sync with the
internal metadata in InnoDB.
Multiple tables, even from more than one database, can be stored in a single “ib-file set”. (In MySQL, a “database” is a logical collection of tables, what other systems refer to as a “schema” or “catalog”.)
To prevent possible crashes or data corruptions when InnoDB
opens an ib-file set, it checks that it can fully support the
file formats in use within the ib-file set. If the system is
restarted following a crash, or a “fast shutdown”
(i.e., innodb_fast_shutdown is
greater than zero), there may be on-disk data structures (such
as redo or undo entries, or doublewrite pages) that are in a
“too-new” format for the current software. During
the recovery process, serious damage can be done to your data
files if these data structures are accessed. The startup check
of the file format occurs before any recovery process begins,
thereby preventing consistency issues with the new tables or
startup problems for the MySQL server.
Beginning with version InnoDB 1.0.1, the system tablespace
records an identifier or tag for the “highest” file
format used by any table in any of the tablespaces that is part
of the ib-file set. Checks against this file format tag are
controlled by the configuration parameter
innodb_file_format_check, which
is ON by default.
If the file format tag in the system tablespace is newer or
higher than the highest version supported by the particular
currently executing software and if
innodb_file_format_check is
ON, the following error is issued when the
server is started:
InnoDB: Error: the system tablespace is in a file format that this version doesn't support
You can also set
innodb_file_format to a file
format name. Doing so prevents InnoDB from starting if the
current software does not support the file format specified. It
also sets the “high water mark” to the value you
specify. The ability to set
innodb_file_format_check is
useful (with future releases) if you manually
“downgrade” all of the tables in an ib-file set (as
described in Section 14.4, “Downgrading the InnoDB Storage Engine”). You can then
rely on the file format check at startup if you subsequently use
an older version of InnoDB to access the ib-file set.
In some limited circumstances, you might want to start the
server and use an ib-file set that is in a new file format that
is not supported by the software you are using. If you set the
configuration parameter
innodb_file_format_check to
OFF, InnoDB opens the database, but issues
this warning message in the error log:
InnoDB: Warning: the system tablespace is in a file format that this version doesn't support
This is a dangerous setting, as it permits the recovery
process to run, possibly corrupting your database if the
previous shutdown was a crash or “fast shutdown”.
You should only set
innodb_file_format_check to
OFF if you are sure that the previous
shutdown was done with
innodb_fast_shutdown=0, so that essentially
no recovery process occurs.
The parameter
innodb_file_format_check
affects only what happens when a database is opened, not
subsequently. Conversely, the parameter
innodb_file_format (which
enables a specific format) only determines whether or not a new
table can be created in the enabled format and has no effect on
whether or not a database can be opened.
The file format tag is a “high water mark”, and as
such it is increased after the server is started, if a table in
a “higher” format is created or an existing table
is accessed for read or write (assuming its format is
supported). If you access an existing table in a format higher
than the format the running software supports, the system
tablespace tag is not updated, but table-level compatibility
checking applies (and an error is issued), as described in
Section 14.13.2.2, “Compatibility Check When a Table Is Opened”.
Any time the high water mark is updated, the value of
innodb_file_format_check is
updated as well, so the command SELECT
@@innodb_file_format_check; displays the name of the
latest file format known to be used by tables in the currently
open ib-file set and supported by the currently executing
software.
When a table is first accessed, InnoDB (including some releases prior to InnoDB 1.0) checks that the file format of the tablespace in which the table is stored is fully supported. This check prevents crashes or corruptions that would otherwise occur when tables using a “too new” data structure are encountered.
All tables using any file format supported by a release can be
read or written (assuming the user has sufficient privileges).
The setting of the system configuration parameter
innodb_file_format can prevent
creating a new table that uses a specific file format, even if
the file format is supported by a given release. Such a setting
might be used to preserve backward compatibility, but it does
not prevent accessing any table that uses a supported format.
Versions of MySQL older than 5.0.21 cannot reliably use database files created by newer versions if a new file format was used when a table was created. To prevent various error conditions or corruptions, InnoDB checks file format compatibility when it opens a file (for example, upon first access to a table). If the currently running version of InnoDB does not support the file format identified by the table type in the InnoDB data dictionary, MySQL reports the following error:
ERROR 1146 (42S02): Table 'test.t1' doesn't exist
InnoDB also writes a message to the error log:
InnoDB: tabletest/t1: unknown table type33
The table type should be equal to the tablespace flags, which contains the file format version as discussed in Section 14.13.3, “Identifying the File Format in Use”.
Versions of InnoDB prior to MySQL 4.1 did not include table format identifiers in the database files, and versions prior to MySQL 5.0.21 did not include a table format compatibility check. Therefore, there is no way to ensure proper operations if a table in a newer file format is used with versions of InnoDB prior to 5.0.21.
The file format management capability in InnoDB 1.0 and higher (tablespace tagging and run-time checks) allows InnoDB to verify as soon as possible that the running version of software can properly process the tables existing in the database.
If you permit InnoDB to open a database containing files in a
format it does not support (by setting the parameter
innodb_file_format_check to
OFF), the table-level checking described in
this section still applies.
Users are strongly urged not to use database files that contain Barracuda file format tables with releases of InnoDB older than the MySQL 5.1 with the InnoDB Plugin. It is possible to “downgrade” such tables to the Antelope format with the procedure described in Section 14.13.4, “Downgrading the File Format”.
If you enable a different file
format using the
innodb_file_format configuration
option, the change only applies to newly created tables. Also,
when you create a new table, the tablespace containing the table
is tagged with the “earliest” or
“simplest” file format that is required to support
the table's features. For example, if you enable the
Barracuda file format, and create a new table
that does not use the Dynamic or Compressed row format, the new
tablespace that contains the table is tagged as using the
Antelope file format .
It is easy to identify the file format used by a given table. The
table uses the Antelope file format if the row
format reported by SHOW TABLE STATUS is either
Compact or Redundant. The
table uses the Barracuda file format if the row
format reported by SHOW TABLE STATUS is either
Compressed or Dynamic.
mysql> SHOW TABLE STATUS\G
*************************** 1. row ***************************
Name: t1
Engine: InnoDB
Version: 10
Row_format: Compact
Rows: 0
Avg_row_length: 0
Data_length: 16384
Max_data_length: 0
Index_length: 16384
Data_free: 0
Auto_increment: 1
Create_time: 2014-11-03 13:32:10
Update_time: NULL
Check_time: NULL
Collation: latin1_swedish_ci
Checksum: NULL
Create_options:
Comment:
Each InnoDB tablespace file (with a name matching
*.ibd) is tagged with the file format used to
create its table and indexes. The way to downgrade the tablespace
is to re-create the table and its indexes. The easiest way to
recreate a table and its indexes is to use the command:
ALTER TABLEtROW_FORMAT=COMPACT;
on each table that you want to downgrade. The
COMPACT row format uses the file format
Antelope. It was introduced in MySQL 5.0.3.
The row format of a table determines how its rows are physically stored, which in turn can affect the performance of queries and DML operations. As more rows fit into a single disk page, queries and index lookups can work faster, less cache memory is required in the buffer pool, and less I/O is required to write out updated values.
The data in each table is divided into pages. The pages that make up each table are arranged in a tree data structure called a B-tree index. Table data and secondary indexes both use this type of structure. The B-tree index that represents an entire table is known as the clustered index, which is organized according to the primary key columns. The nodes of a clustered index data structure contain the values of all columns in the row. The nodes of a secondary index structure contain the values of index columns and primary key columns.
Variable-length columns are an exception to the rule that column values are stored in B-tree index nodes. Variable-length columns that are too long to fit on a B-tree page are stored on separately allocated disk pages called overflow pages. Such columns are referred to as off-page columns. The values of off-page columns are stored in singly-linked lists of overflow pages, with each such column having its own list of one or more overflow pages. Depending on column length, all or a prefix of variable-length column values are stored in the B-tree to avoid wasting storage and having to read a separate page.
The InnoDB storage engine supports four row
formats: REDUNDANT, COMPACT,
DYNAMIC, and COMPRESSED.
Table 14.6 InnoDB Row Format Overview
| Row Format | Compact Storage Characteristics | Enhanced Variable-Length Column Storage | Large Index Key Prefix Support | Compression Support | Supported Tablespace Types | Required File Format |
|---|---|---|---|---|---|---|
REDUNDANT |
No | No | No | No | system, file-per-table | Antelope or Barracuda |
COMPACT |
Yes | No | No | No | system, file-per-table | Antelope or Barracuda |
DYNAMIC |
Yes | Yes | Yes | No | file-per-table | Barracuda |
COMPRESSED |
Yes | Yes | Yes | Yes | file-per-table | Barracuda |
The topics that follow describe row format storage characteristics and how to define and determine the row format of a table.
The REDUNDANT format provides compatibility
with older versions of MySQL.
The REDUNDANT row format is supported by both
InnoDB file formats
(Antelope and Barracuda).
For more information, see Section 14.13, “InnoDB File-Format Management”.
Tables that use the REDUNDANT row format store
the first 768 bytes of variable-length column values
(VARCHAR,
VARBINARY, and
BLOB and
TEXT types) in the index record
within the B-tree node, with the remainder stored on overflow
pages. Fixed-length columns greater than or equal to 768 bytes are
encoded as variable-length columns, which can be stored off-page.
For example, a CHAR(255) column can exceed 768
bytes if the maximum byte length of the character set is greater
than 3, as it is with utf8mb4.
If the value of a column is 768 bytes or less, an overflow page is
not used, and some savings in I/O may result, since the value is
stored entirely in the B-tree node. This works well for relatively
short BLOB column values, but may cause B-tree
nodes to fill with data rather than key values, reducing their
efficiency. Tables with many BLOB columns could
cause B-tree nodes to become too full, and contain too few rows,
making the entire index less efficient than if rows were shorter
or column values were stored off-page.
REDUNDANT Row Format Storage Characteristics
The REDUNDANT row format has the following
storage characteristics:
Each index record contains a 6-byte header. The header is used to link together consecutive records, and for row-level locking.
Records in the clustered index contain fields for all user-defined columns. In addition, there is a 6-byte transaction ID field and a 7-byte roll pointer field.
If no primary key is defined for a table, each clustered index record also contains a 6-byte row ID field.
Each secondary index record contains all the primary key columns defined for the clustered index key that are not in the secondary index.
A record contains a pointer to each field of the record. If the total length of the fields in a record is less than 128 bytes, the pointer is one byte; otherwise, two bytes. The array of pointers is called the record directory. The area where the pointers point is the data part of the record.
Internally, fixed-length character columns such as
CHAR(10)are stored in fixed-length format. Trailing spaces are not truncated fromVARCHARcolumns.Fixed-length columns greater than or equal to 768 bytes are encoded as variable-length columns, which can be stored off-page. For example, a
CHAR(255)column can exceed 768 bytes if the maximum byte length of the character set is greater than 3, as it is withutf8mb4.An SQL
NULLvalue reserves one or two bytes in the record directory. An SQLNULLvalue reserves zero bytes in the data part of the record if stored in a variable-length column. For a fixed-length column, the fixed length of the column is reserved in the data part of the record. Reserving fixed space forNULLvalues permits columns to be updated in place fromNULLto non-NULLvalues without causing index page fragmentation.
The COMPACT row format reduces row storage
space by about 20% compared to the REDUNDANT
row format, at the cost of increasing CPU use for some operations.
If your workload is a typical one that is limited by cache hit
rates and disk speed, COMPACT format is likely
to be faster. If the workload is limited by CPU speed, compact
format might be slower.
The COMPACT row format is supported by both
InnoDB file formats
(Antelope and Barracuda).
For more information, see Section 14.13, “InnoDB File-Format Management”.
Tables that use the COMPACT row format store
the first 768 bytes of variable-length column values
(VARCHAR,
VARBINARY, and
BLOB and
TEXT types) in the index record
within the B-tree node, with
the remainder stored on overflow pages. Fixed-length columns
greater than or equal to 768 bytes are encoded as variable-length
columns, which can be stored off-page. For example, a
CHAR(255) column can exceed 768 bytes if the
maximum byte length of the character set is greater than 3, as it
is with utf8mb4.
If the value of a column is 768 bytes or less, an overflow page is
not used, and some savings in I/O may result, since the value is
stored entirely in the B-tree node. This works well for relatively
short BLOB column values, but may cause B-tree
nodes to fill with data rather than key values, reducing their
efficiency. Tables with many BLOB columns could
cause B-tree nodes to become too full, and contain too few rows,
making the entire index less efficient than if rows were shorter
or column values were stored off-page.
COMPACT Row Format Storage Characteristics
The COMPACT row format has the following
storage characteristics:
Each index record contains a 5-byte header that may be preceded by a variable-length header. The header is used to link together consecutive records, and for row-level locking.
The variable-length part of the record header contains a bit vector for indicating
NULLcolumns. If the number of columns in the index that can beNULLisN, the bit vector occupiesCEILING(bytes. (For example, if there are anywhere from 9 to 16 columns that can beN/8)NULL, the bit vector uses two bytes.) Columns that areNULLdo not occupy space other than the bit in this vector. The variable-length part of the header also contains the lengths of variable-length columns. Each length takes one or two bytes, depending on the maximum length of the column. If all columns in the index areNOT NULLand have a fixed length, the record header has no variable-length part.For each non-
NULLvariable-length field, the record header contains the length of the column in one or two bytes. Two bytes are only needed if part of the column is stored externally in overflow pages or the maximum length exceeds 255 bytes and the actual length exceeds 127 bytes. For an externally stored column, the 2-byte length indicates the length of the internally stored part plus the 20-byte pointer to the externally stored part. The internal part is 768 bytes, so the length is 768+20. The 20-byte pointer stores the true length of the column.The record header is followed by the data contents of non-
NULLcolumns.Records in the clustered index contain fields for all user-defined columns. In addition, there is a 6-byte transaction ID field and a 7-byte roll pointer field.
If no primary key is defined for a table, each clustered index record also contains a 6-byte row ID field.
Each secondary index record contains all the primary key columns defined for the clustered index key that are not in the secondary index. If any of the primary key columns are variable length, the record header for each secondary index has a variable-length part to record their lengths, even if the secondary index is defined on fixed-length columns.
Internally, for nonvariable-length character sets, fixed-length character columns such as
CHAR(10)are stored in a fixed-length format.Trailing spaces are not truncated from
VARCHARcolumns.Internally, for variable-length character sets such as
utf8mb3andutf8mb4,InnoDBattempts to storeCHAR(inN)Nbytes by trimming trailing spaces. If the byte length of aCHAR(column value exceedsN)Nbytes, trailing spaces are trimmed to a minimum of the column value byte length. The maximum length of aCHAR(column is the maximum character byte length ×N)N.A minimum of
Nbytes is reserved forCHAR(. Reserving the minimum spaceN)Nin many cases enables column updates to be done in place without causing index page fragmentation. By comparison,CHAR(columns occupy the maximum character byte length ×N)Nwhen using theREDUNDANTrow format.Fixed-length columns greater than or equal to 768 bytes are encoded as variable-length fields, which can be stored off-page. For example, a
CHAR(255)column can exceed 768 bytes if the maximum byte length of the character set is greater than 3, as it is withutf8mb4.
The DYNAMIC row format offers the same storage
characteristics as the COMPACT row format but
adds enhanced storage capabilities for long variable-length
columns and supports large index key prefixes.
The DYNAMIC row format is supported by the
Barracuda file format. For more information,
see Section 14.13, “InnoDB File-Format Management”. To create tables that
use the DYNAMIC row format, the
innodb_file_format variable must
be set to Barracuda, and the
innodb_file_per_table variable
must be enabled.
When a table is created with
ROW_FORMAT=DYNAMIC, InnoDB
can store long variable-length column values (for
VARCHAR,
VARBINARY, and
BLOB and
TEXT types) fully off-page, with
the clustered index record containing only a 20-byte pointer to
the overflow page. Fixed-length fields greater than or equal to
768 bytes are encoded as variable-length fields. For example, a
CHAR(255) column can exceed 768 bytes if the
maximum byte length of the character set is greater than 3, as it
is with utf8mb4.
Whether columns are stored off-page depends on the page size and
the total size of the row. When a row is too long, the longest
columns are chosen for off-page storage until the clustered index
record fits on the B-tree page.
TEXT and
BLOB columns that are less than or
equal to 40 bytes are stored in line.
The DYNAMIC row format maintains the efficiency
of storing the entire row in the index node if it fits (as do the
COMPACT and REDUNDANT
formats), but the DYNAMIC row format avoids the
problem of filling B-tree nodes with a large number of data bytes
of long columns. The DYNAMIC row format is
based on the idea that if a portion of a long data value is stored
off-page, it is usually most efficient to store the entire value
off-page. With DYNAMIC format, shorter columns
are likely to remain in the B-tree node, minimizing the number of
overflow pages required for a given row.
The DYNAMIC row format supports index key
prefixes up to 3072 bytes. This feature is controlled by the
innodb_large_prefix variable,
which is disabled by default. See the
innodb_large_prefix variable
description for more information.
DYNAMIC Row Format Storage Characteristics
The DYNAMIC row format is a variation of the
COMPACT row format. For storage
characteristics, see
COMPACT Row Format Storage Characteristics.
The COMPRESSED row format offers the same the
storage characteristics and capabilities as the
DYNAMIC row format but adds support for table
and index data compression.
The COMPRESSED row format is supported by the
Barracuda file format. For more information,
see Section 14.13, “InnoDB File-Format Management”. To create tables that
use the COMPRESSED row format, the
innodb_file_format variable must
be set to Barracuda, and the
innodb_file_per_table variable
must be enabled.
The COMPRESSED row format uses similar internal
details for off-page storage as the DYNAMIC row
format, with additional storage and performance considerations
from the table and index data being compressed and using smaller
page sizes. With the COMPRESSED row format, the
KEY_BLOCK_SIZE option controls how much column
data is stored in the clustered index, and how much is placed on
overflow pages. For more information about the
COMPRESSED row format, see
InnoDB Table Compression.
The COMPRESSED row format supports index key
prefixes up to 3072 bytes. This feature is controlled by the
innodb_large_prefix variable,
which is disabled by default. See the
innodb_large_prefix variable
description for more information.
Compressed Row Format Storage Characteristics
The COMPRESSED row format is a variation of the
COMPACT row format. For storage
characteristics, see
COMPACT Row Format Storage Characteristics.
The default row format for InnoDB tables is
COMPACT.
The row format of a table can be defined explicitly using the
ROW_FORMAT table option in a
CREATE TABLE or
ALTER TABLE statement. For example:
CREATE TABLE t1 (c1 INT) ROW_FORMAT=COMPACT;
ROW_FORMAT options include
REDUNDANT, COMPACT,
DYNAMIC, and COMPRESSED.
To create tables that use the DYNAMIC or
COMPRESSED row format, the
innodb_file_format variable must
be set to Barracuda, and the
innodb_file_per_table variable
must be enabled. Otherwise, if
innodb_strict_mode is not
enabled, InnoDB tables are created with the
default COMPACT row format.
Oracle recommends enabling
innodb_strict_mode when using the
ROW_FORMAT table option in
CREATE TABLE and
ALTER TABLE statements.
To determine the row format of a table, use
SHOW TABLE STATUS:
mysql> SHOW TABLE STATUS IN test1\G
*************************** 1. row ***************************
Name: t1
Engine: InnoDB
Version: 10
Row_format: Compact
Rows: 0
Avg_row_length: 0
Data_length: 16384
Max_data_length: 0
Index_length: 16384
Data_free: 0
Auto_increment: 1
Create_time: 2014-10-31 16:02:01
Update_time: NULL
Check_time: NULL
Collation: latin1_swedish_ci
Checksum: NULL
Create_options:
Comment:
As a DBA, you must manage disk I/O to keep the I/O subsystem from
becoming saturated, and manage disk space to avoid filling up
storage devices. The ACID design
model requires a certain amount of I/O that might seem redundant,
but helps to ensure data reliability. Within these constraints,
InnoDB tries to optimize the database work and
the organization of disk files to minimize the amount of disk I/O.
Sometimes, I/O is postponed until the database is not busy, or until
everything needs to be brought to a consistent state, such as during
a database restart after a fast
shutdown.
This section discusses the main considerations for I/O and disk
space with the default kind of MySQL tables (also known as
InnoDB tables):
Controlling the amount of background I/O used to improve query performance.
Enabling or disabling features that provide extra durability at the expense of additional I/O.
Organizing tables into many small files, a few larger files, or a combination of both.
Balancing the size of redo log files against the I/O activity that occurs when the log files become full.
How to reorganize a table for optimal query performance.
InnoDB uses asynchronous disk I/O where
possible, by creating a number of threads to handle I/O
operations, while permitting other database operations to proceed
while the I/O is still in progress. On Linux and Windows
platforms, InnoDB uses the available OS and
library functions to perform “native” asynchronous
I/O. On other platforms, InnoDB still uses I/O
threads, but the threads may actually wait for I/O requests to
complete; this technique is known as “simulated”
asynchronous I/O.
If InnoDB can determine there is a high
probability that data might be needed soon, it performs
read-ahead operations to bring that data into the buffer pool so
that it is available in memory. Making a few large read requests
for contiguous data can be more efficient than making several
small, spread-out requests. There are two read-ahead heuristics
in InnoDB:
In sequential read-ahead, if
InnoDBnotices that the access pattern to a segment in the tablespace is sequential, it posts in advance a batch of reads of database pages to the I/O system.In random read-ahead, if
InnoDBnotices that some area in a tablespace seems to be in the process of being fully read into the buffer pool, it posts the remaining reads to the I/O system.
For information about configuring read-ahead heuristics, see Section 14.11.2.3, “Configuring InnoDB Buffer Pool Prefetching (Read-Ahead)”.
InnoDB uses a novel file flush technique
involving a structure called the
doublewrite
buffer, which is enabled by default
(innodb_doublewrite=ON). It
adds safety to recovery following a crash or power outage, and
improves performance on most varieties of Unix by reducing the
need for fsync() operations.
Before writing pages to a data file, InnoDB
first writes them to a contiguous tablespace area called the
doublewrite buffer. Only after the write and the flush to the
doublewrite buffer has completed does InnoDB
write the pages to their proper positions in the data file. If
there is an operating system, storage subsystem, or
mysqld process crash in the middle of a page
write (causing a torn page
condition), InnoDB can later find a good copy
of the page from the doublewrite buffer during recovery.
The data files that you define in the configuration file using the
innodb_data_file_path
configuration option form the InnoDB
system tablespace.
The files are logically concatenated to form the system
tablespace. There is no striping in use. You cannot define where
within the system tablespace your tables are allocated. In a newly
created system tablespace, InnoDB allocates
space starting from the first data file.
To avoid the issues that come with storing all tables and indexes
inside the system tablespace, you can enable the
innodb_file_per_table
configuration option, which stores each newly created table in a
separate tablespace file (with extension .ibd).
For tables stored this way, there is less fragmentation within the
disk file, and when the table is truncated, the space is returned
to the operating system rather than still being reserved by InnoDB
within the system tablespace.
Pages, Extents, Segments, and Tablespaces
Each tablespace consists of database pages with a default size of
16KB. The pages are grouped into extents of size 1MB (64
consecutive pages). The “files” inside a tablespace
are called segments in
InnoDB. (These segments are different from the
rollback segment,
which actually contains many tablespace segments.)
When a segment grows inside the tablespace,
InnoDB allocates the first 32 pages to it one
at a time. After that, InnoDB starts to
allocate whole extents to the segment. InnoDB
can add up to 4 extents at a time to a large segment to ensure
good sequentiality of data.
Two segments are allocated for each index in
InnoDB. One is for nonleaf nodes of the
B-tree, the other is for the
leaf nodes. Keeping the leaf nodes contiguous on disk enables
better sequential I/O operations, because these leaf nodes contain
the actual table data.
Some pages in the tablespace contain bitmaps of other pages, and
therefore a few extents in an InnoDB tablespace
cannot be allocated to segments as a whole, but only as individual
pages.
When you ask for available free space in the tablespace by issuing
a SHOW TABLE STATUS statement,
InnoDB reports the extents that are definitely
free in the tablespace. InnoDB always reserves
some extents for cleanup and other internal purposes; these
reserved extents are not included in the free space.
When you delete data from a table, InnoDB
contracts the corresponding B-tree indexes. Whether the freed
space becomes available for other users depends on whether the
pattern of deletes frees individual pages or extents to the
tablespace. Dropping a table or deleting all rows from it is
guaranteed to release the space to other users, but remember that
deleted rows are physically removed only by the
purge operation, which happens
automatically some time after they are no longer needed for
transaction rollbacks or consistent reads. (See
Section 14.6, “InnoDB Multi-Versioning”.)
To see information about the tablespace, use the Tablespace Monitor. See Section 14.20, “InnoDB Monitors”.
How Pages Relate to Table Rows
The maximum row length is slightly less than half a database page.
For example, the maximum row length is slightly less than 8KB for
the 16KB InnoDB page size.
If a row does not exceed the half page limit, all of it is stored locally within the page. If a row exceeds the half page limit, variable-length columns are chosen for external off-page storage until the row fits within half a page. External off-page storage for variable-length columns differs by row format:
COMPACT and REDUNDANT Row Formats
When a variable-length column is chosen for external off-page storage,
InnoDBstores the first 768 bytes locally in the row, and the rest externally into overflow pages. Each such column has its own list of overflow pages. The 768-byte prefix is accompanied by a 20-byte value that stores the true length of the column and points into the overflow list where the rest of the value is stored. See Section 14.14, “InnoDB Row Formats”.DYNAMIC and COMPRESSED Row Formats
When a variable-length column is chosen for external off-page storage,
InnoDBstores a 20-byte pointer locally in the row, and the rest externally into overflow pages. See Section 14.14, “InnoDB Row Formats”.
LONGBLOB and
LONGTEXT columns
must be less than 4GB, and the total row length, including
BLOB and
TEXT columns, must be less than
4GB.
Making your log files very large may reduce disk I/O during checkpointing. It often makes sense to set the total size of the log files as large as the buffer pool or even larger. Although in the past large log files could make crash recovery take excessive time, starting with MySQL 5.5, performance enhancements to crash recovery make it possible to use large log files with fast startup after a crash. (Strictly speaking, this performance improvement is available for MySQL 5.1 with the InnoDB Plugin 1.0.7 and higher. It is with MySQL 5.5 that this improvement is available in the default InnoDB storage engine.)
How Checkpoint Processing Works
InnoDB implements a
checkpoint mechanism known
as fuzzy
checkpointing. InnoDB flushes modified
database pages from the buffer pool in small batches. There is no
need to flush the buffer pool in one single batch, which would
disrupt processing of user SQL statements during the checkpointing
process.
During crash recovery,
InnoDB looks for a checkpoint label written to
the log files. It knows that all modifications to the database
before the label are present in the disk image of the database.
Then InnoDB scans the log files forward from
the checkpoint, applying the logged modifications to the database.
InnoDB writes to its log files on a rotating
basis. It also writes checkpoint information to the first log file
at each checkpoint. All committed modifications that make the
database pages in the buffer pool different from the images on
disk must be available in the log files in case
InnoDB has to do a recovery. This means that
when InnoDB starts to reuse a log file, it has
to make sure that the database page images on disk contain the
modifications logged in the log file that
InnoDB is going to reuse. In other words,
InnoDB must create a checkpoint and this often
involves flushing of modified database pages to disk.
Random insertions into or deletions from a secondary index can cause the index to become fragmented. Fragmentation means that the physical ordering of the index pages on the disk is not close to the index ordering of the records on the pages, or that there are many unused pages in the 64-page blocks that were allocated to the index.
One symptom of fragmentation is that a table takes more space than
it “should” take. How much that is exactly, is
difficult to determine. All InnoDB data and
indexes are stored in B-trees,
and their fill factor may
vary from 50% to 100%. Another symptom of fragmentation is that a
table scan such as this takes more time than it
“should” take:
SELECT COUNT(*) FROM t WHERE non_indexed_column <> 12345;
The preceding query requires MySQL to perform a full table scan, the slowest type of query for a large table.
To speed up index scans, you can periodically perform a
“null” ALTER TABLE
operation, which causes MySQL to rebuild the table:
ALTER TABLE tbl_name ENGINE=INNODB
Another way to perform a defragmentation operation is to use mysqldump to dump the table to a text file, drop the table, and reload it from the dump file.
If the insertions into an index are always ascending and records
are deleted only from the end, the InnoDB
filespace management algorithm guarantees that fragmentation in
the index does not occur.
To reclaim operating system disk space when
truncating an
InnoDB table, the table must be stored in its
own .ibd file. For a table to
be stored in its own .ibd
file, innodb_file_per_table must
enabled when the table is created. Additionally, there cannot be a
foreign key constraint
between the table being truncated and other tables, otherwise the
TRUNCATE TABLE operation fails. This is a
change from previous behavior, which would transform the
TRUNCATE operation to a
DELETE operation that removes all
rows and triggers ON DELETE operations on child
tables. A foreign key constraint between two columns in the same
table, however, is permitted.
When a table is truncated, it is dropped and re-created in a new
.ibd file (previous versions of
InnoDB would keep the existing
.idb file), and the freed space is returned
to the operating system. This is in contrast to truncating
InnoDB tables that are stored within the
InnoDB
system tablespace
(tables created when
innodb_file_per_table=OFF), where only
InnoDB can use the freed space after the table
is truncated.
The ability to truncate tables and return disk space to the
operating system also means that
physical backups can
be smaller. Truncating tables that are stored in the system
tablespace (tables created when
innodb_file_per_table=OFF) leaves blocks of
unused space in the system tablespace.
In MySQL 5.5 and higher, or in MySQL 5.1 with the InnoDB Plugin, creating and dropping secondary indexes does not copy the contents of the entire table, making this operation much more efficient than with prior releases.
With MySQL 5.5 and higher, creating and dropping
secondary indexes for
InnoDB tables is much faster than before. Historically, adding or
dropping an index on a table with existing data could be very
slow. The CREATE INDEX and
DROP INDEX statements worked by
creating a new, empty table defined with the requested set of
indexes, then copying the existing rows to the new table
one-by-one, updating the indexes as the rows are inserted. After
all rows from the original table were copied, the old table was
dropped and the copy was renamed with the name of the original
table.
The performance speedup for fast index creation applies to secondary indexes, not to the primary key index. The rows of an InnoDB table are stored in a clustered index organized based on the primary key, forming what some database systems call an “index-organized table”. Because the table structure is so closely tied to the primary key, redefining the primary key still requires copying the data.
This new mechanism also means that you can generally speed the overall process of creating and loading an indexed table by creating the table with only the clustered index, and adding the secondary indexes after the data is loaded.
Although no syntax changes are required in the
CREATE INDEX or
DROP INDEX commands, some factors
affect the performance, space usage, and semantics of this
operation (see Section 14.16.6, “Limitations of Fast Index Creation”).
It is possible to create multiple indexes on a table with one
ALTER TABLE statement. This is
relatively efficient, because the clustered index of the table
needs to be scanned only once (although the data is sorted
separately for each new index). For example:
CREATE TABLE T1(A INT PRIMARY KEY, B INT, C CHAR(1)) ENGINE=InnoDB; INSERT INTO T1 VALUES (1,2,'a'), (2,3,'b'), (3,2,'c'), (4,3,'d'), (5,2,'e'); COMMIT; ALTER TABLE T1 ADD INDEX (B), ADD UNIQUE INDEX (C);
The above statements create table T1 with the
clustered index (primary key) on column A,
insert several rows, and then build two new indexes on columns
B and C. If there were many
rows inserted into T1 before the
ALTER TABLE statement, this
approach is much more efficient than creating all the secondary
indexes before loading the data.
You can also create the indexes one at a time, but then the
clustered index of the table is scanned (as well as sorted) once
for each CREATE INDEX statement.
Thus, the following statements are not as efficient as the
ALTER TABLE statement above, even
though neither requires recreating the clustered index for table
T1.
CREATE INDEX B ON T1 (B); CREATE UNIQUE INDEX C ON T1 (C);
Dropping InnoDB secondary indexes also does not require any
copying of table data. You can equally quickly drop multiple
indexes with a single ALTER TABLE
statement or multiple DROP INDEX
statements:
ALTER TABLE T1 DROP INDEX B, DROP INDEX C;
or:
DROP INDEX B ON T1; DROP INDEX C ON T1;
Restructuring the clustered index in InnoDB always requires
copying the data in the table. For example, if you create a table
without a primary key, InnoDB chooses one for you, which may be
the first UNIQUE key defined on NOT
NULL columns, or a system-generated key. Defining a
PRIMARY KEY later causes the data to be copied,
as in the following example:
CREATE TABLE T2 (A INT, B INT) ENGINE=InnoDB; INSERT INTO T2 VALUES (NULL, 1); ALTER TABLE T2 ADD PRIMARY KEY (B);
When you create a UNIQUE or PRIMARY
KEY index, InnoDB must do some extra work. For
UNIQUE indexes, InnoDB checks that the table
contains no duplicate values for the key. For a PRIMARY
KEY index, InnoDB also checks that none of the
PRIMARY KEY columns contains a
NULL. It is best to define the primary key when
you create a table, so you need not rebuild the table later.
InnoDB has two types of indexes: the clustered index and secondary indexes. Since the clustered index contains the data values in its B-tree nodes, adding or dropping a clustered index does involve copying the data, and creating a new copy of the table. A secondary index, however, contains only the index key and the value of the primary key. This type of index can be created or dropped without copying the data in the clustered index. Because each secondary index contains copies of the primary key values (used to access the clustered index when needed), when you change the definition of the primary key, all secondary indexes are recreated as well.
Dropping a secondary index is simple. Only the internal InnoDB system tables and the MySQL data dictionary tables are updated to reflect the fact that the index no longer exists. InnoDB returns the storage used for the index to the tablespace that contained it, so that new indexes or additional table rows can use the space.
To add a secondary index to an existing table, InnoDB scans the table, and sorts the rows using memory buffers and temporary files in order by the values of the secondary index key columns. The B-tree is then built in key-value order, which is more efficient than inserting rows into an index in random order. Because the B-tree nodes are split when they fill, building the index in this way results in a higher fill-factor for the index, making it more efficient for subsequent access.
While an InnoDB secondary index is being created or dropped, the table is locked in shared mode. Any writes to the table are blocked, but the data in the table can be read. When you alter the clustered index of a table, the table is locked in exclusive mode, because the data must be copied. Thus, during the creation of a new clustered index, all operations on the table are blocked.
A CREATE INDEX or
ALTER TABLE statement for an InnoDB
table always waits for currently executing transactions that are
accessing the table to commit or roll back.
ALTER TABLE statements that
redefine an InnoDB primary key wait for all
SELECT statements that access the table to
complete, or their containing transactions to commit. No
transactions whose execution spans the creation of the index can
be accessing the table, because the original table is dropped when
the clustered index is restructured.
Once a CREATE INDEX or
ALTER TABLE statement that creates
an InnoDB secondary index begins executing, queries can access the
table for read access, but cannot update the table. If an
ALTER TABLE statement is changing
the clustered index for an InnoDB table, all queries wait until
the operation completes.
A newly-created InnoDB secondary index contains only the committed
data in the table at the time the CREATE
INDEX or ALTER TABLE
statement begins to execute. It does not contain any uncommitted
values, old versions of values, or values marked for deletion but
not yet removed from the old index.
Because a newly-created index contains only information about data current at the time the index was created, queries that need to see data that was deleted or changed before the index was created cannot use the index. The only queries that could be affected by this limitation are those executing in transactions that began before the creation of the index was begun. For such queries, unpredictable results could occur. Newer queries can use the index.
Although no data is lost if the server crashes while an
ALTER TABLE statement is executing,
the crash recovery
process is different for
clustered indexes and
secondary indexes.
If the server crashes while creating an InnoDB secondary index,
upon recovery, MySQL drops any partially created indexes. You must
re-run the ALTER TABLE or
CREATE INDEX statement.
When a crash occurs during the creation of an InnoDB clustered index, recovery is more complicated, because the data in the table must be copied to an entirely new clustered index. Remember that all InnoDB tables are stored as clustered indexes. In the following discussion, we use the word table and clustered index interchangeably.
MySQL creates the new clustered index by copying the existing data from the original InnoDB table to a temporary table that has the desired index structure. Once the data is completely copied to this temporary table, the original table is renamed with a different temporary table name. The temporary table comprising the new clustered index is renamed with the name of the original table, and the original table is dropped from the database.
If a system crash occurs while creating a new clustered index, no data is lost, but you must complete the recovery process using the temporary tables that exist during the process. Since it is rare to re-create a clustered index or re-define primary keys on large tables, or to encounter a system crash during this operation, this manual does not provide information on recovering from this scenario. Contact MySQL support.
Take the following considerations into account when creating or dropping InnoDB indexes:
During index creation, files are written to the temporary directory (
$TMPDIRon Unix,%TEMP%on Windows, or the value of the--tmpdirconfiguration variable). Each temporary file is large enough to hold one column that makes up the new index, and each one is removed as soon as it is merged into the final index.An
ALTER TABLEstatement that containsDROP INDEXandADD INDEXclauses that both name the same index uses a table copy, not Fast Index Creation.The table is copied, rather than using Fast Index Creation when you create an index on a
TEMPORARY TABLE. This has been reported as MySQL Bug #39833.To avoid consistency issues between the InnoDB data dictionary and the MySQL data dictionary, the table is copied rather than using Fast Index Creation when renaming a column using
ALTER TABLE ... CHANGEsyntax.The statement
ALTER IGNORE TABLEdoes not delete duplicate rows. This has been reported as MySQL Bug #40344. ThetADD UNIQUE INDEXIGNOREkeyword is ignored. If any duplicate rows exist, the operation fails with the following error message:ERROR 23000: Duplicate entry '
347' for key 'pl'As noted above, a newly-created index contains only information about data current at the time the index was created. Therefore, you should not run queries in a transaction that might use a secondary index that did not exist at the beginning of the transaction. There is no way for InnoDB to access “old” data that is consistent with the rest of the data read by the transaction. See the discussion of locking in Section 14.16.4, “Concurrency Considerations for Fast Index Creation”.
Prior to InnoDB storage engine 1.0.4, unexpected results could occur if a query attempts to use an index created after the start of the transaction containing the query. If an old transaction attempts to access a “too new” index, InnoDB storage engine 1.0.4 and later reports an error:
ERROR HY000: Table definition has changed, please retry transaction
As the error message suggests, committing (or rolling back) the transaction, and restarting it, cures the problem.
InnoDB storage engine 1.0.2 introduces some improvements in error handling when users attempt to drop indexes. See Section B.3.1, “Server Error Message Reference” for information related to errors
1025,1553, and1173.MySQL 5.5 does not support efficient creation or dropping of
FOREIGN KEYconstraints. Therefore, if you useALTER TABLEto add or remove aREFERENCESconstraint, the child table is copied, rather than using Fast Index Creation.OPTIMIZE TABLEfor anInnoDBtable is mapped to anALTER TABLEoperation to rebuild the table and update index statistics and free unused space in the clustered index. This operation does not use fast index creation. Secondary indexes are not created as efficiently because keys are inserted in the order they appeared in the primary key.
This section describes the InnoDB-related
command options and system variables.
System variables that are true or false can be enabled at server startup by naming them, or disabled by using a
--skip-prefix. For example, to enable or disableInnoDBchecksums, you can use--innodb-checksumsor--skip-innodb-checksumson the command line, orinnodb_checksumsorskip_innodb_checksumsin an option file.System variables that take a numeric value can be specified as
--on the command line or asvar_name=valuevar_name=valueMany system variables can be changed at runtime (see Section 5.1.8.2, “Dynamic System Variables”).
For information about
GLOBALandSESSIONvariable scope modifiers, refer to theSETstatement documentation.Certain options control the locations and layout of the
InnoDBdata files. Section 14.11.1, “InnoDB Startup Configuration” explains how to use these options.Some options, which you might not use initially, help tune
InnoDBperformance characteristics based on machine capacity and your database workload.For more information on specifying options and system variables, see Section 4.2.2, “Specifying Program Options”.
Table 14.7 InnoDB Option and Variable Reference
InnoDB Command Options
-
Property Value Command-Line Format --innodb[=value]Type Enumeration Default Value ONValid Values OFFONFORCEControls loading of the
InnoDBstorage engine, if the server was compiled withInnoDBsupport. This option has a tristate format, with possible values ofOFF,ON, orFORCE. See Section 5.5.1, “Installing and Uninstalling Plugins”.To disable
InnoDB, use--innodb=OFFor--skip-innodb. In this case, because the default storage engine isInnoDB, the server will not start unless you also change thedefault_storage_enginesystem variable to set the default to some other available engine. -
Property Value Command-Line Format --innodb-status-file[={OFF|ON}]Type Boolean Default Value OFFThe
--innodb-status-filestartup option controls whetherInnoDBcreates a file namedinnodb_status.in the data directory and writespidSHOW ENGINE INNODB STATUSoutput to it every 15 seconds, approximately.The
innodb_status.file is not created by default. To create it, start mysqld with thepid--innodb-status-fileoption.InnoDBremoves the file when the server is shut down normally. If an abnormal shutdown occurs, the status file may have to be removed manually.The
--innodb-status-fileoption is intended for temporary use, asSHOW ENGINE INNODB STATUSoutput generation can affect performance, and theinnodb_status.file can become quite large over time.pidFor related information, see Section 14.20.2, “Enabling InnoDB Monitors”.
Disable the
InnoDBstorage engine. See the description of--innodb.
InnoDB System Variables
-
Property Value Command-Line Format --ignore-builtin-innodb[={OFF|ON}]Deprecated 5.5.22 System Variable ignore_builtin_innodbScope Global Dynamic No Type Boolean In MySQL 5.1, enabling this variable caused the server to behave as if the built-in
InnoDBwere not present, which enabled theInnoDB Pluginto be used instead. In MySQL 5.5,InnoDBis the default storage engine andInnoDB Pluginis not used, so this variable has no effect. As of MySQL 5.5.22, it is deprecated and its use results in a warning. -
Property Value Command-Line Format --innodb-adaptive-flushing[={OFF|ON}]System Variable innodb_adaptive_flushingScope Global Dynamic Yes Type Boolean Default Value ONSpecifies whether to dynamically adjust the rate of flushing dirty pages in the
InnoDBbuffer pool based on the workload. Adjusting the flush rate dynamically is intended to avoid bursts of I/O activity. This setting is enabled by default. See Section 14.11.2.4, “Configuring Buffer Pool Flushing” for more information. For general I/O tuning advice, see Section 8.5.7, “Optimizing InnoDB Disk I/O”. -
Property Value Command-Line Format --innodb-adaptive-hash-index[={OFF|ON}]System Variable innodb_adaptive_hash_indexScope Global Dynamic Yes Type Boolean Default Value ONWhether the
InnoDBadaptive hash index is enabled or disabled. It may be desirable, depending on your workload, to dynamically enable or disable adaptive hash indexing to improve query performance. Because the adaptive hash index may not be useful for all workloads, conduct benchmarks with it both enabled and disabled, using realistic workloads. See Section 14.8.3, “Adaptive Hash Index” for details.This variable is enabled by default. As of MySQL 5.5, You can modify this parameter using the
SET GLOBALstatement, without restarting the server. Changing the setting at runtime requires privileges sufficient to set global system variables. See Section 5.1.8.1, “System Variable Privileges”. You can also use--skip-innodb-adaptive-hash-indexat server startup to disable it.Disabling the adaptive hash index empties the hash table immediately. Normal operations can continue while the hash table is emptied, and executing queries that were using the hash table access the index B-trees directly instead. When the adaptive hash index is re-enabled, the hash table is populated again during normal operation.
innodb_additional_mem_pool_sizeProperty Value Command-Line Format --innodb-additional-mem-pool-size=#System Variable innodb_additional_mem_pool_sizeScope Global Dynamic No Type Integer Default Value 8388608Minimum Value 2097152Maximum Value 4294967295The size in bytes of a memory pool
InnoDBuses to store data dictionary information and other internal data structures. The more tables you have in your application, the more memory you need to allocate here. IfInnoDBruns out of memory in this pool, it starts to allocate memory from the operating system and writes warning messages to the MySQL error log. The default value is 8MB.This variable relates to the
InnoDBinternal memory allocator, which is unused ifinnodb_use_sys_mallocis enabled. For more information, see Section 14.11.3, “Configuring the Memory Allocator for InnoDB”.-
Property Value Command-Line Format --innodb-autoextend-increment=#System Variable innodb_autoextend_incrementScope Global Dynamic Yes Type Integer Default Value 8Minimum Value 1Maximum Value 1000The increment size (in megabytes) for extending the size of an auto-extending system tablespace file when it becomes full. The default value is 8. For related information, see System Tablespace Data File Configuration, and Resizing the System Tablespace.
The
innodb_autoextend_incrementsetting does not affect file-per-table tablespace files. These files are auto-extending regardless of theinnodb_autoextend_incrementsetting. The initial extensions are by small amounts, after which extensions occur in increments of 4MB. -
Property Value Command-Line Format --innodb-autoinc-lock-mode=#System Variable innodb_autoinc_lock_modeScope Global Dynamic No Type Integer Default Value 1Valid Values 012The lock mode to use for generating auto-increment values. Permissible values are 0, 1, or 2, for traditional, consecutive, or interleaved, respectively. The default setting is 1 (consecutive). For the characteristics of each lock mode, see InnoDB AUTO_INCREMENT Lock Modes.
-
Property Value Command-Line Format --innodb-buffer-pool-instances=#Introduced 5.5.4 System Variable innodb_buffer_pool_instancesScope Global Dynamic No Type Integer Default Value 1Minimum Value 1Maximum Value 64The number of regions that the
InnoDBbuffer pool is divided into. For systems with buffer pools in the multi-gigabyte range, dividing the buffer pool into separate instances can improve concurrency, by reducing contention as different threads read and write to cached pages. Each page that is stored in or read from the buffer pool is assigned to one of the buffer pool instances randomly, using a hashing function. Each buffer pool manages its own free lists, flush lists, LRUs, and all other data structures connected to a buffer pool, and is protected by its own buffer pool mutex.This option only takes effect when setting
innodb_buffer_pool_sizeto a size of 1GB or more. The total size you specify is divided among all the buffer pools. For best efficiency, specify a combination ofinnodb_buffer_pool_instancesandinnodb_buffer_pool_sizeso that each buffer pool instance is at least 1GB. -
Property Value Command-Line Format --innodb-buffer-pool-size=#System Variable innodb_buffer_pool_sizeScope Global Dynamic No Type Integer Default Value 134217728Minimum Value 5242880Maximum Value (64-bit platforms) 2**64-1Maximum Value (32-bit platforms) 2**32-1The size in bytes of the buffer pool, the memory area where
InnoDBcaches table and index data. The default value is 134217728 bytes (128MB). The maximum value depends on the CPU architecture; the maximum is 4294967295 (232-1) on 32-bit systems and 18446744073709551615 (264-1) on 64-bit systems. On 32-bit systems, the CPU architecture and operating system may impose a lower practical maximum size than the stated maximum. When the size of the buffer pool is greater than 1GB, settinginnodb_buffer_pool_instancesto a value greater than 1 can improve the scalability on a busy server.A larger buffer pool requires less disk I/O to access the same table data more than once. On a dedicated database server, you might set the buffer pool size to 80% of the machine's physical memory size. Be aware of the following potential issues when configuring buffer pool size, and be prepared to scale back the size of the buffer pool if necessary.
Competition for physical memory can cause paging in the operating system.
InnoDBreserves additional memory for buffers and control structures, so that the total allocated space is approximately 10% greater than the specified buffer pool size.Address space for the buffer pool must be contiguous, which can be an issue on Windows systems with DLLs that load at specific addresses.
The time to initialize the buffer pool is roughly proportional to its size. On instances with large buffer pools, initialization time might be significant.
-
Property Value Command-Line Format --innodb-change-buffering=valueSystem Variable innodb_change_bufferingScope Global Dynamic Yes Type Enumeration Default Value (>= 5.5.4) allDefault Value (<= 5.5.3) insertsValid Values (>= 5.5.4) noneinsertsdeleteschangespurgesallValid Values (<= 5.5.3) insertsnoneWhether
InnoDBperforms change buffering, an optimization that delays write operations to secondary indexes so that the I/O operations can be performed sequentially. Permitted values are described in the following table.Table 14.8 Permitted Values for innodb_change_buffering
Value Description noneDo not buffer any operations. insertsBuffer insert operations. deletesBuffer delete marking operations; strictly speaking, the writes that mark index records for later deletion during a purge operation. changesBuffer inserts and delete-marking operations. purgesBuffer the physical deletion operations that happen in the background. allThe default. Buffer inserts, delete-marking operations, and purges. For more information, see Section 14.8.2, “Change Buffer”. For general I/O tuning advice, see Section 8.5.7, “Optimizing InnoDB Disk I/O”.
-
Property Value Command-Line Format --innodb-change-buffering-debug=#System Variable innodb_change_buffering_debugScope Global Dynamic Yes Type Integer Default Value 0Maximum Value 2Sets a debug flag for
InnoDBchange buffering. A value of 1 forces all changes to the change buffer. A value of 2 causes a crash at merge. A default value of 0 indicates that the change buffering debug flag is not set. This option is only available when debugging support is compiled in using theWITH_DEBUGCMake option. -
Property Value Command-Line Format --innodb-checksums[={OFF|ON}]System Variable innodb_checksumsScope Global Dynamic No Type Boolean Default Value ONInnoDBcan use checksum validation on all pages read from disk to ensure extra fault tolerance against broken hardware or data files. This validation is enabled by default. Under specialized circumstances (such as when running benchmarks) this safety feature can be disabled with--skip-innodb-checksums. -
Property Value Command-Line Format --innodb-commit-concurrency=#System Variable innodb_commit_concurrencyScope Global Dynamic Yes Type Integer Default Value 0Minimum Value 0Maximum Value 1000The number of threads that can commit at the same time. A value of 0 (the default) permits any number of transactions to commit simultaneously.
The value of
innodb_commit_concurrencycannot be changed at runtime from zero to nonzero or vice versa. The value can be changed from one nonzero value to another. -
Property Value Command-Line Format --innodb-concurrency-tickets=#System Variable innodb_concurrency_ticketsScope Global Dynamic Yes Type Integer Default Value 500Minimum Value 1Maximum Value 4294967295Determines the number of threads that can enter
InnoDBconcurrently. A thread is placed in a queue when it tries to enterInnoDBif the number of threads has already reached the concurrency limit. When a thread is permitted to enterInnoDB, it is given a number of “ tickets” equal to the value ofinnodb_concurrency_tickets, and the thread can enter and leaveInnoDBfreely until it has used up its tickets. After that point, the thread again becomes subject to the concurrency check (and possible queuing) the next time it tries to enterInnoDB. The default value is 500.With a small
innodb_concurrency_ticketsvalue, small transactions that only need to process a few rows compete fairly with larger transactions that process many rows. The disadvantage of a smallinnodb_concurrency_ticketsvalue is that large transactions must loop through the queue many times before they can complete, which extends the amount of time required to complete their task.With a large
innodb_concurrency_ticketsvalue, large transactions spend less time waiting for a position at the end of the queue (controlled byinnodb_thread_concurrency) and more time retrieving rows. Large transactions also require fewer trips through the queue to complete their task. The disadvantage of a largeinnodb_concurrency_ticketsvalue is that too many large transactions running at the same time can starve smaller transactions by making them wait a longer time before executing.With a nonzero
innodb_thread_concurrencyvalue, you may need to adjust theinnodb_concurrency_ticketsvalue up or down to find the optimal balance between larger and smaller transactions. TheSHOW ENGINE INNODB STATUSreport shows the number of tickets remaining for an executing transaction in its current pass through the queue. This data may also be obtained from theTRX_CONCURRENCY_TICKETScolumn of theINFORMATION_SCHEMA.INNODB_TRXtable.For more information, see Section 14.11.4, “Configuring Thread Concurrency for InnoDB”.
-
Property Value Command-Line Format --innodb-data-file-path=file_nameSystem Variable innodb_data_file_pathScope Global Dynamic No Type String Default Value ibdata1:10M:autoextendDefines the name, size, and attributes of
InnoDBsystem tablespace data files. If you do not specify a value forinnodb_data_file_path, the default behavior is to create a single auto-extending data file, slightly larger than 10MB, namedibdata1.The full syntax for a data file specification includes the file name, file size,
autoextendattribute, andmaxattribute:file_name:file_size[:autoextend[:max:max_file_size]]File sizes are specified in kilobytes, megabytes, or gigabytes by appending
K,MorGto the size value. If specifying the data file size in kilobytes, do so in multiples of 1024. Otherwise, KB values are rounded to nearest megabyte (MB) boundary. The sum of file sizes must be, at a minimum, slightly larger than 12MB.For additional configuration information, see System Tablespace Data File Configuration. For resizing instructions, see Resizing the System Tablespace.
-
Property Value Command-Line Format --innodb-data-home-dir=dir_nameSystem Variable innodb_data_home_dirScope Global Dynamic No Type Directory name The common part of the directory path for
InnoDBsystem tablespace data files. This setting does not affect the location of file-per-table tablespaces wheninnodb_file_per_tableis enabled. The default value is the MySQLdatadirectory. If you specify the value as an empty string, you can specify an absolute file paths forinnodb_data_file_path.A trailing slash is required when specifying a value for
innodb_data_home_dir. For example:[mysqld] innodb_data_home_dir = /path/to/myibdata/
For related information, see Section 14.11.1, “InnoDB Startup Configuration”.
-
Property Value Command-Line Format --innodb-doublewrite[={OFF|ON}]System Variable innodb_doublewriteScope Global Dynamic No Type Boolean Default Value ONWhen enabled (the default),
InnoDBstores all data twice, first to the doublewrite buffer, and then to the actual data files. This variable can be turned off with--skip-innodb-doublewritefor benchmarks or cases when top performance is needed rather than concern for data integrity or possible failures.For related information, see Section 14.9.5, “Doublewrite Buffer”.
-
Property Value Command-Line Format --innodb-fast-shutdown=#System Variable innodb_fast_shutdownScope Global Dynamic Yes Type Integer Default Value 1Valid Values 012The
InnoDBshutdown mode. If the value is 0,InnoDBdoes a slow shutdown, a full purge and a change buffer merge before shutting down. If the value is 1 (the default),InnoDBskips these operations at shutdown, a process known as a fast shutdown. If the value is 2,InnoDBflushes its logs and shuts down cold, as if MySQL had crashed; no committed transactions are lost, but the crash recovery operation makes the next startup take longer.The slow shutdown can take minutes, or even hours in extreme cases where substantial amounts of data are still buffered. Use the slow shutdown technique before upgrading or downgrading between MySQL major releases, so that all data files are fully prepared in case the upgrade process updates the file format.
Use
innodb_fast_shutdown=2in emergency or troubleshooting situations, to get the absolute fastest shutdown if data is at risk of corruption. -
Property Value Command-Line Format --innodb-file-format=valueSystem Variable innodb_file_formatScope Global Dynamic Yes Type String Default Value (>= 5.5.7) AntelopeDefault Value (<= 5.5.6) BarracudaValid Values AntelopeBarracudaEnables an
InnoDBfile format for file-per-table tablespaces. Supported file formats areAntelopeandBarracuda.Antelopeis the originalInnoDBfile format, which supportsREDUNDANTandCOMPACTrow formats forInnoDBtables.Barracudais the newer file format, which supportsCOMPRESSEDandDYNAMICrow formats.COMPRESSEDandDYNAMICrow formats enable important storage features forInnoDBtables. See Section 14.14, “InnoDB Row Formats”.To create tables that use
COMPRESSEDorDYNAMICrow format, theBarracudafile format andinnodb_file_per_tablemust be enabled.Changing the
innodb_file_formatsetting does not affect the file format of existingInnoDBtablespace files.For more information, see Section 14.13, “InnoDB File-Format Management”.
-
Property Value Command-Line Format --innodb-file-format-check=value(<= 5.5.4)--innodb-file-format-check[={OFF|ON}](>= 5.5.5)System Variable innodb_file_format_checkScope Global Dynamic (>= 5.5.5) No Dynamic (<= 5.5.4) Yes Type (>= 5.5.5) Boolean Type (<= 5.5.4) String Default Value (>= 5.5.5) ONDefault Value (>= 5.5.1, <= 5.5.4) BarracudaDefault Value (5.5.0) AntelopeAs of MySQL 5.5.5, this variable can be set to 1 or 0 at server startup to enable or disable whether
InnoDBchecks the file format tag in the system tablespace (for example,AntelopeorBarracuda). If the tag is checked and is higher than that supported by the current version ofInnoDB, an error occurs andInnoDBdoes not start. If the tag is not higher,InnoDBsets the value ofinnodb_file_format_maxto the file format tag.Before MySQL 5.5.5, this variable can be set to 1 or 0 at server startup to enable or disable whether
InnoDBchecks the file format tag in the shared tablespace. If the tag is checked and is higher than that supported by the current version ofInnoDB, an error occurs andInnoDBdoes not start. If the tag is not higher,InnoDBsets the value ofinnodb_file_format_checkto the file format tag, which is the value seen at runtime.NoteDespite the default value sometimes being displayed as
ONorOFF, always use the numeric values 1 or 0 to turn this option on or off in your configuration file or command line string.For more information, see Section 14.13.2.1, “Compatibility Check When InnoDB Is Started”.
-
Property Value Command-Line Format --innodb-file-format-max=valueIntroduced 5.5.5 System Variable innodb_file_format_maxScope Global Dynamic Yes Type String Default Value AntelopeValid Values AntelopeBarracudaAt server startup,
InnoDBsets the value of this variable to the file format tag in the system tablespace (for example,AntelopeorBarracuda). If the server creates or opens a table with a “higher” file format, it sets the value ofinnodb_file_format_maxto that format.For related information, see Section 14.13, “InnoDB File-Format Management”.
-
Property Value Command-Line Format --innodb-file-per-table[={OFF|ON}]System Variable innodb_file_per_tableScope Global Dynamic Yes Type Boolean Default Value (>= 5.5.7) OFFDefault Value (<= 5.5.6) ONWhen
innodb_file_per_tableis enabled, tables are created in file-per-table tablespaces. When disabled, tables are created in the system tablespace. For information about file-per-table tablespaces, see Section 14.9.3.2, “File-Per-Table Tablespaces”. For information about theInnoDBsystem tablespace, see Section 14.9.3.1, “The System Tablespace”.The
innodb_file_per_tablevariable can be configured at runtime using aSET GLOBALstatement, specified on the command line at startup, or specified in an option file. Configuration at runtime requires privileges sufficient to set global system variables (see Section 5.1.8.1, “System Variable Privileges”) and immediately affects the operation of all connections.When a table that resides in a file-per-table tablespace is truncated or dropped, the freed space is returned to the operating system. Truncating or dropping a table that resides in the system tablespace only frees space in the system tablespace. Freed space in the system tablespace can be used again for
InnoDBdata but is not returned to the operating system, as system tablespace data files never shrink.When
innodb_file_per_tableis enabled, a table-copyingALTER TABLEoperation on a table that resides in the system tablespace implicitly re-creates the table in a file-per-table tablespace. To prevent this from occurring, disableinnodb_file_per_tablebefore executing table-copyingALTER TABLEoperations on tables that reside in the system tablespace. innodb_flush_log_at_trx_commitProperty Value Command-Line Format --innodb-flush-log-at-trx-commit=#System Variable innodb_flush_log_at_trx_commitScope Global Dynamic Yes Type Enumeration Default Value 1Valid Values 012Controls the balance between strict ACID compliance for commit operations and higher performance that is possible when commit-related I/O operations are rearranged and done in batches. You can achieve better performance by changing the default value but then you can lose transactions in a crash.
The default setting of 1 is required for full ACID compliance. Logs are written and flushed to disk at each transaction commit.
With a setting of 0, logs are written and flushed to disk once per second. Transactions for which logs have not been flushed can be lost in a crash.
With a setting of 2, logs are written after each transaction commit and flushed to disk once per second. Transactions for which logs have not been flushed can be lost in a crash.
For settings 0 and 2, once-per-second flushing is not 100% guaranteed. Flushing may occur more frequently due to DDL changes and other internal
InnoDBactivities that cause logs to be flushed independently of theinnodb_flush_log_at_trx_commitsetting, and sometimes less frequently due to scheduling issues. If logs are flushed once per second, up to one second of transactions can be lost in a crash. If logs are flushed more or less frequently than once per second, the amount of transactions that can be lost varies accordingly.DDL changes and other internal
InnoDBactivities flush the log independently of theinnodb_flush_log_at_trx_commitsetting.InnoDBcrash recovery works regardless of theinnodb_flush_log_at_trx_commitsetting. Transactions are either applied entirely or erased entirely.
For the greatest possible durability and consistency in a replication setup using
InnoDBwith transactions, useinnodb_flush_log_at_trx_commit=1andsync_binlog=1in your master servermy.cnffile.CautionMany operating systems and some disk hardware fool the flush-to-disk operation. They may tell mysqld that the flush has taken place, even though it has not. In this case, the durability of transactions is not guaranteed even with the recommended settings, and in the worst case, a power outage can corrupt
InnoDBdata. Using a battery-backed disk cache in the SCSI disk controller or in the disk itself speeds up file flushes, and makes the operation safer. You can also try to disable the caching of disk writes in hardware caches.-
Property Value Command-Line Format --innodb-flush-method=valueSystem Variable innodb_flush_methodScope Global Dynamic No Type String Default Value NULLValid Values (Windows) async_unbufferednormalunbufferedValid Values (Unix) fsynclittlesyncnosyncO_DSYNCO_DIRECTDefines the method used to flush data to
InnoDBdata files and log files, which can affect I/O throughput.If
innodb_flush_methodis set toNULLon a Unix-like system, thefsyncoption is used by default. Ifinnodb_flush_methodis set toNULLon Windows, theasync_unbufferedoption is used by default.The
innodb_flush_methodoptions for Unix-like systems include:fsync:InnoDBuses thefsync()system call to flush both the data and log files.fsyncis the default setting.O_DSYNC:InnoDBusesO_SYNCto open and flush the log files, andfsync()to flush the data files.InnoDBdoes not useO_DSYNCdirectly because there have been problems with it on many varieties of Unix.littlesync: This option is used for internal performance testing and is currently unsupported. Use at your own risk.nosync: This option is used for internal performance testing and is currently unsupported. Use at your own risk.O_DIRECT:InnoDBusesO_DIRECT(ordirectio()on Solaris) to open the data files, and usesfsync()to flush both the data and log files. This option is available on some GNU/Linux versions, FreeBSD, and Solaris.
The
innodb_flush_methodoptions for Windows systems include:async_unbuffered:InnoDBuses Windows asynchronous I/O and non-buffered I/O.async_unbufferedis the default setting on Windows systems.Running MySQL server on a 4K sector hard drive on Windows is not supported with
async_unbuffered. The workaround is to useinnodb_flush_method=normal.normal:InnoDBuses simulated asynchronous I/O and buffered I/O. This option is used for internal performance testing and is currently unsupported. Use at your own risk.unbuffered:InnoDBuses simulated asynchronous I/O and non-buffered I/O. This option is used for internal performance testing and is currently unsupported. Use at your own risk.
How each setting affects performance depends on hardware configuration and workload. Benchmark your particular configuration to decide which setting to use, or whether to keep the default setting. Examine the
Innodb_data_fsyncsstatus variable to see the overall number offsync()calls for each setting. The mix of read and write operations in your workload can affect how a setting performs. For example, on a system with a hardware RAID controller and battery-backed write cache,O_DIRECTcan help to avoid double buffering between theInnoDBbuffer pool and the operating system file system cache. On some systems whereInnoDBdata and log files are located on a SAN, the default value orO_DSYNCmight be faster for a read-heavy workload with mostlySELECTstatements. Always test this parameter with hardware and workload that reflect your production environment. For general I/O tuning advice, see Section 8.5.7, “Optimizing InnoDB Disk I/O”.Prior to MySQL 5.1.24, the default
innodb_flush_methodoption was namedfdatasync. Whenfdatasyncwas specified,InnoDBused thefsync()system call to flush both the data and log files. To avoid confusing thefdatasyncoption name with thefdatasync()system call, the option name was changed tofsyncin MySQL 5.1.24. -
Property Value Command-Line Format --innodb-force-load-corrupted[={OFF|ON}]Introduced 5.5.18 System Variable innodb_force_load_corruptedScope Global Dynamic No Type Boolean Default Value OFFPermits
InnoDBto load tables at startup that are marked as corrupted. Use only during troubleshooting, to recover data that is otherwise inaccessible. When troubleshooting is complete, disable this setting and restart the server. -
Property Value Command-Line Format --innodb-force-recovery=#System Variable innodb_force_recoveryScope Global Dynamic No Type Integer Default Value 0Minimum Value 0Maximum Value 6The crash recovery mode, typically only changed in serious troubleshooting situations. Possible values are from 0 to 6. For the meanings of these values and important information about
innodb_force_recovery, see Section 14.23.2, “Forcing InnoDB Recovery”. -
Property Value Command-Line Format --innodb-io-capacity=#System Variable innodb_io_capacityScope Global Dynamic Yes Type Integer Default Value 200Minimum Value 100Maximum Value (64-bit platforms) 2**64-1Maximum Value (32-bit platforms) 2**32-1The
innodb_io_capacityparameter sets an upper limit on the number of I/O operations performed per second byInnoDBbackground tasks, such as flushing pages from the buffer pool and merging data from the change buffer.The
innodb_io_capacitylimit is a total limit for all buffer pool instances. When dirty pages are flushed, the limit is divided equally among buffer pool instances.innodb_io_capacityshould be set to approximately the number of I/O operations that the system can perform per second. Ideally, keep the setting as low as practical, but not so low that background activities fall behind. If the value is too high, data is removed from the buffer pool and insert buffer too quickly for caching to provide a significant benefit.The default value is 200. For busy systems capable of higher I/O rates, you can set a higher value to help the server handle the background maintenance work associated with a high rate of row changes.
In general, you can increase the value as a function of the number of drives used for
InnoDBI/O. For example, you can increase the value on systems that use multiple disks or solid-state disks (SSD).The default setting of 200 is generally sufficient for a lower-end SSD. For a higher-end, bus-attached SSD, consider a higher setting such as 1000, for example. For systems with individual 5400 RPM or 7200 RPM drives, you might lower the value to the former default of
100, which represents an estimated proportion of the I/O operations per second (IOPS) available to older-generation disk drives that can perform about 100 IOPS.Although you can specify a very high value such as one million, in practice such large values have little if any benefit. Generally, a value of 20000 or higher is not recommended unless you have proven that lower values are insufficient for your workload.
Consider write workload when tuning
innodb_io_capacity. Systems with large write workloads are likely to benefit from a higher setting. A lower setting may be sufficient for systems with a small write workload.You can set
innodb_io_capacityin the MySQL option file (my.cnformy.ini) or change it dynamically using aSET GLOBALstatement, which requires privileges sufficient to set global system variables. See Section 5.1.8.1, “System Variable Privileges”.See Section 14.11.7, “Configuring InnoDB I/O Capacity” for more information. For general information about
InnoDBI/O performance, see Section 8.5.7, “Optimizing InnoDB Disk I/O”. -
Property Value Command-Line Format --innodb-large-prefix[={OFF|ON}]Introduced 5.5.14 System Variable innodb_large_prefixScope Global Dynamic Yes Type Boolean Default Value OFFEnable this option to allow index key prefixes longer than 767 bytes (up to 3072 bytes), for
InnoDBtables that useDYNAMICorCOMPRESSEDrow format. (Creating such tables also requires the option valuesinnodb_file_format=barracudaandinnodb_file_per_table=true.) See Section 14.9.1.6, “Limits on InnoDB Tables” for maximums associated with index key prefixes under various settings.For tables that use
REDUNDANTorCOMPACTrow format, this option does not affect the permitted index key prefix length. When this setting is enabled, attempting to create an index prefix with a key length greater than 3072 for aREDUNDANTorCOMPACTtable causes anER_INDEX_COLUMN_TOO_LONGerror. innodb_limit_optimistic_insert_debugProperty Value Command-Line Format --innodb-limit-optimistic-insert-debug=#System Variable innodb_limit_optimistic_insert_debugScope Global Dynamic Yes Type Integer Default Value 0Minimum Value 0Maximum Value 2**32-1Limits the number of records per B-tree page. A default value of 0 means that no limit is imposed. This option is only available if debugging support is compiled in using the
WITH_DEBUGCMake option.-
Property Value Command-Line Format --innodb-lock-wait-timeout=#System Variable innodb_lock_wait_timeoutScope Global, Session Dynamic Yes Type Integer Default Value 50Minimum Value 1Maximum Value 1073741824The length of time in seconds an
InnoDBtransaction waits for a row lock before giving up. The default value is 50 seconds. A transaction that tries to access a row that is locked by anotherInnoDBtransaction waits at most this many seconds for write access to the row before issuing the following error:ERROR 1205 (HY000): Lock wait timeout exceeded; try restarting transaction
When a lock wait timeout occurs, the current statement is rolled back (not the entire transaction). To have the entire transaction roll back, start the server with the
--innodb-rollback-on-timeoutoption. See also Section 14.23.4, “InnoDB Error Handling”.You might decrease this value for highly interactive applications or OLTP systems, to display user feedback quickly or put the update into a queue for processing later. You might increase this value for long-running back-end operations, such as a transform step in a data warehouse that waits for other large insert or update operations to finish.
innodb_lock_wait_timeoutapplies toInnoDBrow locks only. A MySQL table lock does not happen insideInnoDBand this timeout does not apply to waits for table locks.The lock wait timeout value does not apply to deadlocks, because
InnoDBdetects them immediately and rolls back one of the deadlocked transactions. See Section 14.10.5.2, “Deadlock Detection and Rollback”.innodb_lock_wait_timeoutcan be set at runtime with theSET GLOBALorSET SESSIONstatement. Changing theGLOBALsetting requires privileges sufficient to set global system variables (see Section 5.1.8.1, “System Variable Privileges”) and affects the operation of all clients that subsequently connect. Any client can change theSESSIONsetting forinnodb_lock_wait_timeout, which affects only that client. innodb_locks_unsafe_for_binlogProperty Value Command-Line Format --innodb-locks-unsafe-for-binlog[={OFF|ON}]System Variable innodb_locks_unsafe_for_binlogScope Global Dynamic No Type Boolean Default Value OFFThis variable affects how
InnoDBuses gap locking for searches and index scans. Normally,InnoDBuses an algorithm called next-key locking that combines index-row locking with gap locking.InnoDBperforms row-level locking in such a way that when it searches or scans a table index, it sets shared or exclusive locks on the index records it encounters. Thus, row-level locks are actually index-record locks. In addition, a next-key lock on an index record also affects the gap before the index record. That is, a next-key lock is an index-record lock plus a gap lock on the gap preceding the index record. If one session has a shared or exclusive lock on recordRin an index, another session cannot insert a new index record in the gap immediately beforeRin the index order. See Section 14.10.1, “InnoDB Locking”.By default, the value of
innodb_locks_unsafe_for_binlogis 0 (disabled), which means that gap locking is enabled:InnoDBuses next-key locks for searches and index scans. To enable the variable, set it to 1. This causes gap locking to be disabled:InnoDBuses only index-record locks for searches and index scans.Enabling
innodb_locks_unsafe_for_binlogdoes not disable the use of gap locking for foreign-key constraint checking or duplicate-key checking.The effects of enabling
innodb_locks_unsafe_for_binlogare the same as setting the transaction isolation level toREAD COMMITTED, with these exceptions:Enabling
innodb_locks_unsafe_for_binlogis a global setting and affects all sessions, whereas the isolation level can be set globally for all sessions, or individually per session.innodb_locks_unsafe_for_binlogcan be set only at server startup, whereas the isolation level can be set at startup or changed at runtime.
READ COMMITTEDtherefore offers finer and more flexible control thaninnodb_locks_unsafe_for_binlog. For more information about the effect of isolation level on gap locking, see Section 14.10.2.1, “Transaction Isolation Levels”.Enabling
innodb_locks_unsafe_for_binlogmay cause phantom problems because other sessions can insert new rows into the gaps when gap locking is disabled. Suppose that there is an index on theidcolumn of thechildtable and that you want to read and lock all rows from the table having an identifier value larger than 100, with the intention of updating some column in the selected rows later:SELECT * FROM child WHERE id > 100 FOR UPDATE;
The query scans the index starting from the first record where the
idis greater than 100. If the locks set on the index records in that range do not lock out inserts made in the gaps, another session can insert a new row into the table. Consequently, if you were to execute the sameSELECTagain within the same transaction, you would see a new row in the result set returned by the query. This also means that if new items are added to the database,InnoDBdoes not guarantee serializability. Therefore, ifinnodb_locks_unsafe_for_binlogis enabled,InnoDBguarantees at most an isolation level ofREAD COMMITTED. (Conflict serializability is still guaranteed.) For more information about phantoms, see Section 14.10.4, “Phantom Rows”.Enabling
innodb_locks_unsafe_for_binloghas additional effects:For
UPDATEorDELETEstatements,InnoDBholds locks only for rows that it updates or deletes. Record locks for nonmatching rows are released after MySQL has evaluated theWHEREcondition. This greatly reduces the probability of deadlocks, but they can still happen.For
UPDATEstatements, if a row is already locked,InnoDBperforms a “semi-consistent” read, returning the latest committed version to MySQL so that MySQL can determine whether the row matches theWHEREcondition of theUPDATE. If the row matches (must be updated), MySQL reads the row again and this timeInnoDBeither locks it or waits for a lock on it.
Consider the following example, beginning with this table:
CREATE TABLE t (a INT NOT NULL, b INT) ENGINE = InnoDB; INSERT INTO t VALUES (1,2),(2,3),(3,2),(4,3),(5,2); COMMIT;
In this case, table has no indexes, so searches and index scans use the hidden clustered index for record locking (see Section 14.9.2.1, “Clustered and Secondary Indexes”).
Suppose that one client performs an
UPDATEusing these statements:SET autocommit = 0; UPDATE t SET b = 5 WHERE b = 3;
Suppose also that a second client performs an
UPDATEby executing these statements following those of the first client:SET autocommit = 0; UPDATE t SET b = 4 WHERE b = 2;
As
InnoDBexecutes eachUPDATE, it first acquires an exclusive lock for each row, and then determines whether to modify it. IfInnoDBdoes not modify the row andinnodb_locks_unsafe_for_binlogis enabled, it releases the lock. Otherwise,InnoDBretains the lock until the end of the transaction. This affects transaction processing as follows.If
innodb_locks_unsafe_for_binlogis disabled, the firstUPDATEacquires x-locks and does not release any of them:x-lock(1,2); retain x-lock x-lock(2,3); update(2,3) to (2,5); retain x-lock x-lock(3,2); retain x-lock x-lock(4,3); update(4,3) to (4,5); retain x-lock x-lock(5,2); retain x-lock
The second
UPDATEblocks as soon as it tries to acquire any locks (because the first update has retained locks on all rows), and does not proceed until the firstUPDATEcommits or rolls back:x-lock(1,2); block and wait for first UPDATE to commit or roll back
If
innodb_locks_unsafe_for_binlogis enabled, the firstUPDATEacquires x-locks and releases those for rows that it does not modify:x-lock(1,2); unlock(1,2) x-lock(2,3); update(2,3) to (2,5); retain x-lock x-lock(3,2); unlock(3,2) x-lock(4,3); update(4,3) to (4,5); retain x-lock x-lock(5,2); unlock(5,2)
For the second
UPDATE,InnoDBdoes a “semi-consistent” read, returning the latest committed version of each row to MySQL so that MySQL can determine whether the row matches theWHEREcondition of theUPDATE:x-lock(1,2); update(1,2) to (1,4); retain x-lock x-lock(2,3); unlock(2,3) x-lock(3,2); update(3,2) to (3,4); retain x-lock x-lock(4,3); unlock(4,3) x-lock(5,2); update(5,2) to (5,4); retain x-lock
-
Property Value Command-Line Format --innodb-log-buffer-size=#System Variable innodb_log_buffer_sizeScope Global Dynamic No Type Integer Default Value 8388608Minimum Value 262144Maximum Value 4294967295The size in bytes of the buffer that
InnoDBuses to write to the log files on disk. The default value is 8MB. A large log buffer enables large transactions to run without the need to write the log to disk before the transactions commit. Thus, if you have transactions that update, insert, or delete many rows, making the log buffer larger saves disk I/O. For related information, see Memory Configuration, and Section 8.5.3, “Optimizing InnoDB Redo Logging”. For general I/O tuning advice, see Section 8.5.7, “Optimizing InnoDB Disk I/O”. -
Property Value Command-Line Format --innodb-log-file-size=#System Variable innodb_log_file_sizeScope Global Dynamic No Type Integer Default Value 5242880Minimum Value 1048576Maximum Value 4GB / innodb_log_files_in_groupThe size in bytes of each log file in a log group. The combined size of log files (
innodb_log_file_size*innodb_log_files_in_group) cannot exceed a maximum value that is slightly less than 4GB. A pair of 2047 MB log files, for example, approaches the limit but does not exceed it. The default value is 5MB.Generally, the combined size of the log files should be large enough that the server can smooth out peaks and troughs in workload activity, which often means that there is enough redo log space to handle more than an hour of write activity. The larger the value, the less checkpoint flush activity is required in the buffer pool, saving disk I/O. Larger log files also make crash recovery slower, although improvements to recovery performance in MySQL 5.5 and higher make the log file size less of a consideration.
For related information, see Redo Log File Configuration. For general I/O tuning advice, see Section 8.5.7, “Optimizing InnoDB Disk I/O”.
-
Property Value Command-Line Format --innodb-log-files-in-group=#System Variable innodb_log_files_in_groupScope Global Dynamic No Type Integer Default Value 2Minimum Value 2Maximum Value 100The number of log files in the log group.
InnoDBwrites to the files in a circular fashion. The default (and recommended) value is 2. The location of the files is specified byinnodb_log_group_home_dir.For related information, see Redo Log File Configuration.
-
Property Value Command-Line Format --innodb-log-group-home-dir=dir_nameSystem Variable innodb_log_group_home_dirScope Global Dynamic No Type Directory name The directory path to the
InnoDBredo log files, whose number is specified byinnodb_log_files_in_group. If you do not specify anyInnoDBlog variables, the default is to create two files namedib_logfile0andib_logfile1in the MySQL data directory. Log file size is given by theinnodb_log_file_sizesystem variable.For related information, see Redo Log File Configuration.
-
Property Value Command-Line Format --innodb-max-dirty-pages-pct=#System Variable innodb_max_dirty_pages_pctScope Global Dynamic Yes Type Numeric Default Value 75Minimum Value 0Maximum Value 99InnoDBtries to flush data from the buffer pool so that the percentage of dirty pages does not exceed this value. Specify an integer in the range from 0 to 99. The default value is 75.For additional information about this variable, see Section 14.11.2.4, “Configuring Buffer Pool Flushing”. For general I/O tuning advice, see Section 8.5.7, “Optimizing InnoDB Disk I/O”.
-
Property Value Command-Line Format --innodb-max-purge-lag=#System Variable innodb_max_purge_lagScope Global Dynamic Yes Type Integer Default Value 0Minimum Value 0Maximum Value 4294967295Defines the maximum length of the purge queue. The default value of 0 indicates no limit (no delays).
Use this option to impose a delay for
INSERT,UPDATE, andDELETEoperations when purge operations are lagging (see Section 14.6, “InnoDB Multi-Versioning”).The
InnoDBtransaction system maintains a list of transactions that have index records delete-marked byUPDATEorDELETEoperations. The length of the list represents thepurge_lagvalue. Whenpurge_lagexceedsinnodb_max_purge_lag,INSERT,UPDATE, andDELETEoperations are delayed by at least 5000 microseconds. The delay calculation is(purge_lag/innodb_max_purge_lag - 0.5) * 10000. The delay is calculated at the beginning of a purge batch, every ten seconds. The operations are not delayed if purge cannot run because of an old consistent read view that could see the rows to be purged.A typical setting for a problematic workload might be 1 million, assuming that transactions are small, only 100 bytes in size, and it is permissible to have 100MB of unpurged
InnoDBtable rows.The lag value is displayed as the history list length in the
TRANSACTIONSsection of InnoDB Monitor output. The lag value is 20 in this example output:------------ TRANSACTIONS ------------ Trx id counter 0 290328385 Purge done for trx's n:o < 0 290315608 undo n:o < 0 17 History list length 20
For general I/O tuning advice, see Section 8.5.7, “Optimizing InnoDB Disk I/O”.
Has no effect.
-
Property Value Command-Line Format --innodb-old-blocks-pct=#System Variable innodb_old_blocks_pctScope Global Dynamic Yes Type Integer Default Value 37Minimum Value 5Maximum Value 95Specifies the approximate percentage of the
InnoDBbuffer pool used for the old block sublist. The range of values is 5 to 95. The default value is 37 (that is, 3/8 of the pool).For more information, see Section 14.11.2.2, “Making the Buffer Pool Scan Resistant”. For information about buffer pool management, the LRU algorithm, and eviction policies, see Section 14.8.1, “Buffer Pool”.
-
Property Value Command-Line Format --innodb-old-blocks-time=#System Variable innodb_old_blocks_timeScope Global Dynamic Yes Type Integer Default Value 0Minimum Value 0Maximum Value 2**32-1Non-zero values protect against the buffer pool being filled by data that is referenced only for a brief period, such as during a full table scan. Increasing this value offers more protection against full table scans interfering with data cached in the buffer pool.
Specifies how long in milliseconds a block inserted into the old sublist must stay there after its first access before it can be moved to the new sublist. If the value is 0, a block inserted into the old sublist moves immediately to the new sublist the first time it is accessed, no matter how soon after insertion the access occurs. If the value is greater than 0, blocks remain in the old sublist until an access occurs at least that many milliseconds after the first access. For example, a value of 1000 causes blocks to stay in the old sublist for 1 second after the first access before they become eligible to move to the new sublist.
This variable is often used in combination with
innodb_old_blocks_pct. For more information, see Section 14.11.2.2, “Making the Buffer Pool Scan Resistant”. For information about buffer pool management, the LRU algorithm, and eviction policies, see Section 14.8.1, “Buffer Pool”. -
Property Value Command-Line Format --innodb-open-files=#System Variable innodb_open_filesScope Global Dynamic No Type Integer Default Value 300Minimum Value 10Maximum Value 4294967295This variable is only relevant if you use multiple
InnoDBtablespaces. It specifies the maximum number of.ibdfiles that MySQL can keep open at one time. The minimum value is 10. The default value is 300.The file descriptors used for
.ibdfiles are forInnoDBtables only. They are independent of those specified by theopen_files_limitsystem variable, and do not affect the operation of the table cache. -
Property Value Command-Line Format --innodb-print-all-deadlocks[={OFF|ON}]Introduced 5.5.30 System Variable innodb_print_all_deadlocksScope Global Dynamic Yes Type Boolean Default Value OFFWhen this option is enabled, information about all deadlocks in
InnoDBuser transactions is recorded in themysqlderror log. Otherwise, you see information about only the last deadlock, using theSHOW ENGINE INNODB STATUScommand. An occasionalInnoDBdeadlock is not necessarily an issue, becauseInnoDBdetects the condition immediately and rolls back one of the transactions automatically. You might use this option to troubleshoot why deadlocks are occurring if an application does not have appropriate error-handling logic to detect the rollback and retry its operation. A large number of deadlocks might indicate the need to restructure transactions that issue DML orSELECT ... FOR UPDATEstatements for multiple tables, so that each transaction accesses the tables in the same order, thus avoiding the deadlock condition.For related information, see Section 14.10.5, “Deadlocks in InnoDB”.
-
Property Value Command-Line Format --innodb-purge-batch-size=#Introduced 5.5.4 System Variable innodb_purge_batch_sizeScope Global Dynamic Yes Type Integer Default Value 20Minimum Value 1Maximum Value 5000Defines the number of undo log pages that purge parses and processes in one batch from the history list. The
innodb_purge_batch_sizeoption also defines the number of undo log pages that purge frees after every 128 iterations through the undo logs.The
innodb_purge_batch_sizeoption is intended for advanced performance tuning in combination with theinnodb_purge_threadssetting. Most MySQL users need not changeinnodb_purge_batch_sizefrom its default value.For related information, see Section 14.11.9, “Purge Configuration”.
-
Property Value Command-Line Format --innodb-purge-threads=#Introduced 5.5.4 System Variable innodb_purge_threadsScope Global Dynamic No Type Integer Default Value 0Minimum Value 0Maximum Value 1The number of background threads devoted to the
InnoDBpurge operation. Currently, can only be 0 (the default) or 1. The default value of 0 signifies that the purge operation is performed as part of the master thread. Running the purge operation in its own thread can reduce internal contention withinInnoDB, improving scalability. Currently, the performance gain might be minimal because the background thread might encounter different kinds of contention than before. This feature primarily lays the groundwork for future performance work.For related information, see Section 14.11.9, “Purge Configuration”.
-
Property Value Command-Line Format --innodb-random-read-ahead[={OFF|ON}]Introduced 5.5.16 System Variable innodb_random_read_aheadScope Global Dynamic Yes Type Boolean Default Value OFFEnables the random read-ahead technique for optimizing
InnoDBI/O. Random read-ahead functionality was removed from theInnoDB Plugin(version 1.0.4) and was therefore not included in MySQL 5.5.0 whenInnoDB Pluginbecame the “built-in” version ofInnoDB. Random read-ahead was reintroduced in MySQL 5.1.59 and 5.5.16 and higher along with theinnodb_random_read_aheadconfiguration option, which is disabled by default.For details about performance considerations for different types of read-ahead requests, see Section 14.11.2.3, “Configuring InnoDB Buffer Pool Prefetching (Read-Ahead)”. For general I/O tuning advice, see Section 8.5.7, “Optimizing InnoDB Disk I/O”.
-
Property Value Command-Line Format --innodb-read-ahead-threshold=#System Variable innodb_read_ahead_thresholdScope Global Dynamic Yes Type Integer Default Value 56Minimum Value 0Maximum Value 64Controls the sensitivity of linear read-ahead that
InnoDBuses to prefetch pages into the buffer pool. IfInnoDBreads at leastinnodb_read_ahead_thresholdpages sequentially from an extent (64 pages), it initiates an asynchronous read for the entire following extent. The permissible range of values is 0 to 64. The default is 56:InnoDBmust read at least 56 pages sequentially from an extent to initiate an asynchronous read for the following extent.Knowing how many pages are read through the read-ahead mechanism, and how many of these pages are evicted from the buffer pool without ever being accessed, can be useful when fine-tuning the
innodb_read_ahead_thresholdsetting. As of MySQL 5.5,SHOW ENGINE INNODB STATUSoutput displays counter information from theInnodb_buffer_pool_read_aheadandInnodb_buffer_pool_read_ahead_evictedglobal status variables, which report the number of pages brought into the buffer pool by read-ahead requests, and the number of such pages evicted from the buffer pool without ever being accessed, respectively. The status variables report global values since the last server restart.SHOW ENGINE INNODB STATUSalso shows the rate at which the read-ahead pages are read and the rate at which such pages are evicted without being accessed. The per-second averages are based on the statistics collected since the last invocation ofSHOW ENGINE INNODB STATUSand are displayed in theBUFFER POOL AND MEMORYsection of theSHOW ENGINE INNODB STATUSoutput.For more information, see Section 14.11.2.3, “Configuring InnoDB Buffer Pool Prefetching (Read-Ahead)”. For general I/O tuning advice, see Section 8.5.7, “Optimizing InnoDB Disk I/O”.
-
Property Value Command-Line Format --innodb-read-io-threads=#System Variable innodb_read_io_threadsScope Global Dynamic No Type Integer Default Value 4Minimum Value 1Maximum Value 64The number of I/O threads for read operations in
InnoDB. Its counterpart for write threads isinnodb_write_io_threads. For more information, see Section 14.11.5, “Configuring the Number of Background InnoDB I/O Threads”. For general I/O tuning advice, see Section 8.5.7, “Optimizing InnoDB Disk I/O”.NoteOn Linux systems, running multiple MySQL servers (typically more than 12) with default settings for
innodb_read_io_threads,innodb_write_io_threads, and the Linuxaio-max-nrsetting can exceed system limits. Ideally, increase theaio-max-nrsetting; as a workaround, you might reduce the settings for one or both of the MySQL variables. -
Property Value Command-Line Format --innodb-replication-delay=#System Variable innodb_replication_delayScope Global Dynamic Yes Type Integer Default Value 0Minimum Value 0Maximum Value 4294967295The replication thread delay in milliseconds on a slave server if
innodb_thread_concurrencyis reached. -
Property Value Command-Line Format --innodb-rollback-on-timeout[={OFF|ON}]System Variable innodb_rollback_on_timeoutScope Global Dynamic No Type Boolean Default Value OFFInnoDBrolls back only the last statement on a transaction timeout by default. If--innodb-rollback-on-timeoutis specified, a transaction timeout causesInnoDBto abort and roll back the entire transaction (the same behavior as in MySQL 4.1).NoteIf the start-transaction statement was
START TRANSACTIONorBEGINstatement, rollback does not cancel that statement. Further SQL statements become part of the transaction until the occurrence ofCOMMIT,ROLLBACK, or some SQL statement that causes an implicit commit.For more information, see Section 14.23.4, “InnoDB Error Handling”.
-
Property Value Command-Line Format --innodb-rollback-segments=#Introduced 5.5.11 System Variable innodb_rollback_segmentsScope Global Dynamic Yes Type Integer Default Value 128Minimum Value 1Maximum Value 128Defines the number of rollback segments used by
InnoDBfor transactions that generate undo records. Each rollback segment can support up to 1024 transactions, depending on the number of undo logs assigned to each transaction. For more information, see Section 14.9.7, “Undo Logs”.This setting is appropriate for tuning performance if you observe mutex contention related to the undo logs.
Although you can increase or decrease the number of rollback segments used by
InnoDB, the number of rollback segments physically present in the system never decreases. Thus, you might start with a low value and gradually increase it to avoid allocating rollback segments that are not required. Theinnodb_rollback_segmentsdefault and maximum value is 128.For related information, see Section 14.6, “InnoDB Multi-Versioning”.
-
Property Value Command-Line Format --innodb-spin-wait-delay=#System Variable innodb_spin_wait_delayScope Global Dynamic Yes Type Integer Default Value 6Minimum Value 0Maximum Value (64-bit platforms) 2**64-1Maximum Value (32-bit platforms) 2**32-1The maximum delay between polls for a spin lock. The low-level implementation of this mechanism varies depending on the combination of hardware and operating system, so the delay does not correspond to a fixed time interval. For more information, see Section 14.11.8, “Configuring Spin Lock Polling”.
-
Property Value Command-Line Format --innodb-stats-method=valueIntroduced 5.5.10 System Variable innodb_stats_methodScope Global Dynamic Yes Type Enumeration Default Value nulls_equalValid Values nulls_equalnulls_unequalnulls_ignoredHow the server treats
NULLvalues when collecting statistics about the distribution of index values forInnoDBtables. Permitted values arenulls_equal,nulls_unequal, andnulls_ignored. Fornulls_equal, allNULLindex values are considered equal and form a single value group with a size equal to the number ofNULLvalues. Fornulls_unequal,NULLvalues are considered unequal, and eachNULLforms a distinct value group of size 1. Fornulls_ignored,NULLvalues are ignored.The method used to generate table statistics influences how the optimizer chooses indexes for query execution, as described in Section 8.3.7, “InnoDB and MyISAM Index Statistics Collection”.
-
Property Value Command-Line Format --innodb-stats-on-metadata[={OFF|ON}]Introduced 5.5.4 System Variable innodb_stats_on_metadataScope Global Dynamic Yes Type Boolean Default Value ONWhen this option is enabled (the default),
InnoDBupdates statistics when metadata statements such asSHOW TABLE STATUSorSHOW INDEXare run, or when accessing theINFORMATION_SCHEMA.TABLESorINFORMATION_SCHEMA.STATISTICStables. (These updates are similar to what happens forANALYZE TABLE.) When disabled,InnoDBdoes not update statistics during these operations. Disabling this variable can improve access speed for schemas that have a large number of tables or indexes. It can also improve the stability of execution plans for queries that involveInnoDBtables.To change the setting, issue the statement
SET GLOBAL innodb_stats_on_metadata=, wheremodemodeONorOFF(or1or0). Changing the setting requires privileges sufficient to set global system variables (see Section 5.1.8.1, “System Variable Privileges”) and immediately affects the operation of all connections. -
Property Value Command-Line Format --innodb-stats-sample-pages=#System Variable innodb_stats_sample_pagesScope Global Dynamic Yes Type Integer Default Value 8Minimum Value 1Maximum Value 2**64-1The number of index pages to sample for index distribution statistics such as are calculated by
ANALYZE TABLE. The default value is 8. For more information, see Section 14.11.10, “Configuring Optimizer Statistics for InnoDB”.Setting a high value for
innodb_stats_sample_pagescould result in lengthyANALYZE TABLEexecution time. To estimate the number of database pages accessed byANALYZE TABLE, see Section 14.11.10.1, “Estimating ANALYZE TABLE Complexity for InnoDB Tables”. -
Property Value Command-Line Format --innodb-strict-mode[={OFF|ON}]System Variable innodb_strict_modeScope Global, Session Dynamic Yes Type Boolean Default Value OFFWhen
innodb_strict_modeis enabled,InnoDBreturns errors rather than warnings for certain conditions.Strict mode helps guard against ignored typos and syntax errors in SQL, or other unintended consequences of various combinations of operational modes and SQL statements. When
innodb_strict_modeis enabled,InnoDBraises error conditions in certain cases, rather than issuing a warning and processing the specified statement (perhaps with unintended behavior). This is analogous tosql_modein MySQL, which controls what SQL syntax MySQL accepts, and determines whether it silently ignores errors, or validates input syntax and data values.The
innodb_strict_modesetting affects the handling of syntax errors forCREATE TABLE,ALTER TABLEandCREATE INDEXstatements.innodb_strict_modealso enables a record size check, so that anINSERTorUPDATEnever fails due to the record being too large for the selected page size.Oracle recommends enabling
innodb_strict_modewhen usingROW_FORMATandKEY_BLOCK_SIZEclauses inCREATE TABLE,ALTER TABLE, andCREATE INDEXstatements. Wheninnodb_strict_modeis disabled,InnoDBignores conflicting clauses and creates the table or index with only a warning in the message log. The resulting table might have different characteristics than intended, such as lack of compression support when attempting to create a compressed table. Wheninnodb_strict_modeis enabled, such problems generate an immediate error and the table or index is not created.You can enable or disable
innodb_strict_modeon the command line when startingmysqld, or in a MySQL configuration file. You can also enable or disableinnodb_strict_modeat runtime with the statementSET [GLOBAL|SESSION] innodb_strict_mode=, wheremodemodeONorOFF. Changing theGLOBALsetting requires privileges sufficient to set global system variables (see Section 5.1.8.1, “System Variable Privileges”) and affects the operation of all clients that subsequently connect. Any client can change theSESSIONsetting forinnodb_strict_mode, and the setting affects only that client. -
Property Value Command-Line Format --innodb-support-xa[={OFF|ON}]System Variable innodb_support_xaScope Global, Session Dynamic Yes Type Boolean Default Value ONEnables
InnoDBsupport for two-phase commit in XA transactions, causing an extra disk flush for transaction preparation. The XA mechanism is used internally and is essential for any server that has its binary log turned on and is accepting changes to its data from more than one thread. If you disableinnodb_support_xa, transactions can be written to the binary log in a different order than the live database is committing them, which can produce different data when the binary log is replayed in disaster recovery or on a replication slave. Do not disableinnodb_support_xaon a replication master server unless you have an unusual setup where only one thread is able to change data.For a server that is accepting data changes from only one thread, it is safe and recommended to disable this option to improve performance for
InnoDBtables. For example, you can turn it off on replication slaves where only the replication SQL thread is changing data.You can also disable this option if you do not need it for safe binary logging or replication, and you also do not use an external XA transaction manager.
-
Property Value Command-Line Format --innodb-sync-spin-loops=#System Variable innodb_sync_spin_loopsScope Global Dynamic Yes Type Integer Default Value 30Minimum Value 0Maximum Value 4294967295The number of times a thread waits for an
InnoDBmutex to be freed before the thread is suspended. -
Property Value Command-Line Format --innodb-table-locks[={OFF|ON}]System Variable innodb_table_locksScope Global, Session Dynamic Yes Type Boolean Default Value ONIf
autocommit = 0,InnoDBhonorsLOCK TABLES; MySQL does not return fromLOCK TABLES ... WRITEuntil all other threads have released all their locks to the table. The default value ofinnodb_table_locksis 1, which means thatLOCK TABLEScausesInnoDBto lock a table internally ifautocommit = 0.As of MySQL 5.5.3,
innodb_table_locks = 0has no effect for tables locked explicitly withLOCK TABLES ... WRITE. It still has an effect for tables locked for read or write byLOCK TABLES ... WRITEimplicitly (for example, through triggers) or byLOCK TABLES ... READ.For related information, see Section 14.10, “InnoDB Locking and Transaction Model”.
-
Property Value Command-Line Format --innodb-thread-concurrency=#System Variable innodb_thread_concurrencyScope Global Dynamic Yes Type Integer Default Value 0Minimum Value 0Maximum Value 1000InnoDBtries to keep the number of operating system threads concurrently insideInnoDBless than or equal to the limit given by this variable (InnoDBuses operating system threads to process user transactions). Once the number of threads reaches this limit, additional threads are placed into a wait state within a “First In, First Out” (FIFO) queue for execution. Threads waiting for locks are not counted in the number of concurrently executing threads.The range of this variable is 0 to 1000. A value of 0 (the default) is interpreted as infinite concurrency (no concurrency checking). Disabling thread concurrency checking enables
InnoDBto create as many threads as it needs. A value of 0 also disables thequeries inside InnoDBandqueries in queue countersin theROW OPERATIONSsection ofSHOW ENGINE INNODB STATUSoutput.Consider setting this variable if your MySQL instance shares CPU resources with other applications, or if your workload or number of concurrent users is growing. The correct setting depends on workload, computing environment, and the version of MySQL that you are running. You will need to test a range of values to determine the setting that provides the best performance.
innodb_thread_concurrencyis a dynamic variable, which allows you to experiment with different settings on a live test system. If a particular setting performs poorly, you can quickly setinnodb_thread_concurrencyback to 0.Use the following guidelines to help find and maintain an appropriate setting:
If the number of concurrent user threads for a workload is less than 64, set
innodb_thread_concurrency=0.If your workload is consistently heavy or occasionally spikes, start by setting
innodb_thread_concurrency=128and then lowering the value to 96, 80, 64, and so on, until you find the number of threads that provides the best performance. Suppose that your system typically has 40 to 50 users, but periodically the number increases to 60, 70, or even 200. You find that performance is stable at 80 concurrent users but starts to show a regression above this number. In this case, you would setinnodb_thread_concurrency=80to avoid impacting performance.If you do not want
InnoDBto use more than a certain number of virtual CPUs for user threads (20 virtual CPUs, for example), setinnodb_thread_concurrencyto this number (or possibly lower, depending on performance results). If your goal is to isolate MySQL from other applications, you may consider binding themysqldprocess exclusively to the virtual CPUs. Be aware, however, that exclusive binding could result in non-optimal hardware usage if themysqldprocess is not consistently busy. In this case, you might bind themysqldprocess to the virtual CPUs but also allow other applications to use some or all of the virtual CPUs.NoteFrom an operating system perspective, using a resource management solution to manage how CPU time is shared among applications may be preferable to binding the
mysqldprocess. For example, you could assign 90% of virtual CPU time to a given application while other critical processes are not running, and scale that value back to 40% when other critical processes are running.innodb_thread_concurrencyvalues that are too high can cause performance regression due to increased contention on system internals and resources.In some cases, the optimal
innodb_thread_concurrencysetting can be smaller than the number of virtual CPUs.Monitor and analyze your system regularly. Changes to workload, number of users, or computing environment may require that you adjust the
innodb_thread_concurrencysetting.
For related information, see Section 14.11.4, “Configuring Thread Concurrency for InnoDB”.
-
Property Value Command-Line Format --innodb-thread-sleep-delay=#System Variable innodb_thread_sleep_delayScope Global Dynamic Yes Type Integer Default Value 10000Minimum Value 0Maximum Value (64-bit platforms, <= 5.5.36) 18446744073709551615Maximum Value (32-bit platforms, <= 5.5.36) 4294967295Maximum Value (>= 5.5.37) 1000000Defines how long
InnoDBthreads sleep before joining theInnoDBqueue, in microseconds. The default value is 10000. A value of 0 disables sleep.For more information, see Section 14.11.4, “Configuring Thread Concurrency for InnoDB”.
-
Property Value Command-Line Format --innodb-use-native-aio[={OFF|ON}]Introduced 5.5.4 System Variable innodb_use_native_aioScope Global Dynamic No Type Boolean Default Value ONSpecifies whether to use the Linux asynchronous I/O subsystem. This variable applies to Linux systems only, and cannot be changed while the server is running. Normally, you do not need to configure this option, because it is enabled by default.
As of MySQL 5.5, the asynchronous I/O capability that
InnoDBhas on Windows systems is available on Linux systems. (Other Unix-like systems continue to use synchronous I/O calls.) This feature improves the scalability of heavily I/O-bound systems, which typically show many pending reads/writes inSHOW ENGINE INNODB STATUS\Goutput.Running with a large number of
InnoDBI/O threads, and especially running multiple such instances on the same server machine, can exceed capacity limits on Linux systems. In this case, you may receive the following error:EAGAIN: The specified maxevents exceeds the user's limit of available events.
You can typically address this error by writing a higher limit to
/proc/sys/fs/aio-max-nr.However, if a problem with the asynchronous I/O subsystem in the OS prevents
InnoDBfrom starting, you can start the server withinnodb_use_native_aio=0. This option may also be disabled automatically during startup ifInnoDBdetects a potential problem such as a combination oftmpdirlocation,tmpfsfile system, and Linux kernel that does not support AIO ontmpfs.For more information, see Section 14.11.6, “Using Asynchronous I/O on Linux”.
innodb_trx_purge_view_update_only_debugProperty Value Command-Line Format --innodb-trx-purge-view-update-only-debug[={OFF|ON}]System Variable innodb_trx_purge_view_update_only_debugScope Global Dynamic Yes Type Boolean Default Value OFFPauses purging of delete-marked records while allowing the purge view to be updated. This option artificially creates a situation in which the purge view is updated but purges have not yet been performed. This option is only available if debugging support is compiled in using the
WITH_DEBUGCMake option.-
Property Value Command-Line Format --innodb-trx-rseg-n-slots-debug=#System Variable innodb_trx_rseg_n_slots_debugScope Global Dynamic Yes Type Integer Default Value 0Maximum Value 1024Sets a debug flag that limits
TRX_RSEG_N_SLOTSto a given value for thetrx_rsegf_undo_find_freefunction that looks for free slots for undo log segments. This option is only available if debugging support is compiled in using theWITH_DEBUGCMake option. -
Property Value Command-Line Format --innodb-use-sys-malloc[={OFF|ON}]System Variable innodb_use_sys_mallocScope Global Dynamic No Type Boolean Default Value ONEnables the operating system memory allocator. If disabled,
InnoDBuses its own allocator. The default value isON. For more information, see Section 14.11.3, “Configuring the Memory Allocator for InnoDB”. The
InnoDBversion number. Starting in MySQL 5.5.30, separate version numbering forInnoDBis discontinued and this value is the same theversionnumber of the server.-
Property Value Command-Line Format --innodb-write-io-threads=#System Variable innodb_write_io_threadsScope Global Dynamic No Type Integer Default Value 4Minimum Value 1Maximum Value 64The number of I/O threads for write operations in
InnoDB. The default value is 4. Its counterpart for read threads isinnodb_read_io_threads. For more information, see Section 14.11.5, “Configuring the Number of Background InnoDB I/O Threads”. For general I/O tuning advice, see Section 8.5.7, “Optimizing InnoDB Disk I/O”.NoteOn Linux systems, running multiple MySQL servers (typically more than 12) with default settings for
innodb_read_io_threads,innodb_write_io_threads, and the Linuxaio-max-nrsetting can exceed system limits. Ideally, increase theaio-max-nrsetting; as a workaround, you might reduce the settings for one or both of the MySQL variables.
Also take into consideration the value of
sync_binlog, which controls
synchronization of the binary log to disk.
For general I/O tuning advice, see Section 8.5.7, “Optimizing InnoDB Disk I/O”.
This section provides information and usage examples for
InnoDB
INFORMATION_SCHEMA tables.
InnoDB INFORMATION_SCHEMA
tables provide metadata, status information, and statistics about
various aspects of the InnoDB storage engine. You
can view a list of InnoDB
INFORMATION_SCHEMA tables by issuing a
SHOW TABLES statement on the
INFORMATION_SCHEMA database:
mysql> SHOW TABLES FROM INFORMATION_SCHEMA LIKE 'INNODB%';
For table definitions, see Section 21.29, “INFORMATION_SCHEMA InnoDB Tables”. For
general information regarding the MySQL
INFORMATION_SCHEMA database, see
Chapter 21, INFORMATION_SCHEMA Tables.
The InnoDB INFORMATION_SCHEMA
tables are themselves plugins to the MySQL server. To see what
plugins are installed, use the SHOW
PLUGINS statement or query the
INFORMATION_SCHEMA.PLUGINS table. Use
INSTALL PLUGIN syntax to install an
INFORMATION_SCHEMA table plugin. If
INFORMATION_SCHEMA table plugins are installed,
but the InnoDB storage engine plugin is not
installed, the tables appear empty.
There are two pairs of InnoDB
INFORMATION_SCHEMA tables about compression
that can provide insight into how well compression is working
overall:
INNODB_CMPandINNODB_CMP_RESETprovide information about the number of compression operations and the amount of time spent performing compression.INNODB_CMPMEMandINNODB_CMP_RESETprovide information about the way memory is allocated for compression.
The INNODB_CMP and
INNODB_CMP_RESET
tables provide status information about operations related to
compressed tables, which are described in
Section 14.12, “InnoDB Table Compression”. The
PAGE_SIZE column reports the compressed
page size.
These two tables have identical contents, but reading from
INNODB_CMP_RESET
resets the statistics on compression and uncompression
operations. For example, if you archive the output of
INNODB_CMP_RESET
every 60 minutes, you see the statistics for each hourly period.
If you monitor the output of
INNODB_CMP (making sure never to
read
INNODB_CMP_RESET),
you see the cumulative statistics since
InnoDB was started.
For the table definition, see Section 21.29.4, “The INFORMATION_SCHEMA INNODB_CMP and INNODB_CMP_RESET Tables”.
The INNODB_CMPMEM and
INNODB_CMPMEM_RESET
tables provide status information about compressed pages that
reside in the buffer pool. Please consult
Section 14.12, “InnoDB Table Compression” for further information on
compressed tables and the use of the buffer pool. The
INNODB_CMP and
INNODB_CMP_RESET
tables should provide more useful statistics on compression.
Internal Details
InnoDB uses a
buddy allocator
system to manage memory allocated to
pages of various sizes,
from 1KB to 16KB. Each row of the two tables described here
corresponds to a single page size.
The INNODB_CMPMEM and
INNODB_CMPMEM_RESET
tables have identical contents, but reading from
INNODB_CMPMEM_RESET
resets the statistics on relocation operations. For example, if
every 60 minutes you archived the output of
INNODB_CMPMEM_RESET,
it would show the hourly statistics. If you never read
INNODB_CMPMEM_RESET
and monitored the output of
INNODB_CMPMEM instead, it would
show the cumulative statistics since InnoDB
was started.
For the table definition, see Section 21.29.5, “The INFORMATION_SCHEMA INNODB_CMPMEM and INNODB_CMPMEM_RESET Tables”.
Example 14.1 Using the Compression Information Schema Tables
The following is sample output from a database that contains
compressed tables (see Section 14.12, “InnoDB Table Compression”,
INNODB_CMP, and
INNODB_CMPMEM).
The following table shows the contents of
INFORMATION_SCHEMA.INNODB_CMP
under a light workload.
The only compressed page size that the buffer pool contains is
8K. Compressing or uncompressing pages has consumed less than
a second since the time the statistics were reset, because the
columns COMPRESS_TIME and
UNCOMPRESS_TIME are zero.
| page size | compress ops | compress ops ok | compress time | uncompress ops | uncompress time |
|---|---|---|---|---|---|
| 1024 | 0 | 0 | 0 | 0 | 0 |
| 2048 | 0 | 0 | 0 | 0 | 0 |
| 4096 | 0 | 0 | 0 | 0 | 0 |
| 8192 | 1048 | 921 | 0 | 61 | 0 |
| 16384 | 0 | 0 | 0 | 0 | 0 |
According to INNODB_CMPMEM, there
are 6169 compressed 8KB pages in the buffer pool.
The following table shows the contents of
INFORMATION_SCHEMA.INNODB_CMPMEM
under a light workload.
Some memory is unusable due to fragmentation of the
InnoDB memory allocator for compressed
pages: SUM(PAGE_SIZE*PAGES_FREE)=6784. This
is because small memory allocation requests are fulfilled by
splitting bigger blocks, starting from the 16K blocks that are
allocated from the main buffer pool, using the buddy
allocation system. The fragmentation is this low because some
allocated blocks have been relocated (copied) to form bigger
adjacent free blocks. This copying of
SUM(PAGE_SIZE*RELOCATION_OPS) bytes has
consumed less than a second
(SUM(RELOCATION_TIME)=0).
Three InnoDB
INFORMATION_SCHEMA tables enable you to monitor
transactions and diagnose potential locking problems:
INNODB_TRX: Provides information about every transaction currently executing insideInnoDB, including the transaction state (for example, whether it is running or waiting for a lock), when the transaction started, and the particular SQL statement the transaction is executing.INNODB_LOCKS: Each transaction in InnoDB that is waiting for another transaction to release a lock (INNODB_TRX.TRX_STATEisLOCK WAIT) is blocked by exactly one blocking lock request. That blocking lock request is for a row or table lock held by another transaction in an incompatible mode. A lock that blocks a transaction is always held in a mode incompatible with the mode of requested lock (read vs. write, shared vs. exclusive). The blocked transaction cannot proceed until the other transaction commits or rolls back, thereby releasing the requested lock. For every blocked transaction,INNODB_LOCKScontains one row that describes each lock the transaction has requested, and for which it is waiting.INNODB_LOCKSalso contains one row for each lock that is blocking another transaction, whatever the state of the transaction that holds the lock (INNODB_TRX.TRX_STATEisRUNNING,LOCK WAIT,ROLLING BACKorCOMMITTING).INNODB_LOCK_WAITS: This table indicates which transactions are waiting for a given lock, or for which lock a given transaction is waiting. This table contains one or more rows for each blocked transaction, indicating the lock it has requested and any locks that are blocking that request. TheREQUESTED_LOCK_IDvalue refers to the lock requested by a transaction, and theBLOCKING_LOCK_IDvalue refers to the lock (held by another transaction) that prevents the first transaction from proceeding. For any given blocked transaction, all rows inINNODB_LOCK_WAITShave the same value forREQUESTED_LOCK_IDand different values forBLOCKING_LOCK_ID.
For more information about the preceding tables, see Section 21.29.8, “The INFORMATION_SCHEMA INNODB_TRX Table”, Section 21.29.6, “The INFORMATION_SCHEMA INNODB_LOCKS Table”, and Section 21.29.7, “The INFORMATION_SCHEMA INNODB_LOCK_WAITS Table”.
It is sometimes helpful to identify which transaction blocks
another. The tables that contain information about
InnoDB transactions and data locks enable
you to determine which transaction is waiting for another, and
which resource is being requested. (For descriptions of these
tables, see
Section 14.18.2, “InnoDB INFORMATION_SCHEMA Transaction and Locking Information”.)
Suppose that three sessions are running concurrently. Each session corresponds to a MySQL thread, and executes one transaction after another. Consider the state of the system when these sessions have issued the following statements, but none has yet committed its transaction:
Session A:
BEGIN; SELECT a FROM t FOR UPDATE; SELECT SLEEP(100);
Session B:
SELECT b FROM t FOR UPDATE;
Session C:
SELECT c FROM t FOR UPDATE;
In this scenario, use the following query to see which transactions are waiting and which transactions are blocking them:
SELECT r.trx_id waiting_trx_id, r.trx_mysql_thread_id waiting_thread, r.trx_query waiting_query, b.trx_id blocking_trx_id, b.trx_mysql_thread_id blocking_thread, b.trx_query blocking_query FROM information_schema.innodb_lock_waits w INNER JOIN information_schema.innodb_trx b ON b.trx_id = w.blocking_trx_id INNER JOIN information_schema.innodb_trx r ON r.trx_id = w.requesting_trx_id;
| waiting trx id | waiting thread | waiting query | blocking trx id | blocking thread | blocking query |
|---|---|---|---|---|---|
A4 |
6 |
SELECT b FROM t FOR UPDATE |
A3 |
5 |
SELECT SLEEP(100) |
A5 |
7 |
SELECT c FROM t FOR UPDATE |
A3 |
5 |
SELECT SLEEP(100) |
A5 |
7 |
SELECT c FROM t FOR UPDATE |
A4 |
6 |
SELECT b FROM t FOR UPDATE |
In the preceding table, you can identify sessions by the “waiting query” or “blocking query” columns. As you can see:
Session B (trx id
A4, thread6) and Session C (trx idA5, thread7) are both waiting for Session A (trx idA3, thread5).Session C is waiting for Session B as well as Session A.
You can see the underlying data in the tables
INNODB_TRX,
INNODB_LOCKS,
and
INNODB_LOCK_WAITS.
The following table shows some sample contents of
INFORMATION_SCHEMA.INNODB_TRX.
| trx id | trx state | trx started | trx requested lock id | trx wait started | trx weight | trx mysql thread id | trx query |
|---|---|---|---|---|---|---|---|
A3 |
RUNNING |
2008-01-15 16:44:54 |
NULL |
NULL |
2 |
5 |
SELECT SLEEP(100) |
A4 |
LOCK WAIT |
2008-01-15 16:45:09 |
A4:1:3:2 |
2008-01-15 16:45:09 |
2 |
6 |
SELECT b FROM t FOR UPDATE |
A5 |
LOCK WAIT |
2008-01-15 16:45:14 |
A5:1:3:2 |
2008-01-15 16:45:14 |
2 |
7 |
SELECT c FROM t FOR UPDATE |
The following table shows some sample contents of
INFORMATION_SCHEMA.INNODB_LOCKS.
| lock id | lock trx id | lock mode | lock type | lock table | lock index | lock data |
|---|---|---|---|---|---|---|
A3:1:3:2 |
A3 |
X |
RECORD |
test.t |
PRIMARY |
0x0200 |
A4:1:3:2 |
A4 |
X |
RECORD |
test.t |
PRIMARY |
0x0200 |
A5:1:3:2 |
A5 |
X |
RECORD |
test.t |
PRIMARY |
0x0200 |
The following table shows some sample contents of
INFORMATION_SCHEMA.INNODB_LOCK_WAITS.
Sometimes it is useful to correlate internal
InnoDB locking information with the
session-level information maintained by MySQL. For example,
you might like to know, for a given InnoDB
transaction ID, the corresponding MySQL session ID and name of
the session that may be holding a lock, and thus blocking
other transactions.
The following output from the
INFORMATION_SCHEMA tables is taken from a
somewhat loaded system. As can be seen, there are several
transactions running.
The following INNODB_LOCKS and
INNODB_LOCK_WAITS tables show that:
Transaction
77F(executing anINSERT) is waiting for transactions77E,77D, and77Bto commit.Transaction
77E(executing anINSERT) is waiting for transactions77Dand77Bto commit.Transaction
77D(executing anINSERT) is waiting for transaction77Bto commit.Transaction
77B(executing anINSERT) is waiting for transaction77Ato commit.Transaction
77Ais running, currently executingSELECT.Transaction
E56(executing anINSERT) is waiting for transactionE55to commit.Transaction
E55(executing anINSERT) is waiting for transaction19Cto commit.Transaction
19Cis running, currently executing anINSERT.
There may be inconsistencies between queries shown in the
INFORMATION_SCHEMA
PROCESSLIST and
INNODB_TRX tables. For an
explanation, see
Section 14.18.2.3, “Persistence and Consistency of InnoDB Transaction and Locking
Information”.
The following table shows the contents of
INFORMATION_SCHEMA.PROCESSLIST
for a system running a heavy
workload.
| ID | USER | HOST | DB | COMMAND | TIME | STATE | INFO |
|---|---|---|---|---|---|---|---|
384 |
root |
localhost |
test |
Query |
10 |
update |
INSERT INTO t2 VALUES … |
257 |
root |
localhost |
test |
Query |
3 |
update |
INSERT INTO t2 VALUES … |
130 |
root |
localhost |
test |
Query |
0 |
update |
INSERT INTO t2 VALUES … |
61 |
root |
localhost |
test |
Query |
1 |
update |
INSERT INTO t2 VALUES … |
8 |
root |
localhost |
test |
Query |
1 |
update |
INSERT INTO t2 VALUES … |
4 |
root |
localhost |
test |
Query |
0 |
preparing |
SELECT * FROM PROCESSLIST |
2 |
root |
localhost |
test |
Sleep |
566 |
|
NULL |
The following table shows the contents of
INFORMATION_SCHEMA.INNODB_TRX for
a system running a heavy
workload.
| trx id | trx state | trx started | trx requested lock id | trx wait started | trx weight | trx mysql thread id | trx query |
|---|---|---|---|---|---|---|---|
77F |
LOCK WAIT |
2008-01-15 13:10:16 |
77F |
2008-01-15 13:10:16 |
1 |
876 |
INSERT INTO t09 (D, B, C) VALUES … |
77E |
LOCK WAIT |
2008-01-15 13:10:16 |
77E |
2008-01-15 13:10:16 |
1 |
875 |
INSERT INTO t09 (D, B, C) VALUES … |
77D |
LOCK WAIT |
2008-01-15 13:10:16 |
77D |
2008-01-15 13:10:16 |
1 |
874 |
INSERT INTO t09 (D, B, C) VALUES … |
77B |
LOCK WAIT |
2008-01-15 13:10:16 |
77B:733:12:1 |
2008-01-15 13:10:16 |
4 |
873 |
INSERT INTO t09 (D, B, C) VALUES … |
77A |
RUNNING |
2008-01-15 13:10:16 |
NULL |
NULL |
4 |
872 |
SELECT b, c FROM t09 WHERE … |
E56 |
LOCK WAIT |
2008-01-15 13:10:06 |
E56:743:6:2 |
2008-01-15 13:10:06 |
5 |
384 |
INSERT INTO t2 VALUES … |
E55 |
LOCK WAIT |
2008-01-15 13:10:06 |
E55:743:38:2 |
2008-01-15 13:10:13 |
965 |
257 |
INSERT INTO t2 VALUES … |
19C |
RUNNING |
2008-01-15 13:09:10 |
NULL |
NULL |
2900 |
130 |
INSERT INTO t2 VALUES … |
E15 |
RUNNING |
2008-01-15 13:08:59 |
NULL |
NULL |
5395 |
61 |
INSERT INTO t2 VALUES … |
51D |
RUNNING |
2008-01-15 13:08:47 |
NULL |
NULL |
9807 |
8 |
INSERT INTO t2 VALUES … |
The following table shows the contents of
INFORMATION_SCHEMA.INNODB_LOCK_WAITS
for a system running a heavy
workload.
| requesting trx id | requested lock id | blocking trx id | blocking lock id |
|---|---|---|---|
77F |
77F:806 |
77E |
77E:806 |
77F |
77F:806 |
77D |
77D:806 |
77F |
77F:806 |
77B |
77B:806 |
77E |
77E:806 |
77D |
77D:806 |
77E |
77E:806 |
77B |
77B:806 |
77D |
77D:806 |
77B |
77B:806 |
77B |
77B:733:12:1 |
77A |
77A:733:12:1 |
E56 |
E56:743:6:2 |
E55 |
E55:743:6:2 |
E55 |
E55:743:38:2 |
19C |
19C:743:38:2 |
The following table shows the contents of
INFORMATION_SCHEMA.INNODB_LOCKS
for a system running a heavy
workload.
| lock id | lock trx id | lock mode | lock type | lock table | lock index | lock data |
|---|---|---|---|---|---|---|
77F:806 |
77F |
AUTO_INC |
TABLE |
test.t09 |
NULL |
NULL |
77E:806 |
77E |
AUTO_INC |
TABLE |
test.t09 |
NULL |
NULL |
77D:806 |
77D |
AUTO_INC |
TABLE |
test.t09 |
NULL |
NULL |
77B:806 |
77B |
AUTO_INC |
TABLE |
test.t09 |
NULL |
NULL |
77B:733:12:1 |
77B |
X |
RECORD |
test.t09 |
PRIMARY |
supremum pseudo-record |
77A:733:12:1 |
77A |
X |
RECORD |
test.t09 |
PRIMARY |
supremum pseudo-record |
E56:743:6:2 |
E56 |
S |
RECORD |
test.t2 |
PRIMARY |
0, 0 |
E55:743:6:2 |
E55 |
X |
RECORD |
test.t2 |
PRIMARY |
0, 0 |
E55:743:38:2 |
E55 |
S |
RECORD |
test.t2 |
PRIMARY |
1922, 1922 |
19C:743:38:2 |
19C |
X |
RECORD |
test.t2 |
PRIMARY |
1922, 1922 |
When a transaction updates a row in a table, or locks it with
SELECT FOR UPDATE, InnoDB
establishes a list or queue of locks on that row. Similarly,
InnoDB maintains a list of locks on a table
for table-level locks. If a second transaction wants to update a
row or lock a table already locked by a prior transaction in an
incompatible mode, InnoDB adds a lock request
for the row to the corresponding queue. For a lock to be
acquired by a transaction, all incompatible lock requests
previously entered into the lock queue for that row or table
must be removed (which occurs when the transactions holding or
requesting those locks either commit or roll back).
A transaction may have any number of lock requests for different
rows or tables. At any given time, a transaction may request a
lock that is held by another transaction, in which case it is
blocked by that other transaction. The requesting transaction
must wait for the transaction that holds the blocking lock to
commit or roll back. If a transaction is not waiting for a lock,
it is in a RUNNING state. If a transaction is
waiting for a lock, it is in a LOCK WAIT
state. (The INFORMATION_SCHEMA
INNODB_TRX table indicates
transaction state values.)
The INNODB_LOCKS table holds one or
more rows for each LOCK WAIT transaction,
indicating any lock requests that prevent its progress. This
table also contains one row describing each lock in a queue of
locks pending for a given row or table. The
INNODB_LOCK_WAITS table shows which
locks already held by a transaction are blocking locks requested
by other transactions.
The data exposed by the transaction and locking tables
(INNODB_TRX,
INNODB_LOCKS, and
INNODB_LOCK_WAITS) represents a
glimpse into fast-changing data. This is not like user tables,
where the data changes only when application-initiated updates
occur. The underlying data is internal system-managed data, and
can change very quickly.
For performance reasons, and to minimize the chance of
misleading joins between the transaction and locking tables,
InnoDB collects the required transaction and
locking information into an intermediate buffer whenever a
SELECT on any of the tables is issued. This
buffer is refreshed only if more than 0.1 seconds has elapsed
since the last time the buffer was read. The data needed to fill
the three tables is fetched atomically and consistently and is
saved in this global internal buffer, forming a point-in-time
“snapshot”. If multiple table accesses occur within
0.1 seconds (as they almost certainly do when MySQL processes a
join among these tables), then the same snapshot is used to
satisfy the query.
A correct result is returned when you join any of these tables together in a single query, because the data for the three tables comes from the same snapshot. Because the buffer is not refreshed with every query of any of these tables, if you issue separate queries against these tables within a tenth of a second, the results are the same from query to query. On the other hand, two separate queries of the same or different tables issued more than a tenth of a second apart may see different results, since the data come from different snapshots.
Because InnoDB must temporarily stall while
the transaction and locking data is collected, too frequent
queries of these tables can negatively impact performance as
seen by other users.
As these tables contain sensitive information (at least
INNODB_LOCKS.LOCK_DATA and
INNODB_TRX.TRX_QUERY), for security reasons,
only the users with the PROCESS privilege are
allowed to SELECT from them.
As described previously, the data that fills the transaction and
locking tables (INNODB_TRX,
INNODB_LOCKS and
INNODB_LOCK_WAITS) is fetched
automatically and saved to an intermediate buffer that provides
a “point-in-time” snapshot. The data across all
three tables is consistent when queried from the same snapshot.
However, the underlying data changes so fast that similar
glimpses at other, similarly fast-changing data, may not be in
synchrony. Thus, you should be careful when comparing data in
the InnoDB transaction and locking tables
with data in the PROCESSLIST table.
The data from the PROCESSLIST table
does not come from the same snapshot as the data about locking
and transactions. Even if you issue a single
SELECT (joining
INNODB_TRX and
PROCESSLIST, for example), the
content of those tables is generally not consistent.
INNODB_TRX may reference rows that
are not present in PROCESSLIST or
the currently executing SQL query of a transaction shown in
INNODB_TRX.TRX_QUERY may differ from the one
in PROCESSLIST.INFO.
The InnoDB
INFORMATION_SCHEMA buffer pool tables provide
buffer pool status information and metadata about the pages within
the InnoDB buffer pool.
The InnoDB
INFORMATION_SCHEMA buffer pool tables include
those listed below:
mysql> SHOW TABLES FROM INFORMATION_SCHEMA LIKE 'INNODB_BUFFER%';
+-----------------------------------------------+
| Tables_in_INFORMATION_SCHEMA (INNODB_BUFFER%) |
+-----------------------------------------------+
| INNODB_BUFFER_PAGE_LRU |
| INNODB_BUFFER_PAGE |
| INNODB_BUFFER_POOL_STATS |
+-----------------------------------------------+
Table Overview
INNODB_BUFFER_PAGE: Holds information about each page in theInnoDBbuffer pool.INNODB_BUFFER_PAGE_LRU: Holds information about the pages in theInnoDBbuffer pool, in particular how they are ordered in the LRU list that determines which pages to evict from the buffer pool when it becomes full. TheINNODB_BUFFER_PAGE_LRUtable has the same columns as theINNODB_BUFFER_PAGEtable, except that theINNODB_BUFFER_PAGE_LRUtable has anLRU_POSITIONcolumn instead of aBLOCK_IDcolumn.INNODB_BUFFER_POOL_STATS: Provides buffer pool status information. Much of the same information is provided bySHOW ENGINE INNODB STATUSoutput, or may be obtained usingInnoDBbuffer pool server status variables.
Querying the INNODB_BUFFER_PAGE or
INNODB_BUFFER_PAGE_LRU table can
affect performance. Do not query these tables on a production
system unless you are aware of the performance impact and have
determined it to be acceptable. To avoid impacting performance
on a production system, reproduce the issue you want to
investigate and query buffer pool statistics on a test instance.
Example 14.2 Querying System Data in the INNODB_BUFFER_PAGE Table
This query provides an approximate count of pages that contain
system data by excluding pages where the
TABLE_NAME value is either
NULL or includes a slash /
or period . in the table name, which
indicates a user-defined table.
mysql>SELECT COUNT(*) FROM INFORMATION_SCHEMA.INNODB_BUFFER_PAGEWHERE TABLE_NAME IS NULL OR (INSTR(TABLE_NAME, '/') = 0 AND INSTR(TABLE_NAME, '.') = 0);+----------+ | COUNT(*) | +----------+ | 381 | +----------+
This query returns the approximate number of pages that contain system data, the total number of buffer pool pages, and an approximate percentage of pages that contain system data.
mysql>SELECT(SELECT COUNT(*) FROM INFORMATION_SCHEMA.INNODB_BUFFER_PAGEWHERE TABLE_NAME IS NULL OR (INSTR(TABLE_NAME, '/') = 0 AND INSTR(TABLE_NAME, '.') = 0)) AS system_pages,(SELECT COUNT(*)FROM INFORMATION_SCHEMA.INNODB_BUFFER_PAGE) AS total_pages,(SELECT ROUND((system_pages/total_pages) * 100)) AS system_page_percentage;+--------------+-------------+------------------------+ | system_pages | total_pages | system_page_percentage | +--------------+-------------+------------------------+ | 381 | 8192 | 5 | +--------------+-------------+------------------------+
The type of system data in the buffer pool can be determined by
querying the PAGE_TYPE value. For example,
the following query returns eight distinct
PAGE_TYPE values among the pages that contain
system data:
mysql>SELECT DISTINCT PAGE_TYPE FROM INFORMATION_SCHEMA.INNODB_BUFFER_PAGEWHERE TABLE_NAME IS NULL OR (INSTR(TABLE_NAME, '/') = 0 AND INSTR(TABLE_NAME, '.') = 0);+-------------------+ | PAGE_TYPE | +-------------------+ | IBUF_BITMAP | | SYSTEM | | INDEX | | UNDO_LOG | | FILE_SPACE_HEADER | | UNKNOWN | | INODE | | EXTENT_DESCRIPTOR | +-------------------+
Example 14.3 Querying User Data in the INNODB_BUFFER_PAGE Table
This query provides an approximate count of pages containing
user data by counting pages where the
TABLE_NAME value is NOT
NULL.
mysql>SELECT COUNT(*) FROM INFORMATION_SCHEMA.INNODB_BUFFER_PAGEWHERE TABLE_NAME IS NOT NULL;+----------+ | COUNT(*) | +----------+ | 7811 | +----------+
This query returns the approximate number of pages that contain user data, the total number of buffer pool pages, and an approximate percentage of pages that contain user data.
mysql>SELECT(SELECT COUNT(*) FROM INFORMATION_SCHEMA.INNODB_BUFFER_PAGEWHERE TABLE_NAME IS NOT NULL AND (INSTR(TABLE_NAME, '/') > 0 OR INSTR(TABLE_NAME, '.') > 0)) AS user_pages,(SELECT COUNT(*)FROM INFORMATION_SCHEMA.INNODB_BUFFER_PAGE) AS total_pages,(SELECT ROUND((user_pages/total_pages) * 100)) AS user_page_percentage;+------------+-------------+----------------------+ | user_pages | total_pages | user_page_percentage | +------------+-------------+----------------------+ | 7811 | 8192 | 95 | +------------+-------------+----------------------+
This query identifies user-defined tables with pages in the buffer pool:
mysql>SELECT DISTINCT TABLE_NAMEFROM INFORMATION_SCHEMA.INNODB_BUFFER_PAGEWHERE TABLE_NAME IS NOT NULLAND (INSTR(TABLE_NAME, '/') > 0 OR INSTR(TABLE_NAME, '.') > 0);+---------------------+ | TABLE_NAME | +---------------------+ | employees/salaries | | employees/employees | +---------------------+
Example 14.4 Querying Index Data in the INNODB_BUFFER_PAGE Table
For information about index pages, query the
INDEX_NAME column using the name of the
index. For example, the following query returns the number of
pages and total data size of pages for the
emp_no index that is defined on the
employees.salaries table:
mysql>SELECT INDEX_NAME, COUNT(*) AS Pages,ROUND(SUM(IF(COMPRESSED_SIZE = 0, 16384, COMPRESSED_SIZE))/1024/1024)AS 'Total Data (MB)' FROM INFORMATION_SCHEMA.INNODB_BUFFER_PAGEWHERE INDEX_NAME='emp_no' AND TABLE_NAME = 'employees/salaries';+------------+-------+-----------------+ | INDEX_NAME | Pages | Total Data (MB) | +------------+-------+-----------------+ | emp_no | 1244 | 19 | +------------+-------+-----------------+
This query returns the number of pages and total data size of
pages for all indexes defined on the
employees.salaries table:
mysql>SELECT INDEX_NAME, COUNT(*) AS Pages,ROUND(SUM(IF(COMPRESSED_SIZE = 0, 16384, COMPRESSED_SIZE))/1024/1024)AS 'Total Data (MB)'FROM INFORMATION_SCHEMA.INNODB_BUFFER_PAGEWHERE TABLE_NAME = 'employees/salaries'GROUP BY INDEX_NAME;+------------+-------+-----------------+ | INDEX_NAME | Pages | Total Data (MB) | +------------+-------+-----------------+ | emp_no | 1244 | 19 | | PRIMARY | 6086 | 95 | +------------+-------+-----------------+
Example 14.5 Querying LRU_POSITION Data in the INNODB_BUFFER_PAGE_LRU Table
The INNODB_BUFFER_PAGE_LRU table
holds information about the pages in the
InnoDB buffer pool, in particular how they
are ordered that determines which pages to evict from the buffer
pool when it becomes full. The definition for this page is the
same as for INNODB_BUFFER_PAGE,
except this table has an LRU_POSITION column
instead of a BLOCK_ID column.
This query counts the number of positions at a specific location
in the LRU list occupied by pages of the
employees.employees table.
mysql>SELECT COUNT(LRU_POSITION) FROM INFORMATION_SCHEMA.INNODB_BUFFER_PAGE_LRUWHERE TABLE_NAME='employees/employees' AND LRU_POSITION < 3072;+---------------------+ | COUNT(LRU_POSITION) | +---------------------+ | 481 | +---------------------+
Example 14.6 Querying the INNODB_BUFFER_POOL_STATS Table
The INNODB_BUFFER_POOL_STATS table
provides information similar to
SHOW ENGINE INNODB
STATUS and InnoDB buffer pool
status variables.
mysql> SELECT * FROM INFORMATION_SCHEMA.INNODB_BUFFER_POOL_STATS \G
*************************** 1. row ***************************
POOL_ID: 0
POOL_SIZE: 8192
FREE_BUFFERS: 1
DATABASE_PAGES: 7942
OLD_DATABASE_PAGES: 2911
MODIFIED_DATABASE_PAGES: 0
PENDING_DECOMPRESS: 0
PENDING_READS: 0
PENDING_FLUSH_LRU: 0
PENDING_FLUSH_LIST: 0
PAGES_MADE_YOUNG: 8358
PAGES_NOT_MADE_YOUNG: 0
PAGES_MADE_YOUNG_RATE: 0
PAGES_MADE_NOT_YOUNG_RATE: 0
NUMBER_PAGES_READ: 7045
NUMBER_PAGES_CREATED: 12382
NUMBER_PAGES_WRITTEN: 15790
PAGES_READ_RATE: 0
PAGES_CREATE_RATE: 0
PAGES_WRITTEN_RATE: 0
NUMBER_PAGES_GET: 28731589
HIT_RATE: 0
YOUNG_MAKE_PER_THOUSAND_GETS: 0
NOT_YOUNG_MAKE_PER_THOUSAND_GETS: 0
NUMBER_PAGES_READ_AHEAD: 2934
NUMBER_READ_AHEAD_EVICTED: 23
READ_AHEAD_RATE: 0
READ_AHEAD_EVICTED_RATE: 0
LRU_IO_TOTAL: 0
LRU_IO_CURRENT: 0
UNCOMPRESS_TOTAL: 0
UNCOMPRESS_CURRENT: 0
For comparison,
SHOW ENGINE INNODB
STATUS output and InnoDB buffer
pool status variable output is shown below, based on the same
data set.
For more information about
SHOW ENGINE INNODB
STATUS output, see
Section 14.20.3, “InnoDB Standard Monitor and Lock Monitor Output”.
mysql> SHOW ENGINE INNODB STATUS \G
...
----------------------
BUFFER POOL AND MEMORY
----------------------
Total memory allocated 137363456; in additional pool allocated 0
Dictionary memory allocated 71426
Buffer pool size 8192
Free buffers 1
Database pages 7942
Old database pages 2911
Modified db pages 0
Pending reads 0
Pending writes: LRU 0, flush list 0, single page 0
Pages made young 8358, not young 0
0.00 youngs/s, 0.00 non-youngs/s
Pages read 7045, created 12382, written 15790
0.00 reads/s, 0.00 creates/s, 0.00 writes/s
No buffer pool page gets since the last printout
Pages read ahead 0.00/s, evicted without access 0.00/s, Random read ahead 0.00/s
LRU len: 7942, unzip_LRU len: 0
I/O sum[0]:cur[0], unzip sum[0]:cur[0]
...
For status variable descriptions, see Section 5.1.9, “Server Status Variables”.
mysql> SHOW STATUS LIKE 'Innodb_buffer%';
+---------------------------------------+-----------+
| Variable_name | Value |
+---------------------------------------+-----------+
| Innodb_buffer_pool_pages_data | 7942 |
| Innodb_buffer_pool_bytes_data | 130121728 |
| Innodb_buffer_pool_pages_dirty | 0 |
| Innodb_buffer_pool_bytes_dirty | 0 |
| Innodb_buffer_pool_pages_flushed | 15790 |
| Innodb_buffer_pool_pages_free | 1 |
| Innodb_buffer_pool_pages_misc | 249 |
| Innodb_buffer_pool_pages_total | 8192 |
| Innodb_buffer_pool_read_ahead_rnd | 0 |
| Innodb_buffer_pool_read_ahead | 2934 |
| Innodb_buffer_pool_read_ahead_evicted | 23 |
| Innodb_buffer_pool_read_requests | 28731589 |
| Innodb_buffer_pool_reads | 4112 |
| Innodb_buffer_pool_wait_free | 0 |
| Innodb_buffer_pool_write_requests | 11965146 |
+---------------------------------------+-----------+
This section provides a brief introduction to
InnoDB integration with Performance Schema. For
comprehensive Performance Schema documentation, see
Chapter 22, MySQL Performance Schema.
Starting with InnoDB 1.1 with MySQL 5.5, you can profile certain
internal InnoDB operations using the MySQL
Performance Schema
feature. This type of tuning is primarily for expert users
who evaluate optimization strategies to overcome performance
bottlenecks. DBAs can also use this feature for capacity planning,
to see whether their typical workload encounters any performance
bottlenecks with a particular combination of CPU, RAM, and disk
storage; and if so, to judge whether performance can be improved by
increasing the capacity of some part of the system.
To use this feature to examine InnoDB
performance:
You must be running MySQL 5.5 or higher with the Performance Schema feature available and enabled, as described in Section 22.2, “Performance Schema Build Configuration”, and Section 22.3, “Performance Schema Startup Configuration”. Since the Performance Schema feature introduces some performance overhead, you should use it on a test or development system rather than on a production system.
You must be running InnoDB 1.1 or higher.
You must be generally familiar with how to use the Performance Schema feature. For example, you should know how enable instruments and consumers, and how to query
performance_schematables to retrieve data. For an introductory overview, see Section 22.1, “Performance Schema Quick Start”.You should be familiar with Performance Schema instruments that are available for
InnoDB. To viewInnoDB-related instruments, you can query thesetup_instrumentstable for instrument names that contain 'innodb'.mysql>
SELECT *FROM performance_schema.setup_instrumentsWHERE NAME LIKE '%innodb%';+-------------------------------------------------------+---------+-------+ | NAME | ENABLED | TIMED | +-------------------------------------------------------+---------+-------+ | wait/synch/mutex/innodb/commit_cond_mutex | YES | YES | | wait/synch/mutex/innodb/innobase_share_mutex | YES | YES | | wait/synch/mutex/innodb/prepare_commit_mutex | YES | YES | | wait/synch/mutex/innodb/autoinc_mutex | YES | YES | | wait/synch/mutex/innodb/btr_search_enabled_mutex | YES | YES | | wait/synch/mutex/innodb/buf_pool_mutex | YES | YES | | wait/synch/mutex/innodb/buf_pool_zip_mutex | YES | YES | | wait/synch/mutex/innodb/cache_last_read_mutex | YES | YES | | wait/synch/mutex/innodb/dict_foreign_err_mutex | YES | YES | | wait/synch/mutex/innodb/dict_sys_mutex | YES | YES | | wait/synch/mutex/innodb/file_format_max_mutex | YES | YES | ... | wait/synch/rwlock/innodb/btr_search_latch | YES | YES | | wait/synch/rwlock/innodb/dict_operation_lock | YES | YES | | wait/synch/rwlock/innodb/fil_space_latch | YES | YES | | wait/synch/rwlock/innodb/checkpoint_lock | YES | YES | | wait/synch/rwlock/innodb/trx_i_s_cache_lock | YES | YES | | wait/synch/rwlock/innodb/trx_purge_latch | YES | YES | | wait/synch/rwlock/innodb/index_tree_rw_lock | YES | YES | | wait/synch/rwlock/innodb/dict_table_stats | YES | YES | | wait/synch/cond/innodb/commit_cond | YES | YES | | wait/io/file/innodb/innodb_data_file | YES | YES | | wait/io/file/innodb/innodb_log_file | YES | YES | | wait/io/file/innodb/innodb_temp_file | YES | YES | +-------------------------------------------------------+---------+-------+ 46 rows in set (0.00 sec)For additional information about the instrumented
InnoDBobjects, you can query Performance Schema instances tables, which provide additional information about instrumented objects. Instance tables relevant toInnoDBinclude:The
mutex_instancestableThe
rwlock_instancestableThe
cond_instancestableThe
file_instancestable
NoteMutexes and RW-locks related to the
InnoDBbuffer pool are not included in this coverage; the same applies to the output of theSHOW ENGINE INNODB MUTEXcommand.For example, to view information about instrumented
InnoDBfile objects seen by the Performance Schema when executing file I/O instrumentation, you might issue the following query:mysql>
SELECT *FROM performance_schema.file_instancesWHERE EVENT_NAME LIKE '%innodb%'\G*************************** 1. row *************************** FILE_NAME: /path/to/mysql-5.5/data/ibdata1 EVENT_NAME: wait/io/file/innodb/innodb_data_file OPEN_COUNT: 1 *************************** 2. row *************************** FILE_NAME: /path/to/mysql-5.5/data/ib_logfile0 EVENT_NAME: wait/io/file/innodb/innodb_log_file OPEN_COUNT: 1 *************************** 3. row *************************** FILE_NAME: /path/to/mysql-5.5/data/ib_logfile1 EVENT_NAME: wait/io/file/innodb/innodb_log_file OPEN_COUNT: 1You should be familiar with
performance_schematables that storeInnoDBevent data. Tables relevant toInnoDB-related events include:The Wait Event tables, which store wait events.
The Summary tables, which provide aggregated information for terminated events over time. Summary tables include file I/O summary tables, which aggregate information about I/O operations.
If you are only interested in
InnoDB-related objects, use the clauseWHERE EVENT_NAME LIKE '%innodb%'orWHERE NAME LIKE '%innodb%'(as required) when querying these tables.
A mutex is a synchronization mechanism used in the code to enforce that only one thread at a given time can have access to a common resource. When two or more threads executing in the server need to access the same resource, the threads compete against each other. The first thread to obtain a lock on the mutex causes the other threads to wait until the lock is released.
For InnoDB mutexes that are instrumented, mutex
waits can be monitored using
Performance Schema. Wait
event data collected in Performance Schema tables can help
identify mutexes with the most waits or the greatest total wait
time, for example.
The following example demonstrates how to view
InnoDB mutex wait instruments, how to verify
that associated consumers are enabled, and how to query wait event
data. It is assumed that Performance Schema was enabled at server
startup. For information about enabling Performance Schema, see
Section 22.1, “Performance Schema Quick Start”.
To view available
InnoDBmutex wait instruments, query the Performance Schemasetup_instrumentstable, as shown below. Instruments are enabled by default.mysql>
SELECT *FROM performance_schema.setup_instrumentsWHERE NAME LIKE '%wait/synch/mutex/innodb%';+-------------------------------------------------------+---------+-------+ | NAME | ENABLED | TIMED | +-------------------------------------------------------+---------+-------+ | wait/synch/mutex/innodb/commit_cond_mutex | YES | YES | | wait/synch/mutex/innodb/innobase_share_mutex | YES | YES | | wait/synch/mutex/innodb/prepare_commit_mutex | YES | YES | | wait/synch/mutex/innodb/autoinc_mutex | YES | YES | | wait/synch/mutex/innodb/btr_search_enabled_mutex | YES | YES | | wait/synch/mutex/innodb/buf_pool_mutex | YES | YES | | wait/synch/mutex/innodb/buf_pool_zip_mutex | YES | YES | | wait/synch/mutex/innodb/cache_last_read_mutex | YES | YES | | wait/synch/mutex/innodb/dict_foreign_err_mutex | YES | YES | | wait/synch/mutex/innodb/dict_sys_mutex | YES | YES | | wait/synch/mutex/innodb/file_format_max_mutex | YES | YES | | wait/synch/mutex/innodb/fil_system_mutex | YES | YES | | wait/synch/mutex/innodb/flush_list_mutex | YES | YES | | wait/synch/mutex/innodb/log_flush_order_mutex | YES | YES | | wait/synch/mutex/innodb/hash_table_mutex | YES | YES | | wait/synch/mutex/innodb/ibuf_bitmap_mutex | YES | YES | | wait/synch/mutex/innodb/ibuf_mutex | YES | YES | | wait/synch/mutex/innodb/ibuf_pessimistic_insert_mutex | YES | YES | | wait/synch/mutex/innodb/kernel_mutex | YES | YES | | wait/synch/mutex/innodb/log_sys_mutex | YES | YES | | wait/synch/mutex/innodb/mem_pool_mutex | YES | YES | | wait/synch/mutex/innodb/mutex_list_mutex | YES | YES | | wait/synch/mutex/innodb/purge_sys_bh_mutex | YES | YES | | wait/synch/mutex/innodb/recv_sys_mutex | YES | YES | | wait/synch/mutex/innodb/rseg_mutex | YES | YES | | wait/synch/mutex/innodb/rw_lock_list_mutex | YES | YES | | wait/synch/mutex/innodb/rw_lock_mutex | YES | YES | | wait/synch/mutex/innodb/srv_dict_tmpfile_mutex | YES | YES | | wait/synch/mutex/innodb/srv_innodb_monitor_mutex | YES | YES | | wait/synch/mutex/innodb/srv_misc_tmpfile_mutex | YES | YES | | wait/synch/mutex/innodb/srv_monitor_file_mutex | YES | YES | | wait/synch/mutex/innodb/syn_arr_mutex | YES | YES | | wait/synch/mutex/innodb/trx_doublewrite_mutex | YES | YES | | wait/synch/mutex/innodb/trx_undo_mutex | YES | YES | +-------------------------------------------------------+---------+-------+ 34 rows in set (0.00 sec)Verify that wait event consumers are enabled by querying the
setup_consumerstable. Theevents_waits_current,events_waits_history, andevents_waits_history_longconsumers should be enabled by default.mysql>
SELECT * FROM performance_schema.setup_consumers;+----------------------------------------------+---------+ | NAME | ENABLED | +----------------------------------------------+---------+ | events_waits_current | YES | | events_waits_history | YES | | events_waits_history_long | YES | | events_waits_summary_by_thread_by_event_name | YES | | events_waits_summary_by_event_name | YES | | events_waits_summary_by_instance | YES | | file_summary_by_event_name | YES | | file_summary_by_instance | YES | +----------------------------------------------+---------+ 8 rows in set (0.00 sec)Run the workload that you want to monitor. In this example, the mysqlslap load emulation client is used to simulate a workload.
shell>
./mysqlslap --auto-generate-sql --concurrency=100 --iterations=10--number-of-queries=1000 --number-char-cols=6 --number-int-cols=6;Query the wait event data. In this example, wait event data is queried from the
events_waits_summary_global_by_event_nametable which aggregates data found in theevents_waits_current,events_waits_history, andevents_waits_history_longtables. Data is summarized by event name (EVENT_NAME), which is the name of the instrument that produced the event. Summarized data includes:COUNT_STARThe number of summarized wait events.
SUM_TIMER_WAITThe total wait time of the summarized timed wait events.
MIN_TIMER_WAITThe minimum wait time of the summarized timed wait events.
AVG_TIMER_WAITThe average wait time of the summarized timed wait events.
MAX_TIMER_WAITThe maximum wait time of the summarized timed wait events.
The following query returns the instrument name (
EVENT_NAME), the number of wait events (COUNT_STAR), and the total wait time for the events for that instrument (SUM_TIMER_WAIT). Because waits are timed in picoseconds (trillionths of a second) by default, wait times are divided by 1000000000 to show wait times in milliseconds. Data is presented in descending order, by the number of summarized wait events (COUNT_STAR). You can adjust theORDER BYclause to order the data by total wait time.mysql>
SELECT EVENT_NAME, COUNT_STAR, SUM_TIMER_WAIT/1000000000 SUM_TIMER_WAIT_MSFROM performance_schema.events_waits_summary_global_by_event_nameWHERE SUM_TIMER_WAIT > 0 AND EVENT_NAME LIKE 'wait/synch/mutex/innodb/%'ORDER BY COUNT_STAR DESC;+-------------------------------------------------------+------------+-------------------+ | EVENT_NAME | COUNT_STAR | SUM_TIMER_WAIT_MS | +-------------------------------------------------------+------------+-------------------+ | wait/synch/mutex/innodb/buf_pool_mutex | 154477 | 6258.6407 | | wait/synch/mutex/innodb/kernel_mutex | 54294 | 1747.1980 | | wait/synch/mutex/innodb/log_sys_mutex | 40578 | 3167.6126 | | wait/synch/mutex/innodb/dict_sys_mutex | 34261 | 26.4183 | | wait/synch/mutex/innodb/log_flush_order_mutex | 24463 | 0.5867 | | wait/synch/mutex/innodb/rseg_mutex | 18204 | 0.4750 | | wait/synch/mutex/innodb/flush_list_mutex | 15949 | 0.7182 | | wait/synch/mutex/innodb/mutex_list_mutex | 10439 | 0.2299 | | wait/synch/mutex/innodb/fil_system_mutex | 9815 | 0.5027 | | wait/synch/mutex/innodb/rw_lock_list_mutex | 8292 | 0.1763 | | wait/synch/mutex/innodb/trx_undo_mutex | 6070 | 0.2339 | | wait/synch/mutex/innodb/innobase_share_mutex | 1994 | 0.0761 | | wait/synch/mutex/innodb/file_format_max_mutex | 1007 | 0.0245 | | wait/synch/mutex/innodb/trx_doublewrite_mutex | 387 | 0.0214 | | wait/synch/mutex/innodb/recv_sys_mutex | 186 | 0.0047 | | wait/synch/mutex/innodb/ibuf_mutex | 121 | 0.0030 | | wait/synch/mutex/innodb/purge_sys_bh_mutex | 99 | 0.0033 | | wait/synch/mutex/innodb/ibuf_pessimistic_insert_mutex | 40 | 0.0011 | | wait/synch/mutex/innodb/srv_innodb_monitor_mutex | 3 | 0.0003 | +-------------------------------------------------------+------------+-------------------+ 19 rows in set (0.00 sec)NoteThe preceding result set includes wait event data produced during the startup process. To exclude this data, you can truncate the
events_waits_summary_global_by_event_nametable immediately after startup and before running your workload. However, the truncate operation itself may produce a negligible amount wait event data.mysql>
TRUNCATE performance_schema.events_waits_summary_global_by_event_name;
InnoDB monitors provide information about the
InnoDB internal state. This information is useful
for performance tuning.
There are four types of InnoDB monitors:
The standard
InnoDBMonitor displays the following types of information:Work done by the main background thread
Semaphore waits
Data about the most recent foreign key and deadlock errors
Lock waits for transactions
Table and record locks held by active transactions
Pending I/O operations and related statistics
Insert buffer and adaptive hash index statistics
Redo log data
Buffer pool statistics
Row operation data
The
InnoDBLock Monitor prints additional lock information as part of the standardInnoDBMonitor output.The
InnoDBTablespace Monitor prints a list of file segments in the shared tablespace and validates the tablespace allocation data structures.The
InnoDBTable Monitor prints the contents of theInnoDBinternal data dictionary.
For additional information about InnoDB table
and tablespace monitors, see
Mark Leith: InnoDB
Table and Tablespace Monitors.
When InnoDB monitors are enabled for periodic
output, InnoDB writes the output to
mysqld server standard error output
(stderr) every 15 seconds, approximately.
InnoDB sends the monitor output to
stderr rather than to stdout
or fixed-size memory buffers to avoid potential buffer overflows.
On Windows, stderr is directed to the default
log file unless configured otherwise. If you want to direct the
output to the console window rather than to the error log, start
the server from a command prompt in a console window with the
--console option. For more
information, see Section 5.4.2.1, “Error Logging on Windows”.
On Unix and Unix-like systems, stderr is
typically directed to the terminal unless configured otherwise.
For more information, see Section 5.4.2.2, “Error Logging on Unix and Unix-Like Systems”.
InnoDB monitors should only be enabled when you
actually want to see monitor information because output generation
causes some performance decrement. Also, if monitor output is
directed to the error log, the log may become quite large if you
forget to disable the monitor later by dropping the monitor table.
To assist with troubleshooting, InnoDB
temporarily enables standard InnoDB Monitor
output under certain conditions. For more information, see
Section 14.23, “InnoDB Troubleshooting”.
Each monitor begins with a header containing a timestamp and the monitor name. For example:
===================================== 141016 15:41:44 INNODB MONITOR OUTPUT =====================================
The header for the standard InnoDB Monitor
(INNODB MONITOR OUTPUT) is also used for the
Lock Monitor because the latter produces the same output with the
addition of extra lock information.
Enabling an InnoDB monitor for periodic output
involves using a CREATE TABLE statement to
create a specially named InnoDB table that is
associated with the monitor. For example, to enable the standard
InnoDB Monitor, you would create an
InnoDB table named
innodb_monitor.
Using CREATE TABLE syntax is just a
way to pass a command to the InnoDB engine
through MySQL's SQL parser. The only things that matter are the
table name and that it be an InnoDB table. The
structure of the table and the database where the table is created
are not relevant. If you shut down the server, the monitor does
not restart automatically when you restart the server. Drop the
monitor table and issue a new CREATE
TABLE statement to start the monitor.
The PROCESS privilege is required
to enable or disable InnoDB Monitors.
Enabling the Standard InnoDB Monitor
To enable the standard InnoDB Monitor for
periodic output, create the innodb_monitor
table:
CREATE TABLE innodb_monitor (a INT) ENGINE=INNODB;
To disable the standard InnoDB Monitor, drop
the table:
DROP TABLE innodb_monitor;
Enabling the InnoDB Lock Monitor
To enable the InnoDB Lock Monitor for periodic
output, create the innodb_lock_monitor table:
CREATE TABLE innodb_lock_monitor (a INT) ENGINE=INNODB;
To disable the InnoDB Lock Monitor, drop the
table:
DROP TABLE innodb_lock_monitor;
Obtaining Standard InnoDB Monitor Output On Demand
As an alternative to enabling the standard
InnoDB Monitor for periodic output, you can
obtain standard InnoDB Monitor output on demand
using the SHOW ENGINE
INNODB STATUS SQL statement, which fetches the output to
your client program. If you are using the mysql
interactive client, the output is more readable if you replace the
usual semicolon statement terminator with \G:
mysql> SHOW ENGINE INNODB STATUS\G
SHOW ENGINE INNODB
STATUS output also includes InnoDB
Lock Monitor data if the InnoDB Lock Monitor is
enabled.
Directing Standard InnoDB Monitor Output to a Status File
Standard InnoDB Monitor output can be enabled
and directed to a status file by specifying the
--innodb-status-file option at startup. When this
option is used, InnoDB creates a file named
innodb_status.
in the data directory and writes output to it every 15 seconds,
approximately.
pid
InnoDB removes the status file when the server
is shut down normally. If an abnormal shutdown occurs, the status
file may have to be removed manually.
The --innodb-status-file option is intended for
temporary use, as output generation can affect performance, and
the
innodb_status.
file can become quite large over time.
pid
Enabling the InnoDB Tablespace Monitor
To enable the InnoDB Tablespace Monitor for
periodic output, create the
innodb_tablespace_monitor table:
CREATE TABLE innodb_tablespace_monitor (a INT) ENGINE=INNODB;
To disable the standard InnoDB Tablespace
Monitor, drop the table:
DROP TABLE innodb_tablespace_monitor;
Enabling the InnoDB Table Monitor
To enable the InnoDB Table Monitor for periodic
output, create the innodb_table_monitor table:
CREATE TABLE innodb_table_monitor (a INT) ENGINE=INNODB;
To disable the InnoDB Table Monitor, drop the
table:
DROP TABLE innodb_table_monitor;
The Lock Monitor is the same as the Standard Monitor except that it includes additional lock information. Enabling either monitor for periodic output turns on the same output stream, but the stream includes extra information if the Lock Monitor is enabled. For example, if you enable the Standard Monitor and Lock Monitor, that turns on a single output stream. The stream includes extra lock information until you disable the Lock Monitor.
Standard Monitor output is limited to 1MB when produced using the
SHOW ENGINE INNODB
STATUS statement. This limit does not apply to output
written to server standard error output
(stderr).
Example Standard Monitor output:
mysql> SHOW ENGINE INNODB STATUS\G
*************************** 1. row ***************************
Type: InnoDB
Name:
Status:
=====================================
141016 15:41:44 INNODB MONITOR OUTPUT
=====================================
Per second averages calculated from the last 6 seconds
-----------------
BACKGROUND THREAD
-----------------
srv_master_thread loops: 49 1_second, 48 sleeps, 3 10_second, 18 background,
18 flush
srv_master_thread log flush and writes: 48
----------
SEMAPHORES
----------
OS WAIT ARRAY INFO: reservation count 46, signal count 45
Mutex spin waits 30, rounds 900, OS waits 27
RW-shared spins 14, rounds 420, OS waits 14
RW-excl spins 0, rounds 150, OS waits 5
Spin rounds per wait: 30.00 mutex, 30.00 RW-shared, 150.00 RW-excl
------------------------
LATEST FOREIGN KEY ERROR
------------------------
141016 15:37:30 Transaction:
TRANSACTION 3D005, ACTIVE 0 sec inserting
mysql tables in use 1, locked 1
4 lock struct(s), heap size 1248, 3 row lock(s), undo log entries 3
MySQL thread id 1, OS thread handle 0x7f0ee440e700, query id 70 localhost root
update
INSERT INTO child VALUES
(NULL, 1)
, (NULL, 2)
, (NULL, 3)
, (NULL, 4)
, (NULL, 5)
, (NULL, 6)
Foreign key constraint fails for table `mysql`.`child`:
,
CONSTRAINT `child_ibfk_1` FOREIGN KEY (`parent_id`) REFERENCES `parent` (`id`)
ON DELETE CASCADE ON UPDATE CASCADE
Trying to add in child table, in index `par_ind` tuple:
DATA TUPLE: 2 fields;
0: len 4; hex 80000003; asc ;;
1: len 4; hex 80000003; asc ;;
But in parent table `mysql`.`parent`, in index `PRIMARY`,
the closest match we can find is record:
PHYSICAL RECORD: n_fields 3; compact format; info bits 0
0: len 4; hex 80000004; asc ;;
1: len 6; hex 00000003d002; asc ;;
2: len 7; hex 8300001d480137; asc H 7;;
------------------------
LATEST DETECTED DEADLOCK
------------------------
141016 15:39:58
*** (1) TRANSACTION:
TRANSACTION 3D009, ACTIVE 19 sec starting index read
mysql tables in use 1, locked 1
LOCK WAIT 2 lock struct(s), heap size 376, 1 row lock(s)
MySQL thread id 2, OS thread handle 0x7f0ee43cd700, query id 78 localhost root
updating
DELETE FROM t WHERE i = 1
*** (1) WAITING FOR THIS LOCK TO BE GRANTED:
RECORD LOCKS space id 0 page no 2428 n bits 72 index `GEN_CLUST_INDEX` of table
`mysql`.`t` trx id 3D009 lock_mode X waiting
Record lock, heap no 2 PHYSICAL RECORD: n_fields 4; compact format; info bits 0
0: len 6; hex 000000000700; asc ;;
1: len 6; hex 00000003d007; asc ;;
2: len 7; hex 87000009560110; asc V ;;
3: len 4; hex 80000001; asc ;;
*** (2) TRANSACTION:
TRANSACTION 3D008, ACTIVE 69 sec starting index read
mysql tables in use 1, locked 1
4 lock struct(s), heap size 1248, 3 row lock(s)
MySQL thread id 1, OS thread handle 0x7f0ee440e700, query id 79 localhost root
updating
DELETE FROM t WHERE i = 1
*** (2) HOLDS THE LOCK(S):
RECORD LOCKS space id 0 page no 2428 n bits 72 index `GEN_CLUST_INDEX` of table
`mysql`.`t` trx id 3D008 lock mode S
Record lock, heap no 1 PHYSICAL RECORD: n_fields 1; compact format; info bits 0
0: len 8; hex 73757072656d756d; asc supremum;;
Record lock, heap no 2 PHYSICAL RECORD: n_fields 4; compact format; info bits 0
0: len 6; hex 000000000700; asc ;;
1: len 6; hex 00000003d007; asc ;;
2: len 7; hex 87000009560110; asc V ;;
3: len 4; hex 80000001; asc ;;
*** (2) WAITING FOR THIS LOCK TO BE GRANTED:
RECORD LOCKS space id 0 page no 2428 n bits 72 index `GEN_CLUST_INDEX` of table
`mysql`.`t` trx id 3D008 lock_mode X waiting
Record lock, heap no 2 PHYSICAL RECORD: n_fields 4; compact format; info bits 0
0: len 6; hex 000000000700; asc ;;
1: len 6; hex 00000003d007; asc ;;
2: len 7; hex 87000009560110; asc V ;;
3: len 4; hex 80000001; asc ;;
*** WE ROLL BACK TRANSACTION (1)
------------
TRANSACTIONS
------------
Trx id counter 3D038
Purge done for trx's n:o < 3D02A undo n:o < 0
History list length 1047
Total number of lock structs in row lock hash table 0
LIST OF TRANSACTIONS FOR EACH SESSION:
---TRANSACTION 3D009, not started
MySQL thread id 2, OS thread handle 0x7f0ee43cd700, query id 78 localhost root
---TRANSACTION 3D008, not started
MySQL thread id 1, OS thread handle 0x7f0ee440e700, query id 113 localhost root
SHOW ENGINE INNODB STATUS
---TRANSACTION 3D037, ACTIVE 1 sec inserting
mysql tables in use 1, locked 1
1 lock struct(s), heap size 376, 0 row lock(s), undo log entries 11940
MySQL thread id 3, OS thread handle 0x7f0ee438c700, query id 112 localhost root
update
INSERT INTO `employees` VALUES (413215,'1962-07-08','Ronghao','Molberg','F',
'1985-06-20'),(413216,'1954-05-25','Masaru','Lieberherr','M','1992-04-08'),
(413217,'1953-03-17','Phule','Waschkowski','F','1988-07-28'),(413218,'1964-10-07',
'Vitaly','Negoita','M','1986-01-13'),(413219,'1957-03-31','Danil','Kalafatis','F',
'1985-04-12'),(413220,'1958-07-25','Jianwen','Radwan','M','1986-09-03'),(413221,
'1964-04-08','Paloma','Bach','M','1986-05-03'),(413222,'1955-06-10','Stafford',
'Muhlberg','M','1989-03-22'),(413223,'1963-10-27','Aiichiro','Benzmuller','M',
'1987-12-02'),(413224,'1955-10-02','Giordano','N
TABLE LOCK table `employees`.`employees` trx id 3D037 lock mode IX
--------
FILE I/O
--------
I/O thread 0 state: waiting for completed aio requests (insert buffer thread)
I/O thread 1 state: waiting for completed aio requests (log thread)
I/O thread 2 state: waiting for completed aio requests (read thread)
I/O thread 3 state: waiting for completed aio requests (read thread)
I/O thread 4 state: waiting for completed aio requests (read thread)
I/O thread 5 state: waiting for completed aio requests (read thread)
I/O thread 6 state: waiting for completed aio requests (write thread)
I/O thread 7 state: waiting for completed aio requests (write thread)
I/O thread 8 state: waiting for completed aio requests (write thread)
I/O thread 9 state: waiting for completed aio requests (write thread)
Pending normal aio reads: 0 [0, 0, 0, 0] , aio writes: 0 [0, 0, 0, 0] ,
ibuf aio reads: 0, log i/o's: 0, sync i/o's: 0
Pending flushes (fsync) log: 0; buffer pool: 0
439 OS file reads, 917 OS file writes, 199 OS fsyncs
0.00 reads/s, 0 avg bytes/read, 56.32 writes/s, 7.67 fsyncs/s
-------------------------------------
INSERT BUFFER AND ADAPTIVE HASH INDEX
-------------------------------------
Ibuf: size 1, free list len 0, seg size 2, 0 merges
merged operations:
insert 0, delete mark 0, delete 0
discarded operations:
insert 0, delete mark 0, delete 0
Hash table size 4425293, used cells 32, node heap has 1 buffer(s)
13577.57 hash searches/s, 202.47 non-hash searches/s
---
LOG
---
Log sequence number 794838329
Log flushed up to 793815740
Last checkpoint at 788417971
0 pending log writes, 0 pending chkp writes
96 log i/o's done, 3.50 log i/o's/second
----------------------
BUFFER POOL AND MEMORY
----------------------
Total memory allocated 2217738240; in additional pool allocated 0
Dictionary memory allocated 121719
Buffer pool size   131072
Free buffers       129937
Database pages     1134
Old database pages 211
Modified db pages  187
Pending reads 0
Pending writes: LRU 0, flush list 0, single page 0
Pages made young 0, not young 0
0.00 youngs/s, 0.00 non-youngs/s
Pages read 426, created 708, written 768
0.00 reads/s, 40.99 creates/s, 50.49 writes/s
Buffer pool hit rate 1000 / 1000, young-making rate 0 / 1000 not 0 / 1000
Pages read ahead 0.00/s, evicted without access 0.00/s, Random read ahead
0.00/s
LRU len: 1134, unzip_LRU len: 0
I/O sum[0]:cur[0], unzip sum[0]:cur[0]
----------------------
INDIVIDUAL BUFFER POOL INFO
----------------------
---BUFFER POOL 0
Buffer pool size 65536
Free buffers 65029
Database pages 506
Old database pages 0
Modified db pages 95
Pending reads 0
Pending writes: LRU 0, flush list 0, single page 0
Pages made young 0, not young 0
0.00 youngs/s, 0.00 non-youngs/s
Pages read 137, created 369, written 412
0.00 reads/s, 20.16 creates/s, 18.00 writes/s
Buffer pool hit rate 1000 / 1000, young-making rate 0 / 1000 not 0 / 1000
Pages read ahead 0.00/s, evicted without access 0.00/s, Random read ahead
0.00/s
LRU len: 506, unzip_LRU len: 0
I/O sum[0]:cur[0], unzip sum[0]:cur[0]
---BUFFER POOL 1
Buffer pool size 65536
Free buffers 64908
Database pages 628
Old database pages 211
Modified db pages 92
Pending reads 0
Pending writes: LRU 0, flush list 0, single page 0
Pages made young 0, not young 0
0.00 youngs/s, 0.00 non-youngs/s
Pages read 289, created 339, written 356
0.00 reads/s, 20.83 creates/s, 32.49 writes/s
Buffer pool hit rate 1000 / 1000, young-making rate 0 / 1000 not 0 / 1000
Pages read ahead 0.00/s, evicted without access 0.00/s, Random read ahead
0.00/s
LRU len: 628, unzip_LRU len: 0
I/O sum[0]:cur[0], unzip sum[0]:cur[0]
--------------
ROW OPERATIONS
--------------
0 queries inside InnoDB, 0 queries in queue
1 read views open inside InnoDB
Main thread process no. 30091, id 139699544078080, state: sleeping
Number of rows inserted 225354, updated 0, deleted 3, read 4
13690.55 inserts/s, 0.00 updates/s, 0.00 deletes/s, 0.00 reads/s
----------------------------
END OF INNODB MONITOR OUTPUT
============================
For a description of each metric reported by the Standard Monitor, refer to the Metrics chapter in the Oracle Enterprise Manager for MySQL Database User's Guide.
StatusThis section shows the timestamp, the monitor name, and the number of seconds that per-second averages are based on. The number of seconds is the elapsed time between the current time and the last time
InnoDBMonitor output was printed.BACKGROUND THREADThe
srv_master_threadlines shows work done by the main background thread.SEMAPHORESThis section reports threads waiting for a semaphore and statistics on how many times threads have needed a spin or a wait on a mutex or a rw-lock semaphore. A large number of threads waiting for semaphores may be a result of disk I/O, or contention problems inside
InnoDB. Contention can be due to heavy parallelism of queries or problems in operating system thread scheduling. Setting theinnodb_thread_concurrencysystem variable smaller than the default value might help in such situations. TheSpin rounds per waitline shows the number of spinlock rounds per OS wait for a mutex.LATEST FOREIGN KEY ERRORThis section provides information about the most recent foreign key constraint error. It is not present if no such error has occurred. The contents include the statement that failed as well as information about the constraint that failed and the referenced and referencing tables.
LATEST DETECTED DEADLOCKThis section provides information about the most recent deadlock. It is not present if no deadlock has occurred. The contents show which transactions are involved, the statement each was attempting to execute, the locks they have and need, and which transaction
InnoDBdecided to roll back to break the deadlock. The lock modes reported in this section are explained in Section 14.10.1, “InnoDB Locking”.TRANSACTIONSIf this section reports lock waits, your applications might have lock contention. The output can also help to trace the reasons for transaction deadlocks.
FILE I/OThis section provides information about threads that
InnoDBuses to perform various types of I/O. The first few of these are dedicated to generalInnoDBprocessing. The contents also display information for pending I/O operations and statistics for I/O performance.The number of these threads are controlled by the
innodb_read_io_threadsandinnodb_write_io_threadsparameters. See Section 14.17, “InnoDB Startup Options and System Variables”.INSERT BUFFER AND ADAPTIVE HASH INDEXThis section shows the status of the
InnoDBinsert buffer (also referred to as the change buffer) and the adaptive hash index.For related information, see Section 14.8.2, “Change Buffer”, and Section 14.8.3, “Adaptive Hash Index”.
LOGThis section displays information about the
InnoDBlog. The contents include the current log sequence number, how far the log has been flushed to disk, and the position at whichInnoDBlast took a checkpoint. (See Section 14.15.3, “InnoDB Checkpoints”.) The section also displays information about pending writes and write performance statistics.BUFFER POOL AND MEMORYThis section gives you statistics on pages read and written. You can calculate from these numbers how many data file I/O operations your queries currently are doing.
For buffer pool statistics descriptions, see Monitoring the Buffer Pool Using the InnoDB Standard Monitor. For additional information about the operation of the buffer pool, see Section 14.8.1, “Buffer Pool”.
ROW OPERATIONSThis section shows what the main thread is doing, including the number and performance rate for each type of row operation.
In MySQL 5.5, output from the standard
InnoDBMonitor includes additional sections compared to the output for previous versions. For details, see Diagnostic and Monitoring Capabilities.
The InnoDB Tablespace Monitor prints
information about the file segments in the shared tablespace and
validates the tablespace allocation data structures. The
Tablespace Monitor does not describe file-per-table tablespaces
created with the
innodb_file_per_table option.
Example InnoDB Tablespace Monitor output:
================================================ 090408 21:28:09 INNODB TABLESPACE MONITOR OUTPUT ================================================ FILE SPACE INFO: id 0 size 13440, free limit 3136, free extents 28 not full frag extents 2: used pages 78, full frag extents 3 first seg id not used 0 23845 SEGMENT id 0 1 space 0; page 2; res 96 used 46; full ext 0 fragm pages 32; free extents 0; not full extents 1: pages 14 SEGMENT id 0 2 space 0; page 2; res 1 used 1; full ext 0 fragm pages 1; free extents 0; not full extents 0: pages 0 SEGMENT id 0 3 space 0; page 2; res 1 used 1; full ext 0 fragm pages 1; free extents 0; not full extents 0: pages 0 ... SEGMENT id 0 15 space 0; page 2; res 160 used 160; full ext 2 fragm pages 32; free extents 0; not full extents 0: pages 0 SEGMENT id 0 488 space 0; page 2; res 1 used 1; full ext 0 fragm pages 1; free extents 0; not full extents 0: pages 0 SEGMENT id 0 17 space 0; page 2; res 1 used 1; full ext 0 fragm pages 1; free extents 0; not full extents 0: pages 0 ... SEGMENT id 0 171 space 0; page 2; res 592 used 481; full ext 7 fragm pages 16; free extents 0; not full extents 2: pages 17 SEGMENT id 0 172 space 0; page 2; res 1 used 1; full ext 0 fragm pages 1; free extents 0; not full extents 0: pages 0 SEGMENT id 0 173 space 0; page 2; res 96 used 44; full ext 0 fragm pages 32; free extents 0; not full extents 1: pages 12 ... SEGMENT id 0 601 space 0; page 2; res 1 used 1; full ext 0 fragm pages 1; free extents 0; not full extents 0: pages 0 NUMBER of file segments: 73 Validating tablespace Validation ok --------------------------------------- END OF INNODB TABLESPACE MONITOR OUTPUT =======================================
The Tablespace Monitor output includes information about the shared tablespace as a whole, followed by a list containing a breakdown for each segment within the tablespace.
In this example using the default page size, the tablespace consists of database pages that are 16KB each. The pages are grouped into extents of size 1MB (64 consecutive pages).
The initial part of the output that displays overall tablespace information has this format:
FILE SPACE INFO: id 0 size 13440, free limit 3136, free extents 28 not full frag extents 2: used pages 78, full frag extents 3 first seg id not used 0 23845
Overall tablespace information includes these values:
idThe tablespace ID. A value of 0 refers to the shared tablespace.
sizeThe current tablespace size in pages.
free limitThe minimum page number for which the free list has not been initialized. Pages at or above this limit are free.
free extentsThe number of free extents.
not full frag extents,used pagesThe number of fragment extents that are not completely filled, and the number of pages in those extents that have been allocated.
full frag extentsThe number of completely full fragment extents.
first seg id not usedThe first unused segment ID.
Individual segment information has this format:
SEGMENT id 0 15 space 0; page 2; res 160 used 160; full ext 2 fragm pages 32; free extents 0; not full extents 0: pages 0
Segment information includes these values:
idThe segment ID.
space,pageThe tablespace number and page within the tablespace where the segment “inode” is located. A tablespace number of 0 indicates the shared tablespace.
InnoDBuses inodes to keep track of segments in the tablespace. The other fields displayed for a segment (id,res, and so forth) are derived from information in the inode.resThe number of pages allocated (reserved) for the segment.
usedThe number of allocated pages in use by the segment.
full extThe number of extents allocated for the segment that are completely used.
fragm pagesThe number of initial pages that have been allocated to the segment.
free extentsThe number of extents allocated for the segment that are completely unused.
not full extentsThe number of extents allocated for the segment that are partially used.
pagesThe number of pages used within the not-full extents.
When a segment grows, it starts as a single page, and
InnoDB allocates the first pages for it one at
a time, up to 32 pages (this is the fragm pages
value). After that, InnoDB allocates complete
extents. InnoDB can add up to 4 extents at a
time to a large segment to ensure good sequentiality of data.
For the example segment shown earlier, it has 32 fragment pages, plus 2 full extents (64 pages each), for a total of 160 pages used out of 160 pages allocated. The following segment has 32 fragment pages and one partially full extent using 14 pages for a total of 46 pages used out of 96 pages allocated:
SEGMENT id 0 1 space 0; page 2; res 96 used 46; full ext 0 fragm pages 32; free extents 0; not full extents 1: pages 14
It is possible for a segment that has extents allocated to it to
have a fragm pages value less than 32 if some
of the individual pages have been deallocated subsequent to extent
allocation.
The InnoDB Table Monitor prints the contents of
the InnoDB internal data dictionary.
The output contains one section per table. The
SYS_FOREIGN and
SYS_FOREIGN_COLS sections are for internal data
dictionary tables that maintain information about foreign keys.
There are also sections for the Table Monitor table and each
user-created InnoDB table. Suppose that the
following two tables have been created in the
test database:
CREATE TABLE parent
(
par_id INT NOT NULL,
fname CHAR(20),
lname CHAR(20),
PRIMARY KEY (par_id),
UNIQUE INDEX (lname, fname)
) ENGINE = INNODB;
CREATE TABLE child
(
par_id INT NOT NULL,
child_id INT NOT NULL,
name VARCHAR(40),
birth DATE,
weight DECIMAL(10,2),
misc_info VARCHAR(255),
last_update TIMESTAMP,
PRIMARY KEY (par_id, child_id),
INDEX (name),
FOREIGN KEY (par_id) REFERENCES parent (par_id)
ON DELETE CASCADE
ON UPDATE CASCADE
) ENGINE = INNODB;
Then the Table Monitor output will look something like this (reformatted slightly):
===========================================
090420 12:09:32 INNODB TABLE MONITOR OUTPUT
===========================================
--------------------------------------
TABLE: name SYS_FOREIGN, id 0 11, columns 7, indexes 3, appr.rows 1
COLUMNS: ID: DATA_VARCHAR DATA_ENGLISH len 0;
FOR_NAME: DATA_VARCHAR DATA_ENGLISH len 0;
REF_NAME: DATA_VARCHAR DATA_ENGLISH len 0;
N_COLS: DATA_INT len 4;
DB_ROW_ID: DATA_SYS prtype 256 len 6;
DB_TRX_ID: DATA_SYS prtype 257 len 6;
INDEX: name ID_IND, id 0 11, fields 1/6, uniq 1, type 3
root page 46, appr.key vals 1, leaf pages 1, size pages 1
FIELDS: ID DB_TRX_ID DB_ROLL_PTR FOR_NAME REF_NAME N_COLS
INDEX: name FOR_IND, id 0 12, fields 1/2, uniq 2, type 0
root page 47, appr.key vals 1, leaf pages 1, size pages 1
FIELDS: FOR_NAME ID
INDEX: name REF_IND, id 0 13, fields 1/2, uniq 2, type 0
root page 48, appr.key vals 1, leaf pages 1, size pages 1
FIELDS: REF_NAME ID
--------------------------------------
TABLE: name SYS_FOREIGN_COLS, id 0 12, columns 7, indexes 1, appr.rows 1
COLUMNS: ID: DATA_VARCHAR DATA_ENGLISH len 0;
POS: DATA_INT len 4;
FOR_COL_NAME: DATA_VARCHAR DATA_ENGLISH len 0;
REF_COL_NAME: DATA_VARCHAR DATA_ENGLISH len 0;
DB_ROW_ID: DATA_SYS prtype 256 len 6;
DB_TRX_ID: DATA_SYS prtype 257 len 6;
INDEX: name ID_IND, id 0 14, fields 2/6, uniq 2, type 3
root page 49, appr.key vals 1, leaf pages 1, size pages 1
FIELDS: ID POS DB_TRX_ID DB_ROLL_PTR FOR_COL_NAME REF_COL_NAME
--------------------------------------
TABLE: name test/child, id 0 14, columns 10, indexes 2, appr.rows 201
COLUMNS: par_id: DATA_INT DATA_BINARY_TYPE DATA_NOT_NULL len 4;
child_id: DATA_INT DATA_BINARY_TYPE DATA_NOT_NULL len 4;
name: DATA_VARCHAR prtype 524303 len 40;
birth: DATA_INT DATA_BINARY_TYPE len 3;
weight: DATA_FIXBINARY DATA_BINARY_TYPE len 5;
misc_info: DATA_VARCHAR prtype 524303 len 255;
last_update: DATA_INT DATA_UNSIGNED DATA_BINARY_TYPE DATA_NOT_NULL len 4;
DB_ROW_ID: DATA_SYS prtype 256 len 6;
DB_TRX_ID: DATA_SYS prtype 257 len 6;
INDEX: name PRIMARY, id 0 17, fields 2/9, uniq 2, type 3
root page 52, appr.key vals 201, leaf pages 5, size pages 6
FIELDS: par_id child_id DB_TRX_ID DB_ROLL_PTR name birth weight misc_info last_update
INDEX: name name, id 0 18, fields 1/3, uniq 3, type 0
root page 53, appr.key vals 210, leaf pages 1, size pages 1
FIELDS: name par_id child_id
FOREIGN KEY CONSTRAINT test/child_ibfk_1: test/child ( par_id )
REFERENCES test/parent ( par_id )
--------------------------------------
TABLE: name test/innodb_table_monitor, id 0 15, columns 4, indexes 1, appr.rows 0
COLUMNS: i: DATA_INT DATA_BINARY_TYPE len 4;
DB_ROW_ID: DATA_SYS prtype 256 len 6;
DB_TRX_ID: DATA_SYS prtype 257 len 6;
INDEX: name GEN_CLUST_INDEX, id 0 19, fields 0/4, uniq 1, type 1
root page 193, appr.key vals 0, leaf pages 1, size pages 1
FIELDS: DB_ROW_ID DB_TRX_ID DB_ROLL_PTR i
--------------------------------------
TABLE: name test/parent, id 0 13, columns 6, indexes 2, appr.rows 299
COLUMNS: par_id: DATA_INT DATA_BINARY_TYPE DATA_NOT_NULL len 4;
fname: DATA_CHAR prtype 524542 len 20;
lname: DATA_CHAR prtype 524542 len 20;
DB_ROW_ID: DATA_SYS prtype 256 len 6;
DB_TRX_ID: DATA_SYS prtype 257 len 6;
INDEX: name PRIMARY, id 0 15, fields 1/5, uniq 1, type 3
root page 50, appr.key vals 299, leaf pages 2, size pages 3
FIELDS: par_id DB_TRX_ID DB_ROLL_PTR fname lname
INDEX: name lname, id 0 16, fields 2/3, uniq 2, type 2
root page 51, appr.key vals 300, leaf pages 1, size pages 1
FIELDS: lname fname par_id
FOREIGN KEY CONSTRAINT test/child_ibfk_1: test/child ( par_id )
REFERENCES test/parent ( par_id )
-----------------------------------
END OF INNODB TABLE MONITOR OUTPUT
==================================
For each table, Table Monitor output contains a section that displays general information about the table and specific information about its columns, indexes, and foreign keys.
The general information for each table includes the table name (in
db_name/tbl_name
The COLUMNS part of a table section lists each
column in the table. Information for each column indicates its
name and data type characteristics. Some internal columns are
added by InnoDB, such as
DB_ROW_ID (row ID),
DB_TRX_ID (transaction ID), and
DB_ROLL_PTR (a pointer to the rollback/undo
data).
DATA_xxxThese symbols indicate the data type. There may be multiple
DATA_symbols for a given column.xxxprtypeThe column's “precise” type. This field includes information such as the column data type, character set code, nullability, signedness, and whether it is a binary string. This field is described in the
innobase/include/data0type.hsource file.lenThe column length in bytes.
Each INDEX part of the table section provides
the name and characteristics of one table index:
nameThe index name. If the name is
PRIMARY, the index is a primary key. If the name isGEN_CLUST_INDEX, the index is the clustered index that is created automatically if the table definition doesn't include a primary key or non-NULLunique index. See Section 14.9.2.1, “Clustered and Secondary Indexes”.idThe index ID.
fieldsThe number of fields in the index, as a value in
m/nmis the number of user-defined columns; that is, the number of columns you would see in the index definition in aCREATE TABLEstatement.nis the total number of index columns, including those added internally. For the clustered index, the total includes the other columns in the table definition, plus any columns added internally. For a secondary index, the total includes the columns from the primary key that are not part of the secondary index.
uniqThe number of leading fields that are enough to determine index values uniquely.
typeThe index type. This is a bit field. For example, 1 indicates a clustered index and 2 indicates a unique index, so a clustered index (which always contains unique values), will have a
typevalue of 3. An index with atypevalue of 0 is neither clustered nor unique. The flag values are defined in theinnobase/include/dict0mem.hsource file.root pageThe index root page number.
appr. key valsThe approximate index cardinality.
leaf pagesThe approximate number of leaf pages in the index.
size pagesThe approximate total number of pages in the index.
FIELDSThe names of the fields in the index. For a clustered index that was generated automatically, the field list begins with the internal
DB_ROW_ID(row ID) field.DB_TRX_IDandDB_ROLL_PTRare always added internally to the clustered index, following the fields that comprise the primary key. For a secondary index, the final fields are those from the primary key that are not part of the secondary index.
The end of the table section lists the FOREIGN
KEY definitions that apply to the table. This
information appears whether the table is a referencing or
referenced table.
This section covers topics related to InnoDB
backup and recovery.
For information about backup techniques applicable to
InnoDB, see Section 14.21.1, “InnoDB Backup”.For information about point-in-time recovery, recovery from disk failure or corruption, and how
InnoDBperforms crash recovery, see Section 14.21.2, “InnoDB Recovery”.
The key to safe database management is making regular backups. Depending on your data volume, number of MySQL servers, and database workload, you can use these backup techniques, alone or in combination: hot backup with MySQL Enterprise Backup; cold backup by copying files while the MySQL server is shut down; logical backup with mysqldump for smaller data volumes or to record the structure of schema objects. Hot and cold backups are physical backups that copy actual data files, which can be used directly by the mysqld server for faster restore.
Using MySQL Enterprise Backup is the
recommended method for backing up InnoDB data.
InnoDB does not support databases that are
restored using third-party backup tools.
Hot Backups
The mysqlbackup command, part of the MySQL
Enterprise Backup component, lets you back up a running MySQL
instance, including InnoDB tables, with minimal
disruption to operations while producing a consistent snapshot of
the database. When mysqlbackup is copying
InnoDB tables, reads and writes to
InnoDB can continue. MySQL Enterprise Backup
can also create compressed backup files, and back up subsets of
tables and databases. In conjunction with the MySQL binary log,
users can perform point-in-time recovery. MySQL Enterprise Backup
is part of the MySQL Enterprise subscription. For more details,
see Section 25.2, “MySQL Enterprise Backup Overview”.
Cold Backups
If you can shut down the MySQL server, you can make a physical
backup that consists of all files used by
InnoDB to manage its tables. Use the following
procedure:
Perform a slow shutdown of the MySQL server and make sure that it stops without errors.
Copy all
InnoDBdata files (ibdatafiles and.ibdfiles) into a safe place.Copy all the
.frmfiles forInnoDBtables to a safe place.Copy all
InnoDBlog files (ib_logfilefiles) to a safe place.Copy your
my.cnfconfiguration file or files to a safe place.
Logical Backups Using mysqldump
In addition to physical backups, it is recommended that you
regularly create logical backups by dumping your tables using
mysqldump. A binary file might be corrupted
without you noticing it. Dumped tables are stored into text files
that are human-readable, so spotting table corruption becomes
easier. Also, because the format is simpler, the chance for
serious data corruption is smaller. mysqldump
also has a --single-transaction
option for making a consistent snapshot without locking out other
clients. See Section 7.3.1, “Establishing a Backup Policy”.
Replication works with InnoDB tables,
so you can use MySQL replication capabilities to keep a copy of
your database at database sites requiring high availability. See
Section 14.22, “InnoDB and MySQL Replication”.
This section describes InnoDB recovery. Topics
include:
To recover an InnoDB database to the present
from the time at which the physical backup was made, you must
run MySQL server with binary logging enabled, even before taking
the backup. To achieve point-in-time recovery after restoring a
backup, you can apply changes from the binary log that occurred
after the backup was made. See
Section 7.5, “Point-in-Time (Incremental) Recovery Using the Binary Log”.
If your database becomes corrupted or disk failure occurs, you must perform the recovery using a backup. In the case of corruption, first find a backup that is not corrupted. After restoring the base backup, do a point-in-time recovery from the binary log files using mysqlbinlog and mysql to restore the changes that occurred after the backup was made.
In some cases of database corruption, it is enough to dump,
drop, and re-create one or a few corrupt tables. You can use the
CHECK TABLE statement to check
whether a table is corrupt, although CHECK
TABLE naturally cannot detect every possible kind of
corruption. You can use the Tablespace Monitor to check the
integrity of the file space management inside the tablespace
files.
In some cases, apparent database page corruption is actually due
to the operating system corrupting its own file cache, and the
data on disk may be okay. It is best to try restarting the
computer first. Doing so may eliminate errors that appeared to
be database page corruption. If MySQL still has trouble starting
because of InnoDB consistency problems, see
Section 14.23.2, “Forcing InnoDB Recovery” for steps to start the
instance in recovery mode, which permits you to dump the data.
To recover from a MySQL server crash, the only requirement is to
restart the MySQL server. InnoDB
automatically checks the logs and performs a roll-forward of the
database to the present. InnoDB automatically
rolls back uncommitted transactions that were present at the
time of the crash. During recovery, mysqld
displays output similar to this:
InnoDB: Log scan progressed past the checkpoint lsn 452854464 InnoDB: Database was not shut down normally! InnoDB: Starting crash recovery. InnoDB: Reading tablespace information from the .ibd files... InnoDB: Restoring possible half-written data pages from the doublewrite InnoDB: buffer... InnoDB: Doing recovery: scanned up to log sequence number 457028695 InnoDB: 1 transaction(s) which must be rolled back or cleaned up InnoDB: in total 990682 row operations to undo InnoDB: Trx id counter is 500 InnoDB: Starting an apply batch of log records to the database... InnoDB: Progress in percents: 7 8 9 10 11 12 13 14 15 16 17 18 19 20 21 22 23 24 25 26 27 28 29 30 31 32 33 34 35 36 37 38 39 40 41 42 43 44 45 46 47 48 49 50 51 52 53 54 55 56 57 58 59 60 61 62 63 64 65 66 67 68 69 70 71 72 73 74 75 76 77 78 79 80 81 82 83 84 85 86 87 88 89 90 91 92 93 94 95 96 97 98 99 InnoDB: Apply batch completed InnoDB: Waiting for the background threads to start InnoDB: Starting in background the rollback of uncommitted transactions InnoDB: Rolling back trx with id 3B1, 990682 rows to undo ... InnoDB: 5.5.55 started; log sequence number 457028695 ... ./mysqld: ready for connections.
The InnoDB
crash recovery
process consists of several steps:
Redo log application
Redo log application is the first step and is performed during initialization, before accepting any connections. If all changes are flushed from the buffer pool to the tablespaces (
ibdata*and*.ibdfiles) at the time of the shutdown or crash, redo log application is skipped.InnoDBalso skips redo log application if redo log files are missing at startup.Removing redo logs to speed up recovery is not recommended, even if some data loss is acceptable. Removing redo logs should only be considered after a clean shutdown, with
innodb_fast_shutdownset to0or1.Roll back of incomplete transactions
Incomplete transactions are any transactions that were active at the time of crash or fast shutdown. The time it takes to roll back an incomplete transaction can be three or four times the amount of time a transaction is active before it is interrupted, depending on server load.
You cannot cancel transactions that are being rolled back. In extreme cases, when rolling back transactions is expected to take an exceptionally long time, it may be faster to start
InnoDBwith aninnodb_force_recoverysetting of3or greater. See Section 14.23.2, “Forcing InnoDB Recovery”.Change buffer merge
Applying changes from the change buffer (part of the system tablespace) to leaf pages of secondary indexes, as the index pages are read to the buffer pool.
Deleting delete-marked records that are no longer visible to active transactions.
The steps that follow redo log application do not depend on the redo log (other than for logging the writes) and are performed in parallel with normal processing. Of these, only rollback of incomplete transactions is special to crash recovery. The insert buffer merge and the purge are performed during normal processing.
After redo log application, InnoDB attempts
to accept connections as early as possible, to reduce downtime.
As part of crash recovery, InnoDB rolls back
transactions that were not committed or in XA
PREPARE state when the server crashed. The rollback is
performed by a background thread, executed in parallel with
transactions from new connections. Until the rollback operation
is completed, new connections may encounter locking conflicts
with recovered transactions.
In most situations, even if the MySQL server was killed
unexpectedly in the middle of heavy activity, the recovery
process happens automatically and no action is required of the
DBA. If a hardware failure or severe system error corrupted
InnoDB data, MySQL might refuse to start. In
this case, see Section 14.23.2, “Forcing InnoDB Recovery”.
For information about the binary log and
InnoDB crash recovery, see
Section 5.4.4, “The Binary Log”.
MySQL replication works for InnoDB tables as it
does for MyISAM tables. It is also possible to
use replication in a way where the storage engine on the slave is
not the same as the original storage engine on the master. For
example, you can replicate modifications to an
InnoDB table on the master to a
MyISAM table on the slave. For more information
see, Section 17.3.2, “Using Replication with Different Master and Slave Storage Engines”.
For information about setting up a new slave for a master, see Section 17.1.1.8, “Setting Up Replication with Existing Data”. To make a new slave without taking down the master or an existing slave, use the MySQL Enterprise Backup product.
Transactions that fail on the master do not affect replication at all. MySQL replication is based on the binary log where MySQL writes SQL statements that modify data. A transaction that fails (for example, because of a foreign key violation, or because it is rolled back) is not written to the binary log, so it is not sent to slaves. See Section 13.3.1, “START TRANSACTION, COMMIT, and ROLLBACK Syntax”.
Replication and CASCADE.
Cascading actions for InnoDB tables on the
master are replicated on the slave only if
the tables sharing the foreign key relation use
InnoDB on both the master and slave. This is
true whether you are using statement-based or row-based
replication. Suppose that you have started replication, and then
create two tables on the master using the following
CREATE TABLE statements:
CREATE TABLE fc1 (
i INT PRIMARY KEY,
j INT
) ENGINE = InnoDB;
CREATE TABLE fc2 (
m INT PRIMARY KEY,
n INT,
FOREIGN KEY ni (n) REFERENCES fc1 (i)
ON DELETE CASCADE
) ENGINE = InnoDB;
Suppose that the slave does not have InnoDB
support enabled. If this is the case, then the tables on the slave
are created, but they use the MyISAM storage
engine, and the FOREIGN KEY option is ignored.
Now we insert some rows into the tables on the master:
master>INSERT INTO fc1 VALUES (1, 1), (2, 2);Query OK, 2 rows affected (0.09 sec) Records: 2 Duplicates: 0 Warnings: 0 master>INSERT INTO fc2 VALUES (1, 1), (2, 2), (3, 1);Query OK, 3 rows affected (0.19 sec) Records: 3 Duplicates: 0 Warnings: 0
At this point, on both the master and the slave, table
fc1 contains 2 rows, and table
fc2 contains 3 rows, as shown here:
master>SELECT * FROM fc1;+---+------+ | i | j | +---+------+ | 1 | 1 | | 2 | 2 | +---+------+ 2 rows in set (0.00 sec) master>SELECT * FROM fc2;+---+------+ | m | n | +---+------+ | 1 | 1 | | 2 | 2 | | 3 | 1 | +---+------+ 3 rows in set (0.00 sec) slave>SELECT * FROM fc1;+---+------+ | i | j | +---+------+ | 1 | 1 | | 2 | 2 | +---+------+ 2 rows in set (0.00 sec) slave>SELECT * FROM fc2;+---+------+ | m | n | +---+------+ | 1 | 1 | | 2 | 2 | | 3 | 1 | +---+------+ 3 rows in set (0.00 sec)
Now suppose that you perform the following
DELETE statement on the master:
master> DELETE FROM fc1 WHERE i=1;
Query OK, 1 row affected (0.09 sec)
Due to the cascade, table fc2 on the master now
contains only 1 row:
master> SELECT * FROM fc2;
+---+---+
| m | n |
+---+---+
| 2 | 2 |
+---+---+
1 row in set (0.00 sec)
However, the cascade does not propagate on the slave because on the
slave the DELETE for
fc1 deletes no rows from fc2.
The slave's copy of fc2 still contains all of the
rows that were originally inserted:
slave> SELECT * FROM fc2;
+---+---+
| m | n |
+---+---+
| 1 | 1 |
| 3 | 1 |
| 2 | 2 |
+---+---+
3 rows in set (0.00 sec)
This difference is due to the fact that the cascading deletes are
handled internally by the InnoDB storage engine,
which means that none of the changes are logged.
The following general guidelines apply to troubleshooting
InnoDB problems:
When an operation fails or you suspect a bug, look at the MySQL server error log (see Section 5.4.2, “The Error Log”). Section B.3.1, “Server Error Message Reference” provides troubleshooting information for some of the common
InnoDB-specific errors that you may encounter.If the failure is related to a deadlock, run with the
innodb_print_all_deadlocksoption enabled so that details about each deadlock are printed to the MySQL server error log. For information about deadlocks, see Section 14.10.5, “Deadlocks in InnoDB”.Issues relating to the
InnoDBdata dictionary include failedCREATE TABLEstatements (orphan table files), inability to openInnoDBfiles, and system cannot find the path specified errors. For information about these sorts of problems and errors, see Section 14.23.3, “Troubleshooting InnoDB Data Dictionary Operations”.When troubleshooting, it is usually best to run the MySQL server from the command prompt, rather than through mysqld_safe or as a Windows service. You can then see what mysqld prints to the console, and so have a better grasp of what is going on. On Windows, start mysqld with the
--consoleoption to direct the output to the console window.Enable the
InnoDBMonitors to obtain information about a problem (see Section 14.20, “InnoDB Monitors”). If the problem is performance-related, or your server appears to be hung, you should enable the standard Monitor to print information about the internal state ofInnoDB. If the problem is with locks, enable the Lock Monitor. If the problem is in creation of tables or other data dictionary operations, enable the Table Monitor to print the contents of theInnoDBinternal data dictionary. To see tablespace information enable the Tablespace Monitor.InnoDBtemporarily enables standardInnoDBMonitor output under the following conditions:A long semaphore wait
InnoDBcannot find free blocks in the buffer poolOver 67% of the buffer pool is occupied by lock heaps or the adaptive hash index
If you suspect that a table is corrupt, run
CHECK TABLEon that table.
The troubleshooting steps for InnoDB I/O
problems depend on when the problem occurs: during startup of the
MySQL server, or during normal operations when a DML or DDL
statement fails due to problems at the file system level.
Initialization Problems
If something goes wrong when InnoDB attempts to
initialize its tablespace or its log files, delete all files
created by InnoDB: all
ibdata files and all
ib_logfile files. If you already created some
InnoDB tables, also delete the corresponding
.frm files for these tables, and any
.ibd files if you are using multiple
tablespaces, from the MySQL database directories. Then try the
InnoDB database creation again. For easiest
troubleshooting, start the MySQL server from a command prompt so
that you see what is happening.
Runtime Problems
If InnoDB prints an operating system error
during a file operation, usually the problem has one of the
following solutions:
Make sure the
InnoDBdata file directory and theInnoDBlog directory exist.Make sure mysqld has access rights to create files in those directories.
Make sure mysqld can read the proper
my.cnformy.inioption file, so that it starts with the options that you specified.Make sure the disk is not full and you are not exceeding any disk quota.
Make sure that the names you specify for subdirectories and data files do not clash.
Doublecheck the syntax of the
innodb_data_home_dirandinnodb_data_file_pathvalues. In particular, anyMAXvalue in theinnodb_data_file_pathoption is a hard limit, and exceeding that limit causes a fatal error.
To investigate database page corruption, you might dump your
tables from the database with
SELECT ... INTO
OUTFILE. Usually, most of the data obtained in this way
is intact. Serious corruption might cause SELECT * FROM
statements or
tbl_nameInnoDB background operations to crash or
assert, or even cause InnoDB roll-forward
recovery to crash. In such cases, you can use the
innodb_force_recovery option to
force the InnoDB storage engine to start up
while preventing background operations from running, so that you
can dump your tables. For example, you can add the following line
to the [mysqld] section of your option file
before restarting the server:
[mysqld] innodb_force_recovery = 1
For information about using option files, see Section 4.2.2.2, “Using Option Files”.
Only set innodb_force_recovery
to a value greater than 0 in an emergency situation, so that you
can start InnoDB and dump your tables. Before
doing so, ensure that you have a backup copy of your database in
case you need to recreate it. Values of 4 or greater can
permanently corrupt data files. Only use an
innodb_force_recovery setting
of 4 or greater on a production server instance after you have
successfully tested the setting on a separate physical copy of
your database. When forcing InnoDB recovery,
you should always start with
innodb_force_recovery=1 and
only increase the value incrementally, as necessary.
innodb_force_recovery is 0 by
default (normal startup without forced recovery). The permissible
nonzero values for
innodb_force_recovery are 1 to 6.
A larger value includes the functionality of lesser values. For
example, a value of 3 includes all of the functionality of values
1 and 2.
If you are able to dump your tables with an
innodb_force_recovery value of 3
or less, then you are relatively safe that only some data on
corrupt individual pages is lost. A value of 4 or greater is
considered dangerous because data files can be permanently
corrupted. A value of 6 is considered drastic because database
pages are left in an obsolete state, which in turn may introduce
more corruption into B-trees
and other database structures.
As a safety measure, InnoDB prevents
INSERT,
UPDATE, or
DELETE operations when
innodb_force_recovery is greater
than 0.
1(SRV_FORCE_IGNORE_CORRUPT)Lets the server run even if it detects a corrupt page. Tries to make
SELECT * FROMjump over corrupt index records and pages, which helps in dumping tables.tbl_name2(SRV_FORCE_NO_BACKGROUND)Prevents the master thread and any purge threads from running. If a crash would occur during the purge operation, this recovery value prevents it.
3(SRV_FORCE_NO_TRX_UNDO)Does not run transaction rollbacks after crash recovery.
4(SRV_FORCE_NO_IBUF_MERGE)Prevents insert buffer merge operations. If they would cause a crash, does not do them. Does not calculate table statistics. This value can permanently corrupt data files. After using this value, be prepared to drop and recreate all secondary indexes.
5(SRV_FORCE_NO_UNDO_LOG_SCAN)Does not look at undo logs when starting the database:
InnoDBtreats even incomplete transactions as committed. This value can permanently corrupt data files.6(SRV_FORCE_NO_LOG_REDO)Does not do the redo log roll-forward in connection with recovery. This value can permanently corrupt data files. Leaves database pages in an obsolete state, which in turn may introduce more corruption into B-trees and other database structures.
You can SELECT from tables to dump
them, or DROP or CREATE
tables even if forced recovery is used. If you know that a given
table is causing a crash on rollback, you can drop it. You can
also use this to stop a runaway rollback caused by a failing mass
import or ALTER TABLE: kill the
mysqld process and set
innodb_force_recovery to
3 to bring the database up without the
rollback, then DROP the table that is causing
the runaway rollback.
If corruption within the table data prevents you from dumping the
entire table contents, a query with an ORDER BY
clause might
be able to dump the portion of the table after the corrupted part.
primary_key DESC
If a high innodb_force_recovery
value is required to start InnoDB, there may be
corrupted data structures that could cause complex queries
(queries containing WHERE, ORDER
BY, or other clauses) to fail. In this case, you may
only be able to run basic SELECT * FROM t
queries.
Information about table definitions is stored both in the
.frm files, and in the InnoDB
data dictionary. If
you move .frm files around, or if the server
crashes in the middle of a data dictionary operation, these
sources of information can become inconsistent.
If a data dictionary corruption or consistency issue prevents you
from starting InnoDB, see
Section 14.23.2, “Forcing InnoDB Recovery” for information about
manual recovery.
A symptom of an out-of-sync data dictionary is that a
CREATE TABLE statement fails. If
this occurs, look in the server's error log. If the log says
that the table already exists inside the
InnoDB internal data dictionary, you have an
orphan table inside the InnoDB tablespace
files that has no corresponding .frm file.
The error message looks like this:
InnoDB: Error: table test/parent already exists in InnoDB internal InnoDB: data dictionary. Have you deleted the .frm file InnoDB: and not used DROP TABLE? Have you used DROP DATABASE InnoDB: for InnoDB tables in MySQL version <= 3.23.43? InnoDB: See the Restrictions section of the InnoDB manual. InnoDB: You can drop the orphaned table inside InnoDB by InnoDB: creating an InnoDB table with the same name in another InnoDB: database and moving the .frm file to the current database. InnoDB: Then MySQL thinks the table exists, and DROP TABLE will InnoDB: succeed.
You can drop the orphan table by following the instructions
given in the error message. If you are still unable to use
DROP TABLE successfully, the
problem may be due to name completion in the
mysql client. To work around this problem,
start the mysql client with the
--skip-auto-rehash
option and try DROP TABLE again.
(With name completion on, mysql tries to
construct a list of table names, which fails when a problem such
as just described exists.)
Another symptom of an out-of-sync data dictionary is that MySQL
prints an error that it cannot open an
InnoDB file:
ERROR 1016: Can't open file: 'child2.ibd'. (errno: 1)
In the error log you can find a message like this:
InnoDB: Cannot find table test/child2 from the internal data dictionary InnoDB: of InnoDB though the .frm file for the table exists. Maybe you InnoDB: have deleted and recreated InnoDB data files but have forgotten InnoDB: to delete the corresponding .frm files of InnoDB tables?
This means that there is an orphan .frm
file without a corresponding table inside
InnoDB. You can drop the orphan
.frm file by deleting it manually.
If MySQL exits in the middle of an ALTER
TABLE operation, you may be left with an orphan
temporary table that takes up space on your system. This section
describes how to identify and remove orphan temporary tables.
Orphan temporary table names begin with an
#sql- prefix (e.g.,
#sql-540_3). The accompanying
.frm file has the same base name as the
orphan temporary table.
If there is no .frm file, you can
recreate it. The .frm file must have the
same table schema as the orphan temporary table (it must have
the same columns and indexes) and must be placed in the
database directory of the orphan temporary table.
To identify orphan temporary tables on your system, you can view
Table Monitor output.
Look for table names that begin with #sql.
If the original table resides in a
file-per-table
tablespace, the tablespace file (the
#sql-*.ibd file) for the orphan temporary
table should be visible in the database directory.
To remove an orphan temporary table, drop the table by issuing a
DROP TABLE statement, prefixing
the name of the table with #mysql50# and
enclosing the table name in backticks. For example:
mysql> DROP TABLE `#mysql50##sql-540_3`;
The #mysql50# prefix tells MySQL to ignore
file name safe encoding introduced in MySQL
5.1. Enclosing the table name in backticks is required to
perform SQL statements on table names with special characters
such as “#”.
With innodb_file_per_table
enabled, the following message might occur if the
.frm or .ibd files (or
both) are missing:
InnoDB: in InnoDB data dictionary has tablespace id N,
InnoDB: but tablespace with that id or name does not exist. Have
InnoDB: you deleted or moved .ibd files?
InnoDB: This may also be a table created with CREATE TEMPORARY TABLE
InnoDB: whose .ibd and .frm files MySQL automatically removed, but the
InnoDB: table still exists in the InnoDB internal data dictionary.
If this occurs, try the following procedure to resolve the problem:
Create a matching
.frmfile in some other database directory and copy it to the database directory where the orphan table is located.Issue
DROP TABLEfor the original table. That should successfully drop the table andInnoDBshould print a warning to the error log that the.ibdfile was missing.
The following items describe how InnoDB
performs error handling. InnoDB sometimes rolls
back only the statement that failed, other times it rolls back the
entire transaction.
If you run out of file space in a tablespace, a MySQL
Table is fullerror occurs andInnoDBrolls back the SQL statement.A transaction deadlock causes
InnoDBto roll back the entire transaction. Retry the whole transaction when this happens.A lock wait timeout causes
InnoDBto roll back only the single statement that was waiting for the lock and encountered the timeout. (To have the entire transaction roll back, start the server with the--innodb-rollback-on-timeoutoption.) Retry the statement if using the current behavior, or the entire transaction if using--innodb-rollback-on-timeout.Both deadlocks and lock wait timeouts are normal on busy servers and it is necessary for applications to be aware that they may happen and handle them by retrying. You can make them less likely by doing as little work as possible between the first change to data during a transaction and the commit, so the locks are held for the shortest possible time and for the smallest possible number of rows. Sometimes splitting work between different transactions may be practical and helpful.
When a transaction rollback occurs due to a deadlock or lock wait timeout, it cancels the effect of the statements within the transaction. But if the start-transaction statement was
START TRANSACTIONorBEGINstatement, rollback does not cancel that statement. Further SQL statements become part of the transaction until the occurrence ofCOMMIT,ROLLBACK, or some SQL statement that causes an implicit commit.A duplicate-key error rolls back the SQL statement, if you have not specified the
IGNOREoption in your statement.A
row too long errorrolls back the SQL statement.Other errors are mostly detected by the MySQL layer of code (above the
InnoDBstorage engine level), and they roll back the corresponding SQL statement. Locks are not released in a rollback of a single SQL statement.
During implicit rollbacks, as well as during the execution of an
explicit
ROLLBACK SQL
statement, SHOW PROCESSLIST
displays Rolling back in the
State column for the relevant connection.